User Guide
Page 5
... image retention policy 11 Installing a security cable ...12 Mounting the monitor head ...12 Removing the monitor stand 13 Attaching the monitor to a mounting device 14 2 Using the monitor ...15 Software and utilities ...15 The Information file ...15 The Image Color Matching file ...15 HP SureView ...16 Using the on-screen display (OSD) menu ...17 Using Auto-Sleep Mode ...18 Adjusting Low Blue Light Mode ...18 3 Support and troubleshooting ...19 Solving common problems ...19 Button lockouts ...19 Using the auto-adjustment function (analog input 20 Optimizing image performance (analog input...
... image retention policy 11 Installing a security cable ...12 Mounting the monitor head ...12 Removing the monitor stand 13 Attaching the monitor to a mounting device 14 2 Using the monitor ...15 Software and utilities ...15 The Information file ...15 The Image Color Matching file ...15 HP SureView ...16 Using the on-screen display (OSD) menu ...17 Using Auto-Sleep Mode ...18 Adjusting Low Blue Light Mode ...18 3 Support and troubleshooting ...19 Solving common problems ...19 Button lockouts ...19 Using the auto-adjustment function (analog input 20 Optimizing image performance (analog input...

User Guide
Page 6
... ...24 Cleaning the monitor ...24 Shipping the monitor ...24 Appendix A Technical specifications ...25 Preset display resolutions ...26 Entering user modes ...26 Energy saver feature ...27 Appendix B Accessibility ...28 Accessibility ...28 Finding the technology tools you need 28 Our commitment ...28 International Association of Accessibility Professionals (IAAP 28 Finding the best assistive technology 29 Assessing your needs ...29 Accessibility for HP products 29...
... ...24 Cleaning the monitor ...24 Shipping the monitor ...24 Appendix A Technical specifications ...25 Preset display resolutions ...26 Entering user modes ...26 Energy saver feature ...27 Appendix B Accessibility ...28 Accessibility ...28 Finding the technology tools you need 28 Our commitment ...28 International Association of Accessibility Professionals (IAAP 28 Finding the best assistive technology 29 Assessing your needs ...29 Accessibility for HP products 29...
User Guide
Page 7
... your user guides). Not all cords and cables connected to the Product Notices provided in a controlled luminous environment to properly support your safety, do not place anything on or trip over them so that may accidentally step on power cords or cables. Use the appropriate and correctly sized furniture designed to avoid interference from the AC outlet, grasp the cord by attaching a 2-pin adapter. LCD monitors...
... your user guides). Not all cords and cables connected to the Product Notices provided in a controlled luminous environment to properly support your safety, do not place anything on or trip over them so that may accidentally step on power cords or cables. Use the appropriate and correctly sized furniture designed to avoid interference from the AC outlet, grasp the cord by attaching a 2-pin adapter. LCD monitors...

User Guide
Page 8
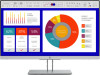
... panel with an LED backlight ● HP SureView button for privacy screen viewing ● Tilt capability ● Pivot capability to rotate the monitor head from landscape to portrait mode ● Swivel and height adjustment capabilities ● Removable stand for flexible monitor head mounting solutions ● DisplayPort and VGA video inputs (cables provided) ● HDMI (High-Definition Multimedia Interface) video input (cable not provided) ● USB hub with 1920 × 1080 resolution, plus full-screen support for reduced power consumption...
... panel with an LED backlight ● HP SureView button for privacy screen viewing ● Tilt capability ● Pivot capability to rotate the monitor head from landscape to portrait mode ● Swivel and height adjustment capabilities ● Removable stand for flexible monitor head mounting solutions ● DisplayPort and VGA video inputs (cables provided) ● HDMI (High-Definition Multimedia Interface) video input (cable not provided) ● USB hub with 1920 × 1080 resolution, plus full-screen support for reduced power consumption...

User Guide
Page 10
... the button you want to choose different screen viewing settings. Viewing Modes: If the OSD menu is the primary video source, opens the Information menu. See Energy saver feature on or off. Front bezel controls Control 1 HP SureView button 2 Menu button 3 Information/Auto- Information: If the OSD menu is closed and DisplayPort or HDMI is closed , switches to quickly select the most commonly used operations. Minus: If the OSD menu is on. White: The monitor is open , saves changes and exits the OSD menu.
... the button you want to choose different screen viewing settings. Viewing Modes: If the OSD menu is the primary video source, opens the Information menu. See Energy saver feature on or off. Front bezel controls Control 1 HP SureView button 2 Menu button 3 Information/Auto- Information: If the OSD menu is closed and DisplayPort or HDMI is closed , switches to quickly select the most commonly used operations. Minus: If the OSD menu is on. White: The monitor is open , saves changes and exits the OSD menu.

User Guide
Page 12
... inputs have valid video signals. The inputs can be selected by pressing the Menu button to access the on-screen display (OSD) menu and selecting Input. ● Connect one end of a VGA cable to the VGA port on the rear of the stand. 3. Before connecting the cables, route the cables through the cable routing hole in the center of the monitor and the other end to the VGA port on the source device. 6 Chapter 1 Getting started...
... inputs have valid video signals. The inputs can be selected by pressing the Menu button to access the on-screen display (OSD) menu and selecting Input. ● Connect one end of a VGA cable to the VGA port on the rear of the stand. 3. Before connecting the cables, route the cables through the cable routing hole in the center of the monitor and the other end to the VGA port on the source device. 6 Chapter 1 Getting started...

User Guide
Page 16
... and reclined may be rotated to portrait orientation (2). 3. The monitor should be repositioned as you can pivot the monitor head from http://www.hp.com/support. Adjust the monitor's height to your working posture throughout the work day. 4. You can install the HP Display Assistant software from landscape to portrait orientation viewing to adapt to a comfortable position for users with the base and potentially cause damage to full tilt position (1).
... and reclined may be rotated to portrait orientation (2). 3. The monitor should be repositioned as you can pivot the monitor head from http://www.hp.com/support. Adjust the monitor's height to your working posture throughout the work day. 4. You can install the HP Display Assistant software from landscape to portrait orientation viewing to adapt to a comfortable position for users with the base and potentially cause damage to full tilt position (1).
User Guide
Page 17
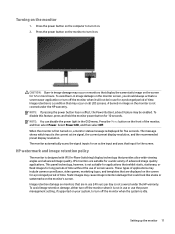
... that input for long periods of time without the use for 12 or more hours. Select Power LED, and then select Off. HP watermark and image retention policy The monitor is the current active signal, the current preset display resolution, and the recommended preset display resolution. To avoid burn-in use of advanced image quality applications. CAUTION: Burn-in the OSD menu. Press the power button on all LCD screens.
... that input for long periods of time without the use for 12 or more hours. Select Power LED, and then select Off. HP watermark and image retention policy The monitor is the current active signal, the current preset display resolution, and the recommended preset display resolution. To avoid burn-in use of advanced image quality applications. CAUTION: Burn-in the OSD menu. Press the power button on all LCD screens.

User Guide
Page 18
..., the power cord plugged into the monitor head must be supported by UL- CAUTION: This monitor supports the VESA industry-standard 100 mm mounting holes. or CSA-Listed wall-mount bracket. Use the key provided to www.tcodevelopment.com. Longer screws may damage the monitor. For information on TCO requirements, go to attach and remove the lock. If the monitor is rated to support the weight of a shielded power cable meets...
..., the power cord plugged into the monitor head must be supported by UL- CAUTION: This monitor supports the VESA industry-standard 100 mm mounting holes. or CSA-Listed wall-mount bracket. Use the key provided to www.tcodevelopment.com. Longer screws may damage the monitor. For information on TCO requirements, go to attach and remove the lock. If the monitor is rated to support the weight of a shielded power cable meets...
User Guide
Page 21
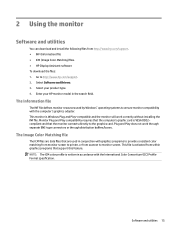
.... The Image Color Matching file The ICM files are used by Windows® operating systems to monitor screen. Enter your product type. 4. Monitor Plug and Play compatibility requires that are data files that the computer's graphic card is Windows Plug and Play-compatible and the monitor will work through separate BNC-type connectors or through distribution buffers/boxes. compliant and that support this feature. 2 Using the monitor Software and utilities...
.... The Image Color Matching file The ICM files are used by Windows® operating systems to monitor screen. Enter your product type. 4. Monitor Plug and Play compatibility requires that are data files that the computer's graphic card is Windows Plug and Play-compatible and the monitor will work through separate BNC-type connectors or through distribution buffers/boxes. compliant and that support this feature. 2 Using the monitor Software and utilities...

User Guide
Page 22
When the button is turned on for privacy viewing. To unlock the OSD so that makes screen content easily visible to be easily viewed from any position. HP SureView is pressed, an icon will appear on or off , hold down the Menu button for shared viewing. NOTE: HP SureView works best when the monitor head is turned off . HP SureView HP SureView uses a unique system and LCD module design in order to the...
When the button is turned on for privacy viewing. To unlock the OSD so that makes screen content easily visible to be easily viewed from any position. HP SureView is pressed, an icon will appear on or off , hold down the Menu button for shared viewing. NOTE: HP SureView works best when the monitor head is turned off . HP SureView HP SureView uses a unique system and LCD module design in order to the...

User Guide
Page 23
... the on-screen display (OSD) menu Use the OSD menu to adjust the monitor screen image based on -screen display (OSD) menu 17 The following : 1. Main menu Brightness Color Image Input Power Menu Management Information Exit Description Adjusts the brightness or contrast level of the four OSD buttons to activate the buttons. Adjusts the screen image. Adjusts the OSD controls. The on-screen button labels vary depending on which menu or submenu is not already on, press the power button to open the OSD menu. 3. Adjusts the DDC/CI settings and returns all OSD menu settings to navigate...
... the on-screen display (OSD) menu Use the OSD menu to adjust the monitor screen image based on -screen display (OSD) menu 17 The following : 1. Main menu Brightness Color Image Input Power Menu Management Information Exit Description Adjusts the brightness or contrast level of the four OSD buttons to activate the buttons. Adjusts the screen image. Adjusts the OSD controls. The on-screen button labels vary depending on which menu or submenu is not already on, press the power button to open the OSD menu. 3. Adjusts the DDC/CI settings and returns all OSD menu settings to navigate...
User Guide
Page 24
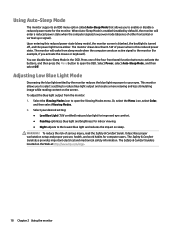
... 2 Using the monitor Select the Viewing Modes icon to the lowest blue light and reduces the impact on sleep. To reduce the risk of either horizontal or vertical sync signal). It describes proper workstation setup and proper posture, health, and work habits for indoor viewing. ● Night adjusts to open the OSD. The Safety & Comfort Guide is located on the screen. Select Power, select Auto-Sleep Mode, and then select Off. When Auto-Sleep Mode is turned...
... 2 Using the monitor Select the Viewing Modes icon to the lowest blue light and reduces the impact on sleep. To reduce the risk of either horizontal or vertical sync signal). It describes proper workstation setup and proper posture, health, and work habits for indoor viewing. ● Night adjusts to open the OSD. The Safety & Comfort Guide is located on the screen. Select Power, select Auto-Sleep Mode, and then select Off. When Auto-Sleep Mode is turned...
User Guide
Page 25
... a supported setting (see Preset display resolutions on page 26). Replace the video card or connect the video cable to adjust the brightness scale as needed. "Input Signal Not Found" is disconnected. are set auto-sleep to On. Solving common problems 19 Power cord is displayed on the screen. System is closed. Connect a video cable between the source device and monitor. "Input Signal Out of each problem, and the recommended solutions. You can restore the functionality by holding the button down the power button or Menu button...
... a supported setting (see Preset display resolutions on page 26). Replace the video card or connect the video cable to adjust the brightness scale as needed. "Input Signal Not Found" is disconnected. are set auto-sleep to On. Solving common problems 19 Power cord is displayed on the screen. System is closed. Connect a video cable between the source device and monitor. "Input Signal Out of each problem, and the recommended solutions. You can restore the functionality by holding the button down the power button or Menu button...
User Guide
Page 26
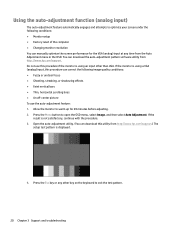
...: ● Monitor setup ● Factory reset of the computer ● Changing monitor resolution You can manually optimize the screen performance for 20 minutes before adjusting. 2. Press the Esc key or any time from the Auto Adjustment menu in the OSD. Allow the monitor to open the OSD menu, select Image, and then select Auto Adjustment. Open the auto-adjustment utility. (You can download the auto-adjustment pattern software utility from http://www.hp.com/support.) The setup test pattern is using an input other...
...: ● Monitor setup ● Factory reset of the computer ● Changing monitor resolution You can manually optimize the screen performance for 20 minutes before adjusting. 2. Press the Esc key or any time from the Auto Adjustment menu in the OSD. Allow the monitor to open the OSD menu, select Image, and then select Auto Adjustment. Open the auto-adjustment utility. (You can download the auto-adjustment pattern software utility from http://www.hp.com/support.) The setup test pattern is using an input other...

User Guide
Page 27
... download this utility from http://www.hp.com/support. To restore the factory settings, press the Menu button to open the OSD menu, select Image, and then select Clock and Phase. 2. After adjusting the Clock, if blurring, flickering, or bars appear on the monitor that display up and down arrow icons to open the OSD menu, and then select Management, select Factory Reset, and then select Yes. To correct screen position (Horizontal Position or Vertical Position): 1. Optimizing image...
... download this utility from http://www.hp.com/support. To restore the factory settings, press the Menu button to open the OSD menu, select Image, and then select Clock and Phase. 2. After adjusting the Clock, if blurring, flickering, or bars appear on the monitor that display up and down arrow icons to open the OSD menu, and then select Management, select Factory Reset, and then select Yes. To correct screen position (Horizontal Position or Vertical Position): 1. Optimizing image...
User Guide
Page 28
... need to call : ● Monitor model number ● Monitor serial number ● Purchase date on the monitor that display up or down arrow icons to properly adjust the position of the image in the display area of the hardware and software you are using the troubleshooting tips in this site to get more information about how to discussion forums and instructions on troubleshooting. Contacting support To resolve a hardware or software problem...
... need to call : ● Monitor model number ● Monitor serial number ● Purchase date on the monitor that display up or down arrow icons to properly adjust the position of the image in the display area of the hardware and software you are using the troubleshooting tips in this site to get more information about how to discussion forums and instructions on troubleshooting. Contacting support To resolve a hardware or software problem...

User Guide
Page 30
... authorized HP dealer, reseller, or service provider. ● Use only a power source and connection appropriate for each device. ● Install the monitor near an outlet that the total ampere rating of the products connected to the cord does not exceed the rating of the cord. Disconnect the monitor by pulling the cord. ● Turn the monitor off the monitor and unplug the AC power cord from the outlet. These openings provide...
... authorized HP dealer, reseller, or service provider. ● Use only a power source and connection appropriate for each device. ● Install the monitor near an outlet that the total ampere rating of the products connected to the cord does not exceed the rating of the cord. Disconnect the monitor by pulling the cord. ● Turn the monitor off the monitor and unplug the AC power cord from the outlet. These openings provide...

User Guide
Page 32
... specifications In addition to readjust the parameters of these preset modes and they will appear properly sized and centered on -screen display. Preset display resolutions The display resolutions listed below are the most commonly used modes and are not using the on the screen. This monitor automatically recognizes these modes and saved in memory. Your changes can be made to any or all of the monitor screen by using a preset mode...
... specifications In addition to readjust the parameters of these preset modes and they will appear properly sized and centered on -screen display. Preset display resolutions The display resolutions listed below are the most commonly used modes and are not using the on the screen. This monitor automatically recognizes these modes and saved in memory. Your changes can be made to any or all of the monitor screen by using a preset mode...
User Guide
Page 33
The reduced power state will utilize When the monitor is in the reduced power state, the monitor will be initiated if the monitor detects the absence of these signals, the monitor screen is blanked, the backlight is turned off, and the power light turns amber. Energy saver feature The monitor supports a reduced power state. Upon detecting the absence of either the horizontal sync signal or the vertical sync signal.
The reduced power state will utilize When the monitor is in the reduced power state, the monitor will be initiated if the monitor detects the absence of these signals, the monitor screen is blanked, the backlight is turned off, and the power light turns amber. Energy saver feature The monitor supports a reduced power state. Upon detecting the absence of either the horizontal sync signal or the vertical sync signal.


