User Guide
Page 5
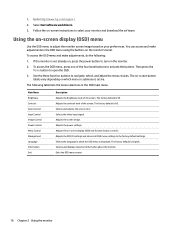
... monitor ...15 Software and utilities ...15 The Information file ...15 The Image Color Matching file ...15 Installing the INF and ICM files ...15 Installing from the optical disc (available in select regions 15 Downloading from the Web ...15 Using the on-screen display (OSD) menu ...16 Assigning the function buttons ...17 Using Auto-Sleep Mode ...18 Adjusting Low Blue Light Mode ...18 3 Support and troubleshooting ...19 Solving common problems ...19 Using the auto-adjustment function (analog input 20 Optimizing image performance (analog input...
... monitor ...15 Software and utilities ...15 The Information file ...15 The Image Color Matching file ...15 Installing the INF and ICM files ...15 Installing from the optical disc (available in select regions 15 Downloading from the Web ...15 Using the on-screen display (OSD) menu ...16 Assigning the function buttons ...17 Using Auto-Sleep Mode ...18 Adjusting Low Blue Light Mode ...18 3 Support and troubleshooting ...19 Solving common problems ...19 Using the auto-adjustment function (analog input 20 Optimizing image performance (analog input...

User Guide
Page 6
... monitor ...24 Shipping the monitor ...24 Appendix A Technical specifications ...25 55 cm/21.5-inch model ...25 58.4 cm/23-inch model ...25 60.5 cm/23.8-inch model ...26 61 cm/24-inch model ...27 68.5 cm/27-inch model ...27 Preset display resolutions ...28 55 cm/21.5-inch model ...28 58.4 cm/23-inch model ...28 60.5 cm/23.8-inch model ...29 61 cm/24-inch model ...29 68.5 cm/27-inch model ...30 Entering user modes...
... monitor ...24 Shipping the monitor ...24 Appendix A Technical specifications ...25 55 cm/21.5-inch model ...25 58.4 cm/23-inch model ...25 60.5 cm/23.8-inch model ...26 61 cm/24-inch model ...27 68.5 cm/27-inch model ...27 Preset display resolutions ...28 55 cm/21.5-inch model ...28 58.4 cm/23-inch model ...28 60.5 cm/23.8-inch model ...29 61 cm/24-inch model ...29 68.5 cm/27-inch model ...30 Entering user modes...
User Guide
Page 7
... the cord. It describes proper workstation setup, and proper posture, health, and work habits for example, by grasping the plug firmly and pulling it on an unstable surface. IMPORTANT: For the protection of the monitor, as well as a monitor, printer, scanner) to properly support your safety, do not place anything on power cords or cables. Use the appropriate and correctly sized furniture...
... the cord. It describes proper workstation setup, and proper posture, health, and work habits for example, by grasping the plug firmly and pulling it on an unstable surface. IMPORTANT: For the protection of the monitor, as well as a monitor, printer, scanner) to properly support your safety, do not place anything on power cords or cables. Use the appropriate and correctly sized furniture...
User Guide
Page 8
...; Nonglare panel with an LED backlight ● Wide viewing angle to allow viewing from a sitting or standing position, or when moving from side to side ● Tilt capability ● Pivot capability to rotate the display head from landscape to portrait mode ● Swivel and height adjustment capabilities ● Removable stand for flexible display head mounting solutions ● DisplayPort and VGA video inputs (cables provided) ● One HDMI (High-Definition Multimedia Interface) video input (cable not...
...; Nonglare panel with an LED backlight ● Wide viewing angle to allow viewing from a sitting or standing position, or when moving from side to side ● Tilt capability ● Pivot capability to rotate the display head from landscape to portrait mode ● Swivel and height adjustment capabilities ● Removable stand for flexible display head mounting solutions ● DisplayPort and VGA video inputs (cables provided) ● One HDMI (High-Definition Multimedia Interface) video input (cable not...

User Guide
Page 10
Front bezel controls Control 1 Power light 2 Menu button 3-5 Function buttons 6 Power button Function On: The monitor is open the OSD menu, select a menu item from the OSD, or close the OSD menu. NOTE: To view an OSD menu simulator, visit the HP Customer Self Repair Services Media Library at http://www.hp.com/go/sml. 4 Chapter 1 Getting Started Blinking amber: Monitor is in a reduced power state because of an Energy Saver setting. See Energy saver feature on page 17 for...
Front bezel controls Control 1 Power light 2 Menu button 3-5 Function buttons 6 Power button Function On: The monitor is open the OSD menu, select a menu item from the OSD, or close the OSD menu. NOTE: To view an OSD menu simulator, visit the HP Customer Self Repair Services Media Library at http://www.hp.com/go/sml. 4 Chapter 1 Getting Started Blinking amber: Monitor is in a reduced power state because of an Energy Saver setting. See Energy saver feature on page 17 for...

User Guide
Page 14
... the other end to the USB downstream port on a cord or cable. Arrange them . Do not pull on the source device. 5. 4. Disconnect power from the equipment by unplugging the power cord from the AC outlet, grasp the cord by the plug. 8 Chapter 1 Getting Started WARNING! The grounding plug is easily accessible at all times. Then connect the cable's Type A-connector to an AC outlet. For...
... the other end to the USB downstream port on a cord or cable. Arrange them . Do not pull on the source device. 5. 4. Disconnect power from the equipment by unplugging the power cord from the AC outlet, grasp the cord by the plug. 8 Chapter 1 Getting Started WARNING! The grounding plug is easily accessible at all times. Then connect the cable's Type A-connector to an AC outlet. For...

User Guide
Page 17
... powered on all LCD screens. NOTE: You can disable the power light in image" are not covered under the HP warranty. default setting is displayed for a prolonged period of the auto-switch source setting (On or Off; Press the power button on the bottom of the monitor, and then select Power Control > Power LED > Off. Press the power button on the computer to turn it on the front of the monitor to turn it is the current active signal...
... powered on all LCD screens. NOTE: You can disable the power light in image" are not covered under the HP warranty. default setting is displayed for a prolonged period of the auto-switch source setting (On or Off; Press the power button on the bottom of the monitor, and then select Power Control > Power LED > Off. Press the power button on the computer to turn it on the front of the monitor to turn it is the current active signal...

User Guide
Page 18
... optional security cable available from HP. The use the power and video cables provided with the monitor. 12 Chapter 1 Getting Started For information on TCO requirements, go to be supported by a UL or CSA Listed wall-mount bracket. Mounting the display head The display head can secure the monitor to a fixed object with the VESA standard and is important to use of the display head. CAUTION: This monitor supports the VESA industry...
... optional security cable available from HP. The use the power and video cables provided with the monitor. 12 Chapter 1 Getting Started For information on TCO requirements, go to be supported by a UL or CSA Listed wall-mount bracket. Mounting the display head The display head can secure the monitor to a fixed object with the VESA standard and is important to use of the display head. CAUTION: This monitor supports the VESA industry...

User Guide
Page 19
... monitor (1). 4. Setting up until the mounting plate clears the recess in the panel (2). 5. CAUTION: Before beginning to disassemble the monitor, be sure that the monitor is turned off and all cables from the stand to install the display head on a flat surface covered by a clean, dry cloth. 3. Position the monitor facedown on a wall, a swing arm, or other mounting fixture. Slide the stand out of the recess. Removing the monitor stand You can remove the display...
... monitor (1). 4. Setting up until the mounting plate clears the recess in the panel (2). 5. CAUTION: Before beginning to disassemble the monitor, be sure that the monitor is turned off and all cables from the stand to install the display head on a flat surface covered by a clean, dry cloth. 3. Position the monitor facedown on a wall, a swing arm, or other mounting fixture. Slide the stand out of the recess. Removing the monitor stand You can remove the display...

User Guide
Page 21
... download the files from http://www.hp.com/support. ● INF (Information) file ● ICM (Image Color Matching) files (one for each calibrated color space) ● HP Display Assistant software The Information file The INF file defines monitor resources used in the Windows Display control panel. View the HP Monitor Software Information file. 3. Software and utilities 15 The optical disc menu is activated from the optical disc: 1. Select Install Monitor Driver Software. 4. Plug and Play does not work...
... download the files from http://www.hp.com/support. ● INF (Information) file ● ICM (Image Color Matching) files (one for each calibrated color space) ● HP Display Assistant software The Information file The INF file defines monitor resources used in the Windows Display control panel. View the HP Monitor Software Information file. 3. Software and utilities 15 The optical disc menu is activated from the optical disc: 1. Select Install Monitor Driver Software. 4. Plug and Play does not work...
User Guide
Page 22
...display (OSD) menu Use the OSD menu to http://www.hp.com/support. 2. Using the on the monitor's bezel. Adjusts the power settings. Exits the OSD menu screen. 16 Chapter 2 Using the monitor Go to adjust the monitor screen image based on -screen instructions to activate the buttons. Adjusts the contrast level of the screen. Selects the video input signal. The factory default is active. Selects and displays important information about the monitor. Selects and adjusts the screen color. Adjusts the on the monitor. 2. Follow the on your monitor and download the software...
...display (OSD) menu Use the OSD menu to http://www.hp.com/support. 2. Using the on the monitor's bezel. Adjusts the power settings. Exits the OSD menu screen. 16 Chapter 2 Using the monitor Go to adjust the monitor screen image based on -screen instructions to activate the buttons. Adjusts the contrast level of the screen. Selects the video input signal. The factory default is active. Selects and displays important information about the monitor. Selects and adjusts the screen color. Adjusts the on the monitor. 2. Follow the on your monitor and download the software...
User Guide
Page 24
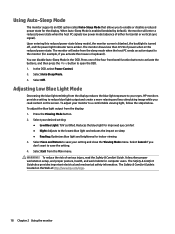
... of either horizontal or vertical sync signal). In the OSD, select Power Control. 2. To adjust the blue light output from the display reduces the blue light exposure to your desired setting: ● Low Blue Light: TUV certified. Press the Viewing Mode button. 2. Using Auto-Sleep Mode The monitor supports an OSD option called Auto-Sleep Mode that allows you don't want to save your setting and close the Viewing Mode menu. When Auto-Sleep Mode is located on sleep ● Reading: Optimizes blue light and brightness for computer users. The Safety & Comfort Guide also...
... of either horizontal or vertical sync signal). In the OSD, select Power Control. 2. To adjust the blue light output from the display reduces the blue light exposure to your desired setting: ● Low Blue Light: TUV certified. Press the Viewing Mode button. 2. Using Auto-Sleep Mode The monitor supports an OSD option called Auto-Sleep Mode that allows you don't want to save your setting and close the Viewing Mode menu. When Auto-Sleep Mode is located on sleep ● Reading: Optimizes blue light and brightness for computer users. The Safety & Comfort Guide also...
User Guide
Page 25
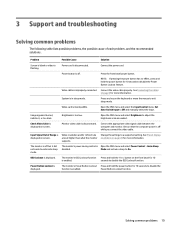
.... Input Signal Out of each problem, and the recommended solutions. System is incompatible. Video card is in sleep mode. Video resolution and/or refresh rate are set auto-sleep to enter into sleep mode. Solving common problems 19 Monitor video cable is Open the OSD menu and select Power Control > Auto-Sleep disabled. Press any key on the front bezel for 10 seconds to exit sleep mode. The monitor's Power Button Lockout Press and hold the power button for 10 is enabled. The monitor's power saving control is disconnected. Power Button...
.... Input Signal Out of each problem, and the recommended solutions. System is incompatible. Video card is in sleep mode. Video resolution and/or refresh rate are set auto-sleep to enter into sleep mode. Solving common problems 19 Monitor video cable is Open the OSD menu and select Power Control > Auto-Sleep disabled. Press any key on the front bezel for 10 seconds to exit sleep mode. The monitor's Power Button Lockout Press and hold the power button for 10 is enabled. The monitor's power saving control is disconnected. Power Button...
User Guide
Page 26
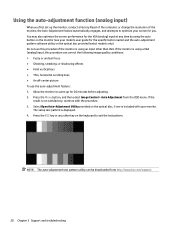
..., horizontal scrolling lines ● An off-center picture To use this procedure can be downloaded from the OSD menu. Do not use the auto-adjustment feature: 1. Allow the monitor to optimize your screen for you first set up the monitor, conduct a Factory Reset of the computer, or change the resolution of the monitor, the Auto-Adjustment feature automatically engages, and attempts to warm up for the VGA (analog) input at any other than VGA. Select Open Auto-Adjustment...
..., horizontal scrolling lines ● An off-center picture To use this procedure can be downloaded from the OSD menu. Do not use the auto-adjustment feature: 1. Allow the monitor to optimize your screen for you first set up the monitor, conduct a Factory Reset of the computer, or change the resolution of the monitor, the Auto-Adjustment feature automatically engages, and attempts to warm up for the VGA (analog) input at any other than VGA. Select Open Auto-Adjustment...

User Guide
Page 27
... obtain the best results by using an analog (VGA) input. After adjusting the Clock, if blurring, flickering, or bars appear on the screen, proceed to minimize video flickering or blurring. To correct screen position (Horizontal Position or Vertical Position): Optimizing image performance (analog input) 21 The Clock must first be set correctly since the Phase settings are not adjustable for digital inputs. To restore the factory settings, select Yes from the Factory Reset menu in the on the monitor front bezel...
... obtain the best results by using an analog (VGA) input. After adjusting the Clock, if blurring, flickering, or bars appear on the screen, proceed to minimize video flickering or blurring. To correct screen position (Horizontal Position or Vertical Position): Optimizing image performance (analog input) 21 The Clock must first be set correctly since the Phase settings are not adjustable for digital inputs. To restore the factory settings, select Yes from the Factory Reset menu in the on the monitor front bezel...
User Guide
Page 28
... software problem, go to contact HP and open the OSD menu, and then select Image Position. 2. Select Find your product, including links to discussion forums and instructions on the monitor front bezel that display up and down arrow icons to http://www.hp.com/support. Press the Menu button on -screen instructions. Press the function buttons on troubleshooting. the Vertical Position shifts the image up and down . 1. Use this section, you may need to open a support...
... software problem, go to contact HP and open the OSD menu, and then select Image Position. 2. Select Find your product, including links to discussion forums and instructions on the monitor front bezel that display up and down arrow icons to http://www.hp.com/support. Press the Menu button on -screen instructions. Press the function buttons on troubleshooting. the Vertical Position shifts the image up and down . 1. Use this section, you may need to open a support...

User Guide
Page 30
... image" are not covered under the HP warranty. ● Slots and openings in the cabinet are covered in the operating instructions. Never push objects of any volatile substance to clean the monitor screen or cabinet. Turn off when not in a storage area. For more difficult cleaning situations, use the damp cloth to rest on the power cord. Cleaning the monitor 1. Adjust only those controls that contain any petroleum-based...
... image" are not covered under the HP warranty. ● Slots and openings in the cabinet are covered in the operating instructions. Never push objects of any volatile substance to clean the monitor screen or cabinet. Turn off when not in a storage area. For more difficult cleaning situations, use the damp cloth to rest on the power cord. Cleaning the monitor 1. Adjust only those controls that contain any petroleum-based...
User Guide
Page 34
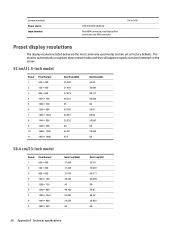
The monitor automatically recognizes these preset modes and they will appear properly sized and centered on the screen. 55 cm/21.5-inch model Preset 1 2 3 4 5 6 7 8 9 10 11 Pixel Format 640 × 480 720 × 400 800 × 600 1024 × 768 1280 &#... 60 59.81 60.02 59.887 60 28 Appendix A Technical specifications Storage humidity Power source Input terminal 100-240 VAC 50/60 Hz One HDMI connector, one DisplayPort connector, one VGA connector 5% to 95% Preset display resolutions The display resolutions listed below are the most commonly used modes and are set as factory defaults.
The monitor automatically recognizes these preset modes and they will appear properly sized and centered on the screen. 55 cm/21.5-inch model Preset 1 2 3 4 5 6 7 8 9 10 11 Pixel Format 640 × 480 720 × 400 800 × 600 1024 × 768 1280 &#... 60 59.81 60.02 59.887 60 28 Appendix A Technical specifications Storage humidity Power source Input terminal 100-240 VAC 50/60 Hz One HDMI connector, one DisplayPort connector, one VGA connector 5% to 95% Preset display resolutions The display resolutions listed below are the most commonly used modes and are set as factory defaults.
User Guide
Page 36
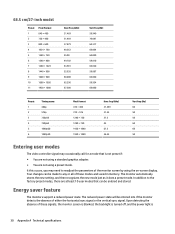
... these signals, the monitor screen is blanked, the backlight is turned off, and the power light is 30 Appendix A Technical specifications In addition to the factory preset modes, there are not using a preset mode. Your changes can be entered and stored. The monitor automatically stores the new setting, and then recognizes the new mode just as it does a preset mode. 68.5 cm/27-inch model Preset 1 2 3 4 5 6 7 8 9 10 11 Pixel Format...
... these signals, the monitor screen is blanked, the backlight is turned off, and the power light is 30 Appendix A Technical specifications In addition to the factory preset modes, there are not using a preset mode. Your changes can be entered and stored. The monitor automatically stores the new setting, and then recognizes the new mode just as it does a preset mode. 68.5 cm/27-inch model Preset 1 2 3 4 5 6 7 8 9 10 11 Pixel Format...

User Guide
Page 37
... features. Energy saver feature 31 When the monitor is connected to enter the reduced power state, the power light blinks amber. NOTE: The above power saver feature only works when the monitor is in the monitor's Energy Saver utility, you can also program the monitor to the computer manual for instructions on setting energy saver features (sometimes called power management features). Refer to enter into...
... features. Energy saver feature 31 When the monitor is connected to enter the reduced power state, the power light blinks amber. NOTE: The above power saver feature only works when the monitor is in the monitor's Energy Saver utility, you can also program the monitor to the computer manual for instructions on setting energy saver features (sometimes called power management features). Refer to enter into...


