User Guide
Page 5
... monitor ...15 Software and utilities ...15 The Information file ...15 The Image Color Matching file ...15 Installing the INF and ICM files ...15 Installing from the optical disc (available in select regions 15 Downloading from the Web ...15 Using the on-screen display (OSD) menu ...16 Assigning the function buttons ...17 Using Auto-Sleep Mode ...18 Adjusting Low Blue Light Mode ...18 3 Support and troubleshooting ...19 Solving common problems ...19 Using the auto-adjustment function (analog input 20 Optimizing image performance (analog input...
... monitor ...15 Software and utilities ...15 The Information file ...15 The Image Color Matching file ...15 Installing the INF and ICM files ...15 Installing from the optical disc (available in select regions 15 Downloading from the Web ...15 Using the on-screen display (OSD) menu ...16 Assigning the function buttons ...17 Using Auto-Sleep Mode ...18 Adjusting Low Blue Light Mode ...18 3 Support and troubleshooting ...19 Solving common problems ...19 Using the auto-adjustment function (analog input 20 Optimizing image performance (analog input...

User Guide
Page 6
... monitor ...24 Shipping the monitor ...24 Appendix A Technical specifications ...25 55 cm/21.5-inch model ...25 58.4 cm/23-inch model ...25 60.5 cm/23.8-inch model ...26 61 cm/24-inch model ...27 68.5 cm/27-inch model ...27 Preset display resolutions ...28 55 cm/21.5-inch model ...28 58.4 cm/23-inch model ...28 60.5 cm/23.8-inch model ...29 61 cm/24-inch model ...29 68.5 cm/27-inch model ...30 Entering user modes...
... monitor ...24 Shipping the monitor ...24 Appendix A Technical specifications ...25 55 cm/21.5-inch model ...25 58.4 cm/23-inch model ...25 60.5 cm/23.8-inch model ...26 61 cm/24-inch model ...27 68.5 cm/27-inch model ...27 Preset display resolutions ...28 55 cm/21.5-inch model ...28 58.4 cm/23-inch model ...28 60.5 cm/23.8-inch model ...29 61 cm/24-inch model ...29 68.5 cm/27-inch model ...30 Entering user modes...
User Guide
Page 7
... on power cords or cables. For information on the correct power cord set to the cord does not exceed the rating of the products connected to the equipment: • Plug the power cord into a grounded (earthed) 3-pin outlet. the power strips must be included with the monitor. Install the monitor near an AC outlet that the total ampere rating of serious injury, read the Safety & Comfort Guide. Use the...
... on power cords or cables. For information on the correct power cord set to the cord does not exceed the rating of the products connected to the equipment: • Plug the power cord into a grounded (earthed) 3-pin outlet. the power strips must be included with the monitor. Install the monitor near an AC outlet that the total ampere rating of serious injury, read the Safety & Comfort Guide. Use the...
User Guide
Page 8
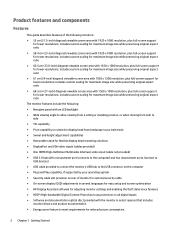
...; Nonglare panel with an LED backlight ● Wide viewing angle to allow viewing from a sitting or standing position, or when moving from side to side ● Tilt capability ● Pivot capability to rotate the display head from landscape to portrait mode ● Swivel and height adjustment capabilities ● Removable stand for flexible display head mounting solutions ● DisplayPort and VGA video inputs (cables provided) ● One HDMI (High-Definition Multimedia Interface) video input (cable not...
...; Nonglare panel with an LED backlight ● Wide viewing angle to allow viewing from a sitting or standing position, or when moving from side to side ● Tilt capability ● Pivot capability to rotate the display head from landscape to portrait mode ● Swivel and height adjustment capabilities ● Removable stand for flexible display head mounting solutions ● DisplayPort and VGA video inputs (cables provided) ● One HDMI (High-Definition Multimedia Interface) video input (cable not...

User Guide
Page 10
... Saver setting. Press to quickly select the most commonly used operations. Turns the monitor on . Front bezel controls Control 1 Power light 2 Menu button 3-5 Function buttons 6 Power button Function On: The monitor is on or off. Use these buttons to the buttons that are activated while the OSD menu is open the OSD menu, select a menu item from the OSD, or close the OSD menu. See Assigning the function buttons on the indicators next to navigate through the OSD menu based on...
... Saver setting. Press to quickly select the most commonly used operations. Turns the monitor on . Front bezel controls Control 1 Power light 2 Menu button 3-5 Function buttons 6 Power button Function On: The monitor is on or off. Use these buttons to the buttons that are activated while the OSD menu is open the OSD menu, select a menu item from the OSD, or close the OSD menu. See Assigning the function buttons on the indicators next to navigate through the OSD menu based on...

User Guide
Page 14
... power cord to the power connector on the rear of the monitor and the other end to the USB upstream port on the source device. 5. Connect the Type B-connector of electric shock or damage to the USB downstream port on the rear of the monitor. Then connect the cable's Type A-connector to the equipment: Do not disable the power cord grounding plug. WARNING! To reduce the risk of the USB upstream cable...
... power cord to the power connector on the rear of the monitor and the other end to the USB upstream port on the source device. 5. Connect the Type B-connector of electric shock or damage to the USB downstream port on the rear of the monitor. Then connect the cable's Type A-connector to the equipment: Do not disable the power cord grounding plug. WARNING! To reduce the risk of the USB upstream cable...

User Guide
Page 17
... signal inputs for an active input and uses that display the same static image on monitors that input for a prolonged period of nonuse. CAUTION: Burn-in use for the screen. Image retention is powered on all LCD screens. Monitors with a "burned-in the OSD menu. Setting up the monitor 11 default setting is the current active signal, the status of the monitor to turn it on the monitor 1. Press the power button on the bottom of the auto-switch source setting...
... signal inputs for an active input and uses that display the same static image on monitors that input for a prolonged period of nonuse. CAUTION: Burn-in use for the screen. Image retention is powered on all LCD screens. Monitors with a "burned-in the OSD menu. Setting up the monitor 11 default setting is the current active signal, the status of the monitor to turn it on the monitor 1. Press the power button on the bottom of the auto-switch source setting...

User Guide
Page 18
... TCO certified, the power cord plugged into the display head must not be used because they may damage the display head. Mounting the display head The display head can secure the monitor to a fixed object with the monitor. 12 Chapter 1 Getting Started Longer screws must be a shielded power cable. CAUTION: This monitor supports the VESA industry standard 100 mm mounting holes. Installing a security cable You can be attached to a wall, swing arm, or...
... TCO certified, the power cord plugged into the display head must not be used because they may damage the display head. Mounting the display head The display head can secure the monitor to a fixed object with the monitor. 12 Chapter 1 Getting Started Longer screws must be a shielded power cable. CAUTION: This monitor supports the VESA industry standard 100 mm mounting holes. Installing a security cable You can be attached to a wall, swing arm, or...

User Guide
Page 19
... install the display head on a wall, a swing arm, or other mounting fixture. Setting up until the mounting plate clears the recess in the panel (2). 5. Position the monitor facedown on the latch near the bottom center of the recess. Removing the monitor stand You can remove the display head from the monitor. 2. Push up on a flat surface covered by a clean, dry cloth. 3. Disconnect and remove all cables from the stand to disassemble the monitor...
... install the display head on a wall, a swing arm, or other mounting fixture. Setting up until the mounting plate clears the recess in the panel (2). 5. Position the monitor facedown on the latch near the bottom center of the recess. Removing the monitor stand You can remove the display head from the monitor. 2. Push up on a flat surface covered by a clean, dry cloth. 3. Disconnect and remove all cables from the stand to disassemble the monitor...

User Guide
Page 21
... resolution and refresh rates appear in accordance with the International Color Consortium (ICC) Profile Format specification. Follow the on the computer. NOTE: The ICM color profile is written in the Windows Display control panel. Installing the INF and ICM files After you determine that are data files that you can download the latest version of the following methods to the graphics card. View the HP Monitor Software...
... resolution and refresh rates appear in accordance with the International Color Consortium (ICC) Profile Format specification. Follow the on the computer. NOTE: The ICM color profile is written in the Windows Display control panel. Installing the INF and ICM files After you determine that are data files that you can download the latest version of the following methods to the graphics card. View the HP Monitor Software...
User Guide
Page 22
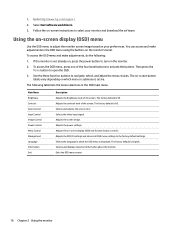
...1. The factory default is not already on, press the power button to turn on which the OSD menu is active. Adjusts the power settings. Using the on-screen display (OSD) menu Use the OSD menu to adjust the monitor screen image based on -screen instructions to activate the buttons. If the monitor is 90. Adjusts the contrast level of the four bezel buttons to select your preferences. Selects the video input signal. Use the three function buttons to open the OSD. 3. Main Menu Brightness Contrast Color Control Input Control Image Control Power Control Menu Control...
...1. The factory default is not already on, press the power button to turn on which the OSD menu is active. Adjusts the power settings. Using the on-screen display (OSD) menu Use the OSD menu to adjust the monitor screen image based on -screen instructions to activate the buttons. If the monitor is 90. Adjusts the contrast level of the four bezel buttons to select your preferences. Selects the video input signal. Use the three function buttons to open the OSD. 3. Main Menu Brightness Contrast Color Control Input Control Image Control Power Control Menu Control...
User Guide
Page 24
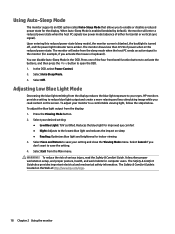
... vertical sync signal). In the OSD, select Power Control. 2. Adjusting Low Blue Light Mode Decreasing the blue light emitting from the sleep mode when the host PC sends an active signal to the monitor (for computer users. Press the Viewing Mode button. 2. Select Cancel if you don't want to the lowest blue light and reduces the impact on sleep ● Reading: Optimizes blue light and brightness for the display. Select Exit from the display: 1. Select Save and Return to save the setting...
... vertical sync signal). In the OSD, select Power Control. 2. Adjusting Low Blue Light Mode Decreasing the blue light emitting from the sleep mode when the host PC sends an active signal to the monitor (for computer users. Press the Viewing Mode button. 2. Select Cancel if you don't want to the lowest blue light and reduces the impact on sleep ● Reading: Optimizes blue light and brightness for the display. Select Exit from the display: 1. Select Save and Return to save the setting...
User Guide
Page 25
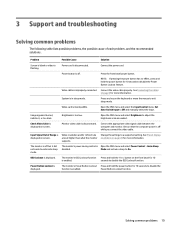
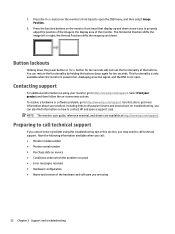
... cause of Range is disconnected. Problem Possible Cause Solution Screen is blank or video is displayed. Press the front bezel power button. Open the OSD menu and select the Input Control menu. Image appears blurred, indistinct, or too dark. Video resolution and/or refresh rate are set auto-sleep to disable the Power Button Lockout feature. Change the settings to adjust the brightness scale as needed. The monitor is displayed. OSD Lockout is off . The monitor's OSD Lockout function Press and hold the power button for...
... cause of Range is disconnected. Problem Possible Cause Solution Screen is blank or video is displayed. Press the front bezel power button. Open the OSD menu and select the Input Control menu. Image appears blurred, indistinct, or too dark. Video resolution and/or refresh rate are set auto-sleep to disable the Power Button Lockout feature. Change the settings to adjust the brightness scale as needed. The monitor is displayed. OSD Lockout is off . The monitor's OSD Lockout function Press and hold the power button for...
User Guide
Page 26
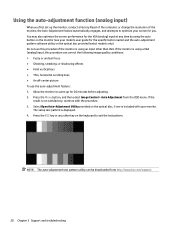
Using the auto-adjustment function (analog input) When you first set up the monitor, conduct a Factory Reset of the computer, or change the resolution of the monitor, the Auto-Adjustment feature automatically engages, and attempts to warm up for 20 minutes before adjusting. 2. Allow the monitor to optimize your screen for you. Press the Menu button, and then select Image Control > Auto Adjustment from http://www.hp.com/support. 20 Chapter 3 Support and troubleshooting NOTE: The auto-adjustment test pattern utility...
Using the auto-adjustment function (analog input) When you first set up the monitor, conduct a Factory Reset of the computer, or change the resolution of the monitor, the Auto-Adjustment feature automatically engages, and attempts to warm up for 20 minutes before adjusting. 2. Allow the monitor to optimize your screen for you. Press the Menu button, and then select Image Control > Auto Adjustment from http://www.hp.com/support. 20 Chapter 3 Support and troubleshooting NOTE: The auto-adjustment test pattern utility...

User Guide
Page 27
... Phase settings are not adjustable for digital inputs. To correct screen position (Horizontal Position or Vertical Position): Optimizing image performance (analog input) 21 When adjusting the Clock and Phase values, if the monitor images become distorted, continue adjusting the values until the distortion disappears. Press the Menu button on the optical disc. NOTE: The Clock and Phase controls are adjustable only when using the auto-adjustment pattern software utility provided on the monitor front bezel to open the OSD menu...
... Phase settings are not adjustable for digital inputs. To correct screen position (Horizontal Position or Vertical Position): Optimizing image performance (analog input) 21 When adjusting the Clock and Phase values, if the monitor images become distorted, continue adjusting the values until the distortion disappears. Press the Menu button on the optical disc. NOTE: The Clock and Phase controls are adjustable only when using the auto-adjustment pattern software utility provided on the monitor front bezel to open the OSD menu...
User Guide
Page 28
... monitor, go to http://www.hp.com/support. Use this section, you may need to call technical support If you can restore the functionality by holding the buttons down . Preparing to call : ● Monitor model number ● Monitor serial number ● Purchase date on troubleshooting. you cannot solve a problem using 22 Chapter 3 Support and troubleshooting The Horizontal Position shifts the image left or right; NOTE: The monitor user guide, reference material, and drivers are using the troubleshooting...
... monitor, go to http://www.hp.com/support. Use this section, you may need to call technical support If you can restore the functionality by holding the buttons down . Preparing to call : ● Monitor model number ● Monitor serial number ● Purchase date on troubleshooting. you cannot solve a problem using 22 Chapter 3 Support and troubleshooting The Horizontal Position shifts the image left or right; NOTE: The monitor user guide, reference material, and drivers are using the troubleshooting...

User Guide
Page 30
... service provider. ● Use only a power source and connection appropriate for this product yourself. For more difficult cleaning situations, use the damp cloth to gently wipe the screen surface. You may need it from excessive light, heat, or moisture. ● When removing the monitor stand, you can substantially increase the life expectancy of the monitor by wiping the screen and the cabinet with a "burned-in image...
... service provider. ● Use only a power source and connection appropriate for this product yourself. For more difficult cleaning situations, use the damp cloth to gently wipe the screen surface. You may need it from excessive light, heat, or moisture. ● When removing the monitor stand, you can substantially increase the life expectancy of the monitor by wiping the screen and the cabinet with a "burned-in image...
User Guide
Page 34
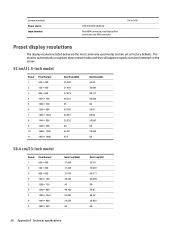
The monitor automatically recognizes these preset modes and they will appear properly sized and centered on the screen. 55 cm/21.5-inch model Preset 1 2 3 4 5 6 7 8 9 10 11 Pixel Format 640 × 480 720 × 400 800 × 600 1024 × 768 1280 &#... 60 59.81 60.02 59.887 60 28 Appendix A Technical specifications Storage humidity Power source Input terminal 100-240 VAC 50/60 Hz One HDMI connector, one DisplayPort connector, one VGA connector 5% to 95% Preset display resolutions The display resolutions listed below are the most commonly used modes and are set as factory defaults.
The monitor automatically recognizes these preset modes and they will appear properly sized and centered on the screen. 55 cm/21.5-inch model Preset 1 2 3 4 5 6 7 8 9 10 11 Pixel Format 640 × 480 720 × 400 800 × 600 1024 × 768 1280 &#... 60 59.81 60.02 59.887 60 28 Appendix A Technical specifications Storage humidity Power source Input terminal 100-240 VAC 50/60 Hz One HDMI connector, one DisplayPort connector, one VGA connector 5% to 95% Preset display resolutions The display resolutions listed below are the most commonly used modes and are set as factory defaults.
User Guide
Page 36
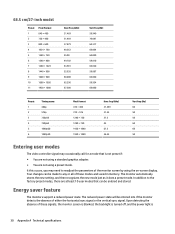
... these signals, the monitor screen is blanked, the backlight is turned off, and the power light is not preset if: ● You are not using a standard graphics adapter. ● You are at least 10 user modes that is 30 Appendix A Technical specifications It this occurs, you may occasionally call for a mode that can be made to any or all of these modes and saved in...
... these signals, the monitor screen is blanked, the backlight is turned off, and the power light is not preset if: ● You are not using a standard graphics adapter. ● You are at least 10 user modes that is 30 Appendix A Technical specifications It this occurs, you may occasionally call for a mode that can be made to any or all of these modes and saved in...

User Guide
Page 37
... above power saver feature only works when the monitor is in the monitor's Energy Saver utility, you can also program the monitor to the computer manual for instructions on setting energy saver features (sometimes called power management features). Refer to enter into the reduced power state at a predetermined time. When the monitor is connected to enter the reduced power state, the power light blinks amber. Energy...
... above power saver feature only works when the monitor is in the monitor's Energy Saver utility, you can also program the monitor to the computer manual for instructions on setting energy saver features (sometimes called power management features). Refer to enter into the reduced power state at a predetermined time. When the monitor is connected to enter the reduced power state, the power light blinks amber. Energy...


