User Guide
Page 5
... HP Quick Start (select models only) ...1 Best practices ...1 Fun things to do ...2 More HP resources ...3 2 Getting to know your computer ...4 Finding your hardware and software information 4 Locating hardware ...4 Locating software ...4 Right side ...5 Left side ...6 Display ...8 Top ...9 TouchPad ...9 Lights ...10 Buttons and speakers ...11 Keys ...12 Bottom ...13 Labels ...14 3 Connecting to a network ...15 Connecting to a wireless network ...15 Using the wireless controls 15 Using the wireless button 15 Using operating system controls 16 Using a WLAN ...16 Using an Internet service...
... HP Quick Start (select models only) ...1 Best practices ...1 Fun things to do ...2 More HP resources ...3 2 Getting to know your computer ...4 Finding your hardware and software information 4 Locating hardware ...4 Locating software ...4 Right side ...5 Left side ...6 Display ...8 Top ...9 TouchPad ...9 Lights ...10 Buttons and speakers ...11 Keys ...12 Bottom ...13 Labels ...14 3 Connecting to a network ...15 Connecting to a wireless network ...15 Using the wireless controls 15 Using the wireless button 15 Using operating system controls 16 Using a WLAN ...16 Using an Internet service...
User Guide
Page 7
... 43 Resolving a low battery level when the computer cannot exit Hibernation ....... 44 Running on external AC power ...44 Troubleshooting power problems 44 HP CoolSense (select models only 45 Refreshing your software content with Intel Smart Connect Technology (select models only 45 Shutting down (turning off) the computer 46 7 Managing and sharing information ...47 Using a USB device ...47 Connecting a USB device 48 Removing a USB device ...48 Connecting a powered USB device 48 Inserting and removing a digital storage card 49 8 Maintaining...
... 43 Resolving a low battery level when the computer cannot exit Hibernation ....... 44 Running on external AC power ...44 Troubleshooting power problems 44 HP CoolSense (select models only 45 Refreshing your software content with Intel Smart Connect Technology (select models only 45 Shutting down (turning off) the computer 46 7 Managing and sharing information ...47 Using a USB device ...47 Connecting a USB device 48 Removing a USB device ...48 Connecting a powered USB device 48 Inserting and removing a digital storage card 49 8 Maintaining...
User Guide
Page 8
... up your software applications and information 57 Using an optional security cable lock 57 10 Using Setup Utility (BIOS) and System Diagnostics 58 Starting Setup Utility (BIOS) ...58 Updating the BIOS ...58 Determining the BIOS version 58 Downloading a BIOS update 59 Using HP PC Hardware Diagnostics (UEFI 60 Downloading HP PC Hardware Diagnostics (UEFI) to a USB device 60 11 Backing up, restoring, and recovering ...61 Creating recovery media and backups 61 Creating HP Recovery media 62 Restore and recovery ...63 Using Windows Refresh for quick and easy recovery 64 Remove everything...
... up your software applications and information 57 Using an optional security cable lock 57 10 Using Setup Utility (BIOS) and System Diagnostics 58 Starting Setup Utility (BIOS) ...58 Updating the BIOS ...58 Determining the BIOS version 58 Downloading a BIOS update 59 Using HP PC Hardware Diagnostics (UEFI 60 Downloading HP PC Hardware Diagnostics (UEFI) to a USB device 60 11 Backing up, restoring, and recovering ...61 Creating recovery media and backups 61 Creating HP Recovery media 62 Restore and recovery ...63 Using Windows Refresh for quick and easy recovery 64 Remove everything...

User Guide
Page 25
...; Operating system controls Using the wireless button The computer has a wireless button, one or more wireless devices, and one or more information about wireless technology, see the information and website links provided in corporate offices, your wireless devices, not the status of websites using these features: ● Wireless button, wireless switch, or wireless key (referred to in your computer communicates with a wireless router or a wireless access point. ● Bluetooth device-Creates a personal area network (PAN) to connect...
...; Operating system controls Using the wireless button The computer has a wireless button, one or more wireless devices, and one or more information about wireless technology, see the information and website links provided in corporate offices, your wireless devices, not the status of websites using these features: ● Wireless button, wireless switch, or wireless key (referred to in your computer communicates with a wireless router or a wireless access point. ● Bluetooth device-Creates a personal area network (PAN) to connect...
User Guide
Page 26
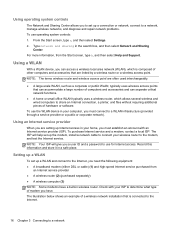
... Internet. 16 Chapter 3 Connecting to the Internet, you need the following equipment: ● A broadband modem (either DSL or cable) (1) and high-speed Internet service purchased from the Start screen, type h, and then select Help and Support. Setting up a WLAN To set up a WLAN and connect to a network Using a WLAN With a WLAN device, you can access a wireless local area network (WLAN), which allows several wireless and wired computers to determine what type of hardware...
... Internet. 16 Chapter 3 Connecting to the Internet, you need the following equipment: ● A broadband modem (either DSL or cable) (1) and high-speed Internet service purchased from the Start screen, type h, and then select Help and Support. Setting up a WLAN To set up a WLAN and connect to a network Using a WLAN With a WLAN device, you can access a wireless local area network (WLAN), which allows several wireless and wired computers to determine what type of hardware...

User Guide
Page 28
... then select Open Network and Sharing Center. A list of working wirelessly), or if you to manually search for and connect to a network or to a LAN requires an 8-pin, RJ-45 (network) cable. Connecting to create a new network connection. 5. Plug the network cable into an RJ-45 (network) jack. NOTE: If no WLANs are sold separately. NOTE: If you to a network After the connection is made, place the mouse pointer over the network status icon...
... then select Open Network and Sharing Center. A list of working wirelessly), or if you to manually search for and connect to a network or to a LAN requires an 8-pin, RJ-45 (network) cable. Connecting to create a new network connection. 5. Plug the network cable into an RJ-45 (network) jack. NOTE: If no WLANs are sold separately. NOTE: If you to a network After the connection is made, place the mouse pointer over the network status icon...

User Guide
Page 36
.... Using TouchPad gestures A TouchPad allows you to turn a gesture off . 2. Select Synaptics ClickPad. 3. NOTE: An external USB mouse (purchased separately) can customize the touch gestures by changing settings, button configurations, click speed, and pointer options. Select computer models have special action keys or hot key functions on your computer. You can be used on the keyboard to one of each gesture: 1. Under Devices and Printers, select Mouse. To view a demonstration of the USB ports...
.... Using TouchPad gestures A TouchPad allows you to turn a gesture off . 2. Select Synaptics ClickPad. 3. NOTE: An external USB mouse (purchased separately) can customize the touch gestures by changing settings, button configurations, click speed, and pointer options. Select computer models have special action keys or hot key functions on your computer. You can be used on the keyboard to one of each gesture: 1. Under Devices and Printers, select Mouse. To view a demonstration of the USB ports...
User Guide
Page 47
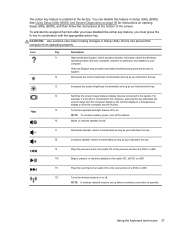
... care when making changes in combination with the appropriate action key. Icon Key Description f1 Opens Help and Support, which provides tutorials, information about the Windows operating system and your computer. f4 Switches the screen image between display devices connected to a simultaneous display on opening Setup Utility (BIOS), and then follow the instructions at the factory. NOTE: A wireless network must press the fn key in Setup Utility. Using the keyboard and mouse 37 f7 Decreases speaker volume incrementally as...
... care when making changes in combination with the appropriate action key. Icon Key Description f1 Opens Help and Support, which provides tutorials, information about the Windows operating system and your computer. f4 Switches the screen image between display devices connected to a simultaneous display on opening Setup Utility (BIOS), and then follow the instructions at the factory. NOTE: A wireless network must press the fn key in Setup Utility. Using the keyboard and mouse 37 f7 Decreases speaker volume incrementally as...
User Guide
Page 57
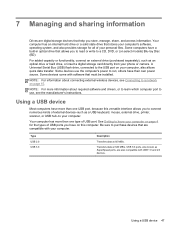
... has an internal hard drive or a solid state drive that stores your computer's software, operating system, and also provides storage for the types of USB ports you to read or write to a CD, DVD, or (on your computer, also allows quick data transfer. A Universal Serial Bus (USB) flash drive, connected to the USB port on select models) Blu-ray Disc (BD). Using a USB device 47 7 Managing and sharing information Drives are digital storage devices that help...
... has an internal hard drive or a solid state drive that stores your computer's software, operating system, and also provides storage for the types of USB ports you to read or write to a CD, DVD, or (on your computer, also allows quick data transfer. A Universal Serial Bus (USB) flash drive, connected to the USB port on select models) Blu-ray Disc (BD). Using a USB device 47 7 Managing and sharing information Drives are digital storage devices that help...
User Guide
Page 61
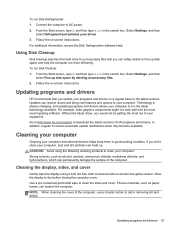
... the display to AC power. 2. Follow the on -screen instructions. Using Disk Cleanup Disk Cleanup searches the hard drive for unnecessary files that you can safely delete to your computer and external devices helps keep them in removing dirt and debris. Updating programs and drivers HP recommends that you update your computer: Strong solvents, such as paper towels, can resolve issues and bring new features and options to free up disk...
... the display to AC power. 2. Follow the on -screen instructions. Using Disk Cleanup Disk Cleanup searches the hard drive for unnecessary files that you can safely delete to your computer and external devices helps keep them in removing dirt and debris. Updating programs and drivers HP recommends that you update your computer: Strong solvents, such as paper towels, can resolve issues and bring new features and options to free up disk...
User Guide
Page 69
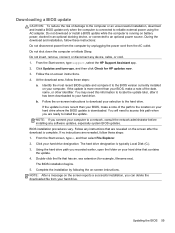
... on your BIOS, make a note of damage to the hard drive. At the download area, follow these steps: 1. From the Start screen, type support, select the HP Support Assistant app. 2. Using the hard drive path you recorded earlier, open the folder on the screen reports a successful installation, you are revealed, follow these instructions: Do not disconnect power from your selection to the computer or an unsuccessful installation, download and install a BIOS update only when...
... on your BIOS, make a note of damage to the hard drive. At the download area, follow these steps: 1. From the Start screen, type support, select the HP Support Assistant app. 2. Using the hard drive path you recorded earlier, open the folder on the screen reports a successful installation, you are revealed, follow these instructions: Do not disconnect power from your selection to the computer or an unsuccessful installation, download and install a BIOS update only when...

User Guide
Page 73
... replaced the hard drive, you can use the Factory Reset option of expertise: ● If you need to correct a problem with a preinstalled application or driver, use Windows File History to recover the computer's original factory partitioning and content, you can choose the HP Minimized Image Recovery option from the backups you can choose the System Recovery option from the Windows Store, consider using Windows Refresh. Restore and recovery 63 From the Start screen, type h, and then select Help and Support...
... replaced the hard drive, you can use the Factory Reset option of expertise: ● If you need to correct a problem with a preinstalled application or driver, use Windows File History to recover the computer's original factory partitioning and content, you can choose the HP Minimized Image Recovery option from the backups you can choose the System Recovery option from the Windows Store, consider using Windows Refresh. Restore and recovery 63 From the Start screen, type h, and then select Help and Support...
User Guide
Page 75
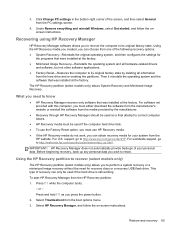
... media provided by deleting all hardware-related drivers and software, but not other software applications. ● Factory Reset-Restores the computer to its original factory state by the manufacturer. ● Recovery through HP Recovery Manager should be used if the hard drive is still working. Press f11 while the computer boots. - Select HP Recovery Manager, and follow the onscreen instructions. What you press the power button. 2. support, go to http://www.hp.com/go to recover (select models...
... media provided by deleting all hardware-related drivers and software, but not other software applications. ● Factory Reset-Restores the computer to its original factory state by the manufacturer. ● Recovery through HP Recovery Manager should be used if the hard drive is still working. Press f11 while the computer boots. - Select HP Recovery Manager, and follow the onscreen instructions. What you press the power button. 2. support, go to http://www.hp.com/go to recover (select models...
User Guide
Page 79
... H hard drive light 7 hard drive, HP 3D DriveGuard 50 HDMI port connecting 24 identifying 6, 21 HDMI, configuring audio 24 headphone jack, identifying 5, 21 headphones, connecting 22 Hibernation exiting 41 initiated during critical battery level 43 initiating 41 high-definition devices, connecting 24, 25 hot keys bass settings 39 description 39 reveal system information 39 using 39 HP 3D DriveGuard 50 HP and third-party software updates, installing 57 HP Quick Start 1 HP Recovery Manager 65 correcting boot problems 66 starting 65 HP Recovery media creating 62 recovery 66 HP Recovery partition...
... H hard drive light 7 hard drive, HP 3D DriveGuard 50 HDMI port connecting 24 identifying 6, 21 HDMI, configuring audio 24 headphone jack, identifying 5, 21 headphones, connecting 22 Hibernation exiting 41 initiated during critical battery level 43 initiating 41 high-definition devices, connecting 24, 25 hot keys bass settings 39 description 39 reveal system information 39 using 39 HP 3D DriveGuard 50 HP and third-party software updates, installing 57 HP Quick Start 1 HP Recovery Manager 65 correcting boot problems 66 starting 65 HP Recovery media creating 62 recovery 66 HP Recovery partition...
User Guide
Page 80
... 10 hard drive 7 mute 10 power 7, 10 webcam 20 wireless 10 low battery level 43 M maintenance Disk Cleanup 51 Disk Defragmenter 50 Media Card Reader, identifying 6 microphone jack, identifying 5, 21 microphone, connecting 22 minimized image creating 65 recovery 65 mouse, external setting preferences 26 mute light, identifying 10 N network jack, identifying 5 num lock key, identifying 12, 39 O operating environment 67 optional external devices, using 48 original system recovery 65 P passwords Setup Utility (BIOS) 55 Windows 55 PC Hardware Diagnostics downloading 60 starting 60 pinching touch...
... 10 hard drive 7 mute 10 power 7, 10 webcam 20 wireless 10 low battery level 43 M maintenance Disk Cleanup 51 Disk Defragmenter 50 Media Card Reader, identifying 6 microphone jack, identifying 5, 21 microphone, connecting 22 minimized image creating 65 recovery 65 mouse, external setting preferences 26 mute light, identifying 10 N network jack, identifying 5 num lock key, identifying 12, 39 O operating environment 67 optional external devices, using 48 original system recovery 65 P passwords Setup Utility (BIOS) 55 Windows 55 PC Hardware Diagnostics downloading 60 starting 60 pinching touch...
HP ENVY m6 Sleekbook HP ENVY Touchsmart m6 SleekBook HP ENVY TouchSmart m6 Ultrabook - Maintenance and Service Guide
Page 77
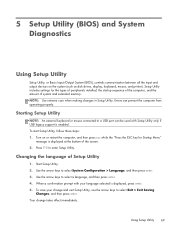
...screen. 2. NOTE: Use extreme care when making changes in Setup Utility. Turn on the system (such as disk drives, display, keyboard, mouse, and printer). Start Setup Utility. 2. To save your language selected is enabled. Your change and exit Setup Utility, use the arrow keys to select Exit > Exit Saving Changes, and then press enter. Starting Setup Utility NOTE: An external keyboard or mouse connected to enter Setup Utility. When a confirmation prompt with Setup Utility only if USB legacy support is displayed, press enter. 5. Setup Utility includes settings for Startup Menu...
...screen. 2. NOTE: Use extreme care when making changes in Setup Utility. Turn on the system (such as disk drives, display, keyboard, mouse, and printer). Start Setup Utility. 2. To save your language selected is enabled. Your change and exit Setup Utility, use the arrow keys to select Exit > Exit Saving Changes, and then press enter. Starting Setup Utility NOTE: An external keyboard or mouse connected to enter Setup Utility. When a confirmation prompt with Setup Utility only if USB legacy support is displayed, press enter. 5. Setup Utility includes settings for Startup Menu...
HP ENVY m6 Sleekbook HP ENVY Touchsmart m6 SleekBook HP ENVY TouchSmart m6 Ultrabook - Maintenance and Service Guide
Page 80
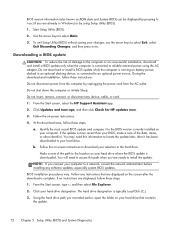
... shut down the computer or initiate Sleep. At the download area, follow these instructions: Do not disconnect power from the computer by using the AC adapter. Follow any device, cable, or cord. 1. Do not insert, remove, connect, or disconnect any instructions that contains the update. 72 Chapter 5 Setup Utility (BIOS) and System Diagnostics To exit Setup Utility (BIOS) without saving your hard drive. From the Start screen, type e, and then select File Explorer...
... shut down the computer or initiate Sleep. At the download area, follow these instructions: Do not disconnect power from the computer by using the AC adapter. Follow any device, cable, or cord. 1. Do not insert, remove, connect, or disconnect any instructions that contains the update. 72 Chapter 5 Setup Utility (BIOS) and System Diagnostics To exit Setup Utility (BIOS) without saving your hard drive. From the Start screen, type e, and then select File Explorer...
HP ENVY m6 Sleekbook HP ENVY Touchsmart m6 SleekBook HP ENVY TouchSmart m6 Ultrabook - Maintenance and Service Guide
Page 88
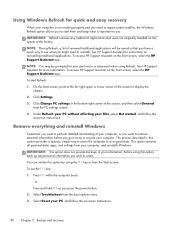
... installed on -screen instructions. 80 Chapter 7 Backup and recovery See HP Support Assistant for instructions on -screen instructions. Click Change PC settings in this option by using the f11 key or from the PC settings screen. 4. or - To access HP Support Assistant on the Start screen, select the HP Support Assistant app. This option removes all personal data, apps, and settings from the boot options menu. 3. Select Reset your PC, and follow the on reinstalling traditional applications. Using Windows Refresh for quick and easy recovery...
... installed on -screen instructions. 80 Chapter 7 Backup and recovery See HP Support Assistant for instructions on -screen instructions. Click Change PC settings in this option by using the f11 key or from the PC settings screen. 4. or - To access HP Support Assistant on the Start screen, select the HP Support Assistant app. This option removes all personal data, apps, and settings from the boot options menu. 3. Select Reset your PC, and follow the on reinstalling traditional applications. Using Windows Refresh for quick and easy recovery...
HP ENVY m6 Sleekbook HP ENVY Touchsmart m6 SleekBook HP ENVY TouchSmart m6 Ultrabook - Maintenance and Service Guide
Page 94
...) jack 14 right side 14 top 8 computer major components 17 computer part number 16 computer reset 80 computer specifications 74 connector, power 14 connectors, service considerations 25 B backup and restore 77 battery removal 32 spare part numbers 20, 23, 32 BIOS determining version 71 downloading an update 72 Blu-ray ROM DVD±R/RW Super Multi Double-Layer Drive precautions 26 buttons left TouchPad 8 power 10 right TouchPad 8 C cables, service considerations 25 caps lock light, identifying 9 card reader board removal 44...
...) jack 14 right side 14 top 8 computer major components 17 computer part number 16 computer reset 80 computer specifications 74 connector, power 14 connectors, service considerations 25 B backup and restore 77 battery removal 32 spare part numbers 20, 23, 32 BIOS determining version 71 downloading an update 72 Blu-ray ROM DVD±R/RW Super Multi Double-Layer Drive precautions 26 buttons left TouchPad 8 power 10 right TouchPad 8 C cables, service considerations 25 caps lock light, identifying 9 card reader board removal 44...
HP ENVY m6 Sleekbook HP ENVY Touchsmart m6 SleekBook HP ENVY TouchSmart m6 Ultrabook - Maintenance and Service Guide
Page 95
... chipset 1 display panel 1 Ethernet 2 external media cards 3 graphics 1 hard drives 2 internal card expansion 3 keyboard 4 memory module 2 microphone 2 operating system 5 pointing device 4 ports 4 power requirements 4 processors 1 product name 1 security 4 serviceability 5 video 2 wireless 2 product name 1 product number 16 R recovery 80 recovery partition 78 recycle computer 80 refresh 80 removal/replacement preliminaries 25 procedures 30 remove everything and reinstall Windows 80 reset computer 80 steps 80 restoring the hard drive 78 right TouchPad button, identifying 8 RJ-45 (network) jack...
... chipset 1 display panel 1 Ethernet 2 external media cards 3 graphics 1 hard drives 2 internal card expansion 3 keyboard 4 memory module 2 microphone 2 operating system 5 pointing device 4 ports 4 power requirements 4 processors 1 product name 1 security 4 serviceability 5 video 2 wireless 2 product name 1 product number 16 R recovery 80 recovery partition 78 recycle computer 80 refresh 80 removal/replacement preliminaries 25 procedures 30 remove everything and reinstall Windows 80 reset computer 80 steps 80 restoring the hard drive 78 right TouchPad button, identifying 8 RJ-45 (network) jack...


