User Guide
Page 8
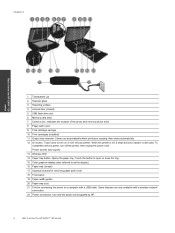
...HP ENVY 120 series 1 Transparent Lid 2 Scanner glass 3 Scanning surface 4 Access door (closed ) 17 Squeeze buttons for removing paper path cover 18 Front panel 19 Paper-width guides 20 Paper tray (out) 21 Port for connecting the printer to a computer with a wireless network connection. 22 Power connection. Printer access door (open or close... features are only available with a USB cable. Opens the paper tray. Use only the power cord supplied by HP. 6 Get to turn on or turn off your printer. When the printer is still used. Chapter 2 Get to know the HP ENVY 120 series
...HP ENVY 120 series 1 Transparent Lid 2 Scanner glass 3 Scanning surface 4 Access door (closed ) 17 Squeeze buttons for removing paper path cover 18 Front panel 19 Paper-width guides 20 Paper tray (out) 21 Port for connecting the printer to a computer with a wireless network connection. 22 Power connection. Printer access door (open or close... features are only available with a USB cable. Opens the paper tray. Use only the power cord supplied by HP. 6 Get to turn on or turn off your printer. When the printer is still used. Chapter 2 Get to know the HP ENVY 120 series

User Guide
Page 28
Remove cartridge from packaging. b. Place new cartridge in slot at an angle under the opened lid. Insert new cartridge. a. c. d. Squeeze the lid closed as the cartridge slides into place. Close access door. 26 Work with cartridges Chapter 7 3. Work with cartridges
Remove cartridge from packaging. b. Place new cartridge in slot at an angle under the opened lid. Insert new cartridge. a. c. d. Squeeze the lid closed as the cartridge slides into place. Close access door. 26 Work with cartridges Chapter 7 3. Work with cartridges
User Guide
Page 31
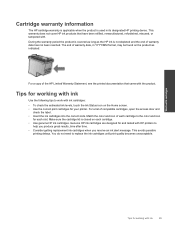
.... For a list of each cartridge to work with ink 29 Match the color and icon of compatible cartridges, open the access door and check the label. • Insert the ink cartridges into the correct slots. This avoids possible printing delays. Make sure the cartridge... lid is closed on each slot. Genuine HP ink cartridges are designed for each cartridge. • Use genuine HP ink cartridges. This warranty does not cover HP ink products that came with HP printers to replace the ink cartridges until print quality becomes...
.... For a list of each cartridge to work with ink 29 Match the color and icon of compatible cartridges, open the access door and check the label. • Insert the ink cartridges into the correct slots. This avoids possible printing delays. Make sure the cartridge... lid is closed on each slot. Genuine HP ink cartridges are designed for each cartridge. • Use genuine HP ink cartridges. This warranty does not cover HP ink products that came with HP printers to replace the ink cartridges until print quality becomes...
User Guide
Page 42
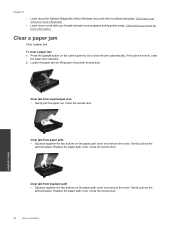
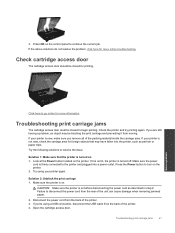
... Solve a problem Clear a paper jam Clear a paper jam. Locate the paper jam by lifting open the printer access door. Close the access door. Close the access door. Replace the paper path cover. Clear jam from paper path • Squeeze together the two buttons on the control panel to try to clear the ...
... Solve a problem Clear a paper jam Clear a paper jam. Locate the paper jam by lifting open the printer access door. Close the access door. Close the access door. Replace the paper path cover. Clear jam from paper path • Squeeze together the two buttons on the control panel to try to clear the ...
User Guide
Page 43
... that the printer is not new, check the carriage area for more online troubleshooting. Troubleshooting print carriage jams The cartridge access door must be closed for more information. Try the following solutions to disconnect the power cord from the back of the unit can cause damage when... removing jammed paper. 2. Solution 1: Make sure that may be closed to continue the current job. Check cartridge access door The cartridge access door should be blocking the print carriage and preventing it is not lit, the printer is new, make sure...
... that the printer is not new, check the carriage area for more online troubleshooting. Troubleshooting print carriage jams The cartridge access door must be closed for more information. Try the following solutions to disconnect the power cord from the back of the unit can cause damage when... removing jammed paper. 2. Solution 1: Make sure that may be closed to continue the current job. Check cartridge access door The cartridge access door should be blocking the print carriage and preventing it is not lit, the printer is new, make sure...
User Guide
Page 44
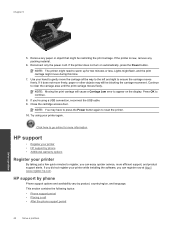
...does not move during this time. 7. Press OK to appear on automatically, press the Power button. If you can register now at http:// www.register.hp.com. This section contains the following topics: • Phone support period • Placing a call • After the phone support period 42 Solve a... or other objects may have to press the Power button again to clear the carriage area until the print carriage moves freely. Close the cartridge access door. Click here to register, you did not register your printer again. Use your printer By taking just a few quick minutes to...
...does not move during this time. 7. Press OK to appear on automatically, press the Power button. If you can register now at http:// www.register.hp.com. This section contains the following topics: • Phone support period • Placing a call • After the phone support period 42 Solve a... or other objects may have to press the Power button again to clear the carriage area until the print carriage moves freely. Close the cartridge access door. Click here to register, you did not register your printer again. Use your printer By taking just a few quick minutes to...


