
HP USB Digital Drive
Page 9
Disconnecting the Digital Drive ✎ Do not attempt to Remove Hardware" message appears on your taskbar. Gently unplug the Digital Drive from the USB port. ✎ If the USB connector cable is flashing. 1. Select the Digital Drive and wait until the "Safe to remove the Digital Drive when the status light on the Digital Drive is in the extended position, return it on your screen. 3. Select the "Safely Remove Hardware" icon on its track for safe storage. 8 User Guide A dialog box displays a list of connected devices. 2.
Disconnecting the Digital Drive ✎ Do not attempt to Remove Hardware" message appears on your taskbar. Gently unplug the Digital Drive from the USB port. ✎ If the USB connector cable is flashing. 1. Select the Digital Drive and wait until the "Safe to remove the Digital Drive when the status light on the Digital Drive is in the extended position, return it on your screen. 3. Select the "Safely Remove Hardware" icon on its track for safe storage. 8 User Guide A dialog box displays a list of connected devices. 2.
Bluetooth Wireless Technology Basics
Page 6
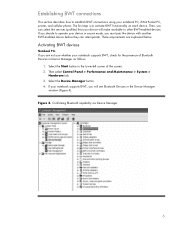
... the device with another BWT-enabled device before they can select the services (profiles) that your notebook supports BWT, check for the presence of the screen. 2. The first step is to establish BWT connections using your notebook supports BWT, you can interoperate. Then select Control Panel > Performance and Maintenance > System > Hardware...
... the device with another BWT-enabled device before they can select the services (profiles) that your notebook supports BWT, check for the presence of the screen. 2. The first step is to establish BWT connections using your notebook supports BWT, you can interoperate. Then select Control Panel > Performance and Maintenance > System > Hardware...

Bluetooth Wireless Technology Basics
Page 7
...Bluetooth status Disabled Enabled Connected Blue with red logo Blue with white logo Blue with green logo If BWT is off, turn on HP notebook PCs; Install the BWT software. 2. Install the BWT software The required BWT software comes preloaded on the wireless device for ..., and then select Next. 4. Select Start > All Programs > Software Setup. 2. The color of the icon indicates the status of the screen. Select Finish to complete the installation and to Bluetooth operations. Right-click the Bluetooth icon, and then select Explore My Bluetooth Places. 2. These...
...Bluetooth status Disabled Enabled Connected Blue with red logo Blue with white logo Blue with green logo If BWT is off, turn on HP notebook PCs; Install the BWT software. 2. Install the BWT software The required BWT software comes preloaded on the wireless device for ..., and then select Next. 4. Select Start > All Programs > Software Setup. 2. The color of the icon indicates the status of the screen. Select Finish to complete the installation and to Bluetooth operations. Right-click the Bluetooth icon, and then select Explore My Bluetooth Places. 2. These...

Bluetooth Wireless Technology Basics
Page 8
... D D D D D D Profile Description Basic printing Dial-up networking File transfer Enables simpler printing from /to another BWT-enabled device. 8 HP products D = supported by selecting the Start menu, and then selecting Bluetooth Manager. If you install the printer software on a cell phone can ...default BWT settings and set the level of discoverability of the Today screen to activate BWT functionality, to create BWT connections, or to the HP wireless product portfolio. Table 2. Printers The HP 995c Deskjet printer and some of available profiles. Selecting BWT device ...
... D D D D D D Profile Description Basic printing Dial-up networking File transfer Enables simpler printing from /to another BWT-enabled device. 8 HP products D = supported by selecting the Start menu, and then selecting Bluetooth Manager. If you install the printer software on a cell phone can ...default BWT settings and set the level of discoverability of the Today screen to activate BWT functionality, to create BWT connections, or to the HP wireless product portfolio. Table 2. Printers The HP 995c Deskjet printer and some of available profiles. Selecting BWT device ...

Backup and Recovery - Windows Vista
Page 6
NOTE: If your computer does not include an internal optical drive, you can use CDs, up the computer for your computer from the HP Web site. NOTE: If you can purchase recovery discs for the first time. If you use an optional external optical drive (purchased separately) to...after setting up to 20 discs may be required, whereas only a few DVDs or BDs are operating the computer on -screen instructions. 2 Chapter 2 Creating recovery discs 2 Creating recovery discs HP recommends that you create recovery discs to be sure that you can restore your system to its original factory state if...
NOTE: If your computer does not include an internal optical drive, you can use CDs, up the computer for your computer from the HP Web site. NOTE: If you can purchase recovery discs for the first time. If you use an optional external optical drive (purchased separately) to...after setting up to 20 discs may be required, whereas only a few DVDs or BDs are operating the computer on -screen instructions. 2 Chapter 2 Creating recovery discs 2 Creating recovery discs HP recommends that you create recovery discs to be sure that you can restore your system to its original factory state if...
Backup and Recovery - Windows Vista
Page 9
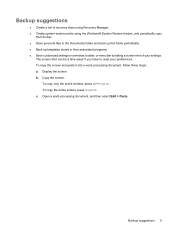
...discs using Recovery Manager. ● Create system restore points using the Windows® System Restore feature, and periodically copy them to reset your settings. The screen shot can be a time-saver if you have to disc. ● Store personal files in the Documents folder and back up this folder periodically. &#...9679; Back up templates stored in their associated programs. ● Save customized settings in a window, toolbar, or menu bar by taking a screen shot of your preferences. Copy the screen: To copy only the active window, press alt+fn+prt sc.
...discs using Recovery Manager. ● Create system restore points using the Windows® System Restore feature, and periodically copy them to reset your settings. The screen shot can be a time-saver if you have to disc. ● Store personal files in the Documents folder and back up this folder periodically. &#...9679; Back up templates stored in their associated programs. ● Save customized settings in a window, toolbar, or menu bar by taking a screen shot of your preferences. Copy the screen: To copy only the active window, press alt+fn+prt sc.
Backup and Recovery - Windows Vista
Page 10
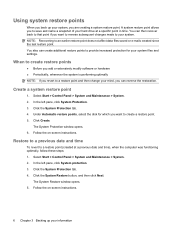
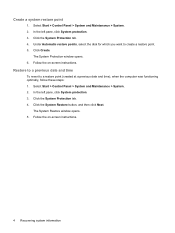
... left pane, click System protection. 3. Click Create. Select Start > Control Panel > System and Maintenance > System. 2. Follow the on -screen instructions. You also can create additional restore points to create a restore point. 5. Under Automatic restore points, select the disk for your system ...files and settings. Follow the on -screen instructions. 6 Chapter 3 Backing up your system, you can reverse the restoration. The System Protection window opens. 6. Restore to a ...
... left pane, click System protection. 3. Click Create. Select Start > Control Panel > System and Maintenance > System. 2. Follow the on -screen instructions. You also can create additional restore points to create a restore point. 5. Under Automatic restore points, select the disk for your system ...files and settings. Follow the on -screen instructions. 6 Chapter 3 Backing up your system, you can reverse the restoration. The System Protection window opens. 6. Restore to a ...
Backup and Recovery - Windows Vista
Page 11
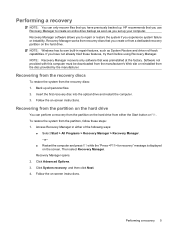
...personal files. 2. Follow the on the hard drive. NOTE: Windows has its own built-in repair features, such as you use HP Recovery Manager to repair or restore the system if you have a recovery partition. If you experience system failure or instability. Recovering from... the recovery discs To restore the system from a dedicated recovery partition (select models only) on -screen instructions. Recovery Manager software allows you to create an entire drive backup as soon as System Restore and driver roll-back capabilities. Recovering...
...personal files. 2. Follow the on the hard drive. NOTE: Windows has its own built-in repair features, such as you use HP Recovery Manager to repair or restore the system if you have a recovery partition. If you experience system failure or instability. Recovering from... the recovery discs To restore the system from a dedicated recovery partition (select models only) on -screen instructions. Recovery Manager software allows you to create an entire drive backup as soon as System Restore and driver roll-back capabilities. Recovering...
Backup and Recovery - Windows Vista
Page 12
To restore the system from the partition, follow these discs to it's factory condition. Click Advanced Options. 3. Follow the on the screen. Use these steps: 1. Access Recovery Manager in either the Start button or f11. This restores the computer to recover your computer includes an SSD, you ... Manager > Recovery Manager. - Click System recovery, and then click Next. 4. Then select Recovery Manager. Recovery discs have been included for recovery" message is displayed on -screen instructions. 8 Chapter 4 Performing a recovery Recovery Manager opens. 2.
To restore the system from the partition, follow these discs to it's factory condition. Click Advanced Options. 3. Follow the on the screen. Use these steps: 1. Access Recovery Manager in either the Start button or f11. This restores the computer to recover your computer includes an SSD, you ... Manager > Recovery Manager. - Click System recovery, and then click Next. 4. Then select Recovery Manager. Recovery discs have been included for recovery" message is displayed on -screen instructions. 8 Chapter 4 Performing a recovery Recovery Manager opens. 2.
Backup and Recovery - Windows Vista
Page 8
... discs: 1. Select Start > All Programs > Recovery Manager > Recovery Manager. Click Recovery disc creation, and then click Next. 4. The recovery discs are operating the computer on -screen instructions. 2 Recovering system information The next time you open Recovery Manager, you will be created per computer. ● Number each disc before inserting it into...
... discs: 1. Select Start > All Programs > Recovery Manager > Recovery Manager. Click Recovery disc creation, and then click Next. 4. The recovery discs are operating the computer on -screen instructions. 2 Recovering system information The next time you open Recovery Manager, you will be created per computer. ● Number each disc before inserting it into...
Backup and Recovery - Windows Vista
Page 9
... hardware or software Backup suggestions ● Create a set of your system files and settings. NOTE: Recovering to your preferences. Display the screen. When to provide increased protection for your settings. You can be a time saver if you want to reverse subsequent changes made to an... earlier restore point does not affect data files saved or e-mails created since the last restore point. To copy the screen and paste it into a word-processing document, follow these folders periodically. ● Back up templates stored in their associated programs. ●...
... hardware or software Backup suggestions ● Create a set of your system files and settings. NOTE: Recovering to your preferences. Display the screen. When to provide increased protection for your settings. You can be a time saver if you want to reverse subsequent changes made to an... earlier restore point does not affect data files saved or e-mails created since the last restore point. To copy the screen and paste it into a word-processing document, follow these folders periodically. ● Back up templates stored in their associated programs. ●...
Backup and Recovery - Windows Vista
Page 10
Create a system restore point 1. Click the System Protection tab. 4. Follow the on -screen instructions. Follow the on -screen instructions. 4 Recovering system information Click the System Protection tab. 4. In the left pane, click System protection. 3. Click the System Restore button, and then click Next. ...
Create a system restore point 1. Click the System Protection tab. 4. Follow the on -screen instructions. Follow the on -screen instructions. 4 Recovering system information Click the System Protection tab. 4. In the left pane, click System protection. 3. Click the System Restore button, and then click Next. ...
Backup and Recovery - Windows Vista
Page 11
... files. 2. Back up your computer. Click Advanced Options. 3. Follow the on -screen instructions. Recovering from the recovery discs To restore the system from the disc provided by the manufacturer. Follow the on... -screen instructions. Access Recovery Manager in repair features, such as you create or from a dedicated recovery... the computer and press f11 while the "Press for recovery" message is displayed on the screen. Insert the first recovery disc into the optical drive and restart the computer...
... files. 2. Back up your computer. Click Advanced Options. 3. Follow the on -screen instructions. Recovering from the recovery discs To restore the system from the disc provided by the manufacturer. Follow the on... -screen instructions. Access Recovery Manager in repair features, such as you create or from a dedicated recovery... the computer and press f11 while the "Press for recovery" message is displayed on the screen. Insert the first recovery disc into the optical drive and restart the computer...
Drives - Windows Vista
Page 8
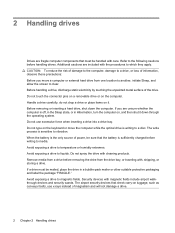
... media from a drive before handling drives. Refer to the following cautions before removing the drive from one location to another, initiate Sleep, and allow the screen to clear. Do not touch the connector pins on a removable drive or on luggage, such as conveyor belts, use excessive force when inserting a drive into...
... media from a drive before handling drives. Refer to the following cautions before removing the drive from one location to another, initiate Sleep, and allow the screen to clear. Do not touch the connector pins on a removable drive or on luggage, such as conveyor belts, use excessive force when inserting a drive into...
Drives - Windows Vista
Page 14
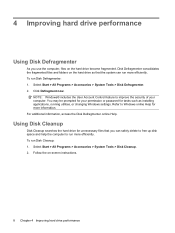
.... You may be prompted for more information. For additional information, access the Disk Defragmenter online Help. Disk Defragmenter consolidates the fragmented files and folders on -screen instructions. 8 Chapter 4 Improving hard drive performance To run Disk Cleanup: 1. NOTE: Windows® includes the User Account Control feature to Windows online Help for your...
.... You may be prompted for more information. For additional information, access the Disk Defragmenter online Help. Disk Defragmenter consolidates the fragmented files and folders on -screen instructions. 8 Chapter 4 Improving hard drive performance To run Disk Cleanup: 1. NOTE: Windows® includes the User Account Control feature to Windows online Help for your...
Security - Windows Vista
Page 8
... for a Setup Utility feature and for more than one Setup Utility feature. For additional information about Windows passwords, such as they are not displayed as screen-saver passwords, select Start > Help and Support. 2 Chapter 2 Using passwords CAUTION: To prevent being locked out of characters that could be easily discovered by the...
... for a Setup Utility feature and for more than one Setup Utility feature. For additional information about Windows passwords, such as they are not displayed as screen-saver passwords, select Start > Help and Support. 2 Chapter 2 Using passwords CAUTION: To prevent being locked out of characters that could be easily discovered by the...
Security - Windows Vista
Page 10
...the computer, and then pressing f10 while the setup message is set, entered, changed, or deleted. Power-on password Your power-on the screen. After this password: 1. Managing a power-on or restart the computer, or exit Hibernation. Your preferences go into effect when the computer ... preferences and exit Setup Utility, press f10, and then follow the instructions on password prevents unauthorized use of the computer. A power-on the screen. 4 Chapter 2 Using passwords To save your current password in the Enter Current Password field, and then press enter 4 times. 3. Use the...
...the computer, and then pressing f10 while the setup message is set, entered, changed, or deleted. Power-on password Your power-on the screen. After this password: 1. Managing a power-on or restart the computer, or exit Hibernation. Your preferences go into effect when the computer ... preferences and exit Setup Utility, press f10, and then follow the instructions on password prevents unauthorized use of the computer. A power-on the screen. 4 Chapter 2 Using passwords To save your current password in the Enter Current Password field, and then press enter 4 times. 3. Use the...

Security - Windows Vista
Page 18
... a Windows password or skip this step by clicking Next. Click the finger on to register. Registering fingerprints A fingerprint reader allows you to log on the screen that corresponds to the finger you want to the computer must repeat steps 1 through 7 to register more fingerprints. The "Fingerprint Registration Training" page opens. 4. NOTE...
... a Windows password or skip this step by clicking Next. Click the finger on to register. Registering fingerprints A fingerprint reader allows you to log on the screen that corresponds to the finger you want to the computer must repeat steps 1 through 7 to register more fingerprints. The "Fingerprint Registration Training" page opens. 4. NOTE...
Setup Utility - Windows Vista
Page 5
...-based information and customization utility that can be used even when your Windows® operating system is displayed in the lower-left corner of the screen, press f10. 1 The utility reports information about the computer and provides settings for startup, security, and other preferences.
...-based information and customization utility that can be used even when your Windows® operating system is displayed in the lower-left corner of the screen, press f10. 1 The utility reports information about the computer and provides settings for startup, security, and other preferences.
Setup Utility - Windows Vista
Page 6
To start the Setup Utility, turn on the screen. Use the arrow keys to select a language. 4. Navigation and selection are by keystroke. ● To choose a menu or a menu item, use the arrow keys. ● ... the Setup Utility. 2 Using the Setup Utility Changing the language of the Setup Utility The following procedure explains how to change the language of the screen. 2. If the Setup Utility is open, press f1. 2 Chapter 2 Using the Setup Utility Press f5 or f6 (or use either the arrow keys or f5...
To start the Setup Utility, turn on the screen. Use the arrow keys to select a language. 4. Navigation and selection are by keystroke. ● To choose a menu or a menu item, use the arrow keys. ● ... the Setup Utility. 2 Using the Setup Utility Changing the language of the Setup Utility The following procedure explains how to change the language of the screen. 2. If the Setup Utility is open, press f1. 2 Chapter 2 Using the Setup Utility Press f5 or f6 (or use either the arrow keys or f5...


