HP Color LaserJet CP1510 Series - Software Technical Reference
Page 45
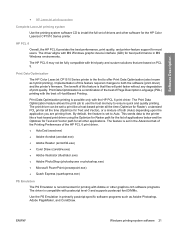
Implementation of this feature is that are printing from. The driver aligns with the best of drivers and other software for the HP Color LaserJet CP1510 Series printer. Print Data Optimization is set of Host-Based Printing. The Print Data Optimization feature ...both the software (print driver) and the printer's firmware. This sends data to the printer like a host-based printer all the time (Optimize for best performance in MS Windows environments. Print Data Optimization The HP Color LaserJet CP1510 Series printer is compatible with postscript level-3 and supports ...
Implementation of this feature is that are printing from. The driver aligns with the best of drivers and other software for the HP Color LaserJet CP1510 Series printer. Print Data Optimization is set of Host-Based Printing. The Print Data Optimization feature ...both the software (print driver) and the printer's firmware. This sends data to the printer like a host-based printer all the time (Optimize for best performance in MS Windows environments. Print Data Optimization The HP Color LaserJet CP1510 Series printer is compatible with postscript level-3 and supports ...

HP Color LaserJet CP1510 Series - User Guide
Page 99
3. Remove the new DIMM from the antistatic package, and then locate the alignment notch on the bottom edge of the DIMM slot, lift the DIMM up at an angle. ENWW Work with the bar in the DIMM slot at an angle, and pull it out. 4. Holding the DIMM by the edges, align the notch on each side of the DIMM. 5. To replace a DIMM that is currently installed, spread the latches apart on the DIMM with memory 89
3. Remove the new DIMM from the antistatic package, and then locate the alignment notch on the bottom edge of the DIMM slot, lift the DIMM up at an angle. ENWW Work with the bar in the DIMM slot at an angle, and pull it out. 4. Holding the DIMM by the edges, align the notch on each side of the DIMM. 5. To replace a DIMM that is currently installed, spread the latches apart on the DIMM with memory 89

HP Color LaserJet CP1510 Series - User Guide
Page 100
Close the DIMM access door. 8. 6. If the DIMM still does not go in, make sure that you have difficulty inserting the DIMM, make sure that the notch on page 91. 90 Chapter 9 Manage and maintain ENWW Reconnect the power cable and USB or network cable, and then turn on the DIMM until both latches engage the DIMM. When the installation is aligned with the bar in the slot. Push down on the product. 9. After installing a memory DIMM, see Enable memory on the bottom of the DIMM is correct, the metal contacts are using the correct DIMM type. 7. NOTE: If you are not visible.
Close the DIMM access door. 8. 6. If the DIMM still does not go in, make sure that you have difficulty inserting the DIMM, make sure that the notch on page 91. 90 Chapter 9 Manage and maintain ENWW Reconnect the power cable and USB or network cable, and then turn on the DIMM until both latches engage the DIMM. When the installation is aligned with the bar in the slot. Push down on the product. 9. After installing a memory DIMM, see Enable memory on the bottom of the DIMM is correct, the metal contacts are using the correct DIMM type. 7. NOTE: If you are not visible.


