HP Business Notebook Password Localization Guidelines
Page 10
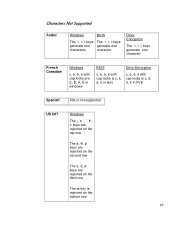
Characters Not Supported Arabic Windows BIOS The keys The keys generate two generate one characters character Drive Encryption The keys generate one character French Canadian Windows with cap locks are in windows BIOS with cap locks is in bios Drive Encryption with cap locks is in FVE Spanish 40a is not supported US Int'l Windows The keys are rejected on the top row The å, ®, þ keys are rejected on the second row The á, ð, ø keys are rejected on the third row The æ key is rejected on the bottom row 10
Characters Not Supported Arabic Windows BIOS The keys The keys generate two generate one characters character Drive Encryption The keys generate one character French Canadian Windows with cap locks are in windows BIOS with cap locks is in bios Drive Encryption with cap locks is in FVE Spanish 40a is not supported US Int'l Windows The keys are rejected on the top row The å, ®, þ keys are rejected on the second row The á, ð, ø keys are rejected on the third row The æ key is rejected on the bottom row 10
Trusted Execution Technology and Tboot Implementation
Page 3
...stating that choose a password of mercurial from internet if you haven't already done (see Appendix B). 2. make mrproper 10.make install 3 Disabled. cd linux-2.6.18-xen-3.3.0 9. unselect/exclude all excluded options (M, implies Module) g. Choose Yes to take effect...xen/release/3.3.0/linux-2.6.18-xen-3.3.0.tar.gz download this takes >30 minutes) 14.make modules_install 15.make menuconfig 11.In the Linux Kernel Configuration window set the proxy options as, export http_proxy=: 4. Don't install boot loader password or select 'configure advance boot loader options'. Disabled, ...
...stating that choose a password of mercurial from internet if you haven't already done (see Appendix B). 2. make mrproper 10.make install 3 Disabled. cd linux-2.6.18-xen-3.3.0 9. unselect/exclude all excluded options (M, implies Module) g. Choose Yes to take effect...xen/release/3.3.0/linux-2.6.18-xen-3.3.0.tar.gz download this takes >30 minutes) 14.make modules_install 15.make menuconfig 11.In the Linux Kernel Configuration window set the proxy options as, export http_proxy=: 4. Don't install boot loader password or select 'configure advance boot loader options'. Disabled, ...
Modem and Local Area Network - Windows 7
Page 9
... 9. NOTE: You must set up an initial (current) location area code before you can use in other countries. Click New. (The New Location window is not made. To add a location setting for accessing an outside line (if necessary). 8. Select a country or region from the settings in which... tab. If you do not delete your new location setting. (The Phone and Modem window is displayed by the computer so that you can add multiple location settings for USA or UK is displayed.) 10. Enter the area code, a carrier code (if necessary), and the number to different...
... 9. NOTE: You must set up an initial (current) location area code before you can use in other countries. Click New. (The New Location window is not made. To add a location setting for accessing an outside line (if necessary). 8. Select a country or region from the settings in which... tab. If you do not delete your new location setting. (The Phone and Modem window is displayed by the computer so that you can add multiple location settings for USA or UK is displayed.) 10. Enter the area code, a carrier code (if necessary), and the number to different...

HP ProtectTools - Windows Vista and Windows XP
Page 3
...HP ProtectTools credentials 10 Backing up credentials and settings 10 2 Credential Manager for HP ProtectTools Setup procedures ...11 Logging on to Credential Manager 11 Using the Credential Manager Logon Wizard 12 Registering credentials ...12 Registering fingerprints 12 Setting up the fingerprint reader 13 Using your registered fingerprint to log on to Windows...Creating a virtual token ...15 Changing the Windows logon password 15 Changing a token PIN ...15 Locking the computer (workstation 16 Using Windows Logon ...16 Logging on to Windows with Credential Manager 16 Using Single Sign ...
...HP ProtectTools credentials 10 Backing up credentials and settings 10 2 Credential Manager for HP ProtectTools Setup procedures ...11 Logging on to Credential Manager 11 Using the Credential Manager Logon Wizard 12 Registering credentials ...12 Registering fingerprints 12 Setting up the fingerprint reader 13 Using your registered fingerprint to log on to Windows...Creating a virtual token ...15 Changing the Windows logon password 15 Changing a token PIN ...15 Locking the computer (workstation 16 Using Windows Logon ...16 Logging on to Windows with Credential Manager 16 Using Single Sign ...
HP ProtectTools - Windows Vista and Windows XP
Page 102
... Manager 75 backing up and restoring certification information 72 Embedded Security 72 HP ProtectTools credentials 10 Single Sign On data 18 basic user account 70 Basic User Key password... registering 12 custom authentication requirements 23 fingerprint log on 13 fingerprint reader 13 lock workstation 16 locking computer 16 logging on 11 logon password 8 logon specifications 22 logon...token, creating 15 Windows Logon 16 Windows logon password, changing 15 Windows logon, allow 24 D data, restricting access to 6 decrypting a drive 26 Device Access Manager for HP ProtectTools background service ...
... Manager 75 backing up and restoring certification information 72 Embedded Security 72 HP ProtectTools credentials 10 Single Sign On data 18 basic user account 70 Basic User Key password... registering 12 custom authentication requirements 23 fingerprint log on 13 fingerprint reader 13 lock workstation 16 locking computer 16 logging on 11 logon password 8 logon specifications 22 logon...token, creating 15 Windows Logon 16 Windows logon password, changing 15 Windows logon, allow 24 D data, restricting access to 6 decrypting a drive 26 Device Access Manager for HP ProtectTools background service ...
HP ProtectTools - Windows Vista and Windows XP
Page 103
... 9 K key security objectives 6 L lock workstation 16 locking computer 16 O objectives, security 6 owner password changing 73 definition 9 setting 70 P password Basic User Key 72 BIOS administrator 60 changing owner 73 emergency recovery token 70 guidelines 10 HP ProtectTools 8 managing 8 owner 70 policies, creating 7 resetting user 73 secure, creating 10 Windows 60 Windows logon 15 personal secure drive...
... 9 K key security objectives 6 L lock workstation 16 locking computer 16 O objectives, security 6 owner password changing 73 definition 9 setting 70 P password Basic User Key 72 BIOS administrator 60 changing owner 73 emergency recovery token 70 guidelines 10 HP ProtectTools 8 managing 8 owner 70 policies, creating 7 resetting user 73 secure, creating 10 Windows 60 Windows logon 15 personal secure drive...
Security - Windows XP, Windows Vista and Windows 7
Page 3
...the computer 2 Using passwords Setting passwords in Windows ...3 Setting passwords in Computer Setup 4 BIOS administrator password ...5 Managing a BIOS administrator password 6 Entering a BIOS administrator password 7 Using Computer Setup DriveLock ...8 Setting a DriveLock password 9 Entering a DriveLock password 10 Changing a DriveLock password 11 Removing DriveLock protection... IDs ...16 4 Using antivirus software 5 Using firewall software 6 Installing critical security updates 7 Using HP ProtectTools Security Manager (select models only) 8 Installing a security cable Index ...22 iii
...the computer 2 Using passwords Setting passwords in Windows ...3 Setting passwords in Computer Setup 4 BIOS administrator password ...5 Managing a BIOS administrator password 6 Entering a BIOS administrator password 7 Using Computer Setup DriveLock ...8 Setting a DriveLock password 9 Entering a DriveLock password 10 Changing a DriveLock password 11 Removing DriveLock protection... IDs ...16 4 Using antivirus software 5 Using firewall software 6 Installing critical security updates 7 Using HP ProtectTools Security Manager (select models only) 8 Installing a security cable Index ...22 iii

Wireless (Select Models Only) - Windows Vista and Windows XP
Page 14
Roaming to another WLAN, Windows attempts to connect to your computer is automatically connected to the new network. If Windows does not recognize the new network, follow the same procedure you move your computer within range of another network When you used initially to connect to that network. If the attempt is successful, your WLAN. 10 Chapter 2 Using a WLAN
Roaming to another WLAN, Windows attempts to connect to your computer is automatically connected to the new network. If Windows does not recognize the new network, follow the same procedure you move your computer within range of another network When you used initially to connect to that network. If the attempt is successful, your WLAN. 10 Chapter 2 Using a WLAN

Wireless (Select Models Only) - Windows XP
Page 14
If the attempt is successful, your computer within range of another network When you used initially to connect to your WLAN. 10 Chapter 2 Using a WLAN Roaming to another WLAN, Windows attempts to connect to that network. If Windows does not recognize the new network, follow the same procedure you move your computer is automatically connected to the new network.
If the attempt is successful, your computer within range of another network When you used initially to connect to your WLAN. 10 Chapter 2 Using a WLAN Roaming to another WLAN, Windows attempts to connect to that network. If Windows does not recognize the new network, follow the same procedure you move your computer is automatically connected to the new network.

ProtectTools (Select Models Only) - Windows 7
Page 3
...HP ProtectTools credentials 10 Backing up credentials and settings 10 2 Credential Manager for HP ProtectTools Setup procedures ...12 Logging on to Credential Manager 12 Using the Credential Manager Logon Wizard 12 Registering credentials ...12 Registering fingerprints 12 Setting up the fingerprint reader 13 Using your registered fingerprint to log on to Windows...Creating a virtual token ...15 Changing the Windows logon password 15 Changing a token PIN ...15 Locking the computer (workstation 17 Using Windows Logon ...17 Logging on to Windows with Credential Manager 17 Using Single Sign ...
...HP ProtectTools credentials 10 Backing up credentials and settings 10 2 Credential Manager for HP ProtectTools Setup procedures ...12 Logging on to Credential Manager 12 Using the Credential Manager Logon Wizard 12 Registering credentials ...12 Registering fingerprints 12 Setting up the fingerprint reader 13 Using your registered fingerprint to log on to Windows...Creating a virtual token ...15 Changing the Windows logon password 15 Changing a token PIN ...15 Locking the computer (workstation 17 Using Windows Logon ...17 Logging on to Windows with Credential Manager 17 Using Single Sign ...
ProtectTools (Select Models Only) - Windows 7
Page 104
...Access Manager 77 backing up and restoring certification information 73 Embedded Security 73 HP ProtectTools credentials 10 Single Sign On data 19 basic user account 70 Basic User Key password..., configuring 23 credentials, registering 12 fingerprint log on 13 fingerprint reader 13 lock workstation 17 locking computer 17 logging on 12 logon password 8 logon specifications 23 logon ...token, creating 15 Windows Logon 17 Windows logon password, changing 15 Windows logon, allow 24 D data, restricting access to 6 decrypting a drive 27 Device Access Manager for HP ProtectTools background service 77...
...Access Manager 77 backing up and restoring certification information 73 Embedded Security 73 HP ProtectTools credentials 10 Single Sign On data 19 basic user account 70 Basic User Key password..., configuring 23 credentials, registering 12 fingerprint log on 13 fingerprint reader 13 lock workstation 17 locking computer 17 logging on 12 logon password 8 logon specifications 23 logon ...token, creating 15 Windows Logon 17 Windows logon password, changing 15 Windows logon, allow 24 D data, restricting access to 6 decrypting a drive 27 Device Access Manager for HP ProtectTools background service 77...
ProtectTools (Select Models Only) - Windows 7
Page 105
... 6 L language options 62 lock workstation 17 locking computer 17 O objectives, security 6 owner password changing 74 definition 9 setting 69 P password Basic User Key 72 BIOS administrator 57 changing owner 74 emergency recovery token 69 guidelines 10 HP ProtectTools 8 managing 8 owner 69 policies, creating 7 resetting user 74 secure, creating 10 Windows 57 Windows logon 15 personal secure drive...
... 6 L language options 62 lock workstation 17 locking computer 17 O objectives, security 6 owner password changing 74 definition 9 setting 69 P password Basic User Key 72 BIOS administrator 57 changing owner 74 emergency recovery token 69 guidelines 10 HP ProtectTools 8 managing 8 owner 69 policies, creating 7 resetting user 74 secure, creating 10 Windows 57 Windows logon 15 personal secure drive...

Wireless (Select Models Only) - Windows 7
Page 14
If Windows does not recognize the new network, follow the same procedure you move your computer within range of another WLAN, Windows attempts to connect to your computer is successful, your WLAN. 10 Chapter 2 Using a WLAN Roaming to another network When you used initially to connect to that network. If the attempt is automatically connected to the new network.
If Windows does not recognize the new network, follow the same procedure you move your computer within range of another WLAN, Windows attempts to connect to your computer is successful, your WLAN. 10 Chapter 2 Using a WLAN Roaming to another network When you used initially to connect to that network. If the attempt is automatically connected to the new network.

RAID - Windows 7
Page 22
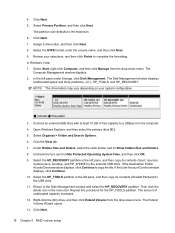
Click Next. 7. In Windows Vista and Windows 7: 1. Select the HP_RECOVERY partition in the left pane, and then copy its contents (Hewlett-Packard) to the external USB drive. Connect an external USB drive with at least 10 GB of unallocated capacity increases. 12. Select Organize > Folder and Search Options. 6. Then click the delete... and folders, select the radio button next to complete the formatting. Repeat this procedure for the HP_TOOLS partition. If the User Account Control window displays, click Continue. 10. Click Next. 18 Chapter 5 RAID volume setup
Click Next. 7. In Windows Vista and Windows 7: 1. Select the HP_RECOVERY partition in the left pane, and then copy its contents (Hewlett-Packard) to the external USB drive. Connect an external USB drive with at least 10 GB of unallocated capacity increases. 12. Select Organize > Folder and Search Options. 6. Then click the delete... and folders, select the radio button next to complete the formatting. Repeat this procedure for the HP_TOOLS partition. If the User Account Control window displays, click Continue. 10. Click Next. 18 Chapter 5 RAID volume setup

RAID - Windows 7
Page 23
... \boot\boot.sdi BCDEDIT.EXE -store D:\Boot\BCD -create {572bcd55-ffa7-11d9-aae0-0007e994107d} -d "HP Recovery Environment" -application OSLOADER BCDEDIT.EXE -store D:\Boot\BCD -set {572bcd55-ffa7-11d9-aae0-0007e994107d} device...,{ramdiskoptions} BCDEDIT.EXE -store D:\Boot\BCD -set {572bcd55-ffa7-11d9-aae0-0007e994107d} path \windows\system32\boot\winload.exe Initiate RAID migration using Intel Matrix Storage Console 19 b. Click Next....Next. Then format the partition as NTFS and name it is displayed next to 10 GB, from the number displayed. Subtract 10240 MB, which is created with the...
... \boot\boot.sdi BCDEDIT.EXE -store D:\Boot\BCD -create {572bcd55-ffa7-11d9-aae0-0007e994107d} -d "HP Recovery Environment" -application OSLOADER BCDEDIT.EXE -store D:\Boot\BCD -set {572bcd55-ffa7-11d9-aae0-0007e994107d} device...,{ramdiskoptions} BCDEDIT.EXE -store D:\Boot\BCD -set {572bcd55-ffa7-11d9-aae0-0007e994107d} path \windows\system32\boot\winload.exe Initiate RAID migration using Intel Matrix Storage Console 19 b. Click Next....Next. Then format the partition as NTFS and name it is displayed next to 10 GB, from the number displayed. Subtract 10240 MB, which is created with the...
RAID User Guide - Windows Vista and Windows XP
Page 22
...(C:). 5. Click Next. 18 Chapter 5 RAID volume setup 4. The partition size defaults to copy the file. Click Next. 7. The Computer Management window displays. 2. In the left pane, and then copy its contents (Hewlett-Packard) to complete the formatting. NOTE: The drive letters may vary ... (\boot, \sources, \system.save, bootmgr, and HP_WINRE) to Show hidden files and folders. 8. If the User Account Control window displays, click Continue. 10. Select the HP_TOOLS partition in the left pane under Storage, click Disk Management. Then click the delete icon in the menu bar....
...(C:). 5. Click Next. 18 Chapter 5 RAID volume setup 4. The partition size defaults to copy the file. Click Next. 7. The Computer Management window displays. 2. In the left pane, and then copy its contents (Hewlett-Packard) to complete the formatting. NOTE: The drive letters may vary ... (\boot, \sources, \system.save, bootmgr, and HP_WINRE) to Show hidden files and folders. 8. If the User Account Control window displays, click Continue. 10. Select the HP_TOOLS partition in the left pane under Storage, click Disk Management. Then click the delete icon in the menu bar....

RAID User Guide - Windows Vista and Windows XP
Page 23
... In Windows Explorer, copy the contents of the HP_TOOLS and HP_RECOVERY from the USB drive to be run rather than typing them in MB) available to extend the (C:) drive is displayed, subtract 10240 MB to the remaining 9 GB of Unallocated capacity. In order for the HP Recovery functionality...the number displayed. b. If it HP_RECOVERY. 18. Then replace the display capacity with the correct drive letter. The new RAID 0 volume capacity and 10 GB of space in Administrator mode. c. Select the drive letter (E:), and then click Next. e. Repeat the previous step to assign the drive ...
... In Windows Explorer, copy the contents of the HP_TOOLS and HP_RECOVERY from the USB drive to be run rather than typing them in MB) available to extend the (C:) drive is displayed, subtract 10240 MB to the remaining 9 GB of Unallocated capacity. In order for the HP Recovery functionality...the number displayed. b. If it HP_RECOVERY. 18. Then replace the display capacity with the correct drive letter. The new RAID 0 volume capacity and 10 GB of space in Administrator mode. c. Select the drive letter (E:), and then click Next. e. Repeat the previous step to assign the drive ...
Notebook Tour - Windows 7
Page 24
...keys esc 8 fn 8 function 8 keypad 8 Windows applications 8 Windows logo 8 L labels Bluetooth 17 Microsoft Certificate of Authenticity label 16 compartments memory module 13 components additional hardware 15 bottom 13 display 2 front 9 left-side 12 rear 10 right-side 11 top 3 wireless antennas 14 ...release latch, identifying 13 battery, identifying 15 bays battery 13, 16 hard drive 13 Bluetooth label 17 business card slot, identifying 10 buttons display release 10 info 6 pointing stick 3 power 6 presentation 7 TouchPad 3 volume mute 7 wireless 6 C caps lock light, identifying 4 Certificate...
...keys esc 8 fn 8 function 8 keypad 8 Windows applications 8 Windows logo 8 L labels Bluetooth 17 Microsoft Certificate of Authenticity label 16 compartments memory module 13 components additional hardware 15 bottom 13 display 2 front 9 left-side 12 rear 10 right-side 11 top 3 wireless antennas 14 ...release latch, identifying 13 battery, identifying 15 bays battery 13, 16 hard drive 13 Bluetooth label 17 business card slot, identifying 10 buttons display release 10 info 6 pointing stick 3 power 6 presentation 7 TouchPad 3 volume mute 7 wireless 6 C caps lock light, identifying 4 Certificate...
Notebook Tour - Windows 7
Page 25
... (network) jack, identifying 11 S scroll zone, TouchPad 3 security cable slot, identifying 12 serial number, computer 16 service tag 16 slots business card 10 ExpressCard 12 memory module 13 security cable 12 smart card reader 12 WLAN 13 smart card reader, identifying 12 speaker, identifying 9 wireless button, identifying 6... 4 volume mute button, identifying 7 volume mute light, identifying 4 volume scroll zone, identifying 7 volume up light, identifying 4 W webcam light, identifying 2 webcam, identifying 2 Windows applications key, identifying 8 Windows logo key, identifying 8 Index 19
... (network) jack, identifying 11 S scroll zone, TouchPad 3 security cable slot, identifying 12 serial number, computer 16 service tag 16 slots business card 10 ExpressCard 12 memory module 13 security cable 12 smart card reader 12 WLAN 13 smart card reader, identifying 12 speaker, identifying 9 wireless button, identifying 6... 4 volume mute button, identifying 7 volume mute light, identifying 4 volume scroll zone, identifying 7 volume up light, identifying 4 W webcam light, identifying 2 webcam, identifying 2 Windows applications key, identifying 8 Windows logo key, identifying 8 Index 19
Notebook Tour - Windows Vista
Page 25
... RJ-11 (modem) 12 RJ-45 (network 12 K keypad keys, identifying 8 keys esc 8 fn 8 function 8 keypad 8 Windows applications 8 Windows logo 8 L labels Bluetooth 18 Microsoft Certificate of Authenticity label 17 compartments memory module 14 components additional hardware 16 bottom 14 display 2 ...battery release latch, identifying 14 battery, identifying 16 bays battery 14, 17 hard drive 14 Bluetooth label 18 business card slot, identifying 10 buttons display release 10 info 6 pointing stick 3 power 6 presentation 7 TouchPad 3 volume mute 7 wireless 6 C caps lock light, identifying 4 Certificate...
... RJ-11 (modem) 12 RJ-45 (network 12 K keypad keys, identifying 8 keys esc 8 fn 8 function 8 keypad 8 Windows applications 8 Windows logo 8 L labels Bluetooth 18 Microsoft Certificate of Authenticity label 17 compartments memory module 14 components additional hardware 16 bottom 14 display 2 ...battery release latch, identifying 14 battery, identifying 16 bays battery 14, 17 hard drive 14 Bluetooth label 18 business card slot, identifying 10 buttons display release 10 info 6 pointing stick 3 power 6 presentation 7 TouchPad 3 volume mute 7 wireless 6 C caps lock light, identifying 4 Certificate...


