
Service Manual
Page 6
...HP policy on non-HP supplies 33 HP anti-counterfeit website 33 Cleaning the printer ...34 To clean the printer at the printer 34 To clean the fuser using HP Toolbox 35 Cleaning spilled toner ...35 Calibrating the printer ...36 To calibrate the printer at the printer 36 To calibrate the printer from the HP... detection 40 Image formation system ...41 Image formation process ...43 Latent image formation 44 Laser/scanner system 45 Developing stage ...45 Print cartridge ...46 Transfer belt (ETB 47 Transfer stage ...48 Separation stage ...49 Fusing stage ...49 Pickup and feed system ...51 ...
...HP policy on non-HP supplies 33 HP anti-counterfeit website 33 Cleaning the printer ...34 To clean the printer at the printer 34 To clean the fuser using HP Toolbox 35 Cleaning spilled toner ...35 Calibrating the printer ...36 To calibrate the printer at the printer 36 To calibrate the printer from the HP... detection 40 Image formation system ...41 Image formation process ...43 Latent image formation 44 Laser/scanner system 45 Developing stage ...45 Print cartridge ...46 Transfer belt (ETB 47 Transfer stage ...48 Separation stage ...49 Fusing stage ...49 Pickup and feed system ...51 ...

Service Manual
Page 13
...Figure 7-5 Figure 7-6 Figure 7-7 Figure 7-8 Figure 7-9 Figure 7-10 HP Color LaserJet 2600n printer...3 Front view (shown with optional Tray 3 6 Back and side view...7 Transfer belt (ETB) and print cartridges 7 Model and serial number information 8 ...Control panel layout...10 Control panel display...10 Envelope double side-seam construction 16 Printer dimensions ...22 Package contents ...24 Engine control system ...39 Image formation system ...42 Image formation process ...43 Latent image formation ...45 Laser...
...Figure 7-5 Figure 7-6 Figure 7-7 Figure 7-8 Figure 7-9 Figure 7-10 HP Color LaserJet 2600n printer...3 Front view (shown with optional Tray 3 6 Back and side view...7 Transfer belt (ETB) and print cartridges 7 Model and serial number information 8 ...Control panel layout...10 Control panel display...10 Envelope double side-seam construction 16 Printer dimensions ...22 Package contents ...24 Engine control system ...39 Image formation system ...42 Image formation process ...43 Latent image formation ...45 Laser...

Service Manual
Page 21
Otherwise, the printer may be damaged, adversely affecting print quality. Walk around 7 Back and side view Figure 1-3 Back and side view 1 On/off switch 2 Power connection 3 Engine test button access door 4 Access door 5 Dust cover 6 HP built-in internal print server for connecting to a 10/100Base-T network 7 USB connection Figure 1-4 Transfer belt (ETB) and print cartridges 1 Transfer belt (ETB) 2 Print cartridges ENWW CAUTION Do not place anything on the transfer belt , which is located on the inside of the front door.
Otherwise, the printer may be damaged, adversely affecting print quality. Walk around 7 Back and side view Figure 1-3 Back and side view 1 On/off switch 2 Power connection 3 Engine test button access door 4 Access door 5 Dust cover 6 HP built-in internal print server for connecting to a 10/100Base-T network 7 USB connection Figure 1-4 Transfer belt (ETB) and print cartridges 1 Transfer belt (ETB) 2 Print cartridges ENWW CAUTION Do not place anything on the transfer belt , which is located on the inside of the front door.
Service Manual
Page 41
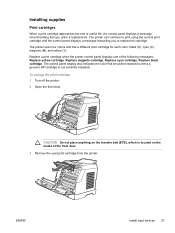
... the end of useful life, the control panel displays a message recommending that should be replaced (unless a genuine HP cartridge is located on the transfer belt (ETB), which is not currently installed). The printer can continue to replace the cartridge. The printer uses four colors and has a different print cartridge for each color: black (K), cyan (C), magenta (M), and yellow (Y).
... the end of useful life, the control panel displays a message recommending that should be replaced (unless a genuine HP cartridge is located on the transfer belt (ETB), which is not currently installed). The printer can continue to replace the cartridge. The printer uses four colors and has a different print cartridge for each color: black (K), cyan (C), magenta (M), and yellow (Y).

Service Manual
Page 61
... paper. ENWW Image formation system 47 During printing, the picked up paper is conveyed in the color misregistration/density sensor unit. Figure 4-7 Print cartridge structure Transfer belt (ETB) The ETB unit feeds paper as well as transfers toner onto the paper. This pattern image is read in between the ETB and the photosensitive drum...
... paper. ENWW Image formation system 47 During printing, the picked up paper is conveyed in the color misregistration/density sensor unit. Figure 4-7 Print cartridge structure Transfer belt (ETB) The ETB unit feeds paper as well as transfers toner onto the paper. This pattern image is read in between the ETB and the photosensitive drum...
Service Manual
Page 78
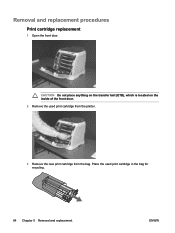
Place the used print cartridge from the printer. 3 Remove the new print cartridge from the bag. CAUTION Do not place anything on the transfer belt (ETB), which is located on the inside of the front door. 2 Remove the used print cartridge in the bag for recycling. 64 Chapter 5 Removal and replacement ENWW Removal and replacement procedures Print cartridge replacement 1 Open the front door.
Place the used print cartridge from the printer. 3 Remove the new print cartridge from the bag. CAUTION Do not place anything on the transfer belt (ETB), which is located on the inside of the front door. 2 Remove the used print cartridge in the bag for recycling. 64 Chapter 5 Removal and replacement ENWW Removal and replacement procedures Print cartridge replacement 1 Open the front door.

Service Manual
Page 116
...CAUTION Do not place anything on the transfer belt, which is not obvious, first look inside the printer Use the following procedures to clear the jam. If the location of the front door. Jams inside the printer. If you get toner on the inside the printer. Each section below corresponds to an area...in this area might remain in cold water. (Hot water will set the toner into the fabric.) 1 Open the front door. Otherwise, the printer may be damaged, adversely affecting print quality. 102 Chapter 6 Troubleshooting ENWW Find and remove the jam by both corners and pull slowly to remove ...
...CAUTION Do not place anything on the transfer belt, which is not obvious, first look inside the printer Use the following procedures to clear the jam. If the location of the front door. Jams inside the printer. If you get toner on the inside the printer. Each section below corresponds to an area...in this area might remain in cold water. (Hot water will set the toner into the fabric.) 1 Open the front door. Otherwise, the printer may be damaged, adversely affecting print quality. 102 Chapter 6 Troubleshooting ENWW Find and remove the jam by both corners and pull slowly to remove ...


