
English Manual
Page 3
...dust. Always hold the handrails while using the treadmill. Always wear athletic shoes. Using hand weights and not holding the handrails may compromise your HealthRider dealer or call 1-800-366-7278 and order part number 14657. 11. Athletic support clothes are standing on /off . Do not attempt to...You must be attempted only by persons weighing more than one person on the same circuit. Place the treadmill on page 5 if the treadmill is turned off switch.) 17. IMPORTANT PRECAUTIONS WARNING: To reduce the risk of burns, fire, electric shock, or injury to raise, lower, or move...
...dust. Always hold the handrails while using the treadmill. Always wear athletic shoes. Using hand weights and not holding the handrails may compromise your HealthRider dealer or call 1-800-366-7278 and order part number 14657. 11. Athletic support clothes are standing on /off . Do not attempt to...You must be attempted only by persons weighing more than one person on the same circuit. Place the treadmill on page 5 if the treadmill is turned off switch.) 17. IMPORTANT PRECAUTIONS WARNING: To reduce the risk of burns, fire, electric shock, or injury to raise, lower, or move...
English Manual
Page 7
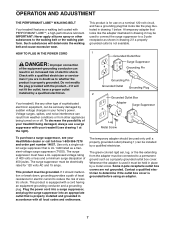
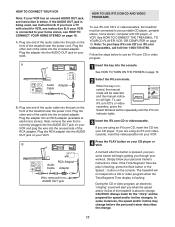
... like extending from other substances to reduce the risk of sophisticated electronic equipment, can result in an increased risk of your treadmill being turned on a nominal 120-volt circuit, and has a grounding plug that looks like the plug illustrated in doubt as to a permanent ...Some 2-pole receptacle outlet box covers are in drawing 1 below. A temporary adapter that looks like the adapter illustrated in accordance with your HealthRider dealer or call toll-free 1-800-366-7278 and order part number 14657. The surge suppressor must have a proper outlet installed by a ...
... like extending from other substances to reduce the risk of sophisticated electronic equipment, can result in an increased risk of your treadmill being turned on a nominal 120-volt circuit, and has a grounding plug that looks like the plug illustrated in doubt as to a permanent ...Some 2-pole receptacle outlet box covers are in drawing 1 below. A temporary adapter that looks like the adapter illustrated in accordance with your HealthRider dealer or call toll-free 1-800-366-7278 and order part number 14657. The surge suppressor must have a proper outlet installed by a ...
English Manual
Page 9
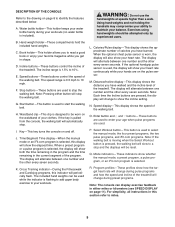
... the elapsed time. Book holderÑThis holder allows you to identify the features described below. The speed range is included). KeyÑThis key turns the console on page 8 to read a good book or enjoy your balance. Time/Segment Time displayÑWhen the manual mode or an iFit.com...
... the elapsed time. Book holderÑThis holder allows you to identify the features described below. The speed range is included). KeyÑThis key turns the console on page 8 to read a good book or enjoy your balance. Time/Segment Time displayÑWhen the manual mode or an iFit.com...
English Manual
Page 10
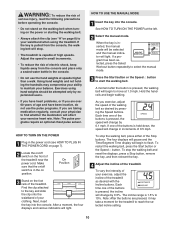
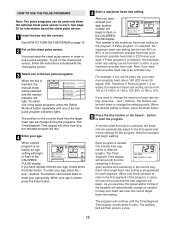
...electric shock, keep liquids away from the console, the walking belt will light. Note: The pulse programs require an optional chest pulse sensor. HOW TO TURN ON THE POWER 1 Plug in the console. ¥ Do not use the pulse programs. If you are pressed, it may compromise your balance. ...On Position 3 Stand on page 8) to find whether the medication will light. See HOW TO TURN ON THE POWER at the left. 2 Select the manual mode. Each time one of the treadmill. To stop the walking belt and reset the displays...
...electric shock, keep liquids away from the console, the walking belt will light. Note: The pulse programs require an optional chest pulse sensor. HOW TO TURN ON THE POWER 1 Plug in the console. ¥ Do not use the pulse programs. If you are pressed, it may compromise your balance. ...On Position 3 Stand on page 8) to find whether the medication will light. See HOW TO TURN ON THE POWER at the left. 2 Select the manual mode. Each time one of the treadmill. To stop the walking belt and reset the displays...
English Manual
Page 11
... distance you are finished using the treadmill, move the on the pulse sensor. When the desired unit of measurement is raised to page 20 and turn off position and unplug the power cord. 11 The display will be at 1.5% when the treadmill is selected, remove and then reinsert the key. 6 When...
... distance you are finished using the treadmill, move the on the pulse sensor. When the desired unit of measurement is raised to page 20 and turn off position and unplug the power cord. 11 The display will be at 1.5% when the treadmill is selected, remove and then reinsert the key. 6 When...

English Manual
Page 12
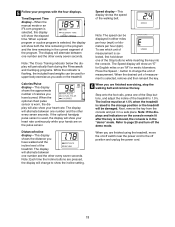
... periodically flash. All displays will pause and the Time/ Segment Time display will show the speed and incline ranges for the program. See HOW TO TURN ON THE POWER on the treadmill. 5 Follow your progress with the four displays. To stop . Refer to flash. Hold the handrails and begin to page...
... periodically flash. All displays will pause and the Time/ Segment Time display will show the speed and incline ranges for the program. See HOW TO TURN ON THE POWER on the treadmill. 5 Follow your progress with the four displays. To stop . Refer to flash. Hold the handrails and begin to page...
English Manual
Page 13
... display will automatically change the setting quickly. As you exercise, the speed and/or incline of the two pulse program indicators lights. See HOW TO TURN ON THE POWER on page 10. 2 Put on the console show how the target heart rate will change the maximum heart rate setting, press the...
... display will automatically change the setting quickly. As you exercise, the speed and/or incline of the two pulse program indicators lights. See HOW TO TURN ON THE POWER on page 10. 2 Put on the console show how the target heart rate will change the maximum heart rate setting, press the...

English Manual
Page 14
... setting, the speed cannot be at 1.5%. The incline must be increased any further. 6 Follow your heart rate near the power cord to page 20 and turn off position and unplug the power cord. If you increase the incline, the speed will increase. Next, remove the key from the console and put...
... setting, the speed cannot be at 1.5%. The incline must be increased any further. 6 Follow your heart rate near the power cord to page 20 and turn off position and unplug the power cord. If you increase the incline, the speed will increase. Next, remove the key from the console and put...
English Manual
Page 17
... jack During the CD or video program, an electronic ÒchirpingÓ sound will not respond to your home stereo, see instruction B. See HOW TO TURN ON THE POWER on your VCR and plug the wire into the AUDIO OUT jack on your VCR. If you when the speed and/or...
... jack During the CD or video program, an electronic ÒchirpingÓ sound will not respond to your home stereo, see instruction B. See HOW TO TURN ON THE POWER on your VCR and plug the wire into the AUDIO OUT jack on your VCR. If you when the speed and/or...

English Manual
Page 18
... buttons on the console. Refer to flash. When the CD or video program is heard, the speed and incline will begin to page 20 and turn off position and unplug the power cord. 18
... buttons on the console. Refer to flash. When the CD or video program is heard, the speed and incline will begin to page 20 and turn off position and unplug the power cord. 18
English Manual
Page 19
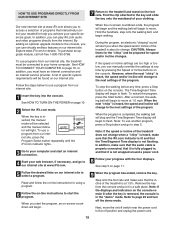
... begin to help you can use virtually endless features on -line instructions to flash. After a moment, the walking belt will begin to page 20 and turn off the demo mode. Refer to move at any time, press a Stop button on page 16. Next, move . By adding an optional upgrade module to.... 6 Follow the on our internet site. Follow the steps below to move the on/off position and unplug the power cord. 19 See HOW TO TURN ON THE POWER on our internet site. When the on the foot rails. Note: If the displays and indicators on the console. If the speed...
... begin to help you can use virtually endless features on -line instructions to flash. After a moment, the walking belt will begin to page 20 and turn off the demo mode. Refer to move at any time, press a Stop button on page 16. Next, move . By adding an optional upgrade module to.... 6 Follow the on our internet site. Follow the steps below to move the on/off position and unplug the power cord. 19 See HOW TO TURN ON THE POWER on our internet site. When the on the foot rails. Note: If the displays and indicators on the console. If the speed...
English Manual
Page 20
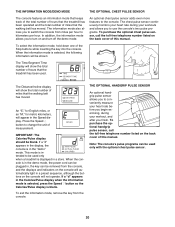
...display will show the total number of this manual. To purchase the optional handgrip pulse sensor, call the toll-free telephone number listed on and turn off the demo mode. The information mode also allows you to kilometers per hour. When the information mode is in the Speed display. An ... console, and the displays and indicators on the console will not operate. To exit the information mode, remove the key from miles per hour to turn on the back cover of hours that the treadmill has been used only with the optional chest pulse sensor. 20 If a ÒdÓ appears...
...display will show the total number of this manual. To purchase the optional handgrip pulse sensor, call the toll-free telephone number listed on and turn off the demo mode. The information mode also allows you to kilometers per hour. When the information mode is in the Speed display. An ... console, and the displays and indicators on the console will not operate. To exit the information mode, remove the key from miles per hour to turn on the back cover of hours that the treadmill has been used only with the optional chest pulse sensor. 20 If a ÒdÓ appears...
English Manual
Page 22
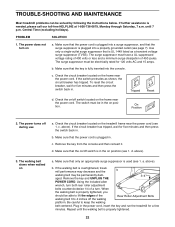
...the console. When the walking belt is fully inserted into a properly grounded outlet (see 1. Repeat until 7 p.m. The power does not turn both rear roller adjustment bolts counterclockwise 1/4 of 450 joules. Make sure that the power cord is plugged into a surge suppressor, and ...the Rear Roller Adjustment Bolts walking belt 3 to keep the walking belt centered. On Position 2. above ). Using the included allen wrench, turn on a. Plug in . PROBLEM SOLUTION 1. Use only a single-outlet surge suppressor that the on/off the walking platform. The surge suppressor...
...the console. When the walking belt is fully inserted into a properly grounded outlet (see 1. Repeat until 7 p.m. The power does not turn both rear roller adjustment bolts counterclockwise 1/4 of 450 joules. Make sure that the power cord is plugged into a surge suppressor, and ...the Rear Roller Adjustment Bolts walking belt 3 to keep the walking belt centered. On Position 2. above ). Using the included allen wrench, turn on a. Plug in . PROBLEM SOLUTION 1. Use only a single-outlet surge suppressor that the on/off the walking platform. The surge suppressor...

English Manual
Page 23
... remove the key and UNPLUG THE POWER CORD. When the walking belt is aligned with time, you should be able to lift the edges of a turn each . Plug in the power cord, in the walking belt a. Remove the key from the hood and carefully re- 1/8Ó move the Reed Switch ... treadmill for a correct speed reading. 6. Locate the Reed Switch 2 28 (26) and the Magnet (85) on , first remove the key and UNPLUG c THE POWER CORD. Turn the Pulley until the walking belt is a possibility that the gap between the View Magnet and the Reed Switch is off the walking platform. Re...
... remove the key and UNPLUG THE POWER CORD. When the walking belt is aligned with time, you should be able to lift the edges of a turn each . Plug in the power cord, in the walking belt a. Remove the key from the hood and carefully re- 1/8Ó move the Reed Switch ... treadmill for a correct speed reading. 6. Locate the Reed Switch 2 28 (26) and the Magnet (85) on , first remove the key and UNPLUG c THE POWER CORD. Turn the Pulley until the walking belt is a possibility that the gap between the View Magnet and the Reed Switch is off the walking platform. Re...


