

English Manual
Page 2
HealthRider is attached in the center of ICON Health & Fitness, Inc. 2 TABLE OF CONTENTS IMPORTANT PRECAUTIONS 3 BEFORE YOU BEGIN 5 ASSEMBLY 6 TREADMILL OPERATION 8 HOW TO FOLD AND MOVE THE TREADMILL 24 TROUBLESHOOTING 26 EXERCISE GUIDELINES 28 PART LIST 30 HOW TO ORDER REPLACEMENT PARTS Back Cover LIMITED WARRANTY Back Cover Note: An EXPLODED DRAWING is a registered trademark of this manual.
HealthRider is attached in the center of ICON Health & Fitness, Inc. 2 TABLE OF CONTENTS IMPORTANT PRECAUTIONS 3 BEFORE YOU BEGIN 5 ASSEMBLY 6 TREADMILL OPERATION 8 HOW TO FOLD AND MOVE THE TREADMILL 24 TROUBLESHOOTING 26 EXERCISE GUIDELINES 28 PART LIST 30 HOW TO ORDER REPLACEMENT PARTS Back Cover LIMITED WARRANTY Back Cover Note: An EXPLODED DRAWING is a registered trademark of this manual.
English Manual
Page 7
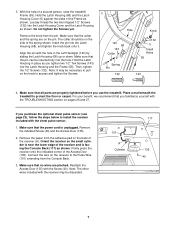
...Cover and the Latch Housing as shown. Make sure that all parts are properly tightened before you familiarize yourself with the TROUBLESHOOTING section on the side of a second person, raise the treadmill Frame (55). If you tighten two 1/2" Tek Screws (143) into the hole. Remove the paper from the pin... with the hole in place as shown. Do not tighten the Screws yet. Then, tighten the 1/2" Screws (132). Place a mat beneath the treadmill to install the receiver included with the receiver may be inserted fully into the Latch Housing and the Frame (55). Make sure that the collar...
...Cover and the Latch Housing as shown. Make sure that all parts are properly tightened before you familiarize yourself with the TROUBLESHOOTING section on the side of a second person, raise the treadmill Frame (55). If you tighten two 1/2" Tek Screws (143) into the hole. Remove the paper from the pin... with the hole in place as shown. Do not tighten the Screws yet. Then, tighten the 1/2" Screws (132). Place a mat beneath the treadmill to install the receiver included with the receiver may be inserted fully into the Latch Housing and the Frame (55). Make sure that the collar...

English Manual
Page 26
... that meets all of the specifications described on page 8. When the walking belt is plugged in the power cord, insert the key and run the treadmill for five minutes, and then plug it . Mountain Time (excluding holidays). The power does not turn . The power turns off circuit breaker located on the.... 26 b. Plug in . b. c. c. Make sure that the surge suppressor is plugged in . PROBLEM SOLUTION 1. If the power cord is plugged into the console. aged. above ). 3. TROUBLESHOOTING Most treadmill problems can be solved by following the instructions below.
... that meets all of the specifications described on page 8. When the walking belt is plugged in the power cord, insert the key and run the treadmill for five minutes, and then plug it . Mountain Time (excluding holidays). The power does not turn . The power turns off circuit breaker located on the.... 26 b. Plug in . b. c. c. Make sure that the surge suppressor is plugged in . PROBLEM SOLUTION 1. If the power cord is plugged into the console. aged. above ). 3. TROUBLESHOOTING Most treadmill problems can be solved by following the instructions below.
