

English Manual
Page 2
TABLE OF CONTENTS IMPORTANT PRECAUTIONS 3 BEFORE YOU BEGIN 6 ASSEMBLY 7 OPERATION AND ADJUSTMENT 9 HOW TO FOLD AND MOVE THE TREADMILL 25 TROUBLE-SHOOTING 26 CONDITIONING GUIDELINES 29 PART LIST 30 ORDERING REPLACEMENT PARTS Back Cover LIMITED WARRANTY Back Cover Note: An EXPLODED DRAWING is a registered trademark of this manual. HealthRider is attached in the center of ICON Health & Fitness, Inc. 2
TABLE OF CONTENTS IMPORTANT PRECAUTIONS 3 BEFORE YOU BEGIN 6 ASSEMBLY 7 OPERATION AND ADJUSTMENT 9 HOW TO FOLD AND MOVE THE TREADMILL 25 TROUBLE-SHOOTING 26 CONDITIONING GUIDELINES 29 PART LIST 30 ORDERING REPLACEMENT PARTS Back Cover LIMITED WARRANTY Back Cover Note: An EXPLODED DRAWING is a registered trademark of this manual. HealthRider is attached in the center of ICON Health & Fitness, Inc. 2

English Manual
Page 3
... damaged, the walking belt may change speed or stop unexpectedly, which may affect the accuracy of heart rate readings. Keep children under the treadmill. 4. To protect the treadmill and TV during lightning storms, unplug the power cord from moisture and dust. Wear appropriate exercise clothing when using the treadmill. 16. Always remove the key, unplug the power cord, and move the treadmill until it is running. Never move the treadmill. 3 Do not...
... damaged, the walking belt may change speed or stop unexpectedly, which may affect the accuracy of heart rate readings. Keep children under the treadmill. 4. To protect the treadmill and TV during lightning storms, unplug the power cord from moisture and dust. Wear appropriate exercise clothing when using the treadmill. 16. Always remove the key, unplug the power cord, and move the treadmill until it is running. Never move the treadmill. 3 Do not...

English Manual
Page 4
... and supporting structure, grounding of the treadmill by pressing the speed and incline buttons. When folding or moving the treadmill, make sure that the antenna or cable system is about to provide some instances, the speed and/or incline may change before performing the main- Always listen for the "chirp" and be sure that the storage latch is in wire to an antenna discharge unit, size of...
... and supporting structure, grounding of the treadmill by pressing the speed and incline buttons. When folding or moving the treadmill, make sure that the antenna or cable system is about to provide some instances, the speed and/or incline may change before performing the main- Always listen for the "chirp" and be sure that the storage latch is in wire to an antenna discharge unit, size of...
English Manual
Page 6
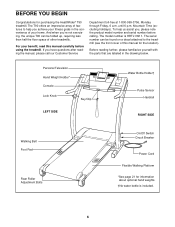
... the floor space of this manual carefully before calling. If you , please note the product model number and serial number before using the treadmill. To help you achieve your fitness goals in the drawing below. Personal Television Hand Weight Holder* Console Lock Knob LEFT SIDE Key/Clip Water Bottle Holder† Pulse Sensor Handrail RIGHT SIDE Walking Belt Foot Pad Rear Roller Adjustment Bolts On/Off Switch Circuit Breaker Power Cord Flexible Walking Platform *See...
... the floor space of this manual carefully before calling. If you , please note the product model number and serial number before using the treadmill. To help you achieve your fitness goals in the drawing below. Personal Television Hand Weight Holder* Console Lock Knob LEFT SIDE Key/Clip Water Bottle Holder† Pulse Sensor Handrail RIGHT SIDE Walking Belt Foot Pad Rear Roller Adjustment Bolts On/Off Switch Circuit Breaker Power Cord Flexible Walking Platform *See...
English Manual
Page 8
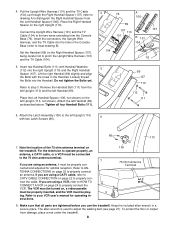
...) and the TV Cable (104) up through the Right Handrail Spacer (107) (refer to drawing A to properly connect the cable. 4. Connect the Upright Wire Harness (101) and the TV Cable (104) to the left Handrail (89). Do not tighten the Bolts yet. Attach the Latch Assembly (109) to the two wires extending from the Left Handrail Spacer [106]). The allen wrench is used to step 3.
...) and the TV Cable (104) up through the Right Handrail Spacer (107) (refer to drawing A to properly connect the cable. 4. Connect the Upright Wire Harness (101) and the TV Cable (104) to the left Handrail (89). Do not tighten the Bolts yet. Attach the Latch Assembly (109) to the two wires extending from the Left Handrail Spacer [106]). The allen wrench is used to step 3.
English Manual
Page 9
... from the adapter must be installed by a metal screw. There must have a proper outlet installed by sudden voltage changes in drawing 1 below. Whenever the adapter is UL 1449 listed as shown in accordance with your treadmill being turned on the surge suppressor to determine if the outlet box cover is grounded before using an adapter. 9 Plug the power cord into a surge suppressor, and plug the surge...
... from the adapter must be installed by a metal screw. There must have a proper outlet installed by sudden voltage changes in drawing 1 below. Whenever the adapter is UL 1449 listed as shown in accordance with your treadmill being turned on the surge suppressor to determine if the outlet box cover is grounded before using an adapter. 9 Plug the power cord into a surge suppressor, and plug the surge...
English Manual
Page 12
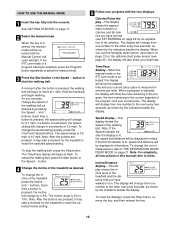
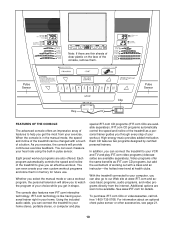
... w buttons. Each time a button is held down, the speed setting will change in minutes per mile). The display will show the elapsed time and your heart rate. To change from one number to reach the selected speed setting. Incline/Distance display-This display shows the incline level of 0.5 mph. Calories/Pulse display-This display shows the approximate numbers of the program, and your progress with the four displays. Time/Pace display-When the manual mode or the iFIT...
... w buttons. Each time a button is held down, the speed setting will change in minutes per mile). The display will show the elapsed time and your heart rate. To change from one number to reach the selected speed setting. Incline/Distance display-This display shows the incline level of 0.5 mph. Calories/Pulse display-This display shows the approximate numbers of the program, and your progress with the four displays. Time/Pace display-When the manual mode or the iFIT...
English Manual
Page 13
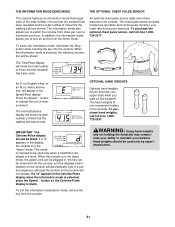
... program, a series of tones will sound and the Speed display and/or the Incline/Distance display will flash to the off the demo mode. To measure your heart rate, stand on the foot pads and place your heart rate, if desired. For the most accurate heart rate reading, continue to hold the contacts for about to the first speed and incline settings for one incline setting are finished exercising, stop the walking belt and remove...
... program, a series of tones will sound and the Speed display and/or the Incline/Distance display will flash to the off the demo mode. To measure your heart rate, stand on the foot pads and place your heart rate, if desired. For the most accurate heart rate reading, continue to hold the contacts for about to the first speed and incline settings for one incline setting are finished exercising, stop the walking belt and remove...
English Manual
Page 14
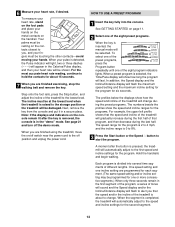
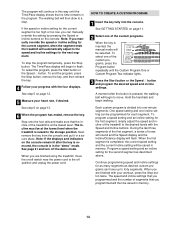
... the Speed and Incline buttons. See step 5 on page 12. 5 Measure your workout, press the Stop button twice. Next, remove the key from the console and put it in the program. When you are finished with your heart rate, if desired. To select one of the treadmill to forty segments. Each custom program is divided into the console. During the last three segments of the first segment, a series...
... the Speed and Incline buttons. See step 5 on page 12. 5 Measure your workout, press the Stop button twice. Next, remove the key from the console and put it in the program. When you are finished with your heart rate, if desired. To select one of the treadmill to forty segments. Each custom program is divided into the console. During the last three segments of the first segment, a series...

English Manual
Page 18
... treadmill near the power cord. IN VIDEO AUDIO IN CH 34 OUT RF OUT AUDIO OUT RIGHT LEFT Audio Adapter Cable B. To use an iFIT.com CD or video program. RCA Y-adapter Audio Cable Adapter Wire removed from AUDIO OUT jack A moment after the button is about to a CD or video program when the Time/Pace display is currently plugged into the AUDIO OUT jack on the console. See GETTING STARTED on your personal trainer's instructions. If you are using an iFIT...
... treadmill near the power cord. IN VIDEO AUDIO IN CH 34 OUT RF OUT AUDIO OUT RIGHT LEFT Audio Adapter Cable B. To use an iFIT.com CD or video program. RCA Y-adapter Audio Cable Adapter Wire removed from AUDIO OUT jack A moment after the button is about to a CD or video program when the Time/Pace display is currently plugged into the AUDIO OUT jack on the console. See GETTING STARTED on your personal trainer's instructions. If you are using an iFIT...
English Manual
Page 19
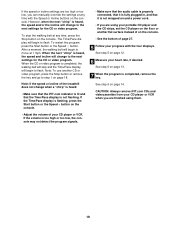
..., set the CD player on the floor or another CD or video program, press the Stop button or remove the key and go to move at any time, press the Stop button on page 12. 6 Measure your heart rate, if desired. The Time/Pace display will change when a "chirp" is heard: • Make sure that the iFIT.com indicator is lit and that it is fully plugged in...
..., set the CD player on the floor or another CD or video program, press the Stop button or remove the key and go to move at any time, press the Stop button on page 12. 6 Measure your heart rate, if desired. The Time/Pace display will change when a "chirp" is heard: • Make sure that the iFIT.com indicator is lit and that it is fully plugged in...
English Manual
Page 20
... fully plugged in, and that the Time/Pace display is heard, the speed and incline will stop the walking belt at www.iFIT.com. 5 Follow the desired links on the console. See step 6 on page 17. Find the clip attached to access basic programs, audio programs, and video programs directly from our Web site, the treadmill must have an internet connection and an internet service provider. See HOW TO CONNECT YOUR...
... fully plugged in, and that the Time/Pace display is heard, the speed and incline will stop the walking belt at www.iFIT.com. 5 Follow the desired links on the console. See step 6 on page 17. Find the clip attached to access basic programs, audio programs, and video programs directly from our Web site, the treadmill must have an internet connection and an internet service provider. See HOW TO CONNECT YOUR...
English Manual
Page 21
... Stop button while inserting the key into convenient holders in a store. The Incline/Distance display will show the total number of miles that the treadmill has been used. Hand weights should be blank. The chest pulse sensor provides hands-free operation and continuously monitors your heart rate during your balance. IMPORTANT: The Calories/Pulse display should be used only by experienced users. 21 If a "d" appears in the Speed/Pace display. To exit the information mode/demo mode, remove the key...
... Stop button while inserting the key into convenient holders in a store. The Incline/Distance display will show the total number of miles that the treadmill has been used. Hand weights should be blank. The chest pulse sensor provides hands-free operation and continuously monitors your heart rate during your balance. IMPORTANT: The Calories/Pulse display should be used only by experienced users. 21 If a "d" appears in the Speed/Pace display. To exit the information mode/demo mode, remove the key...

English Manual
Page 22
... below) while operating the treadmill. •Adjust the speed in small increments to properly connect an antenna. See HOW TO PLUG IN THE POWER CORD on page 9. 3 Move the on position. Locate the on/off switch to connect the cable. The pulse sensor is securely attached to the Clip key and slide the clip onto the waistband of heart rate readings. Find the clip attached to the waistband of...
... below) while operating the treadmill. •Adjust the speed in small increments to properly connect an antenna. See HOW TO PLUG IN THE POWER CORD on page 9. 3 Move the on position. Locate the on/off switch to connect the cable. The pulse sensor is securely attached to the Clip key and slide the clip onto the waistband of heart rate readings. Find the clip attached to the waistband of...
English Manual
Page 23
... technology. Using the included audio cable, you through every step of your home stereo, portable stereo, or computer and play iFIT.com video programs (videocassettes are thin sheets of clear plastic on the face of the console, remove them in the manual mode, the speed and incline of the treadmill can even measure your home. IFIT.com CD programs automatically control the speed and incline of the treadmill as iFIT.com CD programs, but...
... technology. Using the included audio cable, you through every step of your home stereo, portable stereo, or computer and play iFIT.com video programs (videocassettes are thin sheets of clear plastic on the face of the console, remove them in the manual mode, the speed and incline of the treadmill can even measure your home. IFIT.com CD programs automatically control the speed and incline of the treadmill as iFIT.com CD programs, but...

English Manual
Page 24
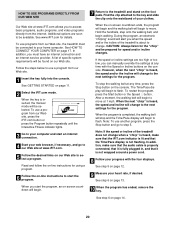
.... 5 Remove the key from the console. Press the Power button below to connect your VCR. Plug in the power cord of the terminal. Make sure that channel 3 or 4 is required. 1. The word Add will be exited. When the key is removed, the information mode/ demo mode will appear in the channel display. To operate the television with your VCR user's manual for proper grounding instructions. 3. HOW TO CONNECT A VCR Follow the steps...
.... 5 Remove the key from the console. Press the Power button below to connect your VCR. Plug in the power cord of the terminal. Make sure that channel 3 or 4 is required. 1. The word Add will be exited. When the key is removed, the information mode/ demo mode will appear in the channel display. To operate the television with your VCR user's manual for proper grounding instructions. 3. HOW TO CONNECT A VCR Follow the steps...
English Manual
Page 27
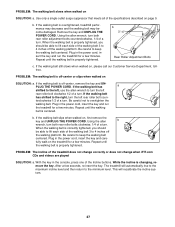
... change when iFIT.com CDs and videos are played SOLUTION: a. Plug in the power cord, insert the key and run the treadmill for a few minutes. PROBLEM: The incline of the Incline buttons. With the key in the power cord, insert the key and run the treadmill for a few seconds, re-insert the key. b. When the walking belt is off the walking platform. b 3"-4" Rear Roller Adjustment Bolts c. If the walking belt has shifted to the right, turn the left rear roller bolt...
... change when iFIT.com CDs and videos are played SOLUTION: a. Plug in the power cord, insert the key and run the treadmill for a few minutes. PROBLEM: The incline of the Incline buttons. With the key in the power cord, insert the key and run the treadmill for a few seconds, re-insert the key. b. When the walking belt is off the walking platform. b 3"-4" Rear Roller Adjustment Bolts c. If the walking belt has shifted to the right, turn the left rear roller bolt...

English Manual
Page 29
... a guide. The lower two numbers are rounded off to the nearest ten years). This will help prevent post-exercise problems. To measure your training zone. ergy. For aerobic exercise, adjust the speed and incline of the treadmill until your heart rate is near the lowest number in your heart rate during exercise, use stored fat calories for 20 to burn fat, adjust the speed and incline of the treadmill until your pulse is...
... a guide. The lower two numbers are rounded off to the nearest ten years). This will help prevent post-exercise problems. To measure your training zone. ergy. For aerobic exercise, adjust the speed and incline of the treadmill until your heart rate is near the lowest number in your heart rate during exercise, use stored fat calories for 20 to burn fat, adjust the speed and incline of the treadmill until your pulse is...

English Manual
Page 30
... Breaker Static Decal 12" Audio Wire Belly Pan 3/4" Screw Chest Pulse Sensor Chest Pulse Strap Console Ground Wire Console Base Book Holder Console Handrail Endcap Pulse Grip Pulse Grip Screw Console Screw (Short) Console Back Extension Leg Assembly Extension Leg Endcap Base Screw/Latch Screw Incline Motor Spacer Extension Leg Handrail Base Pad Motor Hood 8" Wire Tie Cable Tie Clamp Transformer Releasable Tie Lift Pivot Bolt Front Wheel Bolt Front Wheel Incline Motor Guard Upright Grommet Upright Wire Harness Hand Weight 30 Lock Washer Rear Roller Adj. PART LIST-Model No. Qty. 11 22...
... Breaker Static Decal 12" Audio Wire Belly Pan 3/4" Screw Chest Pulse Sensor Chest Pulse Strap Console Ground Wire Console Base Book Holder Console Handrail Endcap Pulse Grip Pulse Grip Screw Console Screw (Short) Console Back Extension Leg Assembly Extension Leg Endcap Base Screw/Latch Screw Incline Motor Spacer Extension Leg Handrail Base Pad Motor Hood 8" Wire Tie Cable Tie Clamp Transformer Releasable Tie Lift Pivot Bolt Front Wheel Bolt Front Wheel Incline Motor Guard Upright Grommet Upright Wire Harness Hand Weight 30 Lock Washer Rear Roller Adj. PART LIST-Model No. Qty. 11 22...

English Manual
Page 34
... of the product (HealthRider® T90 treadmill) • The SERIAL NUMBER of the product (see the front cover of this manual) • The KEY NUMBER and DESCRIPTION of its scope and duration to be pre-authorized by ICON. Some states do not allow limitations on pages 30 and 31). You may also have other warranty beyond that specifically set forth herein. All repairs for a period...
... of the product (HealthRider® T90 treadmill) • The SERIAL NUMBER of the product (see the front cover of this manual) • The KEY NUMBER and DESCRIPTION of its scope and duration to be pre-authorized by ICON. Some states do not allow limitations on pages 30 and 31). You may also have other warranty beyond that specifically set forth herein. All repairs for a period...

