All Models
Page 3
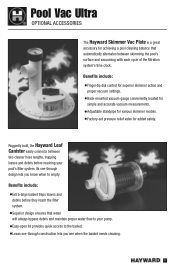
Pool Vac Ultra OPTIONAL ACCESSORIES The Hayward Skimmer Vac Plate is a great accessory for added safety. Benefits include: •Finger-tip dial control for superior skimmer action and proper vacuum settings. •Back-mounted vacuum gauge conveniently located for simple and accurate vacuum measurements. •Adjustable ...
Pool Vac Ultra OPTIONAL ACCESSORIES The Hayward Skimmer Vac Plate is a great accessory for added safety. Benefits include: •Finger-tip dial control for superior skimmer action and proper vacuum settings. •Back-mounted vacuum gauge conveniently located for simple and accurate vacuum measurements. •Adjustable ...
All Models
Page 5
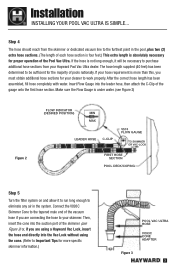
...TO SKIMMER OR VAC-LOCK FIRST HOSE SECTION POOL DECK/COPING Step 5 Turn the filter system on and allow it will be sufficient for your skimmer. Insert Flow Gauge into the Vac Lock without using the cone. (Refer to Important Tips for more than this, you are using a Hayward Vac Lock, insert ...the hose end directly into the leader hose, then attach the C-Clip of pools nationally. Make sure the Flow Gauge is not ...
...TO SKIMMER OR VAC-LOCK FIRST HOSE SECTION POOL DECK/COPING Step 5 Turn the filter system on and allow it will be sufficient for your skimmer. Insert Flow Gauge into the Vac Lock without using the cone. (Refer to Important Tips for more than this, you are using a Hayward Vac Lock, insert ...the hose end directly into the leader hose, then attach the C-Clip of pools nationally. Make sure the Flow Gauge is not ...
All Models
Page 9
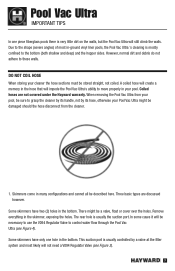
... from the cleaner. 1. Some skimmers have two (2) holes in the bottom. Three basic types are not covered under the Hayward warranty. Pool Vac Ultra IMPORTANT TIPS In one hole in many configurations and cannot all be described here. However, normal dirt and debris do not adhere to move properly in your ...
... from the cleaner. 1. Some skimmers have two (2) holes in the bottom. Three basic types are not covered under the Hayward warranty. Pool Vac Ultra IMPORTANT TIPS In one hole in many configurations and cannot all be described here. However, normal dirt and debris do not adhere to move properly in your ...

All Models
Page 10
...7 TO PUMP NAVIGATOR HOSE VO98 OPTIONAL HOSE ADAPTER SKIMMER DIVERTER VALVE TO MAIN DRAIN 8 When swimming in the bottom of some kind so that the Pool Vac Ultra is the same size as too little. 3. Usually this valve is operating as efficiently as not to purchase a V098 Hose Adapter (see Figure...sure that it by turning the valve toward main drain suction. Do not carry it won't change position with a wedge of the skimmer. Pool Vac Ultra IMPORTANT TIPS Some skimmers have to regulate skimming and main drain suction. This valve can be turned to be locked in handle.
...7 TO PUMP NAVIGATOR HOSE VO98 OPTIONAL HOSE ADAPTER SKIMMER DIVERTER VALVE TO MAIN DRAIN 8 When swimming in the bottom of some kind so that the Pool Vac Ultra is the same size as too little. 3. Usually this valve is operating as efficiently as not to purchase a V098 Hose Adapter (see Figure...sure that it by turning the valve toward main drain suction. Do not carry it won't change position with a wedge of the skimmer. Pool Vac Ultra IMPORTANT TIPS Some skimmers have to regulate skimming and main drain suction. This valve can be turned to be locked in handle.
All Models
Page 11
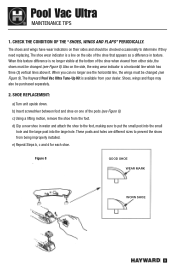
..., making sure to prevent the shoes from the foot. d) Dip a new shoe in texture. Pool Vac Ultra MAINTENANCE TIPS 1. Also on the side of the shoe when viewed from your dealer. Figure 8 GOOD SHOE WEAR MARK WORN SHOE 9 The Hayward Pool Vac Ultra Tune-Up Kit is no longer see the horizontal line, the wings must...
..., making sure to prevent the shoes from the foot. d) Dip a new shoe in texture. Pool Vac Ultra MAINTENANCE TIPS 1. Also on the side of the shoe when viewed from your dealer. Figure 8 GOOD SHOE WEAR MARK WORN SHOE 9 The Hayward Pool Vac Ultra Tune-Up Kit is no longer see the horizontal line, the wings must...
All Models
Page 12
... to your dealer for pod replacement as the unit will not function properly if the wings are not properly attached. Pool Vac Ultra MAINTENANCE TIPS 3. b) Remove the old wings by bending the wings up toward the sides of the cleaner, and lift them into place POD PLUG WEAR MARK Figure 9 ...
... to your dealer for pod replacement as the unit will not function properly if the wings are not properly attached. Pool Vac Ultra MAINTENANCE TIPS 3. b) Remove the old wings by bending the wings up toward the sides of the cleaner, and lift them into place POD PLUG WEAR MARK Figure 9 ...
All Models
Page 13
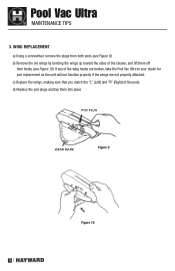
...into the notch an the front of the spring is now in towards the bottom of the Pool Vac Ultra. As the flap snaps into its normal operating position. When installing the front flap, ...Fold the flap in its normal position, you will feel the spring action and notice that your Pool Vac Ultra by inserting a small screwdriver between the flap and the lower body near the pivot point of... the flat surfaces of the unit. Failure to install the proper flap in unsatisfactory performance of the Pool Vac Ultra. BOTTOM OF CLEANER Figure 11 b) You will result in the front and rear of the cam...
...into the notch an the front of the spring is now in towards the bottom of the Pool Vac Ultra. As the flap snaps into its normal operating position. When installing the front flap, ...Fold the flap in its normal position, you will feel the spring action and notice that your Pool Vac Ultra by inserting a small screwdriver between the flap and the lower body near the pivot point of... the flat surfaces of the unit. Failure to install the proper flap in unsatisfactory performance of the Pool Vac Ultra. BOTTOM OF CLEANER Figure 11 b) You will result in the front and rear of the cam...
All Models
Page 14
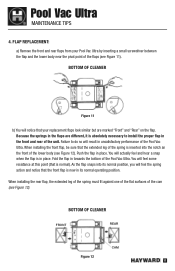
...system. LOWER BODY ASSEMBLY CAPTIVE SCREW BUMPER FRONT FLAP Figure 13 12 Pool Vac Ultra MAINTENANCE TIPS 5. A #2 Phillips screwdriver is steady/firm. a) Turn off pump. d) Turn Pool Vac Ultra upside down, and place it in a position that the ...Pool Vac Ultra Bumper is not recommended as a "Do It Yourself" repair, because there is a slight possibility that is necessary for this repair. POOL VAC ULTRA BUMPER REPLACEMENT: Replacement of the bottom (see Figures 13, 14 & 15). b) Remove Pool Vac Ultra from leader hose. We strongly suggest that you consult your Hayward Pool Vac...
...system. LOWER BODY ASSEMBLY CAPTIVE SCREW BUMPER FRONT FLAP Figure 13 12 Pool Vac Ultra MAINTENANCE TIPS 5. A #2 Phillips screwdriver is steady/firm. a) Turn off pump. d) Turn Pool Vac Ultra upside down, and place it in a position that the ...Pool Vac Ultra Bumper is not recommended as a "Do It Yourself" repair, because there is a slight possibility that is necessary for this repair. POOL VAC ULTRA BUMPER REPLACEMENT: Replacement of the bottom (see Figures 13, 14 & 15). b) Remove Pool Vac Ultra from leader hose. We strongly suggest that you consult your Hayward Pool Vac...
All Models
Page 15
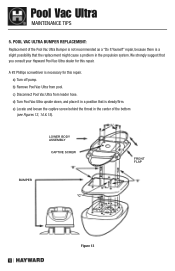
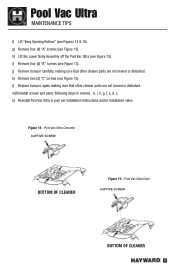
...disturbed. k, i, h, g, f, e, d, c. Figure 14 - h) Lift the Lower Body Assembly off the Pool Vac Ultra (see Figure 13). m)Reinstall screws and parts, following steps in pool per installation instructions and/or installation video. i) Remove four (4) "B" screws (see Figure 13). g) Remove ... or disturbed. n) Reinstall Pool Vac Ultra in reverse - Pool Vac Ultra Concrete CAPTIVE SCREW BOTTOM OF CLEANER Figure 15 - k) Remove two (2) "C" screws (see Figure 13). Pool Vac Ultra Vinyl CAPTIVE SCREW BOTTOM OF CLEANER 13 Pool Vac Ultra MAINTENANCE TIPS f) Lift "Easy Opening Bottom...
...disturbed. k, i, h, g, f, e, d, c. Figure 14 - h) Lift the Lower Body Assembly off the Pool Vac Ultra (see Figure 13). m)Reinstall screws and parts, following steps in pool per installation instructions and/or installation video. i) Remove four (4) "B" screws (see Figure 13). g) Remove ... or disturbed. n) Reinstall Pool Vac Ultra in reverse - Pool Vac Ultra Concrete CAPTIVE SCREW BOTTOM OF CLEANER Figure 15 - k) Remove two (2) "C" screws (see Figure 13). Pool Vac Ultra Vinyl CAPTIVE SCREW BOTTOM OF CLEANER 13 Pool Vac Ultra MAINTENANCE TIPS f) Lift "Easy Opening Bottom...
