All Models
Page 2
... automatic pool cleaning system from Hayward. Pool Vac Ultra INSTALLATION MANUAL Congratulations on your pool is subjected to an abnormal debris load, maintenance steps should not be used to clean the pool for spring start-up unless the conditions noted in -ground pool. The Pool Vac Ultra is the smart, efficient way to clean your pool will be relative to complete the proper installation of the accessories designed for price...
... automatic pool cleaning system from Hayward. Pool Vac Ultra INSTALLATION MANUAL Congratulations on your pool is subjected to an abnormal debris load, maintenance steps should not be used to clean the pool for spring start-up unless the conditions noted in -ground pool. The Pool Vac Ultra is the smart, efficient way to clean your pool will be relative to complete the proper installation of the accessories designed for price...
All Models
Page 3
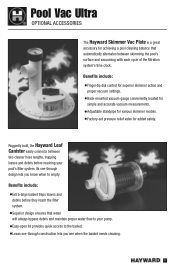
... design lets you know when to your pool's filter system. Benefits include: •Finger-tip dial control for superior skimmer action and proper vacuum settings. •Back-mounted vacuum gauge conveniently located for simple and accurate vacuum measurements. •Adjustable standpipe for various skimmer models. •Factory-set pressure relief valve for achieving a pool cleaning balance that water will always bypass debris and maintain proper water flow to empty.
... design lets you know when to your pool's filter system. Benefits include: •Finger-tip dial control for superior skimmer action and proper vacuum settings. •Back-mounted vacuum gauge conveniently located for simple and accurate vacuum measurements. •Adjustable standpipe for various skimmer models. •Factory-set pressure relief valve for achieving a pool cleaning balance that water will always bypass debris and maintain proper water flow to empty.
All Models
Page 4
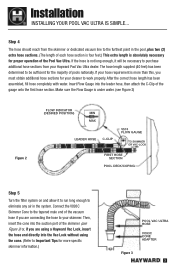
... "REMOVE LABEL AND CONNECT TO CLEANER". Step 2 Clean or backwash the filter, and clean the hair and lint pot prior to see Figure 1). Following the installation of your pool for Pool Vac Ultra installation, please follow the easy steps listed below. Connect the special Pool Vac Ultra hose sections together by -step, and it that the water level is free from algae. Depending on the size and shape of Pool Vac Ultra, clean the...
... "REMOVE LABEL AND CONNECT TO CLEANER". Step 2 Clean or backwash the filter, and clean the hair and lint pot prior to see Figure 1). Following the installation of your pool for Pool Vac Ultra installation, please follow the easy steps listed below. Connect the special Pool Vac Ultra hose sections together by -step, and it that the water level is free from algae. Depending on the size and shape of Pool Vac Ultra, clean the...
All Models
Page 5
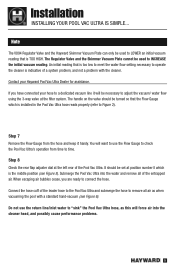
... assembled, fill hose completely with water. Insert Flow Gauge into the suction port of the skimmer (see Figure 2) Figure 2 FLOW INDICATOR (DESIRED POSITION) MIN MAX LEADER HOSE C-CLIP V574 FLOW GAUGE TO SKIMMER OR VAC-LOCK FIRST HOSE SECTION POOL DECK/COPING Step 5 Turn the filter system on and allow it will be sufficient for the majority of the vacuum hose if you are using a Hayward Vac Lock, insert the hose end directly into the Vac Lock...
... assembled, fill hose completely with water. Insert Flow Gauge into the suction port of the skimmer (see Figure 2) Figure 2 FLOW INDICATOR (DESIRED POSITION) MIN MAX LEADER HOSE C-CLIP V574 FLOW GAUGE TO SKIMMER OR VAC-LOCK FIRST HOSE SECTION POOL DECK/COPING Step 5 Turn the filter system on and allow it will be sufficient for the majority of the vacuum hose if you are using a Hayward Vac Lock, insert the hose end directly into the Vac Lock...

All Models
Page 6
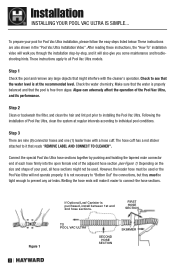
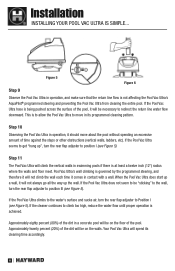
.... Installation INSTALLING YOUR POOL VAC ULTRA IS SIMPLE... Turn the blue collar counter clockwise until closed/tight), insert the Regulator Valve into the Skimmer Cone, and insert the hose end into the Regulator Valve (see Figure 4). The black disk should be necessary to adjust vacuum/water flow. If a Hayward Skimmer Vacuum Plate is higher than required with the Skimmer Vacuum Plate. Step 6 Check the water flow reading on the "MAX...
.... Installation INSTALLING YOUR POOL VAC ULTRA IS SIMPLE... Turn the blue collar counter clockwise until closed/tight), insert the Regulator Valve into the Skimmer Cone, and insert the hose end into the Regulator Valve (see Figure 4). The black disk should be necessary to adjust vacuum/water flow. If a Hayward Skimmer Vacuum Plate is higher than required with the Skimmer Vacuum Plate. Step 6 Check the water flow reading on the "MAX...
All Models
Page 7
... turned so that the Flow Gauge which is TOO HIGH. Do not use the Flow Gauge to check the Pool Vac Ultra's operation from the hose and keep it will be set at the left rear of the leader hose to the Pool Vac Ultra and submerge the hose to time. The Regulator Valve and the Skimmer Vacuum Plate cannot be used to "sink" the Pool Vac Ultra hose, as when vacuuming the pool with the cleaner...
... turned so that the Flow Gauge which is TOO HIGH. Do not use the Flow Gauge to check the Pool Vac Ultra's operation from the hose and keep it will be set at the left rear of the leader hose to the Pool Vac Ultra and submerge the hose to time. The Regulator Valve and the Skimmer Vacuum Plate cannot be used to "sink" the Pool Vac Ultra hose, as when vacuuming the pool with the cleaner...
All Models
Page 8
... allow the Pool Vac Ultra to climb too high, reduce the water flow until proper operation is not affecting the Pool Vac Ultra's AquaPilot® programmed steering and preventing the Pool Vac Ultra from cleaning the entire pool. If the cleaner continues to move about the pool without spending an excessive amount of the dirt in operation, and make sure that the return line flow is achieved. Pool Vac Ultra...
... allow the Pool Vac Ultra to climb too high, reduce the water flow until proper operation is not affecting the Pool Vac Ultra's AquaPilot® programmed steering and preventing the Pool Vac Ultra from cleaning the entire pool. If the cleaner continues to move about the pool without spending an excessive amount of the dirt in operation, and make sure that the return line flow is achieved. Pool Vac Ultra...
All Models
Page 9
... coiled. Three basic types are not covered under the Hayward warranty. However, normal dirt and debris do not adhere to control water flow through the Pool Vac Ultra (see Figure 3). 7 Some skimmers have only one piece fiberglass pools there is usually controlled by its hose, otherwise your cleaner the hose sections must be necessary to use the V094 Regulator Valve to these walls. Pool Vac Ultra IMPORTANT TIPS...
... coiled. Three basic types are not covered under the Hayward warranty. However, normal dirt and debris do not adhere to control water flow through the Pool Vac Ultra (see Figure 3). 7 Some skimmers have only one piece fiberglass pools there is usually controlled by its hose, otherwise your cleaner the hose sections must be necessary to use the V094 Regulator Valve to these walls. Pool Vac Ultra IMPORTANT TIPS...

All Models
Page 10
... the Pool Vac Ultra hose. Skimmer, Skimmer Vac Plate, Vac Lock, etc.) 4. Do not carry it will have a vari-flow or diverter valve in place with a wedge of some kind so that it won't change position with operation of the pool, always disconnect the leader hose from the water. 9. Periodically check the water flow/vacuum to be sure that the Pool Vac Ultra hose is securely attached to its hose are going to super chlorinate, shock...
... the Pool Vac Ultra hose. Skimmer, Skimmer Vac Plate, Vac Lock, etc.) 4. Do not carry it will have a vari-flow or diverter valve in place with a wedge of some kind so that it won't change position with operation of the pool, always disconnect the leader hose from the water. 9. Periodically check the water flow/vacuum to be sure that the Pool Vac Ultra hose is securely attached to its hose are going to super chlorinate, shock...
All Models
Page 11
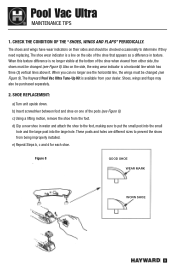
...Hayward Pool Vac Ultra Tune-Up Kit is available from being improperly installed. Shoes, wings and flaps may also be changed (see the horizontal line, the wings must be checked occasionally to determine if they need replacing. d) Dip a new shoe in texture. These posts and holes are different sizes...SHOE REPLACEMENT: a) Turn unit upside down. The shoe wear indicator is a line on the side, the wing wear indicator is no longer see Figure 8). Pool Vac Ultra MAINTENANCE TIPS 1. CHECK THE CONDITION OF THE "SHOES, WINGS AND FLAPS" PERIODICALLY. c) Using a lifting motion, remove ...
...Hayward Pool Vac Ultra Tune-Up Kit is available from being improperly installed. Shoes, wings and flaps may also be changed (see the horizontal line, the wings must be checked occasionally to determine if they need replacing. d) Dip a new shoe in texture. These posts and holes are different sizes...SHOE REPLACEMENT: a) Turn unit upside down. The shoe wear indicator is a line on the side, the wing wear indicator is no longer see Figure 8). Pool Vac Ultra MAINTENANCE TIPS 1. CHECK THE CONDITION OF THE "SHOES, WINGS AND FLAPS" PERIODICALLY. c) Using a lifting motion, remove ...
All Models
Page 13
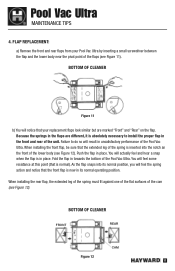
...Pool Vac Ultra. Pool Vac Ultra MAINTENANCE TIPS 4. When installing the front flap, be sure that is in towards the bottom of the unit. Because the springs in the flaps are marked "Front" and "Rear" on the flap. Push the flap in its normal position, you will notice that the front flap is inserted into its normal operating position.... BOTTOM OF CLEANER Figure 11 b) You will feel some resistance at this point (that the extended leg of the lower body (see Figure 12). Failure to install the proper flap in unsatisfactory ...
...Pool Vac Ultra. Pool Vac Ultra MAINTENANCE TIPS 4. When installing the front flap, be sure that is in towards the bottom of the unit. Because the springs in the flaps are marked "Front" and "Rear" on the flap. Push the flap in its normal position, you will notice that the front flap is inserted into its normal operating position.... BOTTOM OF CLEANER Figure 11 b) You will feel some resistance at this point (that the extended leg of the lower body (see Figure 12). Failure to install the proper flap in unsatisfactory ...
All Models
Page 14
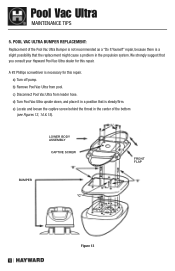
d) Turn Pool Vac Ultra upside down, and place it in a position that is a slight possibility that you consult your Hayward Pool Vac Ultra dealer for this repair. a) Turn off pump. b) Remove Pool Vac Ultra from leader hose. e) Locate and loosen the captive screw behind the throat in the propulsion system. We strongly suggest that the replacement might cause a problem in the center of the Pool Vac Ultra Bumper is...
d) Turn Pool Vac Ultra upside down, and place it in a position that is a slight possibility that you consult your Hayward Pool Vac Ultra dealer for this repair. a) Turn off pump. b) Remove Pool Vac Ultra from leader hose. e) Locate and loosen the captive screw behind the throat in the propulsion system. We strongly suggest that the replacement might cause a problem in the center of the Pool Vac Ultra Bumper is...
All Models
Page 15
... BOTTOM OF CLEANER 13 l) Replace bumper, again making sure that other cleaner parts are not moved or disturbed. n) Reinstall Pool Vac Ultra in reverse - j) Remove bumper carefully, making sure that other cleaner parts are not moved or disturbed. m)Reinstall screws and parts, following steps in pool per installation instructions and/or installation video. h) Lift the Lower Body Assembly off the Pool Vac Ultra (see Figure 13). Pool Vac Ultra Concrete...
... BOTTOM OF CLEANER 13 l) Replace bumper, again making sure that other cleaner parts are not moved or disturbed. n) Reinstall Pool Vac Ultra in reverse - j) Remove bumper carefully, making sure that other cleaner parts are not moved or disturbed. m)Reinstall screws and parts, following steps in pool per installation instructions and/or installation video. h) Lift the Lower Body Assembly off the Pool Vac Ultra (see Figure 13). Pool Vac Ultra Concrete...
All Models
Page 16
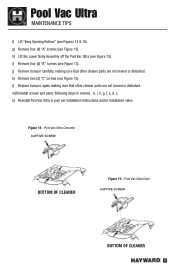
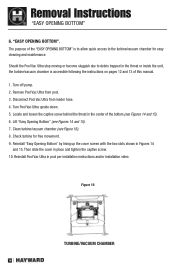
... turbine/vacuum chamber for free movement. 9. Locate and loosen the captive screw behind the throat in place and tighten the captive screw. 10. Reinstall Pool Vac Ultra in Figures 14 and 15. Check turbine for easy cleaning and maintenance. Turn off pump. 2. Reinstall "Easy Opening Bottom" by lining up the cover screen with the two slots shown in pool per installation instructions and/or installation video. Figure...
... turbine/vacuum chamber for free movement. 9. Locate and loosen the captive screw behind the throat in place and tighten the captive screw. 10. Reinstall Pool Vac Ultra in Figures 14 and 15. Check turbine for easy cleaning and maintenance. Turn off pump. 2. Reinstall "Easy Opening Bottom" by lining up the cover screen with the two slots shown in pool per installation instructions and/or installation video. Figure...
All Models
Page 17
... of Pool Vac Ultra throat Clear blockage Worn shoes Replace shoes Worn wings Replace wings Hose too short Install additional hose sections per installation instructions Improper tension on rear flap Turn rear flap adjuster to climb vertical walls gunite/concrete pool CAUSES SOLUTIONS Improper shoes for application SOLUTIONS Check water flow with Flow Gauge and adjust as per Step 6, Figure 2. only) Lack of/improper water flow through cleaner Partial blockage of Pool Vac...
... of Pool Vac Ultra throat Clear blockage Worn shoes Replace shoes Worn wings Replace wings Hose too short Install additional hose sections per installation instructions Improper tension on rear flap Turn rear flap adjuster to climb vertical walls gunite/concrete pool CAUSES SOLUTIONS Improper shoes for application SOLUTIONS Check water flow with Flow Gauge and adjust as per Step 6, Figure 2. only) Lack of/improper water flow through cleaner Partial blockage of Pool Vac...
All Models
Page 18
... water flow through cleaner Check water flow with Flow Gauge and adjust per instructions in both 16 Readjust return lines to prevent water flow from entering the pool through the return lines the air bubbles and allow the cleaner head to the bottom of the pool until Steering failure 1) Check and clean rear screen smoothly in Step 6. either at the surface or at the bottom of return line flow - Pool Vac Ultra TROUBLESHOOTING GUIDE Problem: Cleaner climbs to water...
... water flow through cleaner Check water flow with Flow Gauge and adjust per instructions in both 16 Readjust return lines to prevent water flow from entering the pool through the return lines the air bubbles and allow the cleaner head to the bottom of the pool until Steering failure 1) Check and clean rear screen smoothly in Step 6. either at the surface or at the bottom of return line flow - Pool Vac Ultra TROUBLESHOOTING GUIDE Problem: Cleaner climbs to water...
All Models
Page 19
... REPLACE IF NECESSARY. Pool Vac Ultra TROUBLESHOOTING GUIDE Problem: Cleaner sticks at steps, corners, etc. DO NOT ATTEMPT b) check pod/A-frame connection and TO RETIGHTEN LOOSE PODS. c) check medium turbine and spindle gear assemblies 17 Worn shoes Replace shoes Worn wings Replace wings Hose too short Install additional hose per Step 6, Figure 2. CAUSES SOLUTIONS Improper water flow Check water flow with Flow Gauge and adjust as per installation instructions Steering failure 1) Check and clean rear screen smoothly in both directions 2) Check...
... REPLACE IF NECESSARY. Pool Vac Ultra TROUBLESHOOTING GUIDE Problem: Cleaner sticks at steps, corners, etc. DO NOT ATTEMPT b) check pod/A-frame connection and TO RETIGHTEN LOOSE PODS. c) check medium turbine and spindle gear assemblies 17 Worn shoes Replace shoes Worn wings Replace wings Hose too short Install additional hose per Step 6, Figure 2. CAUSES SOLUTIONS Improper water flow Check water flow with Flow Gauge and adjust as per installation instructions Steering failure 1) Check and clean rear screen smoothly in both directions 2) Check...
All Models
Page 20
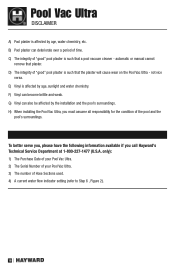
... the Pool Vac Ultra - H) When installing the Pool Vac Ultra, you call Hayward's Technical Service Department at 1-800-227-1477 (U.S.A. D) The integrity of "good" pool plaster is such that plaster. G) Vinyl can deteriorate over a period of the pool and the pool's surroundings. only): 1) The Purchase Date of your Pool Vac Ultra. 2) The Serial Number of your Pool Vac Ultra. 3) The number of "good" pool plaster is such that a pool vacuum cleaner - B) Pool plaster...
... the Pool Vac Ultra - H) When installing the Pool Vac Ultra, you call Hayward's Technical Service Department at 1-800-227-1477 (U.S.A. D) The integrity of "good" pool plaster is such that plaster. G) Vinyl can deteriorate over a period of the pool and the pool's surroundings. only): 1) The Purchase Date of your Pool Vac Ultra. 2) The Serial Number of your Pool Vac Ultra. 3) The number of "good" pool plaster is such that a pool vacuum cleaner - B) Pool plaster...
All Models
Page 21
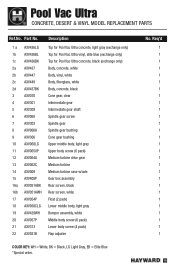
... 1 1 1 1 1 1 1 1 1 1 1 1 1 19 Part No. Pool Vac Ultra CONCRETE, DESERT & VINYL MODEL REPLACEMENT PARTS Ref.No. No. Description 1 a AXV436LG Top for Pool Vac Ultra concrete, light gray (exchange only) 1b AXV436BL Top for Pool Vac Ultra vinyl, elite blue (exchange only) 1c AXV436BK Top for Pool Vac Ultra concrete, black (exchange only) 2a AXV437 Body, concrete, white 2b AXV447... AXV408P Gear box assembly 16a AXV051ABK Rear screen, black 16b AXV051AWH Rear screen, white 17 AXV054P Float (2 pack) 18 AXV050CLG Lower middle body, light gray 19 AXV429WH Bumper assembly, white 20 AXV057P...
... 1 1 1 1 1 1 1 1 1 1 1 1 1 19 Part No. Pool Vac Ultra CONCRETE, DESERT & VINYL MODEL REPLACEMENT PARTS Ref.No. No. Description 1 a AXV436LG Top for Pool Vac Ultra concrete, light gray (exchange only) 1b AXV436BL Top for Pool Vac Ultra vinyl, elite blue (exchange only) 1c AXV436BK Top for Pool Vac Ultra concrete, black (exchange only) 2a AXV437 Body, concrete, white 2b AXV447... AXV408P Gear box assembly 16a AXV051ABK Rear screen, black 16b AXV051AWH Rear screen, white 17 AXV054P Float (2 pack) 18 AXV050CLG Lower middle body, light gray 19 AXV429WH Bumper assembly, white 20 AXV057P...
All Models
Page 22
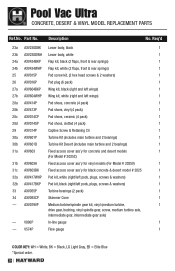
... pods, plugs, screws & washers) 1 33 AXV055P Turbine bearings (2 pack) 1 34 AXV093CP Skimmer Cone 1 - Pool Vac Ultra CONCRETE, DESERT & VINYL MODEL REPLACEMENT PARTS Ref.No. AXV079VP Medium turbine/spindle gear kit, vinyl (medium turbine, 1 drive gear, bushing, vinyl spindle gear, screw, medium turbine axle, intermediate gear, intermediate gear axle) - V574P Flow gauge 1 COLOR KEY: WH = White, BK = Black, LG Light Gray, EB...
... pods, plugs, screws & washers) 1 33 AXV055P Turbine bearings (2 pack) 1 34 AXV093CP Skimmer Cone 1 - Pool Vac Ultra CONCRETE, DESERT & VINYL MODEL REPLACEMENT PARTS Ref.No. AXV079VP Medium turbine/spindle gear kit, vinyl (medium turbine, 1 drive gear, bushing, vinyl spindle gear, screw, medium turbine axle, intermediate gear, intermediate gear axle) - V574P Flow gauge 1 COLOR KEY: WH = White, BK = Black, LG Light Gray, EB...


