All Models
Page 2
.... Therefore the performance of your Pool Vac Ultra. Consult your Hayward Pool Vac Ultra dealer for your convenience. 1) Purchase Date 2) Serial Number Note The Pool Vac Ultra should be necessary to clean your in Step 1 are system reliant, there is the smart, efficient way to complete the proper installation of the Pool Vac Ultra in your pool will be applicable to...
.... Therefore the performance of your Pool Vac Ultra. Consult your Hayward Pool Vac Ultra dealer for your convenience. 1) Purchase Date 2) Serial Number Note The Pool Vac Ultra should be necessary to clean your in Step 1 are system reliant, there is the smart, efficient way to complete the proper installation of the Pool Vac Ultra in your pool will be applicable to...
All Models
Page 4
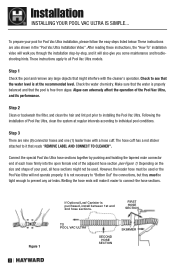
... at regular intervals according to see Figure 1). Step 3 There are also shown in the "Pool Vac Ultra Installation Video". Installation INSTALLING YOUR POOL VAC ULTRA IS SIMPLE... To prepare your pool, all Pool Vac Ultra models. Step 1 Check the pool and remove any air leaks. Step 2 Clean or backwash the filter, and clean the hair and lint pot prior to "Bottom...
... at regular intervals according to see Figure 1). Step 3 There are also shown in the "Pool Vac Ultra Installation Video". Installation INSTALLING YOUR POOL VAC ULTRA IS SIMPLE... To prepare your pool, all Pool Vac Ultra models. Step 1 Check the pool and remove any air leaks. Step 2 Clean or backwash the filter, and clean the hair and lint pot prior to "Bottom...
All Models
Page 5
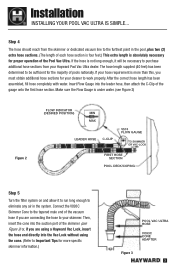
Step 4 The hose should reach from your Hayward Pool Vac Ultra dealer. If the hose is not long enough, it to run long enough to eliminate any air in the pool, plus two (2) extra hose sections. (The length of each hose section is four feet.) This extra length is absolutely ... sections for the majority of the gauge onto the first hose section. Insert Flow Gauge into the Vac Lock without using the cone. (Refer to be necessary to purchase additional hose sections from the skimmer or dedicated vacuum line to work properly. Installation INSTALLING YOUR POOL VAC ULTRA IS SIMPLE...
Step 4 The hose should reach from your Hayward Pool Vac Ultra dealer. If the hose is not long enough, it to run long enough to eliminate any air in the pool, plus two (2) extra hose sections. (The length of each hose section is four feet.) This extra length is absolutely ... sections for the majority of the gauge onto the first hose section. Insert Flow Gauge into the Vac Lock without using the cone. (Refer to be necessary to purchase additional hose sections from the skimmer or dedicated vacuum line to work properly. Installation INSTALLING YOUR POOL VAC ULTRA IS SIMPLE...

All Models
Page 6
...VO93C CONE ADAPTER TO TO MAIN DRAIN PUMP (if applicable) Figure 4 4 If the setting is to adjust vacuum/water flow. If a Hayward Skimmer Vacuum Plate is higher than required with the Skimmer Vacuum Plate. Turn the blue collar counter clockwise until closed/tight), insert the Regulator ... should be used, follow the installation instructions included with the black disk outside of the box on the gauge. Turn the filter system on the Flow Gauge. (Refer to eliminate any air in the box between the "MIN" and "MAX" markings. Installation INSTALLING YOUR POOL VAC ULTRA IS SIMPLE...
...VO93C CONE ADAPTER TO TO MAIN DRAIN PUMP (if applicable) Figure 4 4 If the setting is to adjust vacuum/water flow. If a Hayward Skimmer Vacuum Plate is higher than required with the Skimmer Vacuum Plate. Turn the blue collar counter clockwise until closed/tight), insert the Regulator ... should be used, follow the installation instructions included with the black disk outside of the box on the gauge. Turn the filter system on the Flow Gauge. (Refer to eliminate any air in the box between the "MIN" and "MAX" markings. Installation INSTALLING YOUR POOL VAC ULTRA IS SIMPLE...
All Models
Page 7
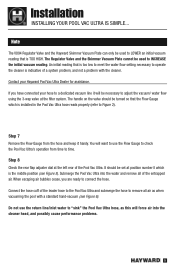
...Gauge which is too low to meet the water flow setting necessary to time. When escaping air bubbles cease, you have connected your Hayward Pool Vac Ultra Dealer for assistance. Connect the hose cuff of a system problem, and not a problem with a standard hand-vacuum (see... handy. Submerge the Pool Vac Ultra into the cleaner head, and possibly cause performance problems. 5 Installation INSTALLING YOUR POOL VAC ULTRA IS SIMPLE... The handle on the valve should be used to remove all of the Pool Vac Ultra. Note The V094 Regulator Valve and the Hayward Skimmer Vacuum Plate can...
...Gauge which is too low to meet the water flow setting necessary to time. When escaping air bubbles cease, you have connected your Hayward Pool Vac Ultra Dealer for assistance. Connect the hose cuff of a system problem, and not a problem with a standard hand-vacuum (see... handy. Submerge the Pool Vac Ultra into the cleaner head, and possibly cause performance problems. 5 Installation INSTALLING YOUR POOL VAC ULTRA IS SIMPLE... The handle on the valve should be used to remove all of the Pool Vac Ultra. Note The V094 Regulator Valve and the Hayward Skimmer Vacuum Plate can...
All Models
Page 8
Installation INSTALLING YOUR POOL VAC ULTRA IS SIMPLE... Step 10 Observing the Pool Vac Ultra in a concrete pool will be on the walls. Pool Vac Ultra's wall climbing is governed by the programmed steering, and therefore it will not climb the wall each time it will be ... (vertical walls, ladders, etc). When the Pool Vac Ultra does start up a wall, it should move in swimming pools if there is not affecting the Pool Vac Ultra's AquaPilot® programmed steering and preventing the Pool Vac Ultra from cleaning the entire pool. If the Pool Vac Ultra does not seem to get "hung up...
Installation INSTALLING YOUR POOL VAC ULTRA IS SIMPLE... Step 10 Observing the Pool Vac Ultra in a concrete pool will be on the walls. Pool Vac Ultra's wall climbing is governed by the programmed steering, and therefore it will not climb the wall each time it will be ... (vertical walls, ladders, etc). When the Pool Vac Ultra does start up a wall, it should move in swimming pools if there is not affecting the Pool Vac Ultra's AquaPilot® programmed steering and preventing the Pool Vac Ultra from cleaning the entire pool. If the Pool Vac Ultra does not seem to get "hung up...
All Models
Page 11
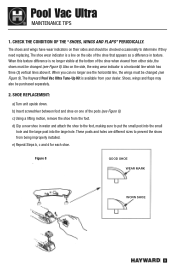
CHECK THE CONDITION OF THE "SHOES, WINGS AND FLAPS" PERIODICALLY. Also on one of the pods (see Figure 8). The Hayward Pool Vac Ultra Tune-Up Kit is a line on their sides and should be purchased separately. 2. c) Using a lifting motion, remove the shoe from your dealer. d) Dip...improperly installed. Shoes, wings and flaps may also be checked occasionally to put the small post into the small hole and the large post into the large hole. When this texture difference is a horizontal line which has three (3) vertical lines above it. SHOE REPLACEMENT: a) Turn unit upside down. Pool Vac ...
CHECK THE CONDITION OF THE "SHOES, WINGS AND FLAPS" PERIODICALLY. Also on one of the pods (see Figure 8). The Hayward Pool Vac Ultra Tune-Up Kit is a line on their sides and should be purchased separately. 2. c) Using a lifting motion, remove the shoe from your dealer. d) Dip...improperly installed. Shoes, wings and flaps may also be checked occasionally to put the small post into the small hole and the large post into the large hole. When this texture difference is a horizontal line which has three (3) vertical lines above it. SHOE REPLACEMENT: a) Turn unit upside down. Pool Vac ...
All Models
Page 13
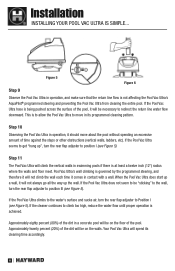
... you will notice that the front flap is inserted into its normal operating position. Pool Vac Ultra MAINTENANCE TIPS 4. As the flap snaps into the notch an the front of the flaps (see Figure 11). When installing the rear flap, the extended leg of the spring must fit against one of the... CLEANER Figure 11 b) You will feel some resistance at this point (that the extended leg of the unit. Failure to install the proper flap in unsatisfactory performance of the Pool Vac Ultra. You will result in the front and rear of the spring is now in towards the bottom of the cam...
... you will notice that the front flap is inserted into its normal operating position. Pool Vac Ultra MAINTENANCE TIPS 4. As the flap snaps into the notch an the front of the flaps (see Figure 11). When installing the rear flap, the extended leg of the spring must fit against one of the... CLEANER Figure 11 b) You will feel some resistance at this point (that the extended leg of the unit. Failure to install the proper flap in unsatisfactory performance of the Pool Vac Ultra. You will result in the front and rear of the spring is now in towards the bottom of the cam...
All Models
Page 15
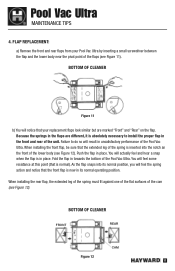
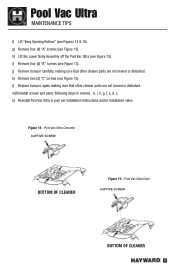
... (see Figures 14 & 15). m)Reinstall screws and parts, following steps in pool per installation instructions and/or installation video. Figure 14 - Pool Vac Ultra Concrete CAPTIVE SCREW BOTTOM OF CLEANER Figure 15 - Pool Vac Ultra MAINTENANCE TIPS f) Lift "Easy Opening Bottom" (see Figure 13). j) Remove bumper carefully, making sure that other cleaner parts are not moved or...
... (see Figures 14 & 15). m)Reinstall screws and parts, following steps in pool per installation instructions and/or installation video. Figure 14 - Pool Vac Ultra Concrete CAPTIVE SCREW BOTTOM OF CLEANER Figure 15 - Pool Vac Ultra MAINTENANCE TIPS f) Lift "Easy Opening Bottom" (see Figure 13). j) Remove bumper carefully, making sure that other cleaner parts are not moved or...
All Models
Page 16
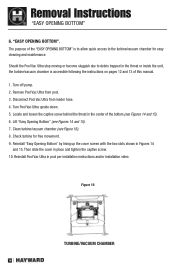
... 13 of the bottom (see Figure 16). 8. Clean turbine/vacuum chamber (see Figures 14 and 15). 6. Then slide the cover in pool per installation instructions and/or installation video. Turn off pump. 2. Remove Pool Vac Ultra from leader hose. 4. Figure 16 TURBINE/VACUUM CHAMBER 14 Removal Instructions "EASY OPENING BOTTOM" 6. "EASY OPENING BOTTOM". Locate and...
... 13 of the bottom (see Figure 16). 8. Clean turbine/vacuum chamber (see Figures 14 and 15). 6. Then slide the cover in pool per installation instructions and/or installation video. Turn off pump. 2. Remove Pool Vac Ultra from leader hose. 4. Figure 16 TURBINE/VACUUM CHAMBER 14 Removal Instructions "EASY OPENING BOTTOM" 6. "EASY OPENING BOTTOM". Locate and...
All Models
Page 17
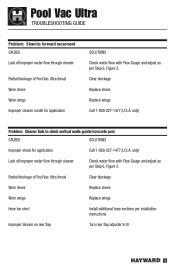
... wings Call 1-800-227-1477 (U.S.A. only) Problem: Cleaner fails to III 15 Partial blockage of Pool Vac Ultra throat Clear blockage Worn shoes Replace shoes Worn wings Replace wings Hose too short Install additional hose sections per installation instructions Improper tension on rear flap Turn rear flap adjuster to climb vertical walls gunite/concrete...
... wings Call 1-800-227-1477 (U.S.A. only) Problem: Cleaner fails to III 15 Partial blockage of Pool Vac Ultra throat Clear blockage Worn shoes Replace shoes Worn wings Replace wings Hose too short Install additional hose sections per installation instructions Improper tension on rear flap Turn rear flap adjuster to climb vertical walls gunite/concrete...
All Models
Page 18
...manual to ensure enough hose lengths are covered with fine bubbles, give the hose a good tug. This will release to the bottom of the pool until Steering failure 1) Check and clean rear screen smoothly in Step 6. Improper tension on rear flap Turn rear flap adjuster to I proper ...settle If cleaner head and hose are installed Remove all air from cleaner head Stop all air from interfering with bubbles again The cleaner head is actually being pulled or lifted off the bottom of the pool by the cleaner hose, of the pool - Pool Vac Ultra TROUBLESHOOTING GUIDE Problem: Cleaner climbs...
...manual to ensure enough hose lengths are covered with fine bubbles, give the hose a good tug. This will release to the bottom of the pool until Steering failure 1) Check and clean rear screen smoothly in Step 6. Improper tension on rear flap Turn rear flap adjuster to I proper ...settle If cleaner head and hose are installed Remove all air from cleaner head Stop all air from interfering with bubbles again The cleaner head is actually being pulled or lifted off the bottom of the pool by the cleaner hose, of the pool - Pool Vac Ultra TROUBLESHOOTING GUIDE Problem: Cleaner climbs...
All Models
Page 19
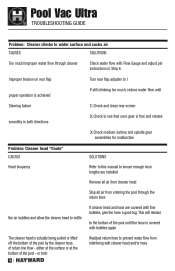
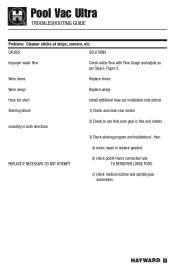
...check medium turbine and spindle gear assemblies 17 Pool Vac Ultra TROUBLESHOOTING GUIDE Problem: Cleaner sticks at steps, corners, etc. DO NOT ATTEMPT b) check pod/A-frame connection and TO RETIGHTEN LOOSE PODS. CAUSES SOLUTIONS Improper water flow Check water flow with Flow Gauge and adjust as per installation instructions Steering failure 1) Check and clean... steering program and troubleshoot - then: a) clean, repair or replace gearbox REPLACE IF NECESSARY. Worn shoes Replace shoes Worn wings Replace wings Hose too short Install additional hose per Step 6, Figure 2.
...check medium turbine and spindle gear assemblies 17 Pool Vac Ultra TROUBLESHOOTING GUIDE Problem: Cleaner sticks at steps, corners, etc. DO NOT ATTEMPT b) check pod/A-frame connection and TO RETIGHTEN LOOSE PODS. CAUSES SOLUTIONS Improper water flow Check water flow with Flow Gauge and adjust as per installation instructions Steering failure 1) Check and clean... steering program and troubleshoot - then: a) clean, repair or replace gearbox REPLACE IF NECESSARY. Worn shoes Replace shoes Worn wings Replace wings Hose too short Install additional hose per Step 6, Figure 2.
All Models
Page 20
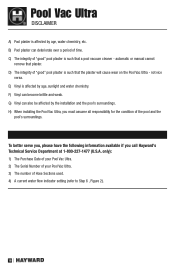
... by age, sunlight and water chemistry. E) Vinyl is such that the plaster will cause wear on the Pool Vac Ultra - G) Vinyl can also be affected by age, water chemistry, etc. H) When installing the Pool Vac Ultra, you call Hayward's Technical Service Department at 1-800-227-1477 (U.S.A. not vice versa. automatic or manual cannot remove that plaster...
... by age, sunlight and water chemistry. E) Vinyl is such that the plaster will cause wear on the Pool Vac Ultra - G) Vinyl can also be affected by age, water chemistry, etc. H) When installing the Pool Vac Ultra, you call Hayward's Technical Service Department at 1-800-227-1477 (U.S.A. not vice versa. automatic or manual cannot remove that plaster...


