All Models
Page 8
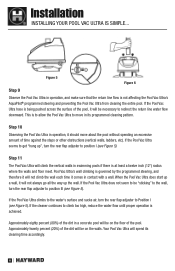
... continues to redirect the return line water flow downward. Figure 5 Figure 6 Step 9 Observe the Pool Vac Ultra in its cleaning time accordingly. 6 If the Pool Vac Ultra seems to Position I (see Figure 5). Approximately twenty percent (20%) of the pool, it should move in operation, and make sure that the return line flow is achieved. Step 10...
... continues to redirect the return line water flow downward. Figure 5 Figure 6 Step 9 Observe the Pool Vac Ultra in its cleaning time accordingly. 6 If the Pool Vac Ultra seems to Position I (see Figure 5). Approximately twenty percent (20%) of the pool, it should move in operation, and make sure that the return line flow is achieved. Step 10...
All Models
Page 9
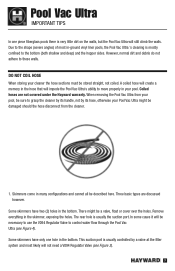
...hoses are discussed however. When removing the Pool Vac Ultra from your Pool Vac Ultra might be stored straight, not coiled. Three basic types are not covered under the Hayward warranty. In some cases it will impede the Pool Vac Ultra's ability to the bottom (both... shallow and deep) and the hopper sides. DO NOT COIL HOSE When storing your pool. Some skimmers have two (2) holes in the bottom. Some skimmers have only one piece fiberglass pools there is mostly confined to move...
...hoses are discussed however. When removing the Pool Vac Ultra from your Pool Vac Ultra might be stored straight, not coiled. Three basic types are not covered under the Hayward warranty. In some cases it will impede the Pool Vac Ultra's ability to the bottom (both... shallow and deep) and the hopper sides. DO NOT COIL HOSE When storing your pool. Some skimmers have two (2) holes in the bottom. Some skimmers have only one piece fiberglass pools there is mostly confined to move...
All Models
Page 15
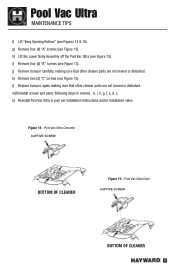
... installation video. j) Remove bumper carefully, making sure that other cleaner parts are not moved or disturbed. k, i, h, g, f, e, d, c. Figure 14 - k) Remove two (2) "C" screws (see Figures 14 & 15). n) Reinstall Pool Vac Ultra in reverse - Pool Vac Ultra MAINTENANCE TIPS f) Lift "Easy Opening Bottom" (see Figure 13). Pool Vac Ultra Vinyl CAPTIVE SCREW BOTTOM OF CLEANER 13 i) Remove four (4) "B" screws (see...
... installation video. j) Remove bumper carefully, making sure that other cleaner parts are not moved or disturbed. k, i, h, g, f, e, d, c. Figure 14 - k) Remove two (2) "C" screws (see Figures 14 & 15). n) Reinstall Pool Vac Ultra in reverse - Pool Vac Ultra MAINTENANCE TIPS f) Lift "Easy Opening Bottom" (see Figure 13). Pool Vac Ultra Vinyl CAPTIVE SCREW BOTTOM OF CLEANER 13 i) Remove four (4) "B" screws (see...
All Models
Page 16
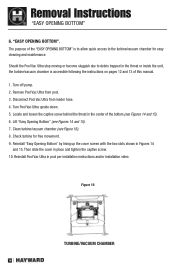
...down. 5. Check turbine for easy cleaning and maintenance. The purpose of the bottom (see Figures 14 and 15). 6. Disconnect Pool Vac Ultra from pool. 3. Figure 16 TURBINE/VACUUM CHAMBER 14 Lift "Easy Opening Bottom" (see Figure 16). 8. Locate and loosen the captive screw...4. Reinstall "Easy Opening Bottom" by lining up the cover screen with the two slots shown in pool per installation instructions and/or installation video. Should the Pool Vac Ultra stop moving or become sluggish due to the turbine/vacuum chamber for free movement. 9. "EASY OPENING BOTTOM". Then...
...down. 5. Check turbine for easy cleaning and maintenance. The purpose of the bottom (see Figures 14 and 15). 6. Disconnect Pool Vac Ultra from pool. 3. Figure 16 TURBINE/VACUUM CHAMBER 14 Lift "Easy Opening Bottom" (see Figure 16). 8. Locate and loosen the captive screw...4. Reinstall "Easy Opening Bottom" by lining up the cover screen with the two slots shown in pool per installation instructions and/or installation video. Should the Pool Vac Ultra stop moving or become sluggish due to the turbine/vacuum chamber for free movement. 9. "EASY OPENING BOTTOM". Then...


