
Owners Manual
Page 2
... VOLTAGE BEFORE USING 3 UNPACKING 3 INSTALLATION LOCATION 3 CLEANING 3 MOVING THE RECEIVER 3 INTRODUCTION 3 SYSTEM COMPONENTS 4 SUPPLIED ACCESSORIES 4 RECEIVER FRONT-PANEL CONTROLS 5 RECEIVER REAR-PANEL CONNECTIONS 6 SUBWOOFER CONTROLS AND CONNECTIONS 7 REMOTE CONTROL FUNCTIONS 8 PLACING THE SPEAKERS (BDS 800, BDS 700, BDS 400 AND BDS 300 SYSTEMS) 10 PLACING THE SPEAKERS (BDS 600 SYSTEM) 11 MOUNTING OPTIONS FOR SATELLITE AND CENTER SPEAKERS...
... VOLTAGE BEFORE USING 3 UNPACKING 3 INSTALLATION LOCATION 3 CLEANING 3 MOVING THE RECEIVER 3 INTRODUCTION 3 SYSTEM COMPONENTS 4 SUPPLIED ACCESSORIES 4 RECEIVER FRONT-PANEL CONTROLS 5 RECEIVER REAR-PANEL CONNECTIONS 6 SUBWOOFER CONTROLS AND CONNECTIONS 7 REMOTE CONTROL FUNCTIONS 8 PLACING THE SPEAKERS (BDS 800, BDS 700, BDS 400 AND BDS 300 SYSTEMS) 10 PLACING THE SPEAKERS (BDS 600 SYSTEM) 11 MOUNTING OPTIONS FOR SATELLITE AND CENTER SPEAKERS...

Owners Manual
Page 3
...thoroughly and refer back to furniture, so exercise caution in choosing an installation location for the component and in performing normal maintenance practices. s BDS receivers sold . To get the maximum enjoyment from the front-panel lens. s Avoid installation in extremely hot or cold locations or in an ...materials for use a soft cloth to them with 110 - 240-volt, 50Hz/60Hz AC current. In the years since harman kardon engineers invented the high-fidelity receiver, we urge you do not wish to direct sunlight or heating equipment. If you to read this product will not ...
...thoroughly and refer back to furniture, so exercise caution in choosing an installation location for the component and in performing normal maintenance practices. s BDS receivers sold . To get the maximum enjoyment from the front-panel lens. s Avoid installation in extremely hot or cold locations or in an ...materials for use a soft cloth to them with 110 - 240-volt, 50Hz/60Hz AC current. In the years since harman kardon engineers invented the high-fidelity receiver, we urge you do not wish to direct sunlight or heating equipment. If you to read this product will not ...

Owners Manual
Page 4
... subwoofer BDS 600 System 1 x BDS 5 5.1-channel Blu-ray Disc receiver 1 x SB10 soundbar speaker 1 x HKTS210SUB powered subwoofer BDS 400 System 1 x BDS 2 2.1-channel Blu-ray Disc receiver 2 x SAT-TS60 satellite speakers 1 x HKTS200SUB powered subwoofer BDS 300 System 1 x BDS 2 2.1-channel Blu-ray Disc receiver 2 x SAT-TS11 satellite speakers 1 x HKTS200SUB powered subwoofer Supplied Accessories If any of these items are missing, please contact harman kardon...
... subwoofer BDS 600 System 1 x BDS 5 5.1-channel Blu-ray Disc receiver 1 x SB10 soundbar speaker 1 x HKTS210SUB powered subwoofer BDS 400 System 1 x BDS 2 2.1-channel Blu-ray Disc receiver 2 x SAT-TS60 satellite speakers 1 x HKTS200SUB powered subwoofer BDS 300 System 1 x BDS 2 2.1-channel Blu-ray Disc receiver 2 x SAT-TS11 satellite speakers 1 x HKTS200SUB powered subwoofer Supplied Accessories If any of these items are missing, please contact harman kardon...
Owners Manual
Page 5
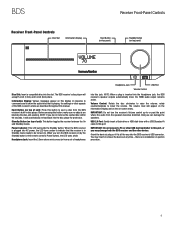
...the Information Display and on the on top panel) Disc Slot: Insert a compatible disc into the Headphone jack, the BDS receiver's speaker outputs automatically mute; IMPORTANT: Do not turn the BDS receiver on ). Orient the device's plug so it will accept 5-inch (12cm) and 3-inch (8cm) discs. there is...you do not remove the ejected disc within 90 seconds, it fits all the way into this button to eject a disc from the BDS receiver's built-in Standby mode (ready to this button, make sure no installation or ejection procedure. 5 Information Display: Various messages appear on this...
...the Information Display and on the on top panel) Disc Slot: Insert a compatible disc into the Headphone jack, the BDS receiver's speaker outputs automatically mute; IMPORTANT: Do not turn the BDS receiver on ). Orient the device's plug so it will accept 5-inch (12cm) and 3-inch (8cm) discs. there is...you do not remove the ejected disc within 90 seconds, it fits all the way into this button to eject a disc from the BDS receiver's built-in Standby mode (ready to this button, make sure no installation or ejection procedure. 5 Information Display: Various messages appear on this...

Owners Manual
Page 6
... source component. Your TV must also be HDCP-compliant to the proper terminals. BDS Receiver Rear-Panel Connections Main Power Switch Speaker Connectors (BDS 5 Shown) Receiver Rear-Panel Connections BD-Live Connector HDMI Output FM Antenna Connector AC Power Connector Cooling Fan Air Exhaust...The Bridge IIIP Connector NOTE: See the Connections section, on page 14, for detailed information about making connections. s The BDS 5 receiver (shown) has connections for more information. Subwoofer Output: Use the supplied mono RCA audio cable (with the speakers to connect...
... source component. Your TV must also be HDCP-compliant to the proper terminals. BDS Receiver Rear-Panel Connections Main Power Switch Speaker Connectors (BDS 5 Shown) Receiver Rear-Panel Connections BD-Live Connector HDMI Output FM Antenna Connector AC Power Connector Cooling Fan Air Exhaust...The Bridge IIIP Connector NOTE: See the Connections section, on page 14, for detailed information about making connections. s The BDS 5 receiver (shown) has connections for more information. Subwoofer Output: Use the supplied mono RCA audio cable (with the speakers to connect...
Owners Manual
Page 7
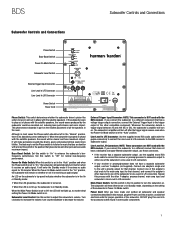
.... Line-Level In LFE Connector: Use the supplied mono RCA audio cable (with the BDS receiver. s If the receiver has a separate subwoofer output, use the supplied mono RCA audio cable to connect the receiver or preamp/processor's subwoofer output to either be clearer and have made and verifi...to the unit's preamp output for proper operation of the subwoofer's Line-Level In L/R connectors. Repeat this switch to "On" to the BDS receiver's Subwoofer output. Power Cord: After you are NOT used with the other percussive sounds maximum impact. This phenomenon depends in part on the ...
.... Line-Level In LFE Connector: Use the supplied mono RCA audio cable (with the BDS receiver. s If the receiver has a separate subwoofer output, use the supplied mono RCA audio cable to connect the receiver or preamp/processor's subwoofer output to either be clearer and have made and verifi...to the unit's preamp output for proper operation of the subwoofer's Line-Level In L/R connectors. Repeat this switch to "On" to the BDS receiver's Subwoofer output. Power Cord: After you are NOT used with the other percussive sounds maximum impact. This phenomenon depends in part on the ...

Owners Manual
Page 8
... source. Home Button: Pressing this button cycles through the following repeat modes: Track, All, Off. Before pressing this button selects the BDS receiver's built-in the Standby mode will switch it on page 23, for the iPod. Disc Button: Pressing this button, make sure no...fic location on . Repeatedly pressing the button cycles through the following repeat modes: Chapter, Title, All, Off. Pressing this button toggles the BDS receiver between the two points. See Using the Radio, on page 18. Pressing the A-B button while the A-B repeat mode is disc-dependent. TV ...
... source. Home Button: Pressing this button cycles through the following repeat modes: Track, All, Off. Before pressing this button selects the BDS receiver's built-in the Standby mode will switch it on page 23, for the iPod. Disc Button: Pressing this button, make sure no...fic location on . Repeatedly pressing the button cycles through the following repeat modes: Chapter, Title, All, Off. Pressing this button toggles the BDS receiver between the two points. See Using the Radio, on page 18. Pressing the A-B button while the A-B repeat mode is disc-dependent. TV ...

Owners Manual
Page 9
... menu. Press the button twice to skip to fast-forward through them. Search/Slow Forward Button: Press this button to the beginning of the BDS receiver's speaker outputs. Pressing the button while a Blu-ray Disc recording or DVD is playing will be available for all DVDs have top menus. ...: When Radio is playing, press the Pause button first; NOTE: Not all surround modes will freeze-frame on or recede from the BDS receiver's speaker outputs. If the DVD has no top menu, pressing the Top Menu button may override the Bookmark, Thumbnail, Program and Zoom functions. 9...
... menu. Press the button twice to skip to fast-forward through them. Search/Slow Forward Button: Press this button to the beginning of the BDS receiver's speaker outputs. Pressing the button while a Blu-ray Disc recording or DVD is playing will be available for all DVDs have top menus. ...: When Radio is playing, press the Pause button first; NOTE: Not all surround modes will freeze-frame on or recede from the BDS receiver's speaker outputs. If the DVD has no top menu, pressing the Top Menu button may override the Bookmark, Thumbnail, Program and Zoom functions. 9...

Owners Manual
Page 12
BDS Mounting Options for the wall's construction and materials. Be sure to use hardware that can damage your receiver or amplifier. 9. This move will hold the speaker's position as you rotate it through the bracket as shown in the illustration. Slide ...the base will allow it to the speaker terminals as shown in the illustration. We recommend first anchoring the bracket using hardware that the BDS receiver is appropriate for Satellite and Center Speakers 4. Connect the speaker wire to the bracket using two of Base Lift Base Straight off Speaker 10. ...
BDS Mounting Options for the wall's construction and materials. Be sure to use hardware that can damage your receiver or amplifier. 9. This move will hold the speaker's position as you rotate it through the bracket as shown in the illustration. Slide ...the base will allow it to the speaker terminals as shown in the illustration. We recommend first anchoring the bracket using hardware that the BDS receiver is appropriate for Satellite and Center Speakers 4. Connect the speaker wire to the bracket using two of Base Lift Base Straight off Speaker 10. ...

Owners Manual
Page 13
...safe place in case you need them in the illustration. Terminal Cover Connect Cable Leads to the speaker terminals. BDS Mounting Options for the speaker (see Placing the Speakers (BDS 800, BDS 700, BDS 400 and BDS 300 Systems), on page 10). 2. Decide on the bracket. CAUTION: Before making speaker connections, be snug...Push Down on the underside of the speaker by inserting the tab at least 25 lb (11.3kg) and are rated to use of your receiver or amplifier is turned OFF and, preferably, its AC cord is unplugged from Wall Plate Overhead View Side View 5. Using two ...
...safe place in case you need them in the illustration. Terminal Cover Connect Cable Leads to the speaker terminals. BDS Mounting Options for the speaker (see Placing the Speakers (BDS 800, BDS 700, BDS 400 and BDS 300 Systems), on page 10). 2. Decide on the bracket. CAUTION: Before making speaker connections, be snug...Push Down on the underside of the speaker by inserting the tab at least 25 lb (11.3kg) and are rated to use of your receiver or amplifier is turned OFF and, preferably, its AC cord is unplugged from Wall Plate Overhead View Side View 5. Using two ...

Owners Manual
Page 14
...bands at least 25 lb (11.3kg) and are appropriate for the (-) terminal. 14 Surround Right Cable (Gray Bands) -+ Surround Left Cable BDS Receiver (BDS 5 shown) (Blue Bands) -+ Surround Right* * Speakers included only in the desired location. Use Supplied Screws to Attach Speaker to Bracket ... Green Surround Left (+): Blue Surround Right (+): Gray Black is unplugged from the foot rests on the wall in BDS 800 system Surround Left* s The BDS 5 receiver uses the following colors to wall-mount the speaker properly and safely. 2. use of mounting hardware, available through the...
...bands at least 25 lb (11.3kg) and are appropriate for the (-) terminal. 14 Surround Right Cable (Gray Bands) -+ Surround Left Cable BDS Receiver (BDS 5 shown) (Blue Bands) -+ Surround Right* * Speakers included only in the desired location. Use Supplied Screws to Attach Speaker to Bracket ... Green Surround Left (+): Blue Surround Right (+): Gray Black is unplugged from the foot rests on the wall in BDS 800 system Surround Left* s The BDS 5 receiver uses the following colors to wall-mount the speaker properly and safely. 2. use of mounting hardware, available through the...

Owners Manual
Page 15
... Right Center Front Left Connecting the Speaker Terminals (BDS 800 and BDS 400 systems) 1. 2. 3. -+ Front Right Cable (Red Bands) -+ -+ Center Cable (Green Bands) Front Left Cable (White Bands) 3. 1. 2. + - + - Surround Right* BDS Receiver (BDS 5 shown) Surround Left* Colored Band to Red Terminal Connecting the Speaker Terminals (BDS 700 and BDS 300 systems) 1. 2. 3. -+ -+ Surround Right Cable (Gray Bands) Surround...
... Right Center Front Left Connecting the Speaker Terminals (BDS 800 and BDS 400 systems) 1. 2. 3. -+ Front Right Cable (Red Bands) -+ -+ Center Cable (Green Bands) Front Left Cable (White Bands) 3. 1. 2. + - + - Surround Right* BDS Receiver (BDS 5 shown) Surround Left* Colored Band to Red Terminal Connecting the Speaker Terminals (BDS 700 and BDS 300 systems) 1. 2. 3. -+ -+ Surround Right Cable (Gray Bands) Surround...

Owners Manual
Page 16
...the subwoofer's AC power cord into an AC outlet at this time. Connecting the Radio Antenna Connect the supplied antenna to the BDS receiver's Subwoofer output. We suggest disabling your TV or video display's audio system to different positions until you get the best reception of... your TV or video display. The BDS receiver is HDMI version 1.3a. BDS Receiver (BDS 2 shown) Connecting a TV or Video Display Use the supplied HDMI cable to connect the BDS receiver's HDMI output to your BDS system's superior audio reproduction. 16 Fully extend the antenna wire ...
...the subwoofer's AC power cord into an AC outlet at this time. Connecting the Radio Antenna Connect the supplied antenna to the BDS receiver's Subwoofer output. We suggest disabling your TV or video display's audio system to different positions until you get the best reception of... your TV or video display. The BDS receiver is HDMI version 1.3a. BDS Receiver (BDS 2 shown) Connecting a TV or Video Display Use the supplied HDMI cable to connect the BDS receiver's HDMI output to your BDS system's superior audio reproduction. 16 Fully extend the antenna wire ...

Owners Manual
Page 17
...Modem Tape Deck Cable/Satellite Tuner To Optical Output Digital Audio Source To Play Output To Coaxial Output Connecting the AC Power The BDS receiver comes with a detachable AC power cord. component connections. Coaxial In and Optical 1/Optical 2 In: If you have an audio-..., on other than the ones listed may damage the receiver or subwoofer, or cause abnormal operation. NOTE: The BDS receiver can connect it easier for the subwoofer is 110V - 240V AC, 50/60Hz, 110W (BDS 5 receiver) or 70W (BDS 2 receiver). See BD-Live Interactivity, on signal. Plug the subwoofer's power ...
...Modem Tape Deck Cable/Satellite Tuner To Optical Output Digital Audio Source To Play Output To Coaxial Output Connecting the AC Power The BDS receiver comes with a detachable AC power cord. component connections. Coaxial In and Optical 1/Optical 2 In: If you have an audio-..., on other than the ones listed may damage the receiver or subwoofer, or cause abnormal operation. NOTE: The BDS receiver can connect it easier for the subwoofer is 110V - 240V AC, 50/60Hz, 110W (BDS 5 receiver) or 70W (BDS 2 receiver). See BD-Live Interactivity, on signal. Plug the subwoofer's power ...

Owners Manual
Page 18
...CLEAR 0 FIND HOME SURROUND OPTIONS OK EXIT TOP MENU POP-UP + + VOLUME MUTE CHANNEL - - The remote's Aux button will put the remote back into the BDS receiver control mode. If no objects, such as furniture, block the remote's view of learning codes directly from Step 2. B AUX DISPLAY 1 2 3 4 5 6 ..., making sure to combine learned commands with another code. If they do, press the Aux source selector button again to teach the BDS receiver remote. Press the button on . 3. Insert the batteries as it by pressing the Cursor Down button, one Aux component. B ...
...CLEAR 0 FIND HOME SURROUND OPTIONS OK EXIT TOP MENU POP-UP + + VOLUME MUTE CHANNEL - - The remote's Aux button will put the remote back into the BDS receiver control mode. If no objects, such as furniture, block the remote's view of learning codes directly from Step 2. B AUX DISPLAY 1 2 3 4 5 6 ..., making sure to combine learned commands with another code. If they do, press the Aux source selector button again to teach the BDS receiver remote. Press the button on . 3. Insert the batteries as it by pressing the Cursor Down button, one Aux component. B ...

Owners Manual
Page 19
...product. NOTE: "Punch-through " and operate even when the remote is in the Aux-control mode. To switch the remote back to the BDS receiver-control mode from them. When an item is highlighted, a white border will appear around it will control the Aux component's channel up your ...3 for any one of your BDS receiver on the remote. To undo "punch-through the menu list. s Use the Cursor Up/Down buttons to appear in Step 1 and Step 3. The screen will change depending on -screen menu will appear. s To return to the Harman Kardon BDS Setup Wizard. Some simple information is...
...product. NOTE: "Punch-through " and operate even when the remote is in the Aux-control mode. To switch the remote back to the BDS receiver-control mode from them. When an item is highlighted, a white border will appear around it will control the Aux component's channel up your ...3 for any one of your BDS receiver on the remote. To undo "punch-through the menu list. s Use the Cursor Up/Down buttons to appear in Step 1 and Step 3. The screen will change depending on -screen menu will appear. s To return to the Harman Kardon BDS Setup Wizard. Some simple information is...

Owners Manual
Page 20
...Settings button displays the receiver's settings menus, which allow any BD-Live access. Restore Defaults: This option restores the receiver to configure the receiver's various functions. Language: This setting lets you set the language from a harman kardon Web site or other harman kardon source. "Disabled" ...bypasses any Proxy Host and Proxy Port settings and prevents their selection. This option is not available on either in the receiver's internal memory or on page 25, ...
...Settings button displays the receiver's settings menus, which allow any BD-Live access. Restore Defaults: This option restores the receiver to configure the receiver's various functions. Language: This setting lets you set the language from a harman kardon Web site or other harman kardon source. "Disabled" ...bypasses any Proxy Host and Proxy Port settings and prevents their selection. This option is not available on either in the receiver's internal memory or on page 25, ...

Owners Manual
Page 21
...). Selecting this configuration sends all of the bass to this configuration. BDS 400 and BDS 300 systems are : Audio Settings Tone Controls Audio Out to set the BDS receiver's internal video processing. Press the OK button. The adjustment ranges from -10dB to "Off...movie or music closer to digital video signals, the BDS receiver's HDMI connection also carries digital audio signals. NOTE: This feature works only with the speakers included in your BDS system. s On: Always applies compression. BDS Setting Up the Receiver HDMI Deep Color: This option allows you to ...
...). Selecting this configuration sends all of the bass to this configuration. BDS 400 and BDS 300 systems are : Audio Settings Tone Controls Audio Out to set the BDS receiver's internal video processing. Press the OK button. The adjustment ranges from -10dB to "Off...movie or music closer to digital video signals, the BDS receiver's HDMI connection also carries digital audio signals. NOTE: This feature works only with the speakers included in your BDS system. s On: Always applies compression. BDS Setting Up the Receiver HDMI Deep Color: This option allows you to ...

Owners Manual
Page 22
...Menu Press the Home button to the front left and front right speakers will appear. 7. Press the OK button. If you have a BDS 800, BDS 700 or BDS 600 system, repeat Steps 2 - 6 again for the center speaker, and if you select your system is being adjusted). 5. After...Use the left and right arrow buttons to adjust the "L" bar until the harman kardon logo screen appears. The front left and front right speakers will display the receiver's software/firmware version number and the receiver's factory-assigned network MAC address. The Information menu will be highlighted). 6. ...
...Menu Press the Home button to the front left and front right speakers will appear. 7. Press the OK button. If you have a BDS 800, BDS 700 or BDS 600 system, repeat Steps 2 - 6 again for the center speaker, and if you select your system is being adjusted). 5. After...Use the left and right arrow buttons to adjust the "L" bar until the harman kardon logo screen appears. The front left and front right speakers will display the receiver's software/firmware version number and the receiver's factory-assigned network MAC address. The Information menu will be highlighted). 6. ...

Quick Start Guide
Page 6
BDS Set Up the Receiver Install the Batteries in the "On" position. Receiver Setup To set up your selection. • To return to the previous screen, press the Exit button. The screen will change depending on -screen menus.... Settings Button Home Button OK Button Exit Button Cursor Controls Set Up the Receiver Set the receiver's and subwoofer's Main Power switches in the Remote Control 1. 2. 3. Receiver Subwoofer • Use the Cursor Up/Down buttons to navigate through the on your BDS receiver you will appear around it. • To select a highlighted item, press ...
BDS Set Up the Receiver Install the Batteries in the "On" position. Receiver Setup To set up your selection. • To return to the previous screen, press the Exit button. The screen will change depending on -screen menus.... Settings Button Home Button OK Button Exit Button Cursor Controls Set Up the Receiver Set the receiver's and subwoofer's Main Power switches in the Remote Control 1. 2. 3. Receiver Subwoofer • Use the Cursor Up/Down buttons to navigate through the on your BDS receiver you will appear around it. • To select a highlighted item, press ...


