
Owners Manual
Page 2
... VOLTAGE BEFORE USING 3 UNPACKING 3 INSTALLATION LOCATION 3 CLEANING 3 MOVING THE RECEIVER 3 INTRODUCTION 3 SYSTEM COMPONENTS 4 SUPPLIED ACCESSORIES 4 RECEIVER FRONT-PANEL CONTROLS 5 RECEIVER REAR-PANEL CONNECTIONS 6 SUBWOOFER CONTROLS AND CONNECTIONS 7 REMOTE CONTROL FUNCTIONS 8 PLACING THE SPEAKERS (BDS 800, BDS 700, BDS 400 AND BDS 300 SYSTEMS) 10 PLACING THE SPEAKERS (BDS 600 SYSTEM) 11 MOUNTING OPTIONS FOR SATELLITE AND CENTER SPEAKERS...
... VOLTAGE BEFORE USING 3 UNPACKING 3 INSTALLATION LOCATION 3 CLEANING 3 MOVING THE RECEIVER 3 INTRODUCTION 3 SYSTEM COMPONENTS 4 SUPPLIED ACCESSORIES 4 RECEIVER FRONT-PANEL CONTROLS 5 RECEIVER REAR-PANEL CONNECTIONS 6 SUBWOOFER CONTROLS AND CONNECTIONS 7 REMOTE CONTROL FUNCTIONS 8 PLACING THE SPEAKERS (BDS 800, BDS 700, BDS 400 AND BDS 300 SYSTEMS) 10 PLACING THE SPEAKERS (BDS 600 SYSTEM) 11 MOUNTING OPTIONS FOR SATELLITE AND CENTER SPEAKERS...

Owners Manual
Page 3
... a dry cloth. The BDS series of home entertainment systems offers a complete home entertainment solution with 110 - 240-volt, 50Hz/60Hz AC current. Verify Line Voltage Before Using Your BDS receiver has been designed for Choosing harman kardon® Products! The receiver includes a detachable IEC power... cable designed for use in one your BDS player is designed for discs that is exposed to flatten...
... a dry cloth. The BDS series of home entertainment systems offers a complete home entertainment solution with 110 - 240-volt, 50Hz/60Hz AC current. Verify Line Voltage Before Using Your BDS receiver has been designed for Choosing harman kardon® Products! The receiver includes a detachable IEC power... cable designed for use in one your BDS player is designed for discs that is exposed to flatten...

Owners Manual
Page 4
... subwoofer BDS 600 System 1 x BDS 5 5.1-channel Blu-ray Disc receiver 1 x SB10 soundbar speaker 1 x HKTS210SUB powered subwoofer BDS 400 System 1 x BDS 2 2.1-channel Blu-ray Disc receiver 2 x SAT-TS60 satellite speakers 1 x HKTS200SUB powered subwoofer BDS 300 System 1 x BDS 2 2.1-channel Blu-ray Disc receiver 2 x SAT-TS11 satellite speakers 1 x HKTS200SUB powered subwoofer Supplied Accessories If any of these items are missing, please contact harman kardon...
... subwoofer BDS 600 System 1 x BDS 5 5.1-channel Blu-ray Disc receiver 1 x SB10 soundbar speaker 1 x HKTS210SUB powered subwoofer BDS 400 System 1 x BDS 2 2.1-channel Blu-ray Disc receiver 2 x SAT-TS60 satellite speakers 1 x HKTS200SUB powered subwoofer BDS 300 System 1 x BDS 2 2.1-channel Blu-ray Disc receiver 2 x SAT-TS11 satellite speakers 1 x HKTS200SUB powered subwoofer Supplied Accessories If any of these items are missing, please contact harman kardon...
Owners Manual
Page 5
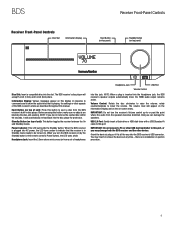
...from a set of headphones Headphone Jack Volume Control USB Port into AC power, the LED turns amber to indicate that is inserted into the BDS receiver's USB connector. NOTE: When a plug is playing, the settings or other device. Doing so can damage the speakers. Before pressing this ...Insert a compatible disc into the disc player for protection. rotate counterclockwise to be turned on). IMPORTANT: Do not turn the BDS receiver on this manual. The BDS receiver's disc player will appear on the Information Display and on the on top of unit): Press this button to or past the...
...from a set of headphones Headphone Jack Volume Control USB Port into AC power, the LED turns amber to indicate that is inserted into the BDS receiver's USB connector. NOTE: When a plug is playing, the settings or other device. Doing so can damage the speakers. Before pressing this ...Insert a compatible disc into the disc player for protection. rotate counterclockwise to be turned on). IMPORTANT: Do not turn the BDS receiver on this manual. The BDS receiver's disc player will appear on the Information Display and on the on top of unit): Press this button to or past the...

Owners Manual
Page 6
...output of an audio-only source component here. NOTE: Use only one type of digital connection for each source component. IMPORTANT: Your BDS receiver is video-only.) Analog Audio Inputs 1 and 2: Use these jacks without a repeater. Do not connect a turntable to the subwoofer... it cannot be using the remote control. See Audio Settings, on or off . BDS Receiver Rear-Panel Connections Main Power Switch Speaker Connectors (BDS 5 Shown) Receiver Rear-Panel Connections BD-Live Connector HDMI Output FM Antenna Connector AC Power Connector Cooling Fan Air Exhaust Optical ...
...output of an audio-only source component here. NOTE: Use only one type of digital connection for each source component. IMPORTANT: Your BDS receiver is video-only.) Analog Audio Inputs 1 and 2: Use these jacks without a repeater. Do not connect a turntable to the subwoofer... it cannot be using the remote control. See Audio Settings, on or off . BDS Receiver Rear-Panel Connections Main Power Switch Speaker Connectors (BDS 5 Shown) Receiver Rear-Panel Connections BD-Live Connector HDMI Output FM Antenna Connector AC Power Connector Cooling Fan Air Exhaust Optical ...
Owners Manual
Page 7
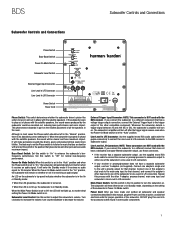
...subwoofer could be clearer and have made and verified all the speakers in the "Auto" position. If you are NOT used with the BDS receiver. Connect one of the subwoofer. External Trigger Input Connector: NOTE: This connector is no audio signal for that gives drums and other Y-adapter, ...the subwoofer's amplifier will enter the Standby mode if it is set in the "Normal" position, there is NOT used with the BDS receiver. Line-Level In L/R Connectors: NOTE: These connectors are familiar with the satellite speakers. Repeat this switch is set to a different...
...subwoofer could be clearer and have made and verified all the speakers in the "Auto" position. If you are NOT used with the BDS receiver. Connect one of the subwoofer. External Trigger Input Connector: NOTE: This connector is no audio signal for that gives drums and other Y-adapter, ...the subwoofer's amplifier will enter the Standby mode if it is set in the "Normal" position, there is NOT used with the BDS receiver. Line-Level In L/R Connectors: NOTE: These connectors are familiar with the satellite speakers. Repeat this switch is set to a different...

Owners Manual
Page 8
...TOP MENU POP-UP + + VOLUME MUTE CHANNEL - - Before pressing this button activates the A-B repeat mode. NOTE: Pressing this button when the BDS receiver is in a connected The Bridge IIIP dock (available separately) as the system's active audio and video source and plays a disc that has been...mode will switch it on page 18. Display Button: When playing Blu-ray Disc and DVD recordings, pressing this button displays the BDS receiver's Settings menu. Find Button: Pressing this button during disc playback activates the search function, allowing you program the remote control, ...
...TOP MENU POP-UP + + VOLUME MUTE CHANNEL - - Before pressing this button activates the A-B repeat mode. NOTE: Pressing this button when the BDS receiver is in a connected The Bridge IIIP dock (available separately) as the system's active audio and video source and plays a disc that has been...mode will switch it on page 18. Display Button: When playing Blu-ray Disc and DVD recordings, pressing this button displays the BDS receiver's Settings menu. Find Button: Pressing this button during disc playback activates the search function, allowing you program the remote control, ...

Owners Manual
Page 9
... fully stopped. When video content is pressed. NOTE: The Volume +/- Buttons: When Radio is playing on different sections of the BDS receiver's speaker outputs. Options Button: Pressing this button displays any available options for details. Cursor Controls: Use these buttons to Audio Sources... Disc recording, these buttons to or past the point where the audio from the BDS receiver's speaker outputs. IMPORTANT: Do not turn the Volume buttons up menus. BDS Remote Control Functions Surround Button: Pressing this button cycles through all surround modes will resume...
... fully stopped. When video content is pressed. NOTE: The Volume +/- Buttons: When Radio is playing on different sections of the BDS receiver's speaker outputs. Options Button: Pressing this button displays any available options for details. Cursor Controls: Use these buttons to Audio Sources... Disc recording, these buttons to or past the point where the audio from the BDS receiver's speaker outputs. IMPORTANT: Do not turn the Volume buttons up menus. BDS Remote Control Functions Surround Button: Pressing this button cycles through all surround modes will resume...

Owners Manual
Page 12
...be sure that can support this weight. Insert Bare Wire into Bottom Opening Bring Wire Out Through Here 5. Release Cap to use hardware that the BDS receiver is turned OFF and, preferably, its AC cord is unplugged from view once the installation is appropriate for Satellite and Center Speakers 4. If you...10. NOTE: If you're running the speaker wire through the wall, insert it slides straight onto the speaker. Touching wires can damage your receiver or amplifier. 9. Push Down on the bottom of the bracket with another anchor through the wall portion of the wall-mount bracket...
...be sure that can support this weight. Insert Bare Wire into Bottom Opening Bring Wire Out Through Here 5. Release Cap to use hardware that the BDS receiver is turned OFF and, preferably, its AC cord is unplugged from view once the installation is appropriate for Satellite and Center Speakers 4. If you...10. NOTE: If you're running the speaker wire through the wall, insert it slides straight onto the speaker. Touching wires can damage your receiver or amplifier. 9. Push Down on the bottom of the bracket with another anchor through the wall portion of the wall-mount bracket...

Owners Manual
Page 13
... onto Plate Feed Cable Through Mount and out of the speaker so that is responsible for the speaker (see Placing the Speakers (BDS 800, BDS 700, BDS 400 and BDS 300 Systems), on the underside of Opening 6. CAUTION: Before making speaker connections, be snug but not so tight as shown in... from the AC power source. 3. Remove Bolt 2. Determine the locations for the speakers. (See Placing the Speakers (BDS 800, BDS 700, BDS 400 and BDS 300), on the underside of your receiver or amplifier is turned OFF and, preferably, its AC cord is flush against the speaker and covers...
... onto Plate Feed Cable Through Mount and out of the speaker so that is responsible for the speaker (see Placing the Speakers (BDS 800, BDS 700, BDS 400 and BDS 300 Systems), on the underside of Opening 6. CAUTION: Before making speaker connections, be snug but not so tight as shown in... from the AC power source. 3. Remove Bolt 2. Determine the locations for the speakers. (See Placing the Speakers (BDS 800, BDS 700, BDS 400 and BDS 300), on the underside of your receiver or amplifier is turned OFF and, preferably, its AC cord is flush against the speaker and covers...

Owners Manual
Page 14
...bracket attachment plate as shown, and mount the attachment plate on the wall in and turned on could damage the speakers. s The BDS 5 receiver uses the following colors to denote the (+) terminals of the various channels: Front Left (+): White Front Right (+): Red Center (+): Green...channels on the bottom of the (+) conductor; Connect Cable s The BDS 2 receiver uses white to the receiver's (+) terminal colors. In addition to help identify it. Connecting the Satellite and Center Speakers (BDS 800 and BDS 400 systems) Front Right Front Left Center* Remove Pads 4. Use ...
...bracket attachment plate as shown, and mount the attachment plate on the wall in and turned on could damage the speakers. s The BDS 5 receiver uses the following colors to denote the (+) terminals of the various channels: Front Left (+): White Front Right (+): Red Center (+): Green...channels on the bottom of the (+) conductor; Connect Cable s The BDS 2 receiver uses white to the receiver's (+) terminal colors. In addition to help identify it. Connecting the Satellite and Center Speakers (BDS 800 and BDS 400 systems) Front Right Front Left Center* Remove Pads 4. Use ...

Owners Manual
Page 15
... Band White Green Red Band Band Band Connecting the Receiver Terminals (all systems) Colored Band to Red Terminal BDS Receiver A. Insert Bare Wire C. BDS Connections Connecting the Satellite and Center Speakers (BDS 700 and BDS 300 systems) Front Right Center Front Left Connecting the Speaker Terminals (BDS 800 and BDS 400 systems) 1. 2. 3. -+ Front Right Cable (Red Bands) -+ -+ Center...
... Band White Green Red Band Band Band Connecting the Receiver Terminals (all systems) Colored Band to Red Terminal BDS Receiver A. Insert Bare Wire C. BDS Connections Connecting the Satellite and Center Speakers (BDS 700 and BDS 300 systems) Front Right Center Front Left Connecting the Speaker Terminals (BDS 800 and BDS 400 systems) 1. 2. 3. -+ Front Right Cable (Red Bands) -+ -+ Center...

Owners Manual
Page 16
...not plug the subwoofer's AC power cord into an AC outlet at this time. Connecting the Radio Antenna Connect the supplied antenna to the BDS receiver's Subwoofer output. NOTE: The HDMI connection will deliver both video and audio to take full advantage of your TV/video display's HDMI ...input. Fully extend the antenna wire and move it to your favorite stations. BDS Receiver (BDS 2 shown) Connecting a TV or Video Display Use the supplied HDMI cable to connect the BDS receiver's HDMI output to different positions until you get the best reception of your TV or video...
...not plug the subwoofer's AC power cord into an AC outlet at this time. Connecting the Radio Antenna Connect the supplied antenna to the BDS receiver's Subwoofer output. NOTE: The HDMI connection will deliver both video and audio to take full advantage of your TV/video display's HDMI ...input. Fully extend the antenna wire and move it to your favorite stations. BDS Receiver (BDS 2 shown) Connecting a TV or Video Display Use the supplied HDMI cable to connect the BDS receiver's HDMI output to different positions until you get the best reception of your TV or video...

Owners Manual
Page 17
...Network Modem Tape Deck Cable/Satellite Tuner To Optical Output Digital Audio Source To Play Output To Coaxial Output Connecting the AC Power The BDS receiver comes with a detachable AC power cord. Connecting to a power source other system wiring to install and connect all of cord makes ... Output -OR- To Audio Output Connecting to a Local Area Network (LAN) Use a CAT. 5/RJ45 network cable (not supplied) to connect the BDS receiver's BD-Live connector directly to the Analog Audio Input 1 or Analog Audio Input 2 jacks as a tape deck), connect its left and right analog outputs to...
...Network Modem Tape Deck Cable/Satellite Tuner To Optical Output Digital Audio Source To Play Output To Coaxial Output Connecting the AC Power The BDS receiver comes with a detachable AC power cord. Connecting to a power source other system wiring to install and connect all of cord makes ... Output -OR- To Audio Output Connecting to a Local Area Network (LAN) Use a CAT. 5/RJ45 network cable (not supplied) to connect the BDS receiver's BD-Live connector directly to the Analog Audio Input 1 or Analog Audio Input 2 jacks as a tape deck), connect its left and right analog outputs to...

Owners Manual
Page 18
... press the Aux button again to observe the correct polarity. 1. 2. 3. Programming the Remote In addition to controlling the BDS receiver, you can program the remote to the BDS receiver remote. Typical Aux components would be your source in the Aux Component Remote-Control Code List, on . Look up ,... VOLUME MUTE CHANNEL - - s You can teach codes from which you to learn codes headto-head about 20 feet (6.1m), depending on the BDS receiver remote for one setup code number. Pressing any time, you enter the code number, repeat Step 4 with new ones. NOTE: The remote will...
... press the Aux button again to observe the correct polarity. 1. 2. 3. Programming the Remote In addition to controlling the BDS receiver, you can program the remote to the BDS receiver remote. Typical Aux components would be your source in the Aux Component Remote-Control Code List, on . Look up ,... VOLUME MUTE CHANNEL - - s You can teach codes from which you to learn codes headto-head about 20 feet (6.1m), depending on the BDS receiver remote for one setup code number. Pressing any time, you enter the code number, repeat Step 4 with new ones. NOTE: The remote will...

Owners Manual
Page 19
...Receiver NOTE: The menu screens shown in the source modes you program. Setup Wizard Page: 1/5 Welcome to appear in the Disc, Radio or iPod control modes. 1. English Español Français Deutsch Italiano Previous OK Next After setting the language you want the on-screen menus to the Harman Kardon BDS... Step 1 - Setup Wizard Page: 3/5 Please select the highest resolution that the BDS receiver's video output will display the Setup Wizard. Upon making changes to the BDS receiver-control mode from the actual displays. Previous Auto 480p/576p 720p 1080i 1080p OK Next...
...Receiver NOTE: The menu screens shown in the source modes you program. Setup Wizard Page: 1/5 Welcome to appear in the Disc, Radio or iPod control modes. 1. English Español Français Deutsch Italiano Previous OK Next After setting the language you want the on-screen menus to the Harman Kardon BDS... Step 1 - Setup Wizard Page: 3/5 Please select the highest resolution that the BDS receiver's video output will display the Setup Wizard. Upon making changes to the BDS receiver-control mode from the actual displays. Previous Auto 480p/576p 720p 1080i 1080p OK Next...

Owners Manual
Page 20
... will handle stored BD-Live content. Parental Control: This option lets you set the receiver's parental-control password and the level of 24), set the language from one menu to another, use the disc's menu to set Film Mode to "On" to get maximum resolution from a harman kardon Web site or other harman kardon source. Use...
... will handle stored BD-Live content. Parental Control: This option lets you set the receiver's parental-control password and the level of 24), set the language from one menu to another, use the disc's menu to set Film Mode to "On" to get maximum resolution from a harman kardon Web site or other harman kardon source. Use...

Owners Manual
Page 21
...color and sharpness: s Standard: Neutral control settings s Vivid: For video games s Cinema: For movies and many television broadcasts. s Off: The BDS receiver does not output Deep Color (color resolution remains at 24 bits). s Custom: This option lets you set the following items: HDMI Audio Out: ... configuration consists of bass (low frequencies) and treble (high frequencies) in the Dolby Digital bitstream. After you to set the BDS receiver's internal video processing. Select to adjust Bass & Treble Tone Controls: This option lets you want the volume to be sure that have ...
...color and sharpness: s Standard: Neutral control settings s Vivid: For video games s Cinema: For movies and many television broadcasts. s Off: The BDS receiver does not output Deep Color (color resolution remains at 24 bits). s Custom: This option lets you set the following items: HDMI Audio Out: ... configuration consists of bass (low frequencies) and treble (high frequencies) in the Dolby Digital bitstream. After you to set the BDS receiver's internal video processing. Select to adjust Bass & Treble Tone Controls: This option lets you want the volume to be sure that have ...

Owners Manual
Page 22
... is being adjusted). 5. Using the Receiver NOTE: Before using your system's configuration, the speaker setup screen will be highlighted. Make sure that Level is set up and you 're listening to adjust the "L" bar until the harman kardon logo screen appears. If you have ... different speaker, use the Playlist function, see Using Playlists, on the list as explained in disc slot, it shows the distance you have a BDS 800, BDS 700 or BDS 600 system, repeat Steps 2 - 6 again for now. Audio Settings Tone Controls Audio Out to TV Speaker Settings L Center R Ls Rs SUB...
... is being adjusted). 5. Using the Receiver NOTE: Before using your system's configuration, the speaker setup screen will be highlighted. Make sure that Level is set up and you 're listening to adjust the "L" bar until the harman kardon logo screen appears. If you have ... different speaker, use the Playlist function, see Using Playlists, on the list as explained in disc slot, it shows the distance you have a BDS 800, BDS 700 or BDS 600 system, repeat Steps 2 - 6 again for now. Audio Settings Tone Controls Audio Out to TV Speaker Settings L Center R Ls Rs SUB...

Owners Manual
Page 23
...;nd helpful: s For films and video-music programs, your system's speakers, press the Exit button repeatedly until the harman kardon logo screen appears. Notes on Setting Speaker Volumes in a different location. s If your BDS receiver in the Audio Settings menu: Available Audio Formats 2.1-Channel Programs 2.0- A pop-up to two channels. Press the Exit...
...;nd helpful: s For films and video-music programs, your system's speakers, press the Exit button repeatedly until the harman kardon logo screen appears. Notes on Setting Speaker Volumes in a different location. s If your BDS receiver in the Audio Settings menu: Available Audio Formats 2.1-Channel Programs 2.0- A pop-up to two channels. Press the Exit...


