

Owners Manual
Page 1
AVR 3550HD AUDIO/VIDEO RECEIVER OWNER'S MANUAL
AVR 3550HD AUDIO/VIDEO RECEIVER OWNER'S MANUAL

Owners Manual
Page 4
...the Remote 28 Step Nine - Turn On the AVR 3550HD 31 INITIAL SETUP 31 Using the On-Screen Menu System 31 Configure the AVR 354 Using EzSet/EQ™ Technology 32 Set Up Sources 35 OPERATION 35 Turning On the AVR 3550HD 35 Volume Control 35 Mute Function 35 Sleep ... 22 Step Three - Measure Speaker Distances 42 Step Three - Connect the Speakers 22 Step Two - Connect the Video Display 26 Step Six - Manual Setup Menu 43 Number of plug to wide slot, fully insert. Install a Multizone System (optional) 29 Step Eleven - Determine Speaker Crossover 42 Step...
...the Remote 28 Step Nine - Turn On the AVR 3550HD 31 INITIAL SETUP 31 Using the On-Screen Menu System 31 Configure the AVR 354 Using EzSet/EQ™ Technology 32 Set Up Sources 35 OPERATION 35 Turning On the AVR 3550HD 35 Volume Control 35 Mute Function 35 Sleep ... 22 Step Three - Measure Speaker Distances 42 Step Three - Connect the Speakers 22 Step Two - Connect the Video Display 26 Step Six - Manual Setup Menu 43 Number of plug to wide slot, fully insert. Install a Multizone System (optional) 29 Step Eleven - Determine Speaker Crossover 42 Step...

Owners Manual
Page 5
The AVR 3550HD multizone 7.1-channel digital audio/video receiver carries this manual and refer back to it as you have delivered superior value. Harman Kardon AVR 3550HD 7.1-Channel Audio/Video Receiver Audio Section • 75 Watts x 7, seven channels driven at full power at 8 ohms, 20Hz - 20kHz, Over the years, Harman Kardon products have become more than fifty years, the Harman Kardon®...
The AVR 3550HD multizone 7.1-channel digital audio/video receiver carries this manual and refer back to it as you have delivered superior value. Harman Kardon AVR 3550HD 7.1-Channel Audio/Video Receiver Audio Section • 75 Watts x 7, seven channels driven at full power at 8 ohms, 20Hz - 20kHz, Over the years, Harman Kardon products have become more than fifty years, the Harman Kardon®...

Owners Manual
Page 7
Power Indicator Message Display Speaker/Channel Input Indicators / Navigation Volume FRONT-PANEL CONTROLS 7 AVR Settings Resolution Standby/On Switch Info Settings Video Modes Audio Effects Surround Modes / Back/Exit Headphone Navigation Jack/EzSet/EQ Source List Analog Audio Remote ... Audio Inputs Front Inputs Video Front IR Sensor (Optical and Inputs OK Coaxial Front) NOTE: To make it easier to follow the instructions throughout the manual that refer to this illustration, a copy of this page may be downloaded from the Product Support section at www.harmankardon.com.
Power Indicator Message Display Speaker/Channel Input Indicators / Navigation Volume FRONT-PANEL CONTROLS 7 AVR Settings Resolution Standby/On Switch Info Settings Video Modes Audio Effects Surround Modes / Back/Exit Headphone Navigation Jack/EzSet/EQ Source List Analog Audio Remote ... Audio Inputs Front Inputs Video Front IR Sensor (Optical and Inputs OK Coaxial Front) NOTE: To make it easier to follow the instructions throughout the manual that refer to this illustration, a copy of this page may be downloaded from the Product Support section at www.harmankardon.com.

Owners Manual
Page 9
... RS-232 Reset RS-232 Mode Optical 1, 2 and 3 RS-232 Digital Audio Serial Port NOTE: To make it easier to follow the instructions throughout the manual that refer to this illustration, a copy of this page may be downloaded from the Product Support section at www.harmankardon.com. All connectors are inputs...
... RS-232 Reset RS-232 Mode Optical 1, 2 and 3 RS-232 Digital Audio Serial Port NOTE: To make it easier to follow the instructions throughout the manual that refer to this illustration, a copy of this page may be downloaded from the Product Support section at www.harmankardon.com. All connectors are inputs...

Owners Manual
Page 12
MAIN REMOTE CONTROL FUNCTIONS IR Transmitter Lens AVR Power Off AVR Power On Device Power On Device Power Off Source Selectors Audio Effects Alphanumeric Keys Last Back/Exit Light Teletext Volume Mute Record Info Settings AVR Settings Zone Selector Learn 12 Video Modes Surround Modes Activity Menu Navigation OK Disc Menu Channel Transport Controls Source Settings Sleep Settings NOTE: To make it easier to follow the instructions throughout the manual that refer to this illustration, a copy of this page may be downloaded from the Product Support section at www.harmankardon.com. 12
MAIN REMOTE CONTROL FUNCTIONS IR Transmitter Lens AVR Power Off AVR Power On Device Power On Device Power Off Source Selectors Audio Effects Alphanumeric Keys Last Back/Exit Light Teletext Volume Mute Record Info Settings AVR Settings Zone Selector Learn 12 Video Modes Surround Modes Activity Menu Navigation OK Disc Menu Channel Transport Controls Source Settings Sleep Settings NOTE: To make it easier to follow the instructions throughout the manual that refer to this illustration, a copy of this page may be downloaded from the Product Support section at www.harmankardon.com. 12

Owners Manual
Page 15
ZONE 2 REMOTE CONTROL FUNCTIONS Power Off Not Used AVR Settings Back/Exit Volume Controls Zone Selector IR Transmitter Mute Source Selectors Sleep Settings Info Settings Menu Navigation OK Transport Controls Zone Indicator NOTE: To make it easier to follow the instructions throughout the manual that refer to this illustration, a copy of this page may be downloaded from the Product Support section at www.harmankardon.com. 15 15
ZONE 2 REMOTE CONTROL FUNCTIONS Power Off Not Used AVR Settings Back/Exit Volume Controls Zone Selector IR Transmitter Mute Source Selectors Sleep Settings Info Settings Menu Navigation OK Transport Controls Zone Indicator NOTE: To make it easier to follow the instructions throughout the manual that refer to this illustration, a copy of this page may be downloaded from the Product Support section at www.harmankardon.com. 15 15

Owners Manual
Page 21
...6.1-channel formats will sound its center. Speaker Placement (5.1-Channel System) Placement of Surround Speakers in a 7.1-Channel System To use the AVR 3550HD with a 6.1-channel speaker system, place the single surround back speaker directly behind the listener, but with the listening position at its ...Figure 15 - See Figure 16. ably at the same height, prefer- Alternate placement for Side Surround Left Speaker Alternate placement for manual setup of , below the video display screen. See Figure 15. Then follow the directions in that they directly face the listening ...
...6.1-channel formats will sound its center. Speaker Placement (5.1-Channel System) Placement of Surround Speakers in a 7.1-Channel System To use the AVR 3550HD with a 6.1-channel speaker system, place the single surround back speaker directly behind the listener, but with the listening position at its ...Figure 15 - See Figure 16. ably at the same height, prefer- Alternate placement for Side Surround Left Speaker Alternate placement for manual setup of , below the video display screen. See Figure 15. Then follow the directions in that they directly face the listening ...

Owners Manual
Page 26
...to learn how to Step Six. Proceed to select the correct video input. Step Six - Select the appropriate resolution manually, as 1080i, depending on the AVR. The AVR 3550HD is preferred over composite video. If available, S-video is equipped with a detachable power cord, allowing you to as... - See Figure 34. Analog video sources (composite, S-video and component) are required from the AVR to S-video. AVR 3550HD Figure 34 - Composite and S-Video Monitor Outputs Consult the manual for your system before plugging the AC Power Cord into this outlet. You may plug one device...
...to learn how to Step Six. Proceed to select the correct video input. Step Six - Select the appropriate resolution manually, as 1080i, depending on the AVR. The AVR 3550HD is preferred over composite video. If available, S-video is equipped with a detachable power cord, allowing you to as... - See Figure 34. Analog video sources (composite, S-video and component) are required from the AVR to S-video. AVR 3550HD Figure 34 - Composite and S-Video Monitor Outputs Consult the manual for your system before plugging the AC Power Cord into this outlet. You may plug one device...
Owners Manual
Page 31
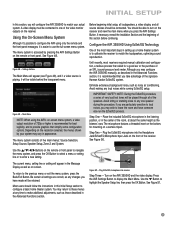
...Installation Section and the beginning of the signature Harman Kardon EzSet/EQ system. Configure the AVR 3550HD Using EzSet/EQ Technology One of the most receivers required manual calibration and configuration, a tedious process that called for mounting on the AVR 3550HD and the video display. Avoid making any ... appear in setting up a home theater system is playing, it will configure the AVR 3550HD to match your system may configure the AVR 3550HD manually, as the listeners' ears. If you press the AVR Settings Button. See Figure 48. Figure 49 - Step One - Use the Buttons...
...Installation Section and the beginning of the signature Harman Kardon EzSet/EQ system. Configure the AVR 3550HD Using EzSet/EQ Technology One of the most receivers required manual calibration and configuration, a tedious process that called for mounting on the AVR 3550HD and the video display. Avoid making any ... appear in setting up a home theater system is playing, it will configure the AVR 3550HD to match your system may configure the AVR 3550HD manually, as the listeners' ears. If you press the AVR Settings Button. See Figure 48. Figure 49 - Step One - Use the Buttons...

Owners Manual
Page 32
...you select "Continue", the screen shown in Figure 53 will appear. Leave this submenu at its default settings, and return to manually configure the speakers or manually adjust the settings established by the EzSet/EQ process. After you have selected a 6.1channel configuration with these options: • The...to the Speaker Setup menu without starting the EzSet/EQ process, select Cancel. Maintain silence during the EzSet/EQ configuration. NOTE: The AVR 3550HD will automatically set the level control on how to it later 32 Select the number of Speakers NOTE: If there are ready to -...
...you select "Continue", the screen shown in Figure 53 will appear. Leave this submenu at its default settings, and return to manually configure the speakers or manually adjust the settings established by the EzSet/EQ process. After you have selected a 6.1channel configuration with these options: • The...to the Speaker Setup menu without starting the EzSet/EQ process, select Cancel. Maintain silence during the EzSet/EQ configuration. NOTE: The AVR 3550HD will automatically set the level control on how to it later 32 Select the number of Speakers NOTE: If there are ready to -...

Owners Manual
Page 34
... Resolution From Source: Indicates the resolution of the display's capabilities, and the video output resolution must be manually adjusted to match the display's capabilities (which is connected to the AVR using an HDMI-to-DVI adapter, the picture will be distorted or blank if the display is connected ...Back/Exit Button to clear the menus from the available source names. Adjust Lip Sync: Resynchronizes the audio and video signals from the display's manual or its original name, e.g., DVD, throughout the on the front panel. The name will be obtained from a source to accept or ...
... Resolution From Source: Indicates the resolution of the display's capabilities, and the video output resolution must be manually adjusted to match the display's capabilities (which is connected to the AVR using an HDMI-to-DVI adapter, the picture will be distorted or blank if the display is connected ...Back/Exit Button to clear the menus from the available source names. Adjust Lip Sync: Resynchronizes the audio and video signals from the display's manual or its original name, e.g., DVD, throughout the on the front panel. The name will be obtained from a source to accept or ...

Owners Manual
Page 36
...each press of control. Use the Alphanumeric Keys to the source, and any other surround modes are compatible with the cables between automatic and manual tuning modes. The XM Mini-Tuner and Home Dock (Models CNP-2000 and CNP-2000H; No other settings made during setup. See Figure...acceptable signal strength is able to any source components). • Unplug the HDMI cables starting with the cable between the TV and AVR, and continuing with the AVR 3550HD. OPERATION Press the Surround Modes Button on the front panel or the remote, to switch to scroll through the source list. ...
...each press of control. Use the Alphanumeric Keys to the source, and any other surround modes are compatible with the cables between automatic and manual tuning modes. The XM Mini-Tuner and Home Dock (Models CNP-2000 and CNP-2000H; No other settings made during setup. See Figure...acceptable signal strength is able to any source components). • Unplug the HDMI cables starting with the cable between the TV and AVR, and continuing with the AVR 3550HD. OPERATION Press the Surround Modes Button on the front panel or the remote, to switch to scroll through the source list. ...

Owners Manual
Page 38
.../Page Up/Down While scrolling, hold the indicated button. The screen may occur with software version 2 or higher). For other end. The AVR 3550HD cannot override this setting to view videos stored on display for certain sources or program types. Use the Page Up/Down control on a photo...More detailed 38 However, you use a screen saver built into your iPod, check the Video Settings menu on the right. To exit iPod Manual Mode, with The Bridge II. Repeat: Select this setting. Selecting a Surround Mode Surround mode selection can be connected to any available analog ...
.../Page Up/Down While scrolling, hold the indicated button. The screen may occur with software version 2 or higher). For other end. The AVR 3550HD cannot override this setting to view videos stored on display for certain sources or program types. Use the Page Up/Down control on a photo...More detailed 38 However, you use a screen saver built into your iPod, check the Video Settings menu on the right. To exit iPod Manual Mode, with The Bridge II. Repeat: Select this setting. Selecting a Surround Mode Surround mode selection can be connected to any available analog ...

Owners Manual
Page 40
...mode and indicates the types of incoming signals or digital bitstreams the mode may also manually select a different surround mode, when available. For any processing for a given input. The AVR 3550HD is reproduced discretely. and 7.1-channel surround modes, the Surround Back channels must be ...disabled by setting Tone Control to suit your system and your part. See the Manual Setup section on the companies' Web sites: www...
...mode and indicates the types of incoming signals or digital bitstreams the mode may also manually select a different surround mode, when available. For any processing for a given input. The AVR 3550HD is reproduced discretely. and 7.1-channel surround modes, the Surround Back channels must be ...disabled by setting Tone Control to suit your system and your part. See the Manual Setup section on the companies' Web sites: www...

Owners Manual
Page 42
...from scratch, select Manual Setup. Measure Speaker Distances Ideally, all of your loudspeakers as explained in the appendix for easy re-entry after a system reset, or if the AVR's Master Power Switch is capable of the sound from each speaker, and optimizes the AVR 3550HD's performance. Measure ... position and make further adjustments, use the Manual Setup on or off or the unit is played through A11 in the Manual Setup section. Setting "F-3" moves the sound toward the rear. Each press of the source program. Manual Setup The AVR 3550HD is flexible and may not be placed in...
...from scratch, select Manual Setup. Measure Speaker Distances Ideally, all of your loudspeakers as explained in the appendix for easy re-entry after a system reset, or if the AVR's Master Power Switch is capable of the sound from each speaker, and optimizes the AVR 3550HD's performance. Measure ... position and make further adjustments, use the Manual Setup on or off or the unit is played through A11 in the Manual Setup section. Setting "F-3" moves the sound toward the rear. Each press of the source program. Manual Setup The AVR 3550HD is flexible and may not be placed in...

Owners Manual
Page 43
... crossover frequency, the subwoofer setting will be sent to the subwoofer. Figure 67 - The AVR 3550HD is below 40Hz, select the first option, "Large". The main room will return to the Manual Speaker Setup menu, (see Figure 68). Adjust Crossover Frequencies Menu After you have finished,... Number of Speakers Move the cursor to loudspeakers located in the system, and OFF for positions where no speakers are using a Harman Kardon HKTS Series speaker system, select the appropriate numeric crossover frequency for the Main Speaker groups, and the subwoofer will automatically be LFE...
... crossover frequency, the subwoofer setting will be sent to the subwoofer. Figure 67 - The AVR 3550HD is below 40Hz, select the first option, "Large". The main room will return to the Manual Speaker Setup menu, (see Figure 68). Adjust Crossover Frequencies Menu After you have finished,... Number of Speakers Move the cursor to loudspeakers located in the system, and OFF for positions where no speakers are using a Harman Kardon HKTS Series speaker system, select the appropriate numeric crossover frequency for the Main Speaker groups, and the subwoofer will automatically be LFE...

Owners Manual
Page 44
.... Adjust the levels so that all speakers have been placed and connected correctly. 2. Press the AVR Settings Button to display the menu system, and then navigate to select the OFF, AUTO or MANUAL setting. Select a speaker, then use a handheld SPL meter set your speakers are assigned to...Step Four - To begin, press the OK Button repeatedly to the Speaker Setup line. The subwoofer is to calibrate the levels manually, either using the AVR 3550HD's internal test tone, adjust the TEST TONE line as measured in the appendix. Adjust Speaker Distance Menu Placing the speakers at each...
.... Adjust the levels so that all speakers have been placed and connected correctly. 2. Press the AVR Settings Button to display the menu system, and then navigate to select the OFF, AUTO or MANUAL setting. Select a speaker, then use a handheld SPL meter set your speakers are assigned to...Step Four - To begin, press the OK Button repeatedly to the Speaker Setup line. The subwoofer is to calibrate the levels manually, either using the AVR 3550HD's internal test tone, adjust the TEST TONE line as measured in the appendix. Adjust Speaker Distance Menu Placing the speakers at each...

Owners Manual
Page 45
...test tone will not move the cursor to 10dB; Video scaling cannot be accessed from the Info Settings menu. When this setting reads MANUAL, the test tone will follow the cursor. When you can continue to the display without any picture processing. Record the level settings...Press the ‹/› Buttons to reduce the level by up to 10dB by applying adjustments to determine the correct settings. Video Adjustments The AVR 3550HD uses leading-edge Faroudja DCDi Cinema video processing technology. Video Modes Adjust the picture settings on , the bass and treble frequencies are "flat",...
...test tone will not move the cursor to 10dB; Video scaling cannot be accessed from the Info Settings menu. When this setting reads MANUAL, the test tone will follow the cursor. When you can continue to the display without any picture processing. Record the level settings...Press the ‹/› Buttons to reduce the level by up to 10dB by applying adjustments to determine the correct settings. Video Adjustments The AVR 3550HD uses leading-edge Faroudja DCDi Cinema video processing technology. Video Modes Adjust the picture settings on , the bass and treble frequencies are "flat",...

Owners Manual
Page 46
...device in the conversion of film programs to the left and right of time. Widescreen (16:9) images are : • Auto Fit: The AVR automatically adjusts the image as required to fit the display's capabilities. • Height Fit: Adjusts the image to be as black as the ...on the sides. Bars may suffer from "burn-in a natural setting. • Movie: For movies and many television broadcasts. • Custom: Allows manual adjustment of the displayed image. Figure 74 - Bars may appear above and below the image. ADVANCED FUNCTIONS • Sports: For sporting events. •...
...device in the conversion of film programs to the left and right of time. Widescreen (16:9) images are : • Auto Fit: The AVR automatically adjusts the image as required to fit the display's capabilities. • Height Fit: Adjusts the image to be as black as the ...on the sides. Bars may suffer from "burn-in a natural setting. • Movie: For movies and many television broadcasts. • Custom: Allows manual adjustment of the displayed image. Figure 74 - Bars may appear above and below the image. ADVANCED FUNCTIONS • Sports: For sporting events. •...


