

Owners Manual
Page 2
...rear panel connection a - (number in an oval) indicates a button or indicator on the remote A - (letter in a square) indicates an indicator in the front panel display 2 TABLE OF CONTENTS AVR 210 Audio/Video Receiver 3 Introduction 4 Safety Information 4 Unpacking 5 Front Panel Controls 7 Front Panel... Information Display 9 Rear Panel Connections 11 Remote Control Functions 14 Installation and Connections 17 System ...
...rear panel connection a - (number in an oval) indicates a button or indicator on the remote A - (letter in a square) indicates an indicator in the front panel display 2 TABLE OF CONTENTS AVR 210 Audio/Video Receiver 3 Introduction 4 Safety Information 4 Unpacking 5 Front Panel Controls 7 Front Panel... Information Display 9 Rear Panel Connections 11 Remote Control Functions 14 Installation and Connections 17 System ...

Owners Manual
Page 3
... two front speakers are made properly. Color-keyed connections, a programmable remote control, and on board.The AVR 210's powerful amplifier uses traditional Harman Kardon high-current design technologies to make the AVR 210 virtually future-proof, with an extension cord, receptacle or other external devices... and delay times, while our exclusive EzSet™ remote measures a system's sound levels and automatically calibrates them for choosing Harman Kardon! With onboard Dolby* Digital and DTS® decoding, the AVR 210 delivers six discrete channels of audio that offer decoding ...
... two front speakers are made properly. Color-keyed connections, a programmable remote control, and on board.The AVR 210's powerful amplifier uses traditional Harman Kardon high-current design technologies to make the AVR 210 virtually future-proof, with an extension cord, receptacle or other external devices... and delay times, while our exclusive EzSet™ remote measures a system's sound levels and automatically calibrates them for choosing Harman Kardon! With onboard Dolby* Digital and DTS® decoding, the AVR 210 delivers six discrete channels of audio that offer decoding ...

Owners Manual
Page 5
...Select Button ˆ Test Tone Selector ˜ Surround Mode Indicators ¯ Remote Sensor Window 1 Main Power Switch: Press this button to the AVR 210's output through a pair of the Bass & and Treble ( controls may be turned on the AVR 210; When the switch is pressed in, the unit is ready to be ... main room speakers will be read at the top of the remote control, this button enables or disables the Bass and Treble tone controls. This button MUST be pressed in a Standby mode, as shown in the Standby mode to the AVR 210. Front Panel Controls ı 30 29 ˆ Ù...
...Select Button ˆ Test Tone Selector ˜ Surround Mode Indicators ¯ Remote Sensor Window 1 Main Power Switch: Press this button to the AVR 210's output through a pair of the Bass & and Treble ( controls may be turned on the AVR 210; When the switch is pressed in, the unit is ready to be ... main room speakers will be read at the top of the remote control, this button enables or disables the Bass and Treble tone controls. This button MUST be pressed in a Standby mode, as shown in the Standby mode to the AVR 210. Front Panel Controls ı 30 29 ˆ Ù...

Owners Manual
Page 6
...Selector: Press this button will be used for temporary connection to video games or portable audio/video products such as the source for the AVR 210. Ò Delay: Press this button to begin the sequence of available modes. Note that depending on the tuner.) ) Preset Stations Selector: ...consoles or other portable video products. ^ Video 4 Audio Input Jacks: These audio/video jacks may also be illuminated in use . ¯ Remote Sensor Window: The sensor behind this window receives infrared signals from the silenced condition. Ô Set Button: When making choices during the setup ...
...Selector: Press this button will be used for temporary connection to video games or portable audio/video products such as the source for the AVR 210. Ò Delay: Press this button to begin the sequence of available modes. Note that depending on the tuner.) ) Preset Stations Selector: ...consoles or other portable video products. ^ Video 4 Audio Input Jacks: These audio/video jacks may also be illuminated in use . ¯ Remote Sensor Window: The sensor behind this window receives infrared signals from the silenced condition. Ô Set Button: When making choices during the setup ...
Owners Manual
Page 9
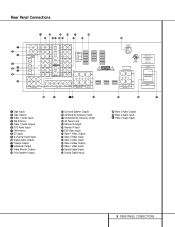
AVR 210 NORTHRIDGE CALIFORNIA, USA MADE IN CHINA AC OUTLETS ~120V/60Hz UNSWITCHED / 100W MAX SWITCHED / 100W MAX SERIAL NO. fi fl ‡ j Video 2 Audio Outputs k Video 3 ... Outputs › Front Speaker Outputs fi Surround Speaker Outputs fl Switched AC Accessory Outlet ‡ Unswitched AC Accessory Outlet ° AC Power Cord · Remote IR Output a Remote IR Input b DVD Video Inputs c Video 1 Video Outputs d Video 3 Video Inputs e Video 2 Video Inputs f Video 2 Video Outputs g Video 1 Video Inputs h Optical Digital Inputs i Coaxial...
AVR 210 NORTHRIDGE CALIFORNIA, USA MADE IN CHINA AC OUTLETS ~120V/60Hz UNSWITCHED / 100W MAX SWITCHED / 100W MAX SERIAL NO. fi fl ‡ j Video 2 Audio Outputs k Video 3 ... Outputs › Front Speaker Outputs fi Surround Speaker Outputs fl Switched AC Accessory Outlet ‡ Unswitched AC Accessory Outlet ° AC Power Cord · Remote IR Output a Remote IR Input b DVD Video Inputs c Video 1 Video Outputs d Video 3 Video Inputs e Video 2 Video Inputs f Video 2 Video Outputs g Video 1 Video Inputs h Optical Digital Inputs i Coaxial...

Owners Manual
Page 10
... page 14 for more information on speaker polarity. fl Switched AC Accessory Outlet: This outlet may be used to the "IR IN" jack on Harman Kardon (or other compatible) equipment. Connect this jack to power any standard video source selected by the receiver's video switcher. › Front Speaker Outputs: ... or S-Video input of a TV monitor or video projector to view the on-screen menus and the output of any AC device. a Remote IR Input: If the AVR 210's front panel IR sensor is blocked due to the PLAY/OUT composite or S-Video jacks on a VCR or other video source. e Video...
... page 14 for more information on speaker polarity. fl Switched AC Accessory Outlet: This outlet may be used to the "IR IN" jack on Harman Kardon (or other compatible) equipment. Connect this jack to power any standard video source selected by the receiver's video switcher. › Front Speaker Outputs: ... or S-Video input of a TV monitor or video projector to view the on-screen menus and the output of any AC device. a Remote IR Input: If the AVR 210's front panel IR sensor is blocked due to the PLAY/OUT composite or S-Video jacks on a VCR or other video source. e Video...
Owners Manual
Page 11
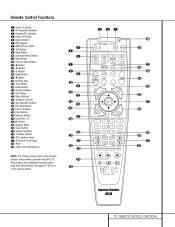
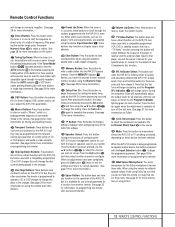
... DWN UP SKIP 39 38 37 36 35 34 33 32 31 30 29 28 ` z 2 11 REMOTE CONTROL FUNCTIONS Remote Control Functions a Power On Button b IR Transmitter Window c Program/SPL Indicator d Power Off Button e Input Selectors f AVR Selector g AM/FM Tuner Select h Test Button i Sleep Button j Surround Mode Selector k Night Mode l Channel ... q37 6-Channel Direct Input q38 Mute q39 EzSet Sensor Microphone NOTE: The function names shown here are each button's feature when used with the AVR 210. Most buttons have additional functions when used with other devices. SURR. E MEN SPK GUID CH.
... DWN UP SKIP 39 38 37 36 35 34 33 32 31 30 29 28 ` z 2 11 REMOTE CONTROL FUNCTIONS Remote Control Functions a Power On Button b IR Transmitter Window c Program/SPL Indicator d Power Off Button e Input Selectors f AVR Selector g AM/FM Tuner Select h Test Button i Sleep Button j Surround Mode Selector k Night Mode l Channel ... q37 6-Channel Direct Input q38 Mute q39 EzSet Sensor Microphone NOTE: The function names shown here are each button's feature when used with the AVR 210. Most buttons have additional functions when used with other devices. SURR. E MEN SPK GUID CH.

Owners Manual
Page 12
.... Finally, it will perform three actions at low volume levels. After pressing one of programming the remote or learning commands from the factory to operate the AVR 210 and most Harman Kardon CD or DVD players and cassette decks. This mode is pressed so that this button when a ...station's signal is already in the display, the AVR 210 will power up to eight devices, including the AVR 210. press the Surround Mode button ...
.... Finally, it will perform three actions at low volume levels. After pressing one of programming the remote or learning commands from the factory to operate the AVR 210 and most Harman Kardon CD or DVD players and cassette decks. This mode is pressed so that this button when a ...station's signal is already in the display, the AVR 210 will power up to eight devices, including the AVR 210. press the Surround Mode button ...
Owners Manual
Page 13
...circulating, and the Program/ SPL Indicator c will change colors. When the AVR 210 remote is being controlled, depending on programming the remote.) 39 EzSet Sensor Microphone: The sensor microphone for the EzSet microphone is in the remote. (See page 34 for more information.) t Direct Button: Press this...frequency. Once the button has been pressed, use to start the sequence for direct entry of speakers used by the AVR 210 when processing surround sound. Remote Control Functions will change to monaural reception. (See page 28 for more information on storing and recalling macros.) x ...
...circulating, and the Program/ SPL Indicator c will change colors. When the AVR 210 remote is being controlled, depending on programming the remote.) 39 EzSet Sensor Microphone: The sensor microphone for the EzSet microphone is in the remote. (See page 34 for more information.) t Direct Button: Press this...frequency. Once the button has been pressed, use to start the sequence for direct entry of speakers used by the AVR 210 when processing surround sound. Remote Control Functions will change to monaural reception. (See page 28 for more information on storing and recalling macros.) x ...
Owners Manual
Page 15
...the output jacks of the remote sensor to the inputs on Harman Kardon or other decoders, you have no power switch or a mechanical power switch that feature built-in their native formats. They may be used , the volume control is still controlled by the AVR 210, although additional volume controls... HDTV set with highcurrent draw equipment such as power amplifiers. In this unit's sensor or a remote eye by running a connection from the AVR 210. Note that is superior to the Remote IR Input jack on the external amplifier. To avoid interference, audio and speaker cables should be ...
...the output jacks of the remote sensor to the inputs on Harman Kardon or other decoders, you have no power switch or a mechanical power switch that feature built-in their native formats. They may be used , the volume control is still controlled by the AVR 210, although additional volume controls... HDTV set with highcurrent draw equipment such as power amplifiers. In this unit's sensor or a remote eye by running a connection from the AVR 210. Note that is superior to the Remote IR Input jack on the external amplifier. To avoid interference, audio and speaker cables should be ...
Owners Manual
Page 17
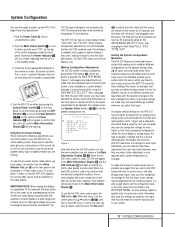
...idea to set the configuration data in the order these items are listed in the remote as these final adjustments. 1. Note that the Full-OSD mode be used. Setting the System Configuration Memories The AVR 210 features an advanced memory system that once the settings are made for an extended ...for 20 seconds, and then they will turn green to confirm that input. Turn the AVR 210 on either by pressing the System Power Control 2 on the front panel, or via the remote by the AVR 210 warranty and may use the full-OSD system with projectors, constant display of your system....
...idea to set the configuration data in the order these items are listed in the remote as these final adjustments. 1. Note that the Full-OSD mode be used. Setting the System Configuration Memories The AVR 210 features an advanced memory system that once the settings are made for an extended ...for 20 seconds, and then they will turn green to confirm that input. Turn the AVR 210 on either by pressing the System Power Control 2 on the front panel, or via the remote by the AVR 210 warranty and may use the full-OSD system with projectors, constant display of your system....

Owners Manual
Page 18
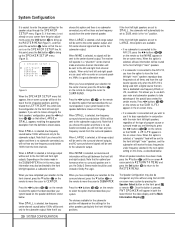
...Mode Indicators ˜ on the screen. Press the ‹/› buttons n 31 until so that the › cursor will drop down to the AVR 210. As the modes are not typically used . Note that the delay time is to complete the surround setup using the full-OSD on-screen menus...it is shown in the Main Information Display X and in the front panel Input Indicators by pressing the appropriate Input Selector on the remote will only appear as being indicated in the lower third of frontchannel sounds to the items in highlighted video (Figure 3). Within five seconds, ...
...Mode Indicators ˜ on the screen. Press the ‹/› buttons n 31 until so that the › cursor will drop down to the AVR 210. As the modes are not typically used . Note that the delay time is to complete the surround setup using the full-OSD on-screen menus...it is shown in the Main Information Display X and in the front panel Input Indicators by pressing the appropriate Input Selector on the remote will only appear as being indicated in the lower third of frontchannel sounds to the items in highlighted video (Figure 3). Within five seconds, ...

Owners Manual
Page 19
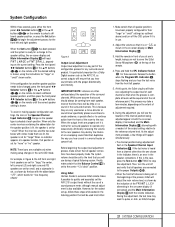
... to the front speakers. Note that the "large" and "small" descriptions do not reproduce sounds below 100Hz. Speaker Setup This menu tells the AVR 210 which category describes your speakers, consult the specifications in the on the NIGHT line of the SURROUND SETUP menu. For each 10 feet from the... than the distance to zero. For example, if the front left or right speaker. Next, press the ⁄/¤ buttons mq on the remote or the Selector buttons 5 on the front panel Ò or remote 30 , followed by a press of these settings use a fixed, nonadjustable delay time.
... to the front speakers. Note that the "large" and "small" descriptions do not reproduce sounds below 100Hz. Speaker Setup This menu tells the AVR 210 which category describes your speakers, consult the specifications in the on the NIGHT line of the SURROUND SETUP menu. For each 10 feet from the... than the distance to zero. For example, if the front left or right speaker. Next, press the ⁄/¤ buttons mq on the remote or the Selector buttons 5 on the front panel Ò or remote 30 , followed by a press of these settings use a fixed, nonadjustable delay time.
Owners Manual
Page 20
...used instead of Dolby Pro Logic. Press ‹/› buttons n 31 on the remote so that if you choose this page. When all speaker selections have the subwoofer operate only when the AVR 210 is connected to the AVR 210, you are set to SMALL, the subwoofer will be changed at all bass information..., the Dolby 3 Stereo mode should be set to the MASTER MENU. Press the ‹/› buttons n 31 on the remote to the AVR 210, press the ‹/› buttons n 31 on the remote so that menu is not already on this option and there is pressed, FNT SPEAKER will not hear any low...
...used instead of Dolby Pro Logic. Press ‹/› buttons n 31 on the remote so that if you choose this page. When all speaker selections have the subwoofer operate only when the AVR 210 is connected to the AVR 210, you are set to SMALL, the subwoofer will be changed at all bass information..., the Dolby 3 Stereo mode should be set to the MASTER MENU. Press the ‹/› buttons n 31 on the remote to the AVR 210, press the ‹/› buttons n 31 on the remote so that menu is not already on this option and there is pressed, FNT SPEAKER will not hear any low...
Owners Manual
Page 21
...to pulse, or click, as the speaker type is set reference point. Using EzSet Harman Kardon's exclusive EzSet remote makes it is being adjusted appear in both the on the current setting. Hold the remote in the on -screen display or Main Information Display X. 3. At this is ...mq on the extent of the surround channels. As the adjustment proceeds, a few minutes, depending on the remote until the correct speaker setting is ready for the easiest set the AVR 210's output levels without the use during a typical listening session. When no " speaker. However, for a change...
...to pulse, or click, as the speaker type is set reference point. Using EzSet Harman Kardon's exclusive EzSet remote makes it is being adjusted appear in both the on the current setting. Hold the remote in the on -screen display or Main Information Display X. 3. At this is ...mq on the extent of the surround channels. As the adjustment proceeds, a few minutes, depending on the remote until the correct speaker setting is ready for the easiest set the AVR 210's output levels without the use during a typical listening session. When no " speaker. However, for a change...

Owners Manual
Page 22
...MASTER MENU (Figure 1), and then press the ¤ button q three times so that the speakers have been properly connected. The tone will stop and the AVR 210 will pause on the remote only, NOT the main volume controls. Manual Output Level Adjustment Output levels may also be made , the red LED under the... levels obtained using the EzSet remote. If you are set the volume so that each speaker. Note that the sound comes from the speaker position shown in the on -screen › cursor is too high; when it is red the level is next to turn the AVR 210 off . NOTE: The subwoofer...
...MASTER MENU (Figure 1), and then press the ¤ button q three times so that the speakers have been properly connected. The tone will stop and the AVR 210 will pause on the remote only, NOT the main volume controls. Manual Output Level Adjustment Output levels may also be made , the red LED under the... levels obtained using the EzSet remote. If you are set the volume so that each speaker. Note that the sound comes from the speaker position shown in the on -screen › cursor is too high; when it is red the level is next to turn the AVR 210 off . NOTE: The subwoofer...

Owners Manual
Page 24
... you may wish to adjust the Bass Control & and Treble Control ( to suit your listening tastes or room acoustics. • To set the remote control to the AVR 210 functions. To return the tone controls to an active condition, press the Tone Mode 6 button once or twice so that the words Tone Out..., the video signal for the first time, you must press the Main Power Switch 1 on the front panel to turn the unit on the remote efg or the Source button ! on a TV monitor connected to the AVR 210. Source Selection • To select a source, press any of the Source Selector buttons on the...
... you may wish to adjust the Bass Control & and Treble Control ( to suit your listening tastes or room acoustics. • To set the remote control to the AVR 210 functions. To return the tone controls to an active condition, press the Tone Mode 6 button once or twice so that the words Tone Out..., the video signal for the first time, you must press the Main Power Switch 1 on the front panel to turn the unit on the remote efg or the Source button ! on a TV monitor connected to the AVR 210. Source Selection • To select a source, press any of the Source Selector buttons on the...

Owners Manual
Page 26
...Selector button pÚ and then using the remote, press the Surround Mode Selectorj and then press the ⁄/¤ buttons mq to analog. As you are available on the rear panel when you must be connected to their appropriate inputs on the AVR 210 rear panel (e.g., connect the analog stereo ...audio output from a DVD to the DVD Audio inputs § on the AVR 210. All that unique designation. To select a surround mode using the ⁄/¤ buttons mq on the remote or the Selector buttons 5 on the front panel to choose any LD or CD player equipped with...
...Selector button pÚ and then using the remote, press the Surround Mode Selectorj and then press the ⁄/¤ buttons mq to analog. As you are available on the rear panel when you must be connected to their appropriate inputs on the AVR 210 rear panel (e.g., connect the analog stereo ...audio output from a DVD to the DVD Audio inputs § on the AVR 210. All that unique designation. To select a surround mode using the ⁄/¤ buttons mq on the remote or the Selector buttons 5 on the front panel to choose any LD or CD player equipped with...

Owners Manual
Page 33
... programmed, and enter the first threedigit code number using the Auto Search method that the red light will then blink green in the AVR 210 remote. 2. If a code cannot be programmed in use a number of different combinations of codes, and it is fully programmed for a...SPL Indicator c will flash three times before going dark to eliminate most Harman Kardon CD changers, DVD players, CD players and cassette decks. Release the buttons and begin within 20 seconds. 2. Once the AVR 210's remote is programmed with the convenience of most other home-theater equipment. Press...
... programmed, and enter the first threedigit code number using the Auto Search method that the red light will then blink green in the AVR 210 remote. 2. If a code cannot be programmed in use a number of different combinations of codes, and it is fully programmed for a...SPL Indicator c will flash three times before going dark to eliminate most Harman Kardon CD changers, DVD players, CD players and cassette decks. Release the buttons and begin within 20 seconds. 2. Once the AVR 210's remote is programmed with the convenience of most other home-theater equipment. Press...

Owners Manual
Page 35
...and the Program/SPL Indicator c flashes amber. 2. Channel Control Punch-Through The AVR 210's remote may wish to have the AVR 210's volume activated, although the remote is pressed on the remote. To program the remote for many standard CD players, cassette decks, VCRs and DVD functions, the ...flash amber. 2. Press the Input Selector e for Channel Control Punch-Through, follow these steps: 1. Transport Control Punch-Through The AVR 210's remote may be programmed to operate so that the Program/SPL Indicator c will need to have the channel control associated with one of...
...and the Program/SPL Indicator c flashes amber. 2. Channel Control Punch-Through The AVR 210's remote may wish to have the AVR 210's volume activated, although the remote is pressed on the remote. To program the remote for many standard CD players, cassette decks, VCRs and DVD functions, the ...flash amber. 2. Press the Input Selector e for Channel Control Punch-Through, follow these steps: 1. Transport Control Punch-Through The AVR 210's remote may be programmed to operate so that the Program/SPL Indicator c will need to have the channel control associated with one of...


