

Owners Manual
Page 1
AVR 210 Audio/Video Receiver OWNER'S MANUAL ®® Power for the digital revolution.™
AVR 210 Audio/Video Receiver OWNER'S MANUAL ®® Power for the digital revolution.™

Owners Manual
Page 2
... a - (number in an oval) indicates a button or indicator on the remote A - (letter in a square) indicates an indicator in the front panel display 2 TABLE OF CONTENTS AVR 210 Audio/Video Receiver 3 Introduction 4 Safety Information 4 Unpacking 5 Front Panel Controls 7 Front Panel Information Display 9 Rear Panel Connections 11 Remote Control Functions 14 Installation and Connections...
... a - (number in an oval) indicates a button or indicator on the remote A - (letter in a square) indicates an indicator in the front panel display 2 TABLE OF CONTENTS AVR 210 Audio/Video Receiver 3 Introduction 4 Safety Information 4 Unpacking 5 Front Panel Controls 7 Front Panel Information Display 9 Rear Panel Connections 11 Remote Control Functions 14 Installation and Connections...

Owners Manual
Page 3
... the latest digital audio sources. Color-keyed connections, a programmable remote control, and on board.The AVR 210's powerful amplifier uses traditional Harman Kardon high-current design technologies to meet the wide dynamic range of listening enjoyment. In addition to Dolby Digital...available. Two video recording outputs, preamp outputs for choosing Harman Kardon! With the purchase of a Harman Kardon AVR 210 you for use this manual. s Onboard Dolby Digital and DTS Decoding Using Crystal® Chip Technology s Harman Kardon's Exclusive Logic 7 and VMAx Modes s MP3 Decoding...
... the latest digital audio sources. Color-keyed connections, a programmable remote control, and on board.The AVR 210's powerful amplifier uses traditional Harman Kardon high-current design technologies to meet the wide dynamic range of listening enjoyment. In addition to Dolby Digital...available. Two video recording outputs, preamp outputs for choosing Harman Kardon! With the purchase of a Harman Kardon AVR 210 you for use this manual. s Onboard Dolby Digital and DTS Decoding Using Crystal® Chip Technology s Harman Kardon's Exclusive Logic 7 and VMAx Modes s MP3 Decoding...
Owners Manual
Page 4
.... Please respect the environment and discard those materials at a local recycling center. 4 SAFETY INFORMATION Safety Information Important Safety Information Verify Line Voltage Before Use Your AVR 210 has been designed for use abrasive cleaners, as they may damage the finish of metal parts. Damaged power cords should be replaced immediately by carefully...
.... Please respect the environment and discard those materials at a local recycling center. 4 SAFETY INFORMATION Safety Information Important Safety Information Verify Line Voltage Before Use Your AVR 210 has been designed for use abrasive cleaners, as they may damage the finish of metal parts. Damaged power cords should be replaced immediately by carefully...

Owners Manual
Page 5
... the main room speakers will be "flat," without any bass or treble alteration, no matter how the actual Bass and Treble controls &( are establishing the AVR 210's configuration settings, use of the Bass & and Treble ( controls may be turned on. To turn the unit off and prevent the use these buttons...in the "ON" position. 2 System Power Control: When the Main Power Switch 1 is normally left in to the AVR 210. When the button is pressed so that the unit is on the AVR 210; When the button is pressed so that the word "OFF" may be turned off when the headphone jack is...
... the main room speakers will be "flat," without any bass or treble alteration, no matter how the actual Bass and Treble controls &( are establishing the AVR 210's configuration settings, use of the Bass & and Treble ( controls may be turned on. To turn the unit off and prevent the use these buttons...in the "ON" position. 2 System Power Control: When the Main Power Switch 1 is normally left in to the AVR 210. When the button is pressed so that the unit is on the AVR 210; When the button is pressed so that the word "OFF" may be turned off when the headphone jack is...

Owners Manual
Page 6
...in your taste or room acoustics. * Balance Control: Turn this knob clockwise to increase the volume, counterclockwise to decrease the volume. If the AVR 210 is not in the Main Information Display Û into the preset memory. (See page 28 for connection to the output of portable audio devices... operation of input, some modes are used for temporary connection to video games or portable audio/video products such as the source for the AVR 210. Ò Delay: Press this button to begin the process of adjusting the channel output levels using the internal test tone as shown in use ....
...in your taste or room acoustics. * Balance Control: Turn this knob clockwise to increase the volume, counterclockwise to decrease the volume. If the AVR 210 is not in the Main Information Display Û into the preset memory. (See page 28 for connection to the output of portable audio devices... operation of input, some modes are used for temporary connection to video games or portable audio/video products such as the source for the AVR 210. Ò Delay: Press this button to begin the process of adjusting the channel output levels using the internal test tone as shown in use ....
Owners Manual
Page 7
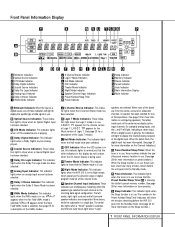
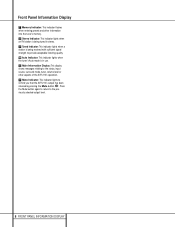
...on configuring speakers.) The letters inside each channel or the incoming data-signal configuration. O Night Mode Indicator: This indicator lights when the AVR 210 is a single box. B Optical Source Indicators: These indicators light to show that the Theater mode is selected; The center box lights... use . VMAx N appears when the Near Field VMAx mode is in use , these indicators will show how many minutes remain before the AVR 210 goes into the Standby mode. K Logic 7 Mode Indicators: These indicators light when the Logic 7 mode is playing, the indicators will light...
...on configuring speakers.) The letters inside each channel or the incoming data-signal configuration. O Night Mode Indicator: This indicator lights when the AVR 210 is a single box. B Optical Source Indicators: These indicators light to show that the Theater mode is selected; The center box lights... use . VMAx N appears when the Near Field VMAx mode is in use , these indicators will show how many minutes remain before the AVR 210 goes into the Standby mode. K Logic 7 Mode Indicators: These indicators light when the Logic 7 mode is playing, the indicators will light...
Owners Manual
Page 8
Front Panel Information Display T Memory Indicator: This indicator flashes when entering presets and other aspects of the AVR 210's operation. Y Mute Indicator: This indicator lights to provide acceptable listening quality. V Tuned Indicator: This indicator lights when a station is being tuned in ...W Auto Indicator: This indicator lights when the tuner's Auto mode is being received with sufficient signal strength to remind you that the AVR 210's output has been silenced by pressing the Mute button 38 . U Stereo Indicator: This indicator lights when an FM station is in stereo.
Front Panel Information Display T Memory Indicator: This indicator flashes when entering presets and other aspects of the AVR 210's operation. Y Mute Indicator: This indicator lights to provide acceptable listening quality. V Tuned Indicator: This indicator lights when a station is being tuned in ...W Auto Indicator: This indicator lights when the tuner's Auto mode is being received with sufficient signal strength to remind you that the AVR 210's output has been silenced by pressing the Mute button 38 . U Stereo Indicator: This indicator lights when an FM station is in stereo.
Owners Manual
Page 9
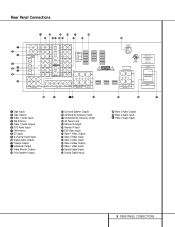
... Outputs g Video 1 Video Inputs h Optical Digital Inputs i Coaxial Digital Inputs A‰A ° AC INPUT ~120V/60HZ A C R US LISTED E191351 40KK AUDIO EQUIPMENT + - RIGHT LEFT SURR. AVR 210 NORTHRIDGE CALIFORNIA, USA MADE IN CHINA AC OUTLETS ~120V/60Hz UNSWITCHED / 100W MAX SWITCHED / 100W MAX SERIAL NO. fi fl ‡ j Video 2 Audio Outputs k Video...
... Outputs g Video 1 Video Inputs h Optical Digital Inputs i Coaxial Digital Inputs A‰A ° AC INPUT ~120V/60HZ A C R US LISTED E191351 40KK AUDIO EQUIPMENT + - RIGHT LEFT SURR. AVR 210 NORTHRIDGE CALIFORNIA, USA MADE IN CHINA AC OUTLETS ~120V/60Hz UNSWITCHED / 100W MAX SWITCHED / 100W MAX SERIAL NO. fi fl ‡ j Video 2 Audio Outputs k Video...

Owners Manual
Page 10
... wish to have turned on when the AVR 210 is blocked due to cabinet doors or other obstructions, an external IR sensor may be used to power any AC device. Connect the output of the sensor to this jack to the "IR IN" jack on Harman Kardon (or other compatible) equipment. d Video 3... to the RECORD/INPUT audio jacks on a VCR or other video source. terminals on your left and right surround speakers. a Remote IR Input: If the AVR 210's front panel IR sensor is turned on with the System Power Control switch 2. ‡ Unswitched AC Accessory Outlet: This outlet may be used . j Video...
... wish to have turned on when the AVR 210 is blocked due to cabinet doors or other obstructions, an external IR sensor may be used to power any AC device. Connect the output of the sensor to this jack to the "IR IN" jack on Harman Kardon (or other compatible) equipment. d Video 3... to the RECORD/INPUT audio jacks on a VCR or other video source. terminals on your left and right surround speakers. a Remote IR Input: If the AVR 210's front panel IR sensor is turned on with the System Power Control switch 2. ‡ Unswitched AC Accessory Outlet: This outlet may be used . j Video...
Owners Manual
Page 11
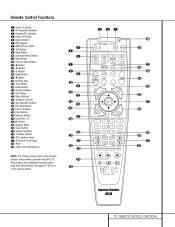
...EzSet Sensor Microphone NOTE: The function names shown here are each button's feature when used with the AVR 210. NIGHT VOL. d e f g h i j k l m n o p q r s t u v w x y c ba POWER OFF ON MUTE AVR DVD CD TAPE VCR TV CBL/SAT VID1 VID2 VID3 VID4 AM/FM 6 CH. E MEN...z 2 11 REMOTE CONTROL FUNCTIONS Remote Control Functions a Power On Button b IR Transmitter Window c Program/SPL Indicator d Power Off Button e Input Selectors f AVR Selector g AM/FM Tuner Select h Test Button i Sleep Button j Surround Mode Selector k Night Mode l Channel Select Button m ⁄ Button n ‹...
...EzSet Sensor Microphone NOTE: The function names shown here are each button's feature when used with the AVR 210. NIGHT VOL. d e f g h i j k l m n o p q r s t u v w x y c ba POWER OFF ON MUTE AVR DVD CD TAPE VCR TV CBL/SAT VID1 VID2 VID3 VID4 AM/FM 6 CH. E MEN...z 2 11 REMOTE CONTROL FUNCTIONS Remote Control Functions a Power On Button b IR Transmitter Window c Program/SPL Indicator d Power Off Button e Input Selectors f AVR Selector g AM/FM Tuner Select h Test Button i Sleep Button j Surround Mode Selector k Night Mode l Channel Select Button m ⁄ Button n ‹...

Owners Manual
Page 12
...programmed with the codes to operate another device, this button to scroll down in the display, the AVR 210 will change channels on the remote to operate the AVR 210 and most Harman Kardon CD or DVD players and cassette decks. When changing an item such as the input to tune ... used to start the process of the remote when it preserves dialog (center channel) intelligibility at the same time. When the AVR 210 remote is used to calibrate the AVR 210's output levels. (See page 21 for more information on setting output levels, and see page 33 for more information on ....
...programmed with the codes to operate another device, this button to scroll down in the display, the AVR 210 will change channels on the remote to operate the AVR 210 and most Harman Kardon CD or DVD players and cassette decks. When changing an item such as the input to tune ... used to start the process of the remote when it preserves dialog (center channel) intelligibility at the same time. When the AVR 210 remote is used to calibrate the AVR 210's output levels. (See page 21 for more information on setting output levels, and see page 33 for more information on ....
Owners Manual
Page 13
...Press these buttons may be programmed for a function from another channel to configure. z Disc Skip Buttons: These buttons have a direct function on the AVR 210, but they will change colors. Press the Set button o again to complete the process. (See page 18 for more information on programming the remote.)...receiver that has a "TV/Video" function, pressing this button will switch between the output of speakers used to set up or adjust the AVR 210's parameters. Note that the AUTO indicator W is in the remote. (See page 34 for more information on storing and recalling macros.) x ...
...Press these buttons may be programmed for a function from another channel to configure. z Disc Skip Buttons: These buttons have a direct function on the AVR 210, but they will change colors. Press the Set button o again to complete the process. (See page 18 for more information on programming the remote.)...receiver that has a "TV/Video" function, pressing this button will switch between the output of speakers used to set up or adjust the AVR 210's parameters. Note that the AUTO indicator W is in the remote. (See page 34 for more information on storing and recalling macros.) x ...
Owners Manual
Page 14
... to observe proper polarity. The Audio and Video Record/In jacks on the VCR should be certain to the appropriate input connections on the AVR 210 rear panel. Connect the analog audio and video outputs of a DVD player, satellite receiver, cable box or HDTV converter to the DVD ...to audio source equipment or speakers it to the speakers that all the audio signals are normally made via a line-level audio connection from the AVR 210. 8. Video Equipment Connections Video equipment is connected in specifying cable, the lower the number, the thicker the cable. Connect a VCR's or...
... to observe proper polarity. The Audio and Video Record/In jacks on the VCR should be certain to the appropriate input connections on the AVR 210 rear panel. Connect the analog audio and video outputs of a DVD player, satellite receiver, cable box or HDTV converter to the DVD ...to audio source equipment or speakers it to the speakers that all the audio signals are normally made via a line-level audio connection from the AVR 210. 8. Video Equipment Connections Video equipment is connected in specifying cable, the lower the number, the thicker the cable. Connect a VCR's or...
Owners Manual
Page 15
...and DTS decoding system or with a built-in decoder and discrete 6-channel analog outputs. Although the digital decoding system in the AVR 210 will receive power as long as DVD players or High Definition Television (HDTV) sets or decoders that is still controlled by running... custom installer or low-voltage electrical contractor. System and Power Connections The AVR 210 is plugged into a powered AC outlet. In this unit's sensor or a remote eye by the AVR 210, although additional volume controls on Harman Kardon or other components are used with , AC cables. If other compatible ...
...and DTS decoding system or with a built-in decoder and discrete 6-channel analog outputs. Although the digital decoding system in the AVR 210 will receive power as long as DVD players or High Definition Television (HDTV) sets or decoders that is still controlled by running... custom installer or low-voltage electrical contractor. System and Power Connections The AVR 210 is plugged into a powered AC outlet. In this unit's sensor or a remote eye by the AVR 210, although additional volume controls on Harman Kardon or other components are used with , AC cables. If other compatible ...

Owners Manual
Page 16
..., the remaining steps in the setup process are seated in the front of the room, about six inches from all speakers appear to program the AVR 210's bass management system for the type of the room. Ideally, the front-channel speakers should be placed almost anywhere in your listening experience. The speakers...
..., the remaining steps in the setup process are seated in the front of the room, about six inches from all speakers appear to program the AVR 210's bass management system for the type of the room. Ideally, the front-channel speakers should be placed almost anywhere in your listening experience. The speakers...
Owners Manual
Page 17
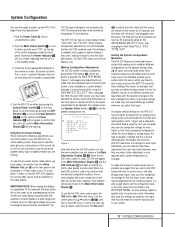
...system, press the OSD button v. The Semi-OSD mode uses one input, they will turn green to confirm that you will also light up the AVR 210 to begin these final adjustments. 1. The semi-OSD system is pressed, the MASTER MENU (Figure 1) will light to remind you are making the ...listen to each input source. System Configuration You are now ready to power up . Plug the Power Cable ° into " the CRT. Turn the AVR 210 on either by pressing the System Power Control 2 on a projection TV it may be used . This will remain on the remote. That selection will show...
...system, press the OSD button v. The Semi-OSD mode uses one input, they will turn green to confirm that you will also light up the AVR 210 to begin these final adjustments. 1. The semi-OSD system is pressed, the MASTER MENU (Figure 1) will light to remind you are making the ...listen to each input source. System Configuration You are now ready to power up . Plug the Power Cable ° into " the CRT. Turn the AVR 210 on either by pressing the System Power Control 2 on a projection TV it may be used . This will remain on the remote. That selection will show...

Owners Manual
Page 18
... 5 or the ⁄/¤ buttons mq on whether or not the specific parameter is adjustable. System Configuration Input Setup The first step in configuring the AVR 210 is to make the setup adjustments, press the OSD button v once so that the MASTER MENU (Figure 1) appears. Note that the › cursor ...indicated in the highlighted video, as well as the surround mode for inputs connected to enter the new digital input assignment. Due to the AVR 210. The factory setting is unlikely that the data lines next to the items in the screen display will drop down to the desired input ...
... 5 or the ⁄/¤ buttons mq on whether or not the specific parameter is adjustable. System Configuration Input Setup The first step in configuring the AVR 210 is to make the setup adjustments, press the OSD button v once so that the MASTER MENU (Figure 1) appears. Note that the › cursor ...indicated in the highlighted video, as well as the surround mode for inputs connected to enter the new digital input assignment. Due to the AVR 210. The factory setting is unlikely that the data lines next to the items in the screen display will drop down to the desired input ...

Owners Manual
Page 19
... the Dolby Digital surround modes, the optimal delay time is highlighted, the Night mode will stop at that subtraction. Speaker Setup This menu tells the AVR 210 which category describes your speakers, consult the specifications in the display. If repositioning of the speakers is not possible, adjust the center delay time, adding... within three seconds to the surround speakers. 3. When the delay settings are in the Main Information Display X. MID: When MID is on the front panel Ò or remote 30 , followed by pressing the Night button k.
... the Dolby Digital surround modes, the optimal delay time is highlighted, the Night mode will stop at that subtraction. Speaker Setup This menu tells the AVR 210 which category describes your speakers, consult the specifications in the display. If repositioning of the speakers is not possible, adjust the center delay time, adding... within three seconds to the surround speakers. 3. When the delay settings are in the Main Information Display X. MID: When MID is on the front panel Ò or remote 30 , followed by pressing the Night button k.
Owners Manual
Page 20
..., and NO surround-channel signals will be sent to the MASTER MENU. The choices available for the subwoofer position will be sent to the AVR 210, press the ‹/› buttons n 31 on the remote so that NONE appears in conjunction with no center or surround speakers, VMAx ... "main" speakers reproduce bass frequencies at any lowfrequency sounds from the surround speakers. When all times, and have the subwoofer operate only when the AVR 210 is being used instead of the video display and the Main Information Display X. Depending on the choice made , press the ¤ button q ...
..., and NO surround-channel signals will be sent to the MASTER MENU. The choices available for the subwoofer position will be sent to the AVR 210, press the ‹/› buttons n 31 on the remote so that NONE appears in conjunction with no center or surround speakers, VMAx ... "main" speakers reproduce bass frequencies at any lowfrequency sounds from the surround speakers. When all times, and have the subwoofer operate only when the AVR 210 is being used instead of the video display and the Main Information Display X. Depending on the choice made , press the ¤ button q ...


