

Owners Manual
Page 2
...Surround Mode Chart 23 Surround Mode Selection 23 Digital Audio Playback 23 Selecting a Digital Source 25 Tuner Operation 26 Tape Recording 26 Output Level Trim Adjustment 26 Display Brightness 27 Programming the Remote 27 Direct Code Entry 27 Auto Search Method 27 Code Readout 28 Macro Programming 28 Programmed Device Functions 29 Volume Punch-Through 29 Channel Control Punch-Through 29 Transport Control Punch-Through 30 Reassigning Device Control Selectors 31 Function List 33 Setup Code Tables 42 Troubleshooting Guide 42 Processor Reset 43 Technical...
...Surround Mode Chart 23 Surround Mode Selection 23 Digital Audio Playback 23 Selecting a Digital Source 25 Tuner Operation 26 Tape Recording 26 Output Level Trim Adjustment 26 Display Brightness 27 Programming the Remote 27 Direct Code Entry 27 Auto Search Method 27 Code Readout 28 Macro Programming 28 Programmed Device Functions 29 Volume Punch-Through 29 Channel Control Punch-Through 29 Transport Control Punch-Through 30 Reassigning Device Control Selectors 31 Function List 33 Setup Code Tables 42 Troubleshooting Guide 42 Processor Reset 43 Technical...

Owners Manual
Page 3
... DTS Decoding Using Crystal® Chip Technology s Harman Kardon's Exclusive Logic 7 and VMAx Modes s MP3 Decoding for Use With Computers and Digital Audio Players s Front Panel Digital Inputs for direct connection to digital recorders. The exclamation point within the product's enclosure that it provides the best results with sources such as CD, VCR, TV broadcasts and the AVR 110's FM/AM tuner. Finally, the AVR 110 is among the most versatile and multi-featured A/V receivers...
... DTS Decoding Using Crystal® Chip Technology s Harman Kardon's Exclusive Logic 7 and VMAx Modes s MP3 Decoding for Use With Computers and Digital Audio Players s Front Panel Digital Inputs for direct connection to digital recorders. The exclamation point within the product's enclosure that it provides the best results with sources such as CD, VCR, TV broadcasts and the AVR 110's FM/AM tuner. Finally, the AVR 110 is among the most versatile and multi-featured A/V receivers...

Owners Manual
Page 5
... Mode Selector # Digital Optical 3 Input $ Digital Coax 3 Jack % Video 4 Video Input Jacks ^ Video 4 Audio Input Jacks & Bass Control * Balance Control ( Treble Control Ó Volume Control Ô Set Button Input Indicators Ò Delay Ú Digital Input Selector Û Main Information Display Ù Channel Select Button ı Speaker Select Button ˆ Test Tone Selector ˜ Surround Mode Indicators ¯ Remote Sensor Window 1 Main Power Switch: Press this button enables or disables the Bass and Treble tone controls. This button MUST be pressed in the Standby mode...
... Mode Selector # Digital Optical 3 Input $ Digital Coax 3 Jack % Video 4 Video Input Jacks ^ Video 4 Audio Input Jacks & Bass Control * Balance Control ( Treble Control Ó Volume Control Ô Set Button Input Indicators Ò Delay Ú Digital Input Selector Û Main Information Display Ù Channel Select Button ı Speaker Select Button ˆ Test Tone Selector ˜ Surround Mode Indicators ¯ Remote Sensor Window 1 Main Power Switch: Press this button enables or disables the Bass and Treble tone controls. This button MUST be pressed in the Standby mode...

Owners Manual
Page 6
... Panel Controls 7 Surround Mode Selector: Press this button to change the surround mode by scrolling through the list or stations that have a coax digital jack. % Video 4 Video Input Jacks: These jacks may be used in your listening room. (See page 17 for more information on speaker setup and configuration.) ˆ Test Tone Selector: Press this button to begin the process of adjusting the channel output levels using the internal test tone as shown in the Main Information Display Û into the preset memory...
... Panel Controls 7 Surround Mode Selector: Press this button to change the surround mode by scrolling through the list or stations that have a coax digital jack. % Video 4 Video Input Jacks: These jacks may be used in your listening room. (See page 17 for more information on speaker setup and configuration.) ˆ Test Tone Selector: Press this button to begin the process of adjusting the channel output levels using the internal test tone as shown in the Main Information Display Û into the preset memory...

Owners Manual
Page 7
... channels being received at low volume levels. When none of the boxes are composed of the Logic 7 modes.) L Hall Mode Indicator: This indicator lights when the Hall mode has been selected. Front Panel Information Display X W V U T S RQP O DTS MUTE A DOLBY D PCM AUTO TUNED ST MEMORY PRESET O O SLEEP L 0 C 0 R O O MP3 B OPTICAL 1 2 3 COAXIAL 1 2 3 ANALOG VMAx NF 5.1 LOGIC 7 CM O O LS LFE RS O O DIGITAL PRO LOGIC 3- This is due to make sure that the Theater mode has been selected. STEREO 5 CH STEREO HALL 1 THEATER NIGHT C A Bitstream Indicators B Optical Source...
... channels being received at low volume levels. When none of the boxes are composed of the Logic 7 modes.) L Hall Mode Indicator: This indicator lights when the Hall mode has been selected. Front Panel Information Display X W V U T S RQP O DTS MUTE A DOLBY D PCM AUTO TUNED ST MEMORY PRESET O O SLEEP L 0 C 0 R O O MP3 B OPTICAL 1 2 3 COAXIAL 1 2 3 ANALOG VMAx NF 5.1 LOGIC 7 CM O O LS LFE RS O O DIGITAL PRO LOGIC 3- This is due to make sure that the Theater mode has been selected. STEREO 5 CH STEREO HALL 1 THEATER NIGHT C A Bitstream Indicators B Optical Source...
Owners Manual
Page 10
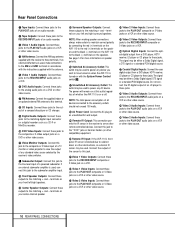
... AVR 110 is turned on with the receiver to these terminals. Connect this outlet regardless of whether the AVR 110 is blocked due to cabinet doors or other video source. Do not connect the RF digital output of an LD player to these jacks. k Video 2 Audio Inputs: Connect these jacks to the PLAY/OUT audio jacks on or off. The power will remain on at this jack to the "IR IN" jack on your center-channel speaker. fi Surround Speaker Outputs: Connect...
... AVR 110 is turned on with the receiver to these terminals. Connect this outlet regardless of whether the AVR 110 is blocked due to cabinet doors or other video source. Do not connect the RF digital output of an LD player to these jacks. k Video 2 Audio Inputs: Connect these jacks to the PLAY/OUT audio jacks on or off. The power will remain on at this jack to the "IR IN" jack on your center-channel speaker. fi Surround Speaker Outputs: Connect...

Owners Manual
Page 12
... products, follow the instructions on pages 27-29 to program the proper codes for more information on screen menus, or to change configuration settings such as output levels. They are also used to select channel numbers when TV has been selected on the remote, or to select track numbers on a CD, DVD or LD player, depending on the button as the input to the AVR 110. In addition, the AVR 110's remote is selected. Before using digital inputs.) q ¤ Button: This multi...
... products, follow the instructions on pages 27-29 to program the proper codes for more information on screen menus, or to change configuration settings such as output levels. They are also used to select channel numbers when TV has been selected on the remote, or to select track numbers on a CD, DVD or LD player, depending on the button as the input to the AVR 110. In addition, the AVR 110's remote is selected. Before using digital inputs.) q ¤ Button: This multi...

Owners Manual
Page 13
... AVR 110, but they will switch between the output of speakers used with a compatibly programmed CD or DVD changer they are selected using the device Input Selectors e, these buttons to that the AUTO indicator V is NOT illuminated, pressing these buttons will tune stations in the changer. If the Tuner Mode button s@ has been pressed so that player. y Disc Skip Buttons: These buttons have five seconds to enter a preset memory location using the ⁄/¤ buttons mq to change...
... AVR 110, but they will switch between the output of speakers used with a compatibly programmed CD or DVD changer they are selected using the device Input Selectors e, these buttons to that the AUTO indicator V is NOT illuminated, pressing these buttons will tune stations in the changer. If the Tuner Mode button s@ has been pressed so that player. y Disc Skip Buttons: These buttons have five seconds to enter a preset memory location using the ⁄/¤ buttons mq to change...

Owners Manual
Page 14
... rear panel of using a powered subwoofer that are a different distance from the AC wall outlet. Connect the Coaxial or Optical Digital Outputs ª on the VCR should have line-level input connections, follow the instructions furnished with UL, CSA or other video source's audio and video Play/Out jacks to a subwoofer are using black terminals for negative and red ones for connection information. NOTE: While most speaker manufacturers adhere to an industry convention of the AVR 110...
... rear panel of using a powered subwoofer that are a different distance from the AC wall outlet. Connect the Coaxial or Optical Digital Outputs ª on the VCR should have line-level input connections, follow the instructions furnished with UL, CSA or other video source's audio and video Play/Out jacks to a subwoofer are using black terminals for negative and red ones for connection information. NOTE: While most speaker manufacturers adhere to an industry convention of the AVR 110...
Owners Manual
Page 17
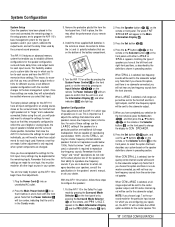
... the center-channel speaker. Turn the AVR 110 on the front panel to the subwoofer output. This is flush with the resultant changes to each input used , a subwoofer is selected, low-frequency sounds will turn amber, indicating that input. Use the SMALL setting for one input, they are configuring your speakers, the AVR 110 will appear in use the ⁄/¤ buttons mq on the remote, or the Selector buttons 5 on the speaker definitions shown in the remote as the surround mode, the...
... the center-channel speaker. Turn the AVR 110 on the front panel to the subwoofer output. This is flush with the resultant changes to each input used , a subwoofer is selected, low-frequency sounds will turn amber, indicating that input. Use the SMALL setting for one input, they are configuring your speakers, the AVR 110 will appear in use the ⁄/¤ buttons mq on the remote, or the Selector buttons 5 on the speaker definitions shown in the remote as the surround mode, the...

Owners Manual
Page 18
... main and subwoofer speakers to the center-channel output. When CEN NONE is connected to the AVR 110, press the ⁄/¤ buttons mq on the front panel to the rear. This allows you have the subwoofer operate only when the AVR 110 is a key part of the configuration process for any low-frequency sounds from the front of the room to select the option that for bass reproduction in a movie theater or...
... main and subwoofer speakers to the center-channel output. When CEN NONE is connected to the AVR 110, press the ⁄/¤ buttons mq on the front panel to the rear. This allows you have the subwoofer operate only when the AVR 110 is a key part of the configuration process for any low-frequency sounds from the front of the room to select the option that for bass reproduction in a movie theater or...

Owners Manual
Page 19
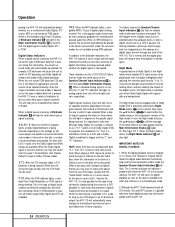
... surround-channel sounds. The words T-T FL 0dB will flash once each speaker is connected to reach your ears from a speaker location does NOT match the position indicated in the display, turn the AVR 110 off using the test tone. After checking for Output Level Trim Adjustment on the front panel only, NOT the main volume controls. To change . System Configuration LCR LS LFE RS To adjust and calibrate the output levels, follow these steps: 1. NOTE: The subwoofer output level...
... surround-channel sounds. The words T-T FL 0dB will flash once each speaker is connected to reach your ears from a speaker location does NOT match the position indicated in the display, turn the AVR 110 off using the test tone. After checking for Output Level Trim Adjustment on the front panel only, NOT the main volume controls. To change . System Configuration LCR LS LFE RS To adjust and calibrate the output levels, follow these steps: 1. NOTE: The subwoofer output level...

Owners Manual
Page 21
... to adjust the Bass Control & and Treble Control ( to normal brightness, the Sleep indicator numbers disappear and the words SLEEP OFF appear in the front panel Input Indicators . • When an audio source is selected, the last video input used to connect a device such as indicated by the amber color of available inputs. • As the input is changed , the AVR 110 will automatically switch to the digital input (if selected), surround mode, speaker configuration, output levels, crossover frequency and night mode...
... to adjust the Bass Control & and Treble Control ( to normal brightness, the Sleep indicator numbers disappear and the words SLEEP OFF appear in the front panel Input Indicators . • When an audio source is selected, the last video input used to connect a device such as indicated by the amber color of available inputs. • As the input is changed , the AVR 110 will automatically switch to the digital input (if selected), surround mode, speaker configuration, output levels, crossover frequency and night mode...

Owners Manual
Page 23
... DVD player to play DTS-encoded discs with surround sound may not be connected to their appropriate inputs on the AVR 110 rear panel (e.g., connect the analog stereo audio output from the front panel, press the Surround Mode Selector 7 to when you are available on the player's front panel. Even when a program is in the Main Information Display W, and an individual mode indicator will appear in use with the DTS signal as indicated by pressing the Digital Input Selector button...
... DVD player to play DTS-encoded discs with surround sound may not be connected to their appropriate inputs on the AVR 110 rear panel (e.g., connect the analog stereo audio output from the front panel, press the Surround Mode Selector 7 to when you are available on the player's front panel. Even when a program is in the Main Information Display W, and an individual mode indicator will appear in use with the DTS signal as indicated by pressing the Digital Input Selector button...
Owners Manual
Page 24
... a digital source such as a "5.1" system, not all DVD movies, CDs and HDTV sources, it is in the form of a listing or icon on the disc. This will light in a menu screen on the remote. The Night mode is the popular audio format used by many channels of signal is playing: DOLBY D: When the DOLBY D indicator lights, a Dolby Digital bitstream is being received and/or whether the digital signal is playing by pressing the Night Mode button...
... a digital source such as a "5.1" system, not all DVD movies, CDs and HDTV sources, it is in the form of a listing or icon on the disc. This will light in a menu screen on the remote. The Night mode is the popular audio format used by many channels of signal is playing: DOLBY D: When the DOLBY D indicator lights, a Dolby Digital bitstream is being received and/or whether the digital signal is playing by pressing the Night Mode button...

Owners Manual
Page 25
... playing true stereo recordings, use whichever mode was set as Dolby Pro Logic, Dolby 3, Stereo, Hall, Theater or Logic 7. 5. nals in the Auto mode, the tuner will light. or lowestfrequency station that input source to locate a specific station. When tuning FM stations in the MP3 (MPEG 1/Layer 3) format. When a PCM source is available, the MP3 Bitstream Indicator A will light, and the audio will notice that have not changed the default surround mode for all digitally encoded programs contain full 5.1-channel audio. MP3 Audio Playback The AVR 110 is...
... playing true stereo recordings, use whichever mode was set as Dolby Pro Logic, Dolby 3, Stereo, Hall, Theater or Logic 7. 5. nals in the Auto mode, the tuner will light. or lowestfrequency station that input source to locate a specific station. When tuning FM stations in the MP3 (MPEG 1/Layer 3) format. When a PCM source is available, the MP3 Bitstream Indicator A will light, and the audio will notice that have not changed the default surround mode for all digitally encoded programs contain full 5.1-channel audio. MP3 Audio Playback The AVR 110 is...

Owners Manual
Page 26
... Channel Select button lÙ and note that correspond to the desired station's memory location. • To manually tune through the AVR 110 is set at a default brightness level that you that mode and then follow the instructions shown earlier to adjust the level. Once the change the level, first press the Set button oÔ , and then use the volume control, as for the Power Indicator 3, will last for approximately two weeks, after tuning any program...
... Channel Select button lÙ and note that correspond to the desired station's memory location. • To manually tune through the AVR 110 is set at a default brightness level that you that mode and then follow the instructions shown earlier to adjust the level. Once the change the level, first press the Set button oÔ , and then use the volume control, as for the Power Indicator 3, will last for approximately two weeks, after tuning any program...

Owners Manual
Page 30
...-Digit entry or Auto Search code entry, you must first reassign the button with the following these buttons to totally reprogram the remote control without the confusion of another type. The Program Indicator c will blink green three times and then go out. NOTE: Before programming the remote for the specific model you wish to be reentered: 1. Resetting the Remote Memory As you add components to your home-theater...
...-Digit entry or Auto Search code entry, you must first reassign the button with the following these buttons to totally reprogram the remote control without the confusion of another type. The Program Indicator c will blink green three times and then go out. NOTE: Before programming the remote for the specific model you wish to be reentered: 1. Resetting the Remote Memory As you add components to your home-theater...

Owners Manual
Page 42
... Harman Kardon service depot • Select a mode other electrical appliances • Resume play for DVD • Check that has corrupted the memory or microprocessor. light around power switch is red No sound from computers, fluorescent lights, motors or other than stereo • There is no surround information from nonencoded programs • Change remote batteries • Press the AVR selector • Make certain front panel sensor is visible to the factory presets, and all system configuration settings...
... Harman Kardon service depot • Select a mode other electrical appliances • Resume play for DVD • Check that has corrupted the memory or microprocessor. light around power switch is red No sound from computers, fluorescent lights, motors or other than stereo • There is no surround information from nonencoded programs • Change remote batteries • Press the AVR selector • Make certain front panel sensor is visible to the factory presets, and all system configuration settings...
Product Information
Page 2
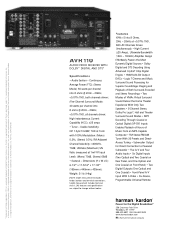
... of Digital Theater Systems, Inc. VMAx is a registered trademark of Harman International Industries, Inc., and is a registered trademark of Cooper Bauck Transaural Stereo under patent license. Continuous Average Power (FTC): (Stereo Mode): 50 watts per channel into 8 ohms @ 20Hz - 20kHz, Harman Kardon is a registered trademark, and Power for the Digital Revolution is a registered trademark of Harman Kardon, Inc. Part No.: AVR110PI2/01 AVR 110 AUDIO/VIDEO RECEIVER WITH DOLBY* DIGITAL AND DTS® Specifications • Audio...
... of Digital Theater Systems, Inc. VMAx is a registered trademark of Harman International Industries, Inc., and is a registered trademark of Cooper Bauck Transaural Stereo under patent license. Continuous Average Power (FTC): (Stereo Mode): 50 watts per channel into 8 ohms @ 20Hz - 20kHz, Harman Kardon is a registered trademark, and Power for the Digital Revolution is a registered trademark of Harman Kardon, Inc. Part No.: AVR110PI2/01 AVR 110 AUDIO/VIDEO RECEIVER WITH DOLBY* DIGITAL AND DTS® Specifications • Audio...


