User Manual
Page 1
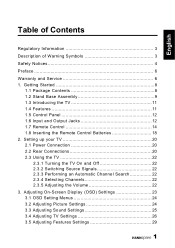
... 1.2 Stand Base Assembly 9 1.3 Introducing the TV 11 1.4 Features 11 1.5 Control Panel 12 1.6 Input and Output Jacks 12 1.7 Remote Control 14 1.8 Inserting the Remote Control Batteries 18 2. Setting up your TV 20 2.1 Power Connection 20 2.2 Rear Connections 20 2.3 Using the TV 22 2.3.1 Turning the TV On and Off 22 2.3.2 Switching Source Signals 22 2.3.3 Performing an Automatic Channel Search 22 2.3.4 Selecting Channels 22 2.3.5 Adjusting the Volume 22 3. Adjusting On-Screen Display (OSD) Settings 23 3.1 OSD Setting Menus 24 3.2 Adjusting Picture Settings 24 3.3 Adjusting...
... 1.2 Stand Base Assembly 9 1.3 Introducing the TV 11 1.4 Features 11 1.5 Control Panel 12 1.6 Input and Output Jacks 12 1.7 Remote Control 14 1.8 Inserting the Remote Control Batteries 18 2. Setting up your TV 20 2.1 Power Connection 20 2.2 Rear Connections 20 2.3 Using the TV 22 2.3.1 Turning the TV On and Off 22 2.3.2 Switching Source Signals 22 2.3.3 Performing an Automatic Channel Search 22 2.3.4 Selecting Channels 22 2.3.5 Adjusting the Volume 22 3. Adjusting On-Screen Display (OSD) Settings 23 3.1 OSD Setting Menus 24 3.2 Adjusting Picture Settings 24 3.3 Adjusting...
User Manual
Page 2
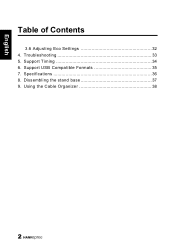
Support USB Compatible Formats 35 7. Specifications 36 8. Troubleshooting 33 5. Dissembling the stand base 37 9. English Table of Contents 3.6 Adjusting Eco Settings 32 4. Using the Cable Organizer 38 2 Support Timing 34 6.
Support USB Compatible Formats 35 7. Specifications 36 8. Troubleshooting 33 5. Dissembling the stand base 37 9. English Table of Contents 3.6 Adjusting Eco Settings 32 4. Using the Cable Organizer 38 2 Support Timing 34 6.

User Manual
Page 4
... contained in the operating instructions unless you are for the emission of heat. CAUTION These servicing instructions are qualified to do not expose this product at all times. 4 WARNING To prevent the spread of fire, keep candles or other strong sources of fire or electric shock, do so. English Safety Notices Installation Safety Notes Location Avoid allowing the...
... contained in the operating instructions unless you are for the emission of heat. CAUTION These servicing instructions are qualified to do not expose this product at all times. 4 WARNING To prevent the spread of fire, keep candles or other strong sources of fire or electric shock, do so. English Safety Notices Installation Safety Notes Location Avoid allowing the...

User Manual
Page 5
... glass. 7. Dangerous high-voltage electric power components are excluded. • This device uses a VGA connector to connect to disconnect the plug by pulling on the source signal, use the TV unattended. 8. English Notes: • The LED-LCD HDTV is for entertainment use only and visual display tasks are located inside the TV. Personal Safety 1. To avoid overloading the power supply, never plug too many electrical devices into...
... glass. 7. Dangerous high-voltage electric power components are excluded. • This device uses a VGA connector to connect to disconnect the plug by pulling on the source signal, use the TV unattended. 8. English Notes: • The LED-LCD HDTV is for entertainment use only and visual display tasks are located inside the TV. Personal Safety 1. To avoid overloading the power supply, never plug too many electrical devices into...
User Manual
Page 6
... allow you to assist you for accuracy; This instruction manual is subject to the correctness of the contents. To ensure the safe and correct installation and operations of such damages in setting up , using the TV. The information in this manual has been carefully checked for purchasing a Hannspree Liquid Crystal Display Television (LEDLCD HDTV). Preface Thank you in advance. The information...
... allow you to assist you for accuracy; This instruction manual is subject to the correctness of the contents. To ensure the safe and correct installation and operations of such damages in setting up , using the TV. The information in this manual has been carefully checked for purchasing a Hannspree Liquid Crystal Display Television (LEDLCD HDTV). Preface Thank you in advance. The information...
User Manual
Page 11
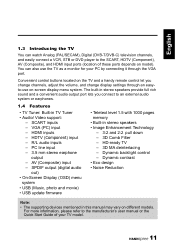
...'s user manual or the Quick Start Guide of these ports depends on model). SCART inputs - SPDIF output (digital audio out) • On-Screen Display (OSD) menu system • USB (Music, photo and movie) • USB update firmware • Teletext level 1.5 with 1000 pages memory • Built-in TV Tuner • Audio/ Video support: - VGA (PC) input - Dynamic backlight control - You can watch Analog (PAL/SECAM), Digital (DVB-T/DVB-C) television channels, and easily connect a VCR, STB or DVD player to an external audio...
...'s user manual or the Quick Start Guide of these ports depends on model). SCART inputs - SPDIF output (digital audio out) • On-Screen Display (OSD) menu system • USB (Music, photo and movie) • USB update firmware • Teletext level 1.5 with 1000 pages memory • Built-in TV Tuner • Audio/ Video support: - VGA (PC) input - Dynamic backlight control - You can watch Analog (PAL/SECAM), Digital (DVB-T/DVB-C) television channels, and easily connect a VCR, STB or DVD player to an external audio...
User Manual
Page 12
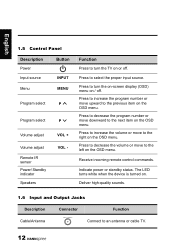
... Cable/Antenna Connect to select the proper input source. Receive incoming remote control commands. Indicate power or standby status. Function Press to the left on . The LED turns white when the device is turned on the OSD menu. Press to an antenna or cable TV. 12 Press to decrease the program number or move to turn the on-screen display (OSD) menu on the OSD menu. English 1.5 Control Panel Description Power Input source Button INPUT Menu MENU Program select P Program select P Volume adjust Volume adjust Remote IR sensor Power/ Standby indicator Speakers...
... Cable/Antenna Connect to select the proper input source. Receive incoming remote control commands. Indicate power or standby status. Function Press to the left on . The LED turns white when the device is turned on the OSD menu. Press to an antenna or cable TV. 12 Press to decrease the program number or move to turn the on-screen display (OSD) menu on the OSD menu. English 1.5 Control Panel Description Power Input source Button INPUT Menu MENU Program select P Program select P Volume adjust Volume adjust Remote IR sensor Power/ Standby indicator Speakers...

User Manual
Page 14
... power cord. 1.7 Remote Control Description Icon Power Input Signal Type INPUT Keypad Pro.List Pro.LIST Function Press to select the input signal type selections: TV, YPbPr, AV, SCART, PC, HDMI 1, HDMI 2, and USB. Press to turn the TV on or off. Connect to a digital audio output device such as a DVD player or set-top box. Connect an HDMI equipment or an HDMI-DVI adapter cable to devices such as a DVD player or set -top box. Connect an HDMI equipment or an HDMI-DVI adapter cable to devices such as a DVD player...
... power cord. 1.7 Remote Control Description Icon Power Input Signal Type INPUT Keypad Pro.List Pro.LIST Function Press to select the input signal type selections: TV, YPbPr, AV, SCART, PC, HDMI 1, HDMI 2, and USB. Press to turn the TV on or off. Connect to a digital audio output device such as a DVD player or set-top box. Connect an HDMI equipment or an HDMI-DVI adapter cable to devices such as a DVD player or set -top box. Connect an HDMI equipment or an HDMI-DVI adapter cable to devices such as a DVD player...
User Manual
Page 16
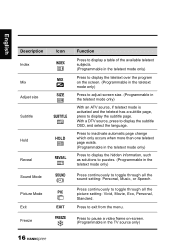
... subtitle page. English Description Index Mix Adjust size Subtitle Hold Reveal Sound Mode Picture Mode Exit Freeze Icon INDEX MIX SIZE SUBTITLE HOLD REVEAL SOUND PIC EXIT FREEZE Function Press to display a table of the available teletext subjects. (Programmable in the teletext mode only) Press to display the teletext over the program on -screen. (Programmable in the TV source only) 16 Press continuously to toggle...
... subtitle page. English Description Index Mix Adjust size Subtitle Hold Reveal Sound Mode Picture Mode Exit Freeze Icon INDEX MIX SIZE SUBTITLE HOLD REVEAL SOUND PIC EXIT FREEZE Function Press to display a table of the available teletext subjects. (Programmable in the teletext mode only) Press to display the teletext over the program on -screen. (Programmable in the TV source only) 16 Press continuously to toggle...

User Manual
Page 20
... quality speaker system 1 32"/42" only 45 6 7 Home theater Video Game Console DVD player VCR VCR/VCD/DVD/STB Video Game Console 10 CI-based devices 9 Camcorder VCR/VCD/DVD STB 8 Earphone TV cable / antenna 20 English 2 Setting up your TV 2.1 Power Connection 1 Connect the power cord to the AC IN input jack on the rear of the TV. 2 Insert the plug at the other end of the power cord into a power outlet. 2.2 Rear Connections See...
... quality speaker system 1 32"/42" only 45 6 7 Home theater Video Game Console DVD player VCR VCR/VCD/DVD/STB Video Game Console 10 CI-based devices 9 Camcorder VCR/VCD/DVD STB 8 Earphone TV cable / antenna 20 English 2 Setting up your TV 2.1 Power Connection 1 Connect the power cord to the AC IN input jack on the rear of the TV. 2 Insert the plug at the other end of the power cord into a power outlet. 2.2 Rear Connections See...

User Manual
Page 21
... receive channels after connecting to a TV cable or antenna, try scanning for channels. 8 Earphone • The internal TV speakers will not output sound when a speaker or earphone is optional. 5 Component • The video and audio cables are optional. HDMI 3 However it's necessary to do so if a HDMI to HDMI cable is connected, connecting the audio cable is optional. 2 VGA • The VGA and audio cables are optional. English No. Video Inputs Component Audio Inputs 6 SCART 1 • If your TV model. 21 HDMI...
... receive channels after connecting to a TV cable or antenna, try scanning for channels. 8 Earphone • The internal TV speakers will not output sound when a speaker or earphone is optional. 5 Component • The video and audio cables are optional. HDMI 3 However it's necessary to do so if a HDMI to HDMI cable is connected, connecting the audio cable is optional. 2 VGA • The VGA and audio cables are optional. English No. Video Inputs Component Audio Inputs 6 SCART 1 • If your TV model. 21 HDMI...

User Manual
Page 22
... the volume buttons to increase the volume. 2 Press VOL- on the control panel or remote control to restore the original volume. 22 The power LED turns off . 2.3.2 Switching Source Signals Press INPUT on the control panel or remote control to select the incoming source signal. 2.3.3 Performing an Automatic Channel Search Before using the TV to view programs, you need to activate the channel search first. 1 Press MENU on the control panel or remote control, then select to enter the TV menu. 2 Select Channels > Channel Scan > ATV...
... the volume buttons to increase the volume. 2 Press VOL- on the control panel or remote control to restore the original volume. 22 The power LED turns off . 2.3.2 Switching Source Signals Press INPUT on the control panel or remote control to select the incoming source signal. 2.3.3 Performing an Automatic Channel Search Before using the TV to view programs, you need to activate the channel search first. 1 Press MENU on the control panel or remote control, then select to enter the TV menu. 2 Select Channels > Channel Scan > ATV...
User Manual
Page 25
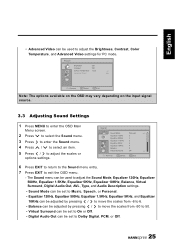
... may vary depending on the input signal source. 3.3 Adjusting Sound Settings 1 Press MENU to enter the OSD Main Menu screen. 2 Press to select the Sound menu. 3 Press to enter the Sound menu. 4 Press / to select an item. 5 Press / to Dolby Digital, PCM, or Off. 25 The Sound menu can be used to exit the OSD menu. - English • Advanced Video can be used to adjust the Sound Mode, Equalizer 120Hz, Equalizer 500Hz, Equalizer...
... may vary depending on the input signal source. 3.3 Adjusting Sound Settings 1 Press MENU to enter the OSD Main Menu screen. 2 Press to select the Sound menu. 3 Press to enter the Sound menu. 4 Press / to select an item. 5 Press / to Dolby Digital, PCM, or Off. 25 The Sound menu can be used to exit the OSD menu. - English • Advanced Video can be used to adjust the Sound Mode, Equalizer 120Hz, Equalizer 500Hz, Equalizer...
User Manual
Page 26
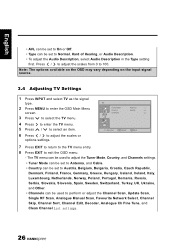
... Channel Scan, Update Scan, Single RF Scan, Analogue Manual Scan, Favourite Network Select, Channel Skip, Channel Sort, Channel Edit, Decoder, Analogue Ch Fine Tune, and Clean Channel List settings. 26 Press / to adjust the scales from 0 to 100. English • AVL can be set to On or Off. • Type can be used to adjust the Tuner Mode, Country, and Channels settings. • Tuner Mode can be set to Antenna, and Cable. • Country can be set to Normal, Hard...
... Channel Scan, Update Scan, Single RF Scan, Analogue Manual Scan, Favourite Network Select, Channel Skip, Channel Sort, Channel Edit, Decoder, Analogue Ch Fine Tune, and Clean Channel List settings. 26 Press / to adjust the scales from 0 to 100. English • AVL can be set to On or Off. • Type can be used to adjust the Tuner Mode, Country, and Channels settings. • Tuner Mode can be set to Antenna, and Cable. • Country can be set to Normal, Hard...
User Manual
Page 28
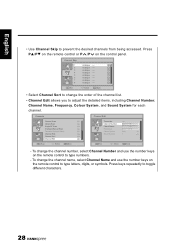
Channels Channel Scan Update Scan Single RF Scan Analogue Manual Scan Favourite Network Select Channel Skip Channel Sort Channel Edit OK Scan Select EXIT Back Channel Edit Transmitter Channel Number: Chanel Name: Frequency Colour System Sound System ----1 ----77.3 Auto I OK Set Select EXIT Back - To change the channel number, select Channel Number and use the number keys on the control panel. Press keys repeatedly to adjust the detailed items, including Channel Number, Channel Name, Frequency, Colour System, and Sound System for each channel. To change the...
Channels Channel Scan Update Scan Single RF Scan Analogue Manual Scan Favourite Network Select Channel Skip Channel Sort Channel Edit OK Scan Select EXIT Back Channel Edit Transmitter Channel Number: Chanel Name: Frequency Colour System Sound System ----1 ----77.3 Auto I OK Set Select EXIT Back - To change the channel number, select Channel Number and use the number keys on the control panel. Press keys repeatedly to adjust the detailed items, including Channel Number, Channel Name, Frequency, Colour System, and Sound System for each channel. To change the...
User Manual
Page 29
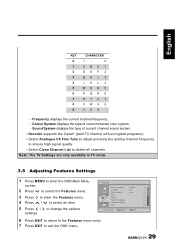
... OSD menu. 29 Frequency displays the current channel frequency. - Colour System displays the type of current channel sound system. • Decoder supports the Canal+ (paid TV channel with encrypted programs). • Select Analogue Ch Fine Tune to adjust precisely the analog channel frequency to ensure high signal quality. • Select Clean Channel List to delete all channels. Features Menu Language 4:3 Mode Picture Format Time Subtitle Teletext Language Common Interface OAD English 4:3 Auto Remove OK...
... OSD menu. 29 Frequency displays the current channel frequency. - Colour System displays the type of current channel sound system. • Decoder supports the Canal+ (paid TV channel with encrypted programs). • Select Analogue Ch Fine Tune to adjust precisely the analog channel frequency to ensure high signal quality. • Select Clean Channel List to delete all channels. Features Menu Language 4:3 Mode Picture Format Time Subtitle Teletext Language Common Interface OAD English 4:3 Auto Remove OK...
User Manual
Page 30
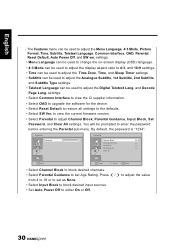
... be used to adjust the display aspect ratio to 4:3, and 16:9 settings. • Time can be used to adjust the Time Zone, Time, and Sleep Timer settings. • Subtitle can be used to adjust the Analogue Subtitle, 1st Subtitle, 2nd Subtitle, and Subtitle Type settings. • Teletext Language can be used to adjust the Menu Language, 4:3 Mode, Picture Format, Time, Subtitle, Teletext Language, Common Interface, OAD, Parental, Reset Default, Auto Power Off, and SW ver. Parental Parental Password Channel Block Parental Guidance Input Block Set Password...
... be used to adjust the display aspect ratio to 4:3, and 16:9 settings. • Time can be used to adjust the Time Zone, Time, and Sleep Timer settings. • Subtitle can be used to adjust the Analogue Subtitle, 1st Subtitle, 2nd Subtitle, and Subtitle Type settings. • Teletext Language can be used to adjust the Menu Language, 4:3 Mode, Picture Format, Time, Subtitle, Teletext Language, Common Interface, OAD, Parental, Reset Default, Auto Power Off, and SW ver. Parental Parental Password Channel Block Parental Guidance Input Block Set Password...
User Manual
Page 33
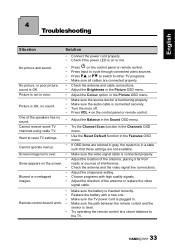
... the Channels OSD menu. Make sure the video signal cable is on the control panel or remote control. Press Input to the TV. 33 Try the Channel Scan function in the Picture OSD menu. Adjust the location of the antenna, placing it far from roads or sources of the antenna or replace the video signal cable. Adjust the direction of interference. English 4 Troubleshooting Situation Solution • Connect the power cord properly. • Check if the power LED is connected properly. Use the Reset Default...
... the Channels OSD menu. Make sure the video signal cable is on the control panel or remote control. Press Input to the TV. 33 Try the Channel Scan function in the Picture OSD menu. Adjust the location of the antenna, placing it far from roads or sources of the antenna or replace the video signal cable. Adjust the direction of interference. English 4 Troubleshooting Situation Solution • Connect the power cord properly. • Check if the power LED is connected properly. Use the Reset Default...
User Manual
Page 36
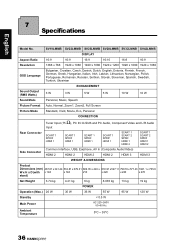
... W Sound Mode Personal, Music, Speech Picture Format Auto, Normal, Zoom1, Zoom2, Full Screen Picture Mode Standard, Vivid, Movie, Eco, Personal CONNECTION Ω Tuner Input (75 ), PC IN: D-SUB and PC Audio, Component Video and L/R Audio Input Rear Connector SCART 1 SPDIF HDMI 1 SCART 1 SPDIF HDMI 1 SCART 1 SPDIF HDMI 1 SCART 1 SPDIF HDMI 1 SCART 1 SCART 2 SPDIF HDMI 1 HDMI 2 SCART 1 SCART 2 SPDIF HDMI 1 HDMI 2 Common Interface, USB, Earphone, AV In (Composite Audio/Video) Side Connector HDMI 2 HDMI 2 HDMI 2 HDMI 2 HDMI 3 HDMI 3 WEIGHT & DIMENSIONS Product Dimensions...
... W Sound Mode Personal, Music, Speech Picture Format Auto, Normal, Zoom1, Zoom2, Full Screen Picture Mode Standard, Vivid, Movie, Eco, Personal CONNECTION Ω Tuner Input (75 ), PC IN: D-SUB and PC Audio, Component Video and L/R Audio Input Rear Connector SCART 1 SPDIF HDMI 1 SCART 1 SPDIF HDMI 1 SCART 1 SPDIF HDMI 1 SCART 1 SPDIF HDMI 1 SCART 1 SCART 2 SPDIF HDMI 1 HDMI 2 SCART 1 SCART 2 SPDIF HDMI 1 HDMI 2 Common Interface, USB, Earphone, AV In (Composite Audio/Video) Side Connector HDMI 2 HDMI 2 HDMI 2 HDMI 2 HDMI 3 HDMI 3 WEIGHT & DIMENSIONS Product Dimensions...
User Manual
Page 37
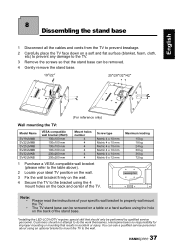
... SV32LMNB SV42LMNB VESA-compatible wall bracket (WxH) 100x100 mm 100x100 mm 100x100 mm 100x100 mm 200x200 mm 200x200 mm Mount holes number 4 4 4 4 4 4 Screw type Metric 4 x 10 mm Metric 4 x 10 mm Metric 4 x 10 mm Metric 4 x 10 mm Metric 4 x 14 mm Metric 6 x 12 mm 1 Purchase a VESA compatible wall bracket (please refer to the table above). 2 Locate your specific wall bracket to properly wall mount the TV. • The TV stand base can ask a qualified service...
... SV32LMNB SV42LMNB VESA-compatible wall bracket (WxH) 100x100 mm 100x100 mm 100x100 mm 100x100 mm 200x200 mm 200x200 mm Mount holes number 4 4 4 4 4 4 Screw type Metric 4 x 10 mm Metric 4 x 10 mm Metric 4 x 10 mm Metric 4 x 10 mm Metric 4 x 14 mm Metric 6 x 12 mm 1 Purchase a VESA compatible wall bracket (please refer to the table above). 2 Locate your specific wall bracket to properly wall mount the TV. • The TV stand base can ask a qualified service...


