User Manual
Page 1
... a PC using VGA 25 2.2.5 Connecting a PC using DVI 25 2.2.6 Connecting HDMI 26 2.2.7 Connecting USB 26 2.3 Using the TV 27 2.3.1 Turning the TV On and Off 27 2.3.2 Switching Source Signals 27 2.3.3 Performing an Automatic Channel Search 27 2.3.4 Selecting Channels 27 2.3.5 Adjusting the ...Volume 28 2.3.6 Editing Channel Table or Favorite Channel 28 1 Getting Started 12 1.1 Package Contents 12 1.2 Introducing the TV 13 1.2.1 Features 13 1.3 Control Panel 14 1.4 Input and Output Jacks 15 1.5 Remote Control 17 1.6 Inserting the Remote Control Batteries 19...
... a PC using VGA 25 2.2.5 Connecting a PC using DVI 25 2.2.6 Connecting HDMI 26 2.2.7 Connecting USB 26 2.3 Using the TV 27 2.3.1 Turning the TV On and Off 27 2.3.2 Switching Source Signals 27 2.3.3 Performing an Automatic Channel Search 27 2.3.4 Selecting Channels 27 2.3.5 Adjusting the ...Volume 28 2.3.6 Editing Channel Table or Favorite Channel 28 1 Getting Started 12 1.1 Package Contents 12 1.2 Introducing the TV 13 1.2.1 Features 13 1.3 Control Panel 14 1.4 Input and Output Jacks 15 1.5 Remote Control 17 1.6 Inserting the Remote Control Batteries 19...
User Manual
Page 2
... Setting Menus 30 3.2 Adjusting Picture Settings 30 3.3 Adjusting Audio Settings 31 3.4 Adjusting Channel Settings 32 3.5 Adjusting V-CHIP Settings 33 3.6 Adjusting Setup Settings 34 4. Setting the TV on the Wall 51 8. Using the Cable Organizer 52 2 Specifications 36 6. Appendix: Remote Control Guide 38 6.1 Introduction 38 6.1.2 Setting Program Codes 38 6.1.3 Searching Codes 39...
... Setting Menus 30 3.2 Adjusting Picture Settings 30 3.3 Adjusting Audio Settings 31 3.4 Adjusting Channel Settings 32 3.5 Adjusting V-CHIP Settings 33 3.6 Adjusting Setup Settings 34 4. Setting the TV on the Wall 51 8. Using the Cable Organizer 52 2 Specifications 36 6. Appendix: Remote Control Guide 38 6.1 Introduction 38 6.1.2 Setting Program Codes 38 6.1.3 Searching Codes 39...

User Manual
Page 4
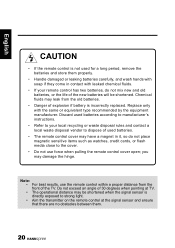
English Description of electric shocks due to this TV. This symbol is used to alert users to the risk of Warning Symbols CAUTION RISK OF ELECTRIC SHOCK DO NOT OPEN WARNING CAUTION This symbol is used to alert users to pay attention to important descriptions regarding usage, maintenance (repair), and additional important information related to dangerous and uninsulated components. 4
English Description of electric shocks due to this TV. This symbol is used to alert users to the risk of Warning Symbols CAUTION RISK OF ELECTRIC SHOCK DO NOT OPEN WARNING CAUTION This symbol is used to alert users to pay attention to important descriptions regarding usage, maintenance (repair), and additional important information related to dangerous and uninsulated components. 4

User Manual
Page 5
... for entertainment use by qualified service personnel only. English Safety Notices Installation Safety Notes Location Avoid allowing the TV to get prolonged exposure to sunlight or other than that contained in the operating instructions unless you are excluded. • This device uses a VGA ...shall not be placed on the apparatus. To reduce the influence of heat. WARNING To reduce the risk of heat. Leave sufficient distance between the TV and the wall to provide enough space for use only and visual display tasks are qualified to dripping or splashing and no objects filled with...
... for entertainment use by qualified service personnel only. English Safety Notices Installation Safety Notes Location Avoid allowing the TV to get prolonged exposure to sunlight or other than that contained in the operating instructions unless you are excluded. • This device uses a VGA ...shall not be placed on the apparatus. To reduce the influence of heat. WARNING To reduce the risk of heat. Leave sufficient distance between the TV and the wall to provide enough space for use only and visual display tasks are qualified to dripping or splashing and no objects filled with...

User Manual
Page 8
... the plug. To avoid electric shock, do not touch the broken glass. 7. The screen of the TV. 4. If any fluid is sprayed or dropped into the vent of the TV is otherwise damaged, unplug the power cord immediately and contact an authorized service technician. 5. Avoid hitting or... scraping it. Installation 1. English Personal safety 1. Avoid blocking the TV's vents, do not place the TV on the power cord. To avoid overloading the power supply, never plug too many electrical devices into an outlet, power strip...
... the plug. To avoid electric shock, do not touch the broken glass. 7. The screen of the TV. 4. If any fluid is sprayed or dropped into the vent of the TV is otherwise damaged, unplug the power cord immediately and contact an authorized service technician. 5. Avoid hitting or... scraping it. Installation 1. English Personal safety 1. Avoid blocking the TV's vents, do not place the TV on the power cord. To avoid overloading the power supply, never plug too many electrical devices into an outlet, power strip...
User Manual
Page 9
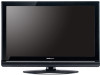
...refer to the correctness of such damages in its entirety before setting up and using or operating your TV. To the extent allowed by applicable law, Hannspree, Inc. ("Hannspree") shall not be liable for direct, indirect, special, exemplary, incidental or consequential damages arising from... English Preface Thank you in setting up , using the TV. The information in this manual has been carefully checked for purchasing a Hannspree Liquid Crystal Display Television (LCD TV). As an ENERGY STAR® Partner, Hannspree has determined that the safety and operation instructions in this...
...refer to the correctness of such damages in its entirety before setting up and using or operating your TV. To the extent allowed by applicable law, Hannspree, Inc. ("Hannspree") shall not be liable for direct, indirect, special, exemplary, incidental or consequential damages arising from... English Preface Thank you in setting up , using the TV. The information in this manual has been carefully checked for purchasing a Hannspree Liquid Crystal Display Television (LCD TV). As an ENERGY STAR® Partner, Hannspree has determined that the safety and operation instructions in this...

User Manual
Page 10
... reintegrated into brand-new marvels. http://www.hannspree.com/us have healthier earth via appropriate treatment and recycling of industrial technology devices at the end-of-life. The TV described in this manual may include copyrighted software of Hannspree, except for the normal, non-exclusive use... that it helps us 888.808.6789 Copyright © Copyright 2009 Hannspree, Inc. The purchase of the product described herein...
... reintegrated into brand-new marvels. http://www.hannspree.com/us have healthier earth via appropriate treatment and recycling of industrial technology devices at the end-of-life. The TV described in this manual may include copyrighted software of Hannspree, except for the normal, non-exclusive use... that it helps us 888.808.6789 Copyright © Copyright 2009 Hannspree, Inc. The purchase of the product described herein...
User Manual
Page 12
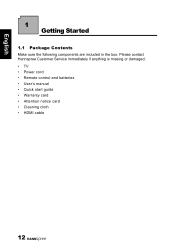
Please contact Hannspree Customer Service immediately if anything is missing or damaged. • TV • Power cord • Remote control and batteries • User's manual • Quick start guide • Warranty card • Attention notice card • Cleaning cloth • HDMI cable 12 English 1 Getting Started 1.1 Package Contents Make sure the following components are included in the box.
Please contact Hannspree Customer Service immediately if anything is missing or damaged. • TV • Power cord • Remote control and batteries • User's manual • Quick start guide • Warranty card • Attention notice card • Cleaning cloth • HDMI cable 12 English 1 Getting Started 1.1 Package Contents Make sure the following components are included in the box.
User Manual
Page 13
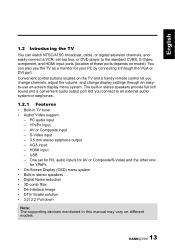
... a VCR, set for R/L audio inputs for AV or Composite/S-Video and the other one for your PC by connecting it through an easyto-use the TV as a monitor for YPbPr. • On-Screen Display (OSD) menu system • Built-in stereo speakers • Digital Noise reduction • 3D ...models. 13 One set -top box, or DVD player to an external audio system or earphones. 1.2.1 Features • Built-in TV tuner • Audio/ Video support: - English 1.2 Introducing the TV You can also use on-screen display menu system. YPBPR input - AV or Composite input - VGA input - HDMI input -
... a VCR, set for R/L audio inputs for AV or Composite/S-Video and the other one for your PC by connecting it through an easyto-use the TV as a monitor for YPbPr. • On-Screen Display (OSD) menu system • Built-in stereo speakers • Digital Noise reduction • 3D ...models. 13 One set -top box, or DVD player to an external audio system or earphones. 1.2.1 Features • Built-in TV tuner • Audio/ Video support: - English 1.2 Introducing the TV You can also use on-screen display menu system. YPBPR input - AV or Composite input - VGA input - HDMI input -
User Manual
Page 14
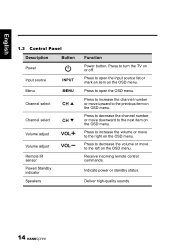
... Volume adjust Remote IR sensor Power/ Standby indicator Speakers VOL VOL Function Power button. Press to increase the channel number or move to turn the TV on the OSD menu.
... Volume adjust Remote IR sensor Power/ Standby indicator Speakers VOL VOL Function Power button. Press to increase the channel number or move to turn the TV on the OSD menu.

User Manual
Page 17
... to turn the on-screen display (OSD) menu on/ off . Press to decrease audio volume. 17 to confirm the TV source selection. Press to return to scroll through the on or off ; Press to turn the TV on -screen display menus. Press up, down, left or right to the last channel selected.
... to turn the on-screen display (OSD) menu on/ off . Press to decrease audio volume. 17 to confirm the TV source selection. Press to return to scroll through the on or off ; Press to turn the TV on -screen display menus. Press up, down, left or right to the last channel selected.
User Manual
Page 18
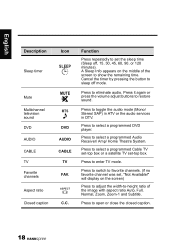
...middle of the image with aspect ratio Auto, Full, Normal, Zoom, Zoom-1 and Subtitle. Press to switch to select a programmed Cable TV set-top box or a satellite TV set-top box. Cancel the timer by pressing the button to sleep off , 15, 30, 45, 60, 90, or 120 minutes)....-to select a programmed DVD player. Press to set , "Not Available!" English Description Sleep timer Mute Multichannel television sound DVD AUDIO CABLE TV Favorite channels Aspect ratio Closed caption Icon SLEEP MUTE MTS DVD AUDIO CABLE TV FAV. Function Press repeatedly to open or close the closed caption. 18
...middle of the image with aspect ratio Auto, Full, Normal, Zoom, Zoom-1 and Subtitle. Press to switch to select a programmed Cable TV set-top box or a satellite TV set-top box. Cancel the timer by pressing the button to sleep off , 15, 30, 45, 60, 90, or 120 minutes)....-to select a programmed DVD player. Press to set , "Not Available!" English Description Sleep timer Mute Multichannel television sound DVD AUDIO CABLE TV Favorite channels Aspect ratio Closed caption Icon SLEEP MUTE MTS DVD AUDIO CABLE TV FAV. Function Press repeatedly to open or close the closed caption. 18
User Manual
Page 20
Do not exceed an angle of the TV. Chemical fluids may damage the hinge. you may leak from the front of 30 degrees when pointing at the signal sensor and ensure that there ... your local recycling or waste disposal rules and contact a local waste disposal vendor to strong light. • Aim the transmitter on the remote control at TV. • The operational distance may have a magnet in contact with the same or equivalent type recommended by the equipment manufacturer. Note: • For best results...
Do not exceed an angle of the TV. Chemical fluids may damage the hinge. you may leak from the front of 30 degrees when pointing at the signal sensor and ensure that there ... your local recycling or waste disposal rules and contact a local waste disposal vendor to strong light. • Aim the transmitter on the remote control at TV. • The operational distance may have a magnet in contact with the same or equivalent type recommended by the equipment manufacturer. Note: • For best results...

User Manual
Page 21
Antenna Coaxial Cable VHF / UHF CABLE / ANTENNA Ground Clamp Ground Note: If you cannot receive channels after connecting to VHF/UHF jack on the rear of the TV. 2 Insert the plug at the other end of the power cord into a power outlet. 2.1.2 Connecting an Antenna or Cable TV Connect one end of the TV. English 2 Setting up your TV 2.1 Basic Connections 2.1.1 Power Connection 1 Connect the power cord to the AC IN input jack on the rear of the VHF/UHF (Antenna) or CATV cable to an antenna or cable TV line, try scanning for channels. 21
Antenna Coaxial Cable VHF / UHF CABLE / ANTENNA Ground Clamp Ground Note: If you cannot receive channels after connecting to VHF/UHF jack on the rear of the TV. 2 Insert the plug at the other end of the power cord into a power outlet. 2.1.2 Connecting an Antenna or Cable TV Connect one end of the TV. English 2 Setting up your TV 2.1 Basic Connections 2.1.1 Power Connection 1 Connect the power cord to the AC IN input jack on the rear of the VHF/UHF (Antenna) or CATV cable to an antenna or cable TV line, try scanning for channels. 21

User Manual
Page 22
English 2.2 Connecting External Devices Connect external devices such as VCRs, set-top box, DVD players, video game consoles, earphones, or a PC to the TV using the appropriate ports on the rear of the TV. 2.2.1 Connecting External Earphones Headphones Speakers (Built-in Amplifiers) Note: • External speakers or headphones are not included with the TV. • The internal TV speakers will not output sound when headphones are plugged in. • Use external speakers with built-in amplifiers only. • Only one external device for sound can be connected at a time. 22
English 2.2 Connecting External Devices Connect external devices such as VCRs, set-top box, DVD players, video game consoles, earphones, or a PC to the TV using the appropriate ports on the rear of the TV. 2.2.1 Connecting External Earphones Headphones Speakers (Built-in Amplifiers) Note: • External speakers or headphones are not included with the TV. • The internal TV speakers will not output sound when headphones are plugged in. • Use external speakers with built-in amplifiers only. • Only one external device for sound can be connected at a time. 22
User Manual
Page 24
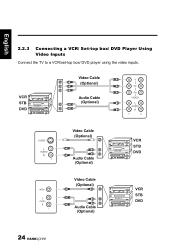
VCR STB DVD Video Cable (Optional) Audio Cable (Optional) Y PB PR VIDEO L AUDIO R 1 2 S-VIDEO 1 L AUDIO R 1 Video Cable (Optional) Audio Cable (Optional) VCR STB DVD Video Cable (Optional) Audio Cable (Optional) VCR STB DVD 24 English 2.2.3 Connecting a VCR/ Set-top box/ DVD Player Using Video Inputs Connect the TV to a VCR/set-top box/ DVD player using the video inputs.
VCR STB DVD Video Cable (Optional) Audio Cable (Optional) Y PB PR VIDEO L AUDIO R 1 2 S-VIDEO 1 L AUDIO R 1 Video Cable (Optional) Audio Cable (Optional) VCR STB DVD Video Cable (Optional) Audio Cable (Optional) VCR STB DVD 24 English 2.2.3 Connecting a VCR/ Set-top box/ DVD Player Using Video Inputs Connect the TV to a VCR/set-top box/ DVD player using the video inputs.

User Manual
Page 25
... it as the monitor using the VGA port as shown. 1 Connect the HDMI 1 or HDMI 2 port of the TV to the DVI output of the PC. 2 Connect the PC LINE IN port of your TV to listen to audio from the PC. HDMI IN 1 2 HDMI 4 AUDIO 3 IN PC Audio Cable (Optional) HDMI... to DVI Cable (Optional) 25 HDMI English 2.2.4 Connecting a PC using VGA Connect the TV to your PC to use it as the monitor using the DVI port as shown. 1 Connect the VGA port of the...
... it as the monitor using the VGA port as shown. 1 Connect the HDMI 1 or HDMI 2 port of the TV to the DVI output of the PC. 2 Connect the PC LINE IN port of your TV to listen to audio from the PC. HDMI IN 1 2 HDMI 4 AUDIO 3 IN PC Audio Cable (Optional) HDMI... to DVI Cable (Optional) 25 HDMI English 2.2.4 Connecting a PC using VGA Connect the TV to your PC to use it as the monitor using the DVI port as shown. 1 Connect the VGA port of the...

User Manual
Page 26
... USB Flash Drive (Optional) Note: The USB HDD is not necessary. Refer to the following illustration to connect an HDMI device to the TV using the USB port as shown. HDMI IN 1 2 HDMI 4 3 HDMI Cable (Optional) DVD Player Note: When the HDMI cable is connected, connecting the audio cable ... English 2.2.6 Connecting HDMI HDMI (High Definition Multimedia Interface) assures that the best video signal is connected. 2.2.7 Connecting USB Connect the USB flash drive to the TV.
... USB Flash Drive (Optional) Note: The USB HDD is not necessary. Refer to the following illustration to connect an HDMI device to the TV using the USB port as shown. HDMI IN 1 2 HDMI 4 3 HDMI Cable (Optional) DVD Player Note: When the HDMI cable is connected, connecting the audio cable ... English 2.2.6 Connecting HDMI HDMI (High Definition Multimedia Interface) assures that the best video signal is connected. 2.2.7 Connecting USB Connect the USB flash drive to the TV.
User Manual
Page 27
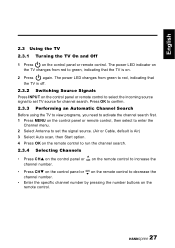
... and Off 1 Press on the remote control. 27 The power LED changes from red to green, indicating that the TV is off. 2.3.2 Switching Source Signals Press INPUT on the control panel or remote control to select the incoming source signal to set the signal source. (... specific channel number by pressing the number buttons on the control panel or remote control. The power LED indicator on the TV changes from green to red, indicating that the TV is Air) 3 Select Auto scan, then Start option. 4 Press OK on the remote control to run the channel search. 2.3.4 Selecting Channels...
... and Off 1 Press on the remote control. 27 The power LED changes from red to green, indicating that the TV is off. 2.3.2 Switching Source Signals Press INPUT on the control panel or remote control to select the incoming source signal to set the signal source. (... specific channel number by pressing the number buttons on the control panel or remote control. The power LED indicator on the TV changes from green to red, indicating that the TV is Air) 3 Select Auto scan, then Start option. 4 Press OK on the remote control to run the channel search. 2.3.4 Selecting Channels...
User Manual
Page 29
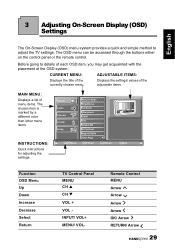
... Sharpness Color Tint Digital NR X-Contrast Aspect Ratio Next Page OK Enter Return Return Menu Exit Function OSD Menu Up Down Increase Decrease Select Return TV Control Panel MENU CH S CH T VOL + VOL INPUT/ VOL+ MENU/ VOL- Displays the settings/ values of the adjustable items. MAIN MENU: Displays... menu. The OSD menu can be accessed through the buttons either on the control panel or the remote control. Before going to adjust the TV settings. Remote Control MENU Arrow Arrow Arrow Arrow OK/ Arrow RETURN/ Arrow 29 3 Adjusting On-Screen Display (OSD) Settings English The On...
... Sharpness Color Tint Digital NR X-Contrast Aspect Ratio Next Page OK Enter Return Return Menu Exit Function OSD Menu Up Down Increase Decrease Select Return TV Control Panel MENU CH S CH T VOL + VOL INPUT/ VOL+ MENU/ VOL- Displays the settings/ values of the adjustable items. MAIN MENU: Displays... menu. The OSD menu can be accessed through the buttons either on the control panel or the remote control. Before going to adjust the TV settings. Remote Control MENU Arrow Arrow Arrow Arrow OK/ Arrow RETURN/ Arrow 29 3 Adjusting On-Screen Display (OSD) Settings English The On...


