User Manual
Page 2
English Table of Contents Regulatory Information 3 Description of Warning Symbols 3 Safety Notices 4 Preface 6 Warranty and Service 6 1. Setting up your TV 18 2.1 Basic Connections 18 2.1.1 Power Connection 18 2.1.2 Connecting an Antenna or Cable TV 18 2.2 Connecting External Devices 19 2.2.1 Connecting External Earphones 19 2.2.2 ...
English Table of Contents Regulatory Information 3 Description of Warning Symbols 3 Safety Notices 4 Preface 6 Warranty and Service 6 1. Setting up your TV 18 2.1 Basic Connections 18 2.1.1 Power Connection 18 2.1.2 Connecting an Antenna or Cable TV 18 2.2 Connecting External Devices 19 2.2.1 Connecting External Earphones 19 2.2.2 ...
User Manual
Page 3
Using the Cable Organizer 38 2 Setting the TV on the Wall 37 8. English Table of Contents 2.3.5 Adjusting the Volume 25 2.3.6 Editing the Favorite List 26 2.3.7 Editing the Channel List 26 3. Adjusting On-Screen Display (OSD) Settings 27 3.1 OSD Setting Menus 28 3.2 Adjusting Picture Settings 28 3.3 Adjusting Audio Settings 29 3.4 Adjusting Clock and Timer Settings 30 3.5 Adjusting Channel Settings 31 3.6 Adjusting PC Setting Options 32 3.7 Adjusting Setup Settings 33 4. Support Timing 35 6. Specifications 36 7. Troubleshooting 34 5.
Using the Cable Organizer 38 2 Setting the TV on the Wall 37 8. English Table of Contents 2.3.5 Adjusting the Volume 25 2.3.6 Editing the Favorite List 26 2.3.7 Editing the Channel List 26 3. Adjusting On-Screen Display (OSD) Settings 27 3.1 OSD Setting Menus 28 3.2 Adjusting Picture Settings 28 3.3 Adjusting Audio Settings 29 3.4 Adjusting Clock and Timer Settings 30 3.5 Adjusting Channel Settings 31 3.6 Adjusting PC Setting Options 32 3.7 Adjusting Setup Settings 33 4. Support Timing 35 6. Specifications 36 7. Troubleshooting 34 5.
User Manual
Page 7
...The information in this manual, even if advised of the possibility of such damages in advance. To the extent allowed by applicable law, Hannspree, Inc. ("Hannspree") shall not be liable for direct, indirect, special, exemplary, incidental or consequential damages arising from any defect or omission in this manual ...in this manual is important that the safety and operation instructions in this manual in its entirety before setting up and using or operating your TV. 6 English Preface Thank you in setting up , using the TV. however, no guarantee is given to the correctness of the TV, ...
...The information in this manual, even if advised of the possibility of such damages in advance. To the extent allowed by applicable law, Hannspree, Inc. ("Hannspree") shall not be liable for direct, indirect, special, exemplary, incidental or consequential damages arising from any defect or omission in this manual ...in this manual is important that the safety and operation instructions in this manual in its entirety before setting up and using or operating your TV. 6 English Preface Thank you in setting up , using the TV. however, no guarantee is given to the correctness of the TV, ...
User Manual
Page 10
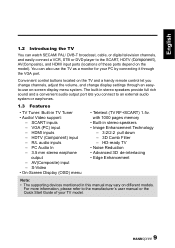
... support: - The built-in stereo speakers provide full rich sound and a convenient audio output port lets you change channels, adjust the volume, and change display settings through the VGA port. S-Video • On-Screen Display (OSD) menu • Teletext (TV RF+SCART) 1.5v. SCART inputs - For more information, please refer to...
... support: - The built-in stereo speakers provide full rich sound and a convenient audio output port lets you change channels, adjust the volume, and change display settings through the VGA port. S-Video • On-Screen Display (OSD) menu • Teletext (TV RF+SCART) 1.5v. SCART inputs - For more information, please refer to...

User Manual
Page 12
... Service only. SCART 1 Connect to an external device, such as a VCR, STB, or a DVD player. Connect to an external device, such as a DVD player or set-top box.
... Service only. SCART 1 Connect to an external device, such as a VCR, STB, or a DVD player. Connect to an external device, such as a DVD player or set-top box.

User Manual
Page 13
...PC's VGA port. Press to turn the TV on or off. Connect a HDMI equipment or a HDMIDVI adapter cable to devices such as a DVD player or set -top box. Connect a HDMI equipment or a HDMIDVI adapter cable to devices such as a VCR, STB, or a DVD player with AV, SVideo, L/R IN.... SCART 2 English Description SCART 2 IN Connector Function Connect to an external device, such as a DVD player or set-top box. Connect to the included power cord. 1.6 Remote Control Description Icon Power Input Signal Type INPUT Function Press to select the input signal types...
...PC's VGA port. Press to turn the TV on or off. Connect a HDMI equipment or a HDMIDVI adapter cable to devices such as a DVD player or set -top box. Connect a HDMI equipment or a HDMIDVI adapter cable to devices such as a VCR, STB, or a DVD player with AV, SVideo, L/R IN.... SCART 2 English Description SCART 2 IN Connector Function Connect to an external device, such as a DVD player or set-top box. Connect to the included power cord. 1.6 Remote Control Description Icon Power Input Signal Type INPUT Function Press to select the input signal types...

User Manual
Page 15
.... Press to display the teletext over the program on the screen (programmable in the teletext mode only) Press continuously to toggle through all the sound settings: Dynamic, Standard, Soft, or User. 14 Press to inactivate automatic page change the multi sound selection of the available teletext subjects (programmable in the teletext...
.... Press to display the teletext over the program on the screen (programmable in the teletext mode only) Press continuously to toggle through all the sound settings: Dynamic, Standard, Soft, or User. 14 Press to inactivate automatic page change the multi sound selection of the available teletext subjects (programmable in the teletext...
User Manual
Page 16
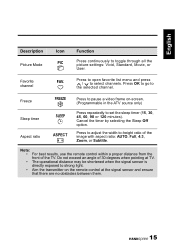
English Description Picture Mode Icon PIC Function Press continuously to set the sleep timer (15, 30, 45, 60, 90 or 120 minutes). Freeze FREEZE Press to pause a video frame on the remote control at TV. • ...; Aim the transmitter on -screen. (Programmable in the ATV source only) Sleep timer Aspect ratio SLEEP ASPECT Press repeatedly to toggle through all the picture settings: Vivid, Standard, Movie, or User. Cancel the timer by selecting the Sleep Off option. Favorite channel FAV.
English Description Picture Mode Icon PIC Function Press continuously to set the sleep timer (15, 30, 45, 60, 90 or 120 minutes). Freeze FREEZE Press to pause a video frame on the remote control at TV. • ...; Aim the transmitter on -screen. (Programmable in the ATV source only) Sleep timer Aspect ratio SLEEP ASPECT Press repeatedly to toggle through all the picture settings: Vivid, Standard, Movie, or User. Cancel the timer by selecting the Sleep Off option. Favorite channel FAV.

User Manual
Page 19
... plug at the other end of the power cord into a power outlet. 2.1.2 Connecting an Antenna or Cable TV Connect one end of the TV. English 2 Setting up your TV 2.1 Basic Connections 2.1.1 Power Connection 1 Connect the power cord to the AC IN input jack on the rear of the VHF/UHF (Antenna...
... plug at the other end of the power cord into a power outlet. 2.1.2 Connecting an Antenna or Cable TV Connect one end of the TV. English 2 Setting up your TV 2.1 Basic Connections 2.1.1 Power Connection 1 Connect the power cord to the AC IN input jack on the rear of the VHF/UHF (Antenna...
User Manual
Page 21
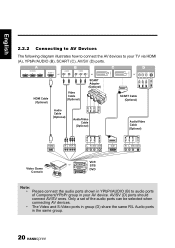
Only a set of Component/YPbPr group in the same group. 20 SCART 2 SCART 1 English 2.2.2 Connecting to AV Devices The following diagram illustrates how to connect the AV ...
Only a set of Component/YPbPr group in the same group. 20 SCART 2 SCART 1 English 2.2.2 Connecting to AV Devices The following diagram illustrates how to connect the AV ...

User Manual
Page 28
... Audio Clock / Timer Channel Setup INSTRUCTIONS: Quick instructions for adjusting the settings. Before going to adjust the TV settings. Remote Control MENU Arrow Arrow Arrow Arrow OK MENU 27 English 3 Adjusting On-Screen Display (OSD) Settings The On-Screen Display (OSD) menu system provides a quick and simple... method to details of each OSD item, you may get acquainted with the placement of the OSD system: ADJUSTABLE ITEMS: Displays the settings/values of menu items. The ...
... Audio Clock / Timer Channel Setup INSTRUCTIONS: Quick instructions for adjusting the settings. Before going to adjust the TV settings. Remote Control MENU Arrow Arrow Arrow Arrow OK MENU 27 English 3 Adjusting On-Screen Display (OSD) Settings The On-Screen Display (OSD) menu system provides a quick and simple... method to details of each OSD item, you may get acquainted with the placement of the OSD system: ADJUSTABLE ITEMS: Displays the settings/values of menu items. The ...

User Manual
Page 29
... Follow the instructions indicated on the remote control or VOL+ / VOL- to enter the Picture menu. The following menus can be set to Warm, Standard, or Cool. • The Recall can be used to adjust the Picture Mode, Brightness, Contrast, Sharpness, Color, Tint, Digital NR, X-Contrast, Backlight,... Auto, Full, 4:3, Zoom, or Subtitle. • The Color Temp can be used to reset the submenu's original factory settings. Brightness, Contrast, Sharpness, Color, and Tint are only available for adjustments if you select User in Picture Mode. on the control panel, to change ...
... Follow the instructions indicated on the remote control or VOL+ / VOL- to enter the Picture menu. The following menus can be set to Warm, Standard, or Cool. • The Recall can be used to adjust the Picture Mode, Brightness, Contrast, Sharpness, Color, Tint, Digital NR, X-Contrast, Backlight,... Auto, Full, 4:3, Zoom, or Subtitle. • The Color Temp can be used to reset the submenu's original factory settings. Brightness, Contrast, Sharpness, Color, and Tint are only available for adjustments if you select User in Picture Mode. on the control panel, to change ...

User Manual
Page 30
... the Audio Mode, Equalizer, Balance, Audio Effect, Auto Volume (ATV only), Preferred Language (DTV only), Digital MTS (DTV only), Audio Description (DTV only), and Recall settings. Note: The items available on the OSD may vary depending on the control panel to enter the Audio menu. English 3.3 Adjusting Audio... Settings 1 Press MENU to enter the OSD Main Menu screen. 2 Press / on the remote control or PS / PT on the control panel to select Audio menu. 3 ...
... the Audio Mode, Equalizer, Balance, Audio Effect, Auto Volume (ATV only), Preferred Language (DTV only), Digital MTS (DTV only), Audio Description (DTV only), and Recall settings. Note: The items available on the OSD may vary depending on the control panel to enter the Audio menu. English 3.3 Adjusting Audio... Settings 1 Press MENU to enter the OSD Main Menu screen. 2 Press / on the remote control or PS / PT on the control panel to select Audio menu. 3 ...

User Manual
Page 31
...for adjustments only if you select Manual in Date. • The Local Offset can be set to Auto or Manual. • Press / on the control panel to adjust the Sleep Timer, Time Mode, Date, ...and Local Offset settings. Picture Audio Clock / Timer Channel Setup Sleep Timer Time Mode Date Local Offset Move OK Select Menu Return...control panel to mark an item. 7 Press MENU to exit. 8 The Clock and Timer menu can be set to Current Time, CT +1h, CT +2h, CT +3h, CT -1h, CT -2h, or CT -3h. English...
...for adjustments only if you select Manual in Date. • The Local Offset can be set to Auto or Manual. • Press / on the control panel to adjust the Sleep Timer, Time Mode, Date, ...and Local Offset settings. Picture Audio Clock / Timer Channel Setup Sleep Timer Time Mode Date Local Offset Move OK Select Menu Return...control panel to mark an item. 7 Press MENU to exit. 8 The Clock and Timer menu can be set to Current Time, CT +1h, CT +2h, CT +3h, CT -1h, CT -2h, or CT -3h. English...
User Manual
Page 32
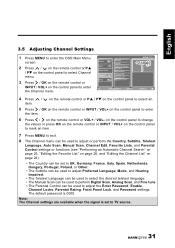
...INPUT / VOL+ on the control panel to enter the item. 6 Press / on the remote control or VOL+ / VOL- Note: The Channel settings are available when the signal is 0000. Picture Audio Clock / Timer Channel Setup Country Subtitle Teletext Language Auto Scan Manual Scan Channel Edit Favorite Lists... can be used to adjust or perform the Country, Subtitle, Teletext Language, Auto Scan, Manual Scan, Channel Edit, Favorite Lists, and Parental Control settings or functions (see "Performing an Automatic Channel Search" on page 25, "Editing the Favorite List" on page 26, and "Editing the Channel List...
...INPUT / VOL+ on the control panel to enter the item. 6 Press / on the remote control or VOL+ / VOL- Note: The Channel settings are available when the signal is 0000. Picture Audio Clock / Timer Channel Setup Country Subtitle Teletext Language Auto Scan Manual Scan Channel Edit Favorite Lists... can be used to adjust or perform the Country, Subtitle, Teletext Language, Auto Scan, Manual Scan, Channel Edit, Favorite Lists, and Parental Control settings or functions (see "Performing an Automatic Channel Search" on page 25, "Editing the Favorite List" on page 26, and "Editing the Channel List...
User Manual
Page 33
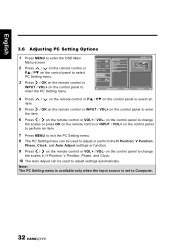
... INPUT / VOL+ on the control panel to perform an item. 7 Press MENU to exit the PC Setting menu. 8 The PC Setting menu can be used to adjust or perform the H Position, V Position, Phase, Clock, and Auto Adjust settings or function. 9 Press / on the control panel to change the scales in H Position, V Position, .... 3 Press / OK on the remote control or INPUT / VOL+ on the remote control or VOL+ / VOL- Picture Audio Clock / Timer PC Setting Setup H Position V Position Phase Clock Auto Adjust Move OK Select Menu Return 4 Press / on the remote control or PS / PT on the control panel to ...
... INPUT / VOL+ on the control panel to perform an item. 7 Press MENU to exit the PC Setting menu. 8 The PC Setting menu can be used to adjust or perform the H Position, V Position, Phase, Clock, and Auto Adjust settings or function. 9 Press / on the control panel to change the scales in H Position, V Position, .... 3 Press / OK on the remote control or INPUT / VOL+ on the remote control or VOL+ / VOL- Picture Audio Clock / Timer PC Setting Setup H Position V Position Phase Clock Auto Adjust Move OK Select Menu Return 4 Press / on the remote control or PS / PT on the control panel to ...

User Manual
Page 34
... only available for adjustments when the input source is connected. Picture Audio Clock / Timer Channel Setup OSD Language OSD Time Common Interface SCART1 SCART2 Mode Setting Hannspree Light First Time Setup Recall Move OK Select Menu Return 4 Press / on the remote control or PS / PT on the control panel to select an.... 6 Press OK on the remote control or INPUT / VOL+ on the control panel to adjust the OSD Language, OSD Time, Common Interface, SCART1, SCART2, Mode Setting, Hannspree Light, First Time Setup, and Recall...
... only available for adjustments when the input source is connected. Picture Audio Clock / Timer Channel Setup OSD Language OSD Time Common Interface SCART1 SCART2 Mode Setting Hannspree Light First Time Setup Recall Move OK Select Menu Return 4 Press / on the remote control or PS / PT on the control panel to select an.... 6 Press OK on the remote control or INPUT / VOL+ on the control panel to adjust the OSD Language, OSD Time, Common Interface, SCART1, SCART2, Mode Setting, Hannspree Light, First Time Setup, and Recall...

User Manual
Page 35
... properly. Make sure the source device is connected properly. Use the Recall function in . Choose programs with a new one. Adjust the Sharpness setting. Make sure the path between the remote control and the sensor is OK, no sound. • • • One of the ... • Connect the power cord properly. • Check if the power LED is on the control panel or remote control. Press Input to reset TV settings. • Cannot operate menus. • Screen image turns over. • • Snow appears on the screen. • • Blurred or overlapped &#...
... properly. Make sure the source device is connected properly. Use the Recall function in . Choose programs with a new one. Adjust the Sharpness setting. Make sure the path between the remote control and the sensor is OK, no sound. • • • One of the ... • Connect the power cord properly. • Check if the power LED is on the control panel or remote control. Press Input to reset TV settings. • Cannot operate menus. • Screen image turns over. • • Snow appears on the screen. • • Blurred or overlapped &#...

User Manual
Page 38
... using the hole on the back of the stand base. *Installing the LCD TV requires special skill that results in accident or injury. Hannspree bears no responsibility for improper mounting or mounting that should not attempt to the wall. 37 Customers should only be performed by qualified service... personnel. English 7 Setting the TV on the Wall Dissembling the stand base: 1 Disconnect all the cables and cords from the TV to prevent breakage. 2 Carefully ...
... using the hole on the back of the stand base. *Installing the LCD TV requires special skill that results in accident or injury. Hannspree bears no responsibility for improper mounting or mounting that should not attempt to the wall. 37 Customers should only be performed by qualified service... personnel. English 7 Setting the TV on the Wall Dissembling the stand base: 1 Disconnect all the cables and cords from the TV to prevent breakage. 2 Carefully ...


