User Manual
Page 2
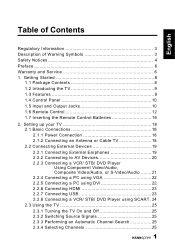
...DVD Player Using Component Video/Audio, Composite Video/Audio, or S-Video/Audio ........ 21 2.2.4 Connecting a PC using VGA 22 2.2.5 Connecting a PC using DVI 22 2.2.6 Connecting HDMI 23 2.2.7 Connecting USB 23 2.2.8 Connecting a VCR/ STB/ DVD Player using SCART . 24 2.3 Using the TV 25 2.3.1 Turning the TV On and Off 25 2.3.2 Switching Source Signals 25 2.3.3 Performing an Automatic Channel Search 25 2.3.4 Selecting Channels 25 1 Getting Started 8 1.1 Package Contents 8 1.2 Introducing the TV 9 1.3 Features 9 1.4 Control Panel 10 1.5 Input and Output Jacks 10 1.6 Remote Control...
...DVD Player Using Component Video/Audio, Composite Video/Audio, or S-Video/Audio ........ 21 2.2.4 Connecting a PC using VGA 22 2.2.5 Connecting a PC using DVI 22 2.2.6 Connecting HDMI 23 2.2.7 Connecting USB 23 2.2.8 Connecting a VCR/ STB/ DVD Player using SCART . 24 2.3 Using the TV 25 2.3.1 Turning the TV On and Off 25 2.3.2 Switching Source Signals 25 2.3.3 Performing an Automatic Channel Search 25 2.3.4 Selecting Channels 25 1 Getting Started 8 1.1 Package Contents 8 1.2 Introducing the TV 9 1.3 Features 9 1.4 Control Panel 10 1.5 Input and Output Jacks 10 1.6 Remote Control...
User Manual
Page 3
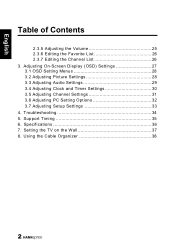
Support Timing 35 6. Specifications 36 7. Troubleshooting 34 5. Setting the TV on the Wall 37 8. English Table of Contents 2.3.5 Adjusting the Volume 25 2.3.6 Editing the Favorite List 26 2.3.7 Editing the Channel List 26 3. Adjusting On-Screen Display (OSD) Settings 27 3.1 OSD Setting Menus 28 3.2 Adjusting Picture Settings 28 3.3 Adjusting Audio Settings 29 3.4 Adjusting Clock and Timer Settings 30 3.5 Adjusting Channel Settings 31 3.6 Adjusting PC Setting Options 32 3.7 Adjusting Setup Settings 33 4. Using the Cable Organizer 38 2
Support Timing 35 6. Specifications 36 7. Troubleshooting 34 5. Setting the TV on the Wall 37 8. English Table of Contents 2.3.5 Adjusting the Volume 25 2.3.6 Editing the Favorite List 26 2.3.7 Editing the Channel List 26 3. Adjusting On-Screen Display (OSD) Settings 27 3.1 OSD Setting Menus 28 3.2 Adjusting Picture Settings 28 3.3 Adjusting Audio Settings 29 3.4 Adjusting Clock and Timer Settings 30 3.5 Adjusting Channel Settings 31 3.6 Adjusting PC Setting Options 32 3.7 Adjusting Setup Settings 33 4. Using the Cable Organizer 38 2
User Manual
Page 5
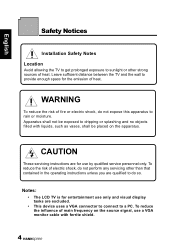
... the source signal, use a VGA monitor cable with liquids, such as vases, shall be exposed to rain or moisture. Leave sufficient distance between the TV and the wall to provide enough space for entertainment use by qualified service personnel only. CAUTION These servicing instructions are for use only and visual display tasks are qualified to do so. English Safety Notices Installation Safety Notes Location...
... the source signal, use a VGA monitor cable with liquids, such as vases, shall be exposed to rain or moisture. Leave sufficient distance between the TV and the wall to provide enough space for entertainment use by qualified service personnel only. CAUTION These servicing instructions are for use only and visual display tasks are qualified to do so. English Safety Notices Installation Safety Notes Location...
User Manual
Page 7
... been carefully checked for purchasing a Hannspree Liquid Crystal Display Television (LCD TV). This instruction manual is subject to the "Warranty Card" enclosed with advanced technology. Please carefully read this manual are followed. however, no guarantee is important that the safety and operation instructions in this manual in advance. Warranty and Service For complete warranty service information, please refer to change without notice. English Preface Thank you...
... been carefully checked for purchasing a Hannspree Liquid Crystal Display Television (LCD TV). This instruction manual is subject to the "Warranty Card" enclosed with advanced technology. Please carefully read this manual are followed. however, no guarantee is important that the safety and operation instructions in this manual in advance. Warranty and Service For complete warranty service information, please refer to change without notice. English Preface Thank you...
User Manual
Page 10
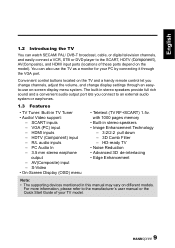
.../ DVB-T broadcast, cable, or digital television channels, and easily connect a VCR, STB or DVD player to the SCART, HDTV (Component), AV(Composite), and HDMI input ports (locations of your PC by connecting it through an easyto-use the TV as a monitor for your TV model. 9 The built-in stereo speakers provide full rich sound and a convenient audio output port lets you change channels, adjust the volume, and change display settings through the VGA port. SCART inputs - HDTV (Component) input - S-Video • On-Screen Display (OSD) menu • Teletext...
.../ DVB-T broadcast, cable, or digital television channels, and easily connect a VCR, STB or DVD player to the SCART, HDTV (Component), AV(Composite), and HDMI input ports (locations of your PC by connecting it through an easyto-use the TV as a monitor for your TV model. 9 The built-in stereo speakers provide full rich sound and a convenient audio output port lets you change channels, adjust the volume, and change display settings through the VGA port. SCART inputs - HDTV (Component) input - S-Video • On-Screen Display (OSD) menu • Teletext...

User Manual
Page 11
... 1.4 Control Panel Description Button Power Input source INPUT Menu MENU Program select P Program select Volume adjust Volume adjust Remote IR sensor Power/Standby indicator Speakers P VOL + VOL - Press to increase the program number or move to the previous item on the OSD menu. Press to increase the volume or move upward to the right on the OSD menu. Indicate power (green) or standby (red) status. Press to select the proper input source. Press to open the OSD menu. Press to decrease the volume...
... 1.4 Control Panel Description Button Power Input source INPUT Menu MENU Program select P Program select Volume adjust Volume adjust Remote IR sensor Power/Standby indicator Speakers P VOL + VOL - Press to increase the program number or move to the previous item on the OSD menu. Press to increase the volume or move upward to the right on the OSD menu. Indicate power (green) or standby (red) status. Press to select the proper input source. Press to open the OSD menu. Press to decrease the volume...

User Manual
Page 12
... Service Connector SERVICE Function Service only. S-Video Input Composite Input (Video) Composite Inputs (Audio) Earphone Output HDMI 4 Input S-VIDEO VIDEO R-AUDIO-L HDMI 4 Connect to an external device, such as a VCR, STB, or a DVD player. Connect to earphones or external speakers with AV, SVideo, RGB, L/R IN, Analog TV Out, and L/R Out. 11 Connect to an external device, such as a VCR, STB, or a DVD player. Connect a HDMI equipment or a HDMIDVI adapter cable to an external device, such as a DVD player or set-top box. Not available for users. R L Connect...
... Service Connector SERVICE Function Service only. S-Video Input Composite Input (Video) Composite Inputs (Audio) Earphone Output HDMI 4 Input S-VIDEO VIDEO R-AUDIO-L HDMI 4 Connect to an external device, such as a VCR, STB, or a DVD player. Connect to earphones or external speakers with AV, SVideo, RGB, L/R IN, Analog TV Out, and L/R Out. 11 Connect to an external device, such as a VCR, STB, or a DVD player. Connect a HDMI equipment or a HDMIDVI adapter cable to an external device, such as a DVD player or set-top box. Not available for users. R L Connect...

User Manual
Page 13
... set -top box. Connect to the included power cord. 1.6 Remote Control Description Icon Power Input Signal Type INPUT Function Press to devices such as a VCR, STB, or a DVD player with AV, SVideo, L/R IN. Connect a HDMI equipment or a HDMIDVI adapter cable to turn the TV on or off. Press to an external device, such as a DVD player or set-top box. SCART 2 English Description SCART 2 IN Connector Function Connect to select the input signal types: TV, SCART1, SCART2, Composite, S-Video, Component, HDMI 1, HDMI 2, HDMI 3, HDMI...
... set -top box. Connect to the included power cord. 1.6 Remote Control Description Icon Power Input Signal Type INPUT Function Press to devices such as a VCR, STB, or a DVD player with AV, SVideo, L/R IN. Connect a HDMI equipment or a HDMIDVI adapter cable to turn the TV on or off. Press to an external device, such as a DVD player or set-top box. SCART 2 English Description SCART 2 IN Connector Function Connect to select the input signal types: TV, SCART1, SCART2, Composite, S-Video, Component, HDMI 1, HDMI 2, HDMI 3, HDMI...
User Manual
Page 21
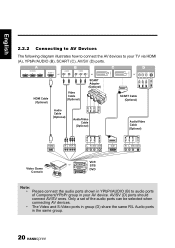
...20 Only a set of Component/YPbPr group in YPbPr/AUDIO (B) to your AV device. AV/SV (D) ports should connect AV/SV ones. A B C HDMI IN 1 2 3 HDMI 4 or AUDIO R L VIDEO PR PB Y or D R-AUDIO-L VIDEO S-VIDEO or HDMI Cable (Optional) Video Cable (Optional) SCART Adapter (Optional) R-AUDIO-L/MONO VIDEO S.VIDEO SCART Cable (Optional) Audio Cable (Optional) Audio/Video Cable (Optional) Audio/Video Cable (Optional) HDMI R L PR PB Y L R VIDEO S-VIDEO SCART R L VIDEO S-VIDEO Video Game Console VCR or STB DVD Note: • Please connect the audio ports shown in...
...20 Only a set of Component/YPbPr group in YPbPr/AUDIO (B) to your AV device. AV/SV (D) ports should connect AV/SV ones. A B C HDMI IN 1 2 3 HDMI 4 or AUDIO R L VIDEO PR PB Y or D R-AUDIO-L VIDEO S-VIDEO or HDMI Cable (Optional) Video Cable (Optional) SCART Adapter (Optional) R-AUDIO-L/MONO VIDEO S.VIDEO SCART Cable (Optional) Audio Cable (Optional) Audio/Video Cable (Optional) Audio/Video Cable (Optional) HDMI R L PR PB Y L R VIDEO S-VIDEO SCART R L VIDEO S-VIDEO Video Game Console VCR or STB DVD Note: • Please connect the audio ports shown in...

User Manual
Page 25
... Adapter (Optional) R-AUDIO-L/MONO VIDEO S.VIDEO Connect to AV connectors Connect to connect a TV, VCR, VCD, DVD player or video game console. English 2.2.8 Connecting a VCR/ STB/ DVD Player using SCART Use the SCART ports to S-Video connectors SCART 1 SCART 2 SCART Cable (Optional) Note: • The S-Video connector and AV connectors cannot be connected at the same time, or the wrong signals might be generated. • The cables are color-coded (black, red, white, and yellow). Connect each color-coded cable to use a SCART cable or adapter...
... Adapter (Optional) R-AUDIO-L/MONO VIDEO S.VIDEO Connect to AV connectors Connect to connect a TV, VCR, VCD, DVD player or video game console. English 2.2.8 Connecting a VCR/ STB/ DVD Player using SCART Use the SCART ports to S-Video connectors SCART 1 SCART 2 SCART Cable (Optional) Note: • The S-Video connector and AV connectors cannot be connected at the same time, or the wrong signals might be generated. • The cables are color-coded (black, red, white, and yellow). Connect each color-coded cable to use a SCART cable or adapter...

User Manual
Page 26
... remote control to increase the volume. 2 Press VOL- The power LED indicator on the TV changes from green to red, indicating that the TV is off. 2.3.2 Switching Source Signals Press INPUT on the control panel or remote control to select the incoming source signal. 2.3.3 Performing an Automatic Channel Search Before using the TV to view programs, you need to activate the channel search first. 1 Press MENU on the control panel or remote control, then select to enter the Channel menu. 2 Select Auto Scan...
... remote control to increase the volume. 2 Press VOL- The power LED indicator on the TV changes from green to red, indicating that the TV is off. 2.3.2 Switching Source Signals Press INPUT on the control panel or remote control to select the incoming source signal. 2.3.3 Performing an Automatic Channel Search Before using the TV to view programs, you need to activate the channel search first. 1 Press MENU on the control panel or remote control, then select to enter the Channel menu. 2 Select Auto Scan...

User Manual
Page 28
Before going to adjust the TV settings. Picture Audio Clock / Timer Channel Setup INSTRUCTIONS: Quick instructions for adjusting the settings. MAIN MENU: Displays a list of the adjustable options. The OSD menu can be accessed through the buttons either on the control panel or the remote control. Remote Control MENU Arrow Arrow Arrow Arrow OK MENU 27 English 3 Adjusting On-Screen Display (OSD) Settings The On-Screen Display (OSD) menu system provides a quick and simple method to details of each OSD item, you may get acquainted with...
Before going to adjust the TV settings. Picture Audio Clock / Timer Channel Setup INSTRUCTIONS: Quick instructions for adjusting the settings. MAIN MENU: Displays a list of the adjustable options. The OSD menu can be accessed through the buttons either on the control panel or the remote control. Remote Control MENU Arrow Arrow Arrow Arrow OK MENU 27 English 3 Adjusting On-Screen Display (OSD) Settings The On-Screen Display (OSD) menu system provides a quick and simple method to details of each OSD item, you may get acquainted with...

User Manual
Page 29
... the instructions indicated on the input signal source. 28 on the control panel, to change the scales or press OK on the remote control or INPUT / VOL+ on the control panel to select an item and then press MENU/ VOL- Note: The items available on the OSD may vary depending on the bottom of the OSD Function Menu. to adjust the Picture Mode, Brightness, Contrast, Sharpness, Color, Tint, Digital...
... the instructions indicated on the input signal source. 28 on the control panel, to change the scales or press OK on the remote control or INPUT / VOL+ on the control panel to select an item and then press MENU/ VOL- Note: The items available on the OSD may vary depending on the bottom of the OSD Function Menu. to adjust the Picture Mode, Brightness, Contrast, Sharpness, Color, Tint, Digital...

User Manual
Page 30
...- Picture Audio Clock / Timer Channel Setup Audio Mode Equalizer Balance Audio Effect Auto Volume Preferred Language Digital MTS Audio Description Recall Move OK Select Menu Return 4 Press / on the remote control or PS / PT on the control panel to select an item. 5 Press / OK on the remote control or INPUT / VOL+ on the control panel to enter the item. 6 Press / on the control panel to enter the Audio menu. English 3.3 Adjusting Audio Settings 1 Press MENU to enter the OSD Main Menu screen. 2 Press...
...- Picture Audio Clock / Timer Channel Setup Audio Mode Equalizer Balance Audio Effect Auto Volume Preferred Language Digital MTS Audio Description Recall Move OK Select Menu Return 4 Press / on the remote control or PS / PT on the control panel to select an item. 5 Press / OK on the remote control or INPUT / VOL+ on the control panel to enter the item. 6 Press / on the control panel to enter the Audio menu. English 3.3 Adjusting Audio Settings 1 Press MENU to enter the OSD Main Menu screen. 2 Press...

User Manual
Page 31
... the control panel to enter the Clock and Timer menu. on the control panel to adjust the Sleep Timer, Time Mode, Date, and Local Offset settings. Note: The items available on the OSD may vary depending on the control panel to mark an item. 7 Press MENU to exit. 8 The Clock and Timer menu can be used to change the values or press OK on the remote control or INPUT / VOL+ on the input signal source...
... the control panel to enter the Clock and Timer menu. on the control panel to adjust the Sleep Timer, Time Mode, Date, and Local Offset settings. Note: The items available on the OSD may vary depending on the control panel to mark an item. 7 Press MENU to exit. 8 The Clock and Timer menu can be used to change the values or press OK on the remote control or INPUT / VOL+ on the input signal source...
User Manual
Page 32
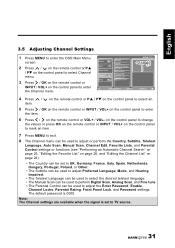
..., Mode, and Hearing Impaired. • The Teletext Language can be used to select the desired teletext language. • The Manual Scan can be used to perform Digital Scan, Analog Scan, and Fine tune. • The Parental Control can be set to enter the Channel menu. Picture Audio Clock / Timer Channel Setup Country Subtitle Teletext Language Auto Scan Manual Scan Channel Edit Favorite Lists Parental Control Move OK Select Menu Return 4 Press / on the remote control or PS / PT on the control panel...
..., Mode, and Hearing Impaired. • The Teletext Language can be used to select the desired teletext language. • The Manual Scan can be used to perform Digital Scan, Analog Scan, and Fine tune. • The Parental Control can be set to enter the Channel menu. Picture Audio Clock / Timer Channel Setup Country Subtitle Teletext Language Auto Scan Manual Scan Channel Edit Favorite Lists Parental Control Move OK Select Menu Return 4 Press / on the remote control or PS / PT on the control panel...
User Manual
Page 33
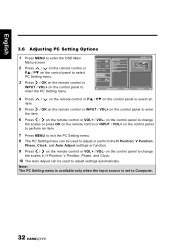
... input source is set to enter the PC Setting menu. on the remote control or VOL+ / VOL- English 3.6 Adjusting PC Setting Options 1 Press MENU to enter the OSD Main Menu screen. 2 Press / on the remote control or PS / PT on the control panel to select PC Setting menu. 3 Press / OK on the remote control or INPUT / VOL+ on the remote control or VOL+ / VOL- Picture Audio Clock / Timer PC Setting Setup H Position V Position Phase Clock Auto Adjust Move OK Select Menu...
... input source is set to enter the PC Setting menu. on the remote control or VOL+ / VOL- English 3.6 Adjusting PC Setting Options 1 Press MENU to enter the OSD Main Menu screen. 2 Press / on the remote control or PS / PT on the control panel to select PC Setting menu. 3 Press / OK on the remote control or INPUT / VOL+ on the remote control or VOL+ / VOL- Picture Audio Clock / Timer PC Setting Setup H Position V Position Phase Clock Auto Adjust Move OK Select Menu...

User Manual
Page 34
... the input source is connected. If you want to exit from CI Main menu, please press Red key on the control panel to mark an item or perform a function. 7 Press MENU to exit. 8 The Setup menu can be used to restore the Setup settings to enter the Setup menu. Picture Audio Clock / Timer Channel Setup OSD Language OSD Time Common Interface SCART1 SCART2 Mode Setting Hannspree Light First Time Setup Recall Move OK Select Menu Return 4 Press / on the remote control...
... the input source is connected. If you want to exit from CI Main menu, please press Red key on the control panel to mark an item or perform a function. 7 Press MENU to exit. 8 The Setup menu can be used to restore the Setup settings to enter the Setup menu. Picture Audio Clock / Timer Channel Setup OSD Language OSD Time Common Interface SCART1 SCART2 Mode Setting Hannspree Light First Time Setup Recall Move OK Select Menu Return 4 Press / on the remote control...

User Manual
Page 35
...; • • • Remote control doesn't work. • • Press on the control panel or remote control. Adjust the Brightness in the Channel OSD menu. Adjust the location of the antenna, placing it far from roads or sources of the antenna or replace the video signal cable. Replace the battery with high quality signals. English 4 Troubleshooting Situation Solution • Connect the power cord properly. • Check if the power LED is plugged in. No picture and sound. • • •...
...; • • • Remote control doesn't work. • • Press on the control panel or remote control. Adjust the Brightness in the Channel OSD menu. Adjust the location of the antenna, placing it far from roads or sources of the antenna or replace the video signal cable. Replace the battery with high quality signals. English 4 Troubleshooting Situation Solution • Connect the power cord properly. • Check if the power LED is plugged in. No picture and sound. • • •...

User Manual
Page 38
... ) Wall mounting the TV: 1 Purchase a VESA compatible wall bracket: VESA 200 X 200, 4 holes, M5, 12mm, 20 kg. 2 Locate your specific wall bracket to properly wall mount the TV. • The pitch of the mounting holes is 200mm horizontally and 200mm vertically. • The screws type required is metric: M5, 12 mm length. • The 32" TV stand base can ask a qualified service personnel about using the hole on a table or a hard surface using...
... ) Wall mounting the TV: 1 Purchase a VESA compatible wall bracket: VESA 200 X 200, 4 holes, M5, 12mm, 20 kg. 2 Locate your specific wall bracket to properly wall mount the TV. • The pitch of the mounting holes is 200mm horizontally and 200mm vertically. • The screws type required is metric: M5, 12 mm length. • The 32" TV stand base can ask a qualified service personnel about using the hole on a table or a hard surface using...


