User Manual
Page 2
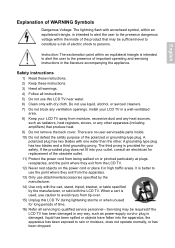
...the obsolete outlet. 11) Protect the power cord from the apparatus. 13) Only use this LCD TV during lightening storms or when unused for your LCD TV away from tip-over. 15) Unplug this LCD TV near water. 6) Clean only with one wider than the other apparatus (including amplifiers) that ...cart, stand, tripod, bracket, or table specified by the manufacturer, or sold with the LCD TV. Install your LCD TV in a well-ventilated area. 8) Keep your safety. Servicing may be required if the LCD TV has been damaged in any ventilation openings. There are no user-serviceable parts inside of ...
...the obsolete outlet. 11) Protect the power cord from the apparatus. 13) Only use this LCD TV during lightening storms or when unused for your LCD TV away from tip-over. 15) Unplug this LCD TV near water. 6) Clean only with one wider than the other apparatus (including amplifiers) that ...cart, stand, tripod, bracket, or table specified by the manufacturer, or sold with the LCD TV. Install your LCD TV in a well-ventilated area. 8) Keep your safety. Servicing may be required if the LCD TV has been damaged in any ventilation openings. There are no user-serviceable parts inside of ...
User Manual
Page 3
... can't be handled as normal trash in Europe when it is not covered under the terms of fire or electric shock, do not expose this LCD TV is out of entertainment and visual display tasks are provided on a wall or ceiling, be placed on it . CAUTION: Any damage caused by ...incorrectly attempting to mount this LCD TV to handle it . 18) The Shock Hazard Marking and Associated Graphical Symbol are excluded. 20) Wall or ceiling mounting: When mounting the product on ...
... can't be handled as normal trash in Europe when it is not covered under the terms of fire or electric shock, do not expose this LCD TV is out of entertainment and visual display tasks are provided on a wall or ceiling, be placed on it . CAUTION: Any damage caused by ...incorrectly attempting to mount this LCD TV to handle it . 18) The Shock Hazard Marking and Associated Graphical Symbol are excluded. 20) Wall or ceiling mounting: When mounting the product on ...
User Manual
Page 5
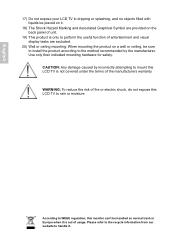
This LCD-TV package comes with: LCD TV User's Manual Quick Start Guide Warranty Card Remote Control Battery AAA x 2 Power Cord 1 English ACCESSORIES Thank you for purchasing this LCD-TV of high performance!
This LCD-TV package comes with: LCD TV User's Manual Quick Start Guide Warranty Card Remote Control Battery AAA x 2 Power Cord 1 English ACCESSORIES Thank you for purchasing this LCD-TV of high performance!
User Manual
Page 12
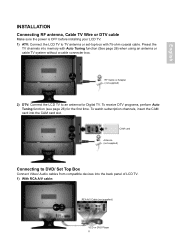
...Video/ Audio cables from compatible devices into the CAM card slot. English INSTALLATION Connecting RF antenna, Cable TV Wire or DTV cable Make sure the power is OFF before installing your LCD TV. 1) ATV: Connect the LCD TV to an antenna for the first time. RF Cable or Adapter (not supplied) 2) DTV: Connect ...the LCD TV to TV antenna or set-top-box with Auto Tuning function (See page 26) when using an ...
...Video/ Audio cables from compatible devices into the CAM card slot. English INSTALLATION Connecting RF antenna, Cable TV Wire or DTV cable Make sure the power is OFF before installing your LCD TV. 1) ATV: Connect the LCD TV to an antenna for the first time. RF Cable or Adapter (not supplied) 2) DTV: Connect ...the LCD TV to TV antenna or set-top-box with Auto Tuning function (See page 26) when using an ...

User Manual
Page 14
English 5) With HDMI cable: HDMI Cable (not supplied) 6) With HDMI to DVI cable: VCD or DVD Player Audio Cable (not supplied) VCD or DVD Player HDMI-DVI Cable (not supplied) Connecting to the Headphone Connect the headphone to the headphone output terminal of the LCD TV. (Headphone sold separately) Headphone (not supplied) 10
English 5) With HDMI cable: HDMI Cable (not supplied) 6) With HDMI to DVI cable: VCD or DVD Player Audio Cable (not supplied) VCD or DVD Player HDMI-DVI Cable (not supplied) Connecting to the Headphone Connect the headphone to the headphone output terminal of the LCD TV. (Headphone sold separately) Headphone (not supplied) 10

User Manual
Page 15
...-DVI cable from the audio output of your computer to the audio input terminal (green) of the LCD TV. PC Audio In Cable (not supplied) HDMI to DVI Cable (not supplied) Connecting with the Power... Cord Connect the power cord to the power cord connector on the back of your LCD TV. AC power socket Power cable 11 English Connecting to a Computer 1) VGA (15pin D-Sub): Connect ...the VGA cable from VGA output of the computer to the VGA terminal input of your LCD TV, and plug the other end of the power cord into a correctly grounded electrical outlet. Also, connect...
...-DVI cable from the audio output of your computer to the audio input terminal (green) of the LCD TV. PC Audio In Cable (not supplied) HDMI to DVI Cable (not supplied) Connecting with the Power... Cord Connect the power cord to the power cord connector on the back of your LCD TV. AC power socket Power cable 11 English Connecting to a Computer 1) VGA (15pin D-Sub): Connect ...the VGA cable from VGA output of the computer to the VGA terminal input of your LCD TV, and plug the other end of the power cord into a correctly grounded electrical outlet. Also, connect...

User Manual
Page 16
... Adjust Press VOL+/- directly. Sleep Time Setting Repeatedly press SLEEP key to turn off timer. English BASIC OPERATION Before using the LCD TV: Connect external equipments properly. To turn on your LCD TV, you may use ▲▼ to select the required input source between DTV, ATV, SCART, YPbPr, VGA, HDMI, ...10min, 20min, 30min, 60min, 90min, 120min, 180min and 240min. Power On/Off To turn the LCD TV on/off: Press POWER button on the bottom of LCD TV or press POWER button on /off the LCD TV after a preset period of LED indicator is no signal in the PC mode, the power LED ...
... Adjust Press VOL+/- directly. Sleep Time Setting Repeatedly press SLEEP key to turn off timer. English BASIC OPERATION Before using the LCD TV: Connect external equipments properly. To turn on your LCD TV, you may use ▲▼ to select the required input source between DTV, ATV, SCART, YPbPr, VGA, HDMI, ...10min, 20min, 30min, 60min, 90min, 120min, 180min and 240min. Power On/Off To turn the LCD TV on/off: Press POWER button on the bottom of LCD TV or press POWER button on /off the LCD TV after a preset period of LED indicator is no signal in the PC mode, the power LED ...

User Manual
Page 18
INFO To display the current information of the LCD TV: Press INFO, and the banner displays the program No., current time, program name, teletext info, etc. When in the channel banner. 14 When pressed in other input source, it will not be displayed in ATV mode, the displayed items may be different. Note: The favorite channel icon will automatically direct to switch between DTV and RADIO programs. TV/DTV Repeatedly press the TV/DTV key to TV source. English DTV/RADIO Press the DTV/RADIO key to switch between TV/DTV.
INFO To display the current information of the LCD TV: Press INFO, and the banner displays the program No., current time, program name, teletext info, etc. When in the channel banner. 14 When pressed in other input source, it will not be displayed in ATV mode, the displayed items may be different. Note: The favorite channel icon will automatically direct to switch between DTV and RADIO programs. TV/DTV Repeatedly press the TV/DTV key to TV source. English DTV/RADIO Press the DTV/RADIO key to switch between TV/DTV.
User Manual
Page 20
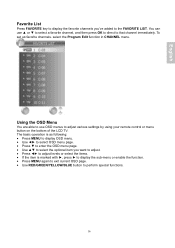
... a favorite channel, and then press OK to direct to adjust various settings by using your remote control or menu button on the bottom of the LCD TV. The basic operation is as following: • Press MENU to display OSD menu. • Use ◄► to select OSD menu page. • Press ▼...
... a favorite channel, and then press OK to direct to adjust various settings by using your remote control or menu button on the bottom of the LCD TV. The basic operation is as following: • Press MENU to display OSD menu. • Use ◄► to select OSD menu page. • Press ▼...

User Manual
Page 21
Press the MENU button to display the OSD Menu, and use the OSD menu to select the desired OSD menu. English ADVANCED OPERATION-OSD MENU You can use ▲▼ to adjust various settings for your LCD TV. Picture Menu -To adjust the picture quality In ATV, DTV, AV, S-Video, SCART, YPbPr, HDMI source: Note: The LOCK and CHANNEL menu icons are only enabled in ATV and DTV source. 17
Press the MENU button to display the OSD Menu, and use the OSD menu to select the desired OSD menu. English ADVANCED OPERATION-OSD MENU You can use ▲▼ to adjust various settings for your LCD TV. Picture Menu -To adjust the picture quality In ATV, DTV, AV, S-Video, SCART, YPbPr, HDMI source: Note: The LOCK and CHANNEL menu icons are only enabled in ATV and DTV source. 17
User Manual
Page 36
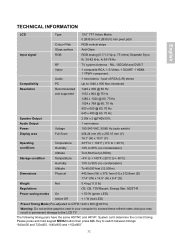
Please press and hold keypad MENU button then press CH- TECHNICAL INFORMATION English LCD Type 19.0" TFT Active Matrix 0.2835 (H) x 0.2835 (V) mm pixel pitch Colour Filter RGB vertical stripe Glass surface Anti-Glare Input signal RGB RGB analog (0.7/1.0 Vp-p, ...75 ohms) Separate Sync, fh: 30-82 kHz, fv:55-76 Hz RF TV system Antenna - doing so may result in your computer to exceed these refresh rates; Key to the LCD TV The following timing pairs have the same HSYNC and HP/VP. PAL / SECAM and DVB-T Video 1 composite...
Please press and hold keypad MENU button then press CH- TECHNICAL INFORMATION English LCD Type 19.0" TFT Active Matrix 0.2835 (H) x 0.2835 (V) mm pixel pitch Colour Filter RGB vertical stripe Glass surface Anti-Glare Input signal RGB RGB analog (0.7/1.0 Vp-p, ...75 ohms) Separate Sync, fh: 30-82 kHz, fv:55-76 Hz RF TV system Antenna - doing so may result in your computer to exceed these refresh rates; Key to the LCD TV The following timing pairs have the same HSYNC and HP/VP. PAL / SECAM and DVB-T Video 1 composite...
User Manual
Page 37
...sources indicated on the label on the rear end of the power supply in your residence, consult your LCD TV only in a clean dry environment. Warnings This LCD TV should be repaired by a service technician. However, improper use or installation may cause electric shock to ... power cord is damaged. The LCD TV should be easily accessible. 33 Stop using the LCD TV if the cabinet is disconnected. Unplug the LCD TV immediately if it checked by a qualified technician only. Do not remove the LCD TV cabinet. English SAFETY PRECAUTIONS This LCD TV is manufactured and tested on ...
...sources indicated on the label on the rear end of the power supply in your residence, consult your LCD TV only in a clean dry environment. Warnings This LCD TV should be repaired by a service technician. However, improper use or installation may cause electric shock to ... power cord is damaged. The LCD TV should be easily accessible. 33 Stop using the LCD TV if the cabinet is disconnected. Unplug the LCD TV immediately if it checked by a qualified technician only. Do not remove the LCD TV cabinet. English SAFETY PRECAUTIONS This LCD TV is manufactured and tested on ...
User Manual
Page 38
...your service center. You have selected the correct video input. Loose or broken pins in a well ventilated area. Place your LCD TV away from your LCD TV. Keep your LCD TV away from magnets, motors, transformers, speakers, and other heat source. The display unit inside contains high-voltage and may cause...check the video cable to make sure the video source is working. Plug another TVs to make sure it . Put your LCD TV in the cable connector could cause an improper connection. Connect the TV unit to another video source or use another electrical device into the power outlet to...
...your service center. You have selected the correct video input. Loose or broken pins in a well ventilated area. Place your LCD TV away from your LCD TV. Keep your LCD TV away from magnets, motors, transformers, speakers, and other heat source. The display unit inside contains high-voltage and may cause...check the video cable to make sure the video source is working. Plug another TVs to make sure it . Put your LCD TV in the cable connector could cause an improper connection. Connect the TV unit to another video source or use another electrical device into the power outlet to...


