
User Manual
Page 1
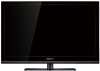
LED-TV SL-SEenrgileishs User's ManDueutasclh Français
LED-TV SL-SEenrgileishs User's ManDueutasclh Français

User Manual
Page 3
For device connection instructions, please refer to the I/O port descriptions and function table in the enclosed user's manual. SPDIF Pr/Cr Pb/Cb Y R COMPONENT L VGA SCART DTV/TV VGA AUDIO ADAPTER CABLE/ANTENNA HDMI 1 HDMI 2 HDMI 3 USB
For device connection instructions, please refer to the I/O port descriptions and function table in the enclosed user's manual. SPDIF Pr/Cr Pb/Cb Y R COMPONENT L VGA SCART DTV/TV VGA AUDIO ADAPTER CABLE/ANTENNA HDMI 1 HDMI 2 HDMI 3 USB

User Manual
Page 4
...23 Watching Videos 24 • PVR (Personal Video Record).......24 4. Troubleshooting 25 5. Getting Started 5 • Package Contents 5 • Introducing the TV 5 • Features 5 • Foot Stand Installation 6 • Disconnecting the Stand 6 • Installing the Wall Mount Kit............7 • Control ... 9 • Remote Control 10 2. Specifications 27 1 Setting up your TV 11 • Power Connection 11 • Rear Connections 11 • Using the TV 12 Turning the TV On and Off...........12 Running Setup Wizard 12 Selecting Your Content Source....13 ...
...23 Watching Videos 24 • PVR (Personal Video Record).......24 4. Troubleshooting 25 5. Getting Started 5 • Package Contents 5 • Introducing the TV 5 • Features 5 • Foot Stand Installation 6 • Disconnecting the Stand 6 • Installing the Wall Mount Kit............7 • Control ... 9 • Remote Control 10 2. Specifications 27 1 Setting up your TV 11 • Power Connection 11 • Rear Connections 11 • Using the TV 12 Turning the TV On and Off...........12 Running Setup Wizard 12 Selecting Your Content Source....13 ...

User Manual
Page 5
... Logo, and HighDefinition Multimedia Interface are trademarks of Dolby Laboratories. The "HD TV" Logo is a trademark of DIGITALEUROPE. (SL32UMNB) The "HD TV" Logo and "1080p" qualifier Logo are trademarks of DIGITALEUROPE. (SL40UMNB) "DVB and the DVB logos are trademarks of the DVB Project". •...on the harmonization of the laws of Member States relating to electrical equipment for use within certain voltage limits. Trademark Notice Hannspree products incorporate HighDefinition Multimedia Interface (HDMI™) technology. If the screen is made of glass. The double-D symbol are...
... Logo, and HighDefinition Multimedia Interface are trademarks of Dolby Laboratories. The "HD TV" Logo is a trademark of DIGITALEUROPE. (SL32UMNB) The "HD TV" Logo and "1080p" qualifier Logo are trademarks of DIGITALEUROPE. (SL40UMNB) "DVB and the DVB logos are trademarks of the DVB Project". •...on the harmonization of the laws of Member States relating to electrical equipment for use within certain voltage limits. Trademark Notice Hannspree products incorporate HighDefinition Multimedia Interface (HDMI™) technology. If the screen is made of glass. The double-D symbol are...

User Manual
Page 6
..., either directly or by copyright and distributed under the copyrights, patents, patent applications or trademarks of Hannspree, except for identification purpose only, and may be distributed, modified, reverse engineered, or reproduced in this manual may be handled as the right to recycle this TV can be deemed to hazardous and poisoned substances.
..., either directly or by copyright and distributed under the copyrights, patents, patent applications or trademarks of Hannspree, except for identification purpose only, and may be distributed, modified, reverse engineered, or reproduced in this manual may be handled as the right to recycle this TV can be deemed to hazardous and poisoned substances.

User Manual
Page 7
...disposal. To ensure the safe and correct installation and operations of the contents. Please visit HANNspree Europe Website: http://www.hannspree.com/eu and go to the correctness of the TV, it is important that the safety and operation instructions in advance. Keep this manual for..., use . Cleaning Instruction for accuracy; Packing Material Disposal: Please refer to a PC. ENGLISH Notes: • The LED TV is for purchasing a Hannspree LED TV. Warranty and Service / Repair For complete warranty service information, please refer to the warranty card for the Terms and Conditions. ...
...disposal. To ensure the safe and correct installation and operations of the contents. Please visit HANNspree Europe Website: http://www.hannspree.com/eu and go to the correctness of the TV, it is important that the safety and operation instructions in advance. Keep this manual for..., use . Cleaning Instruction for accuracy; Packing Material Disposal: Please refer to a PC. ENGLISH Notes: • The LED TV is for purchasing a Hannspree LED TV. Warranty and Service / Repair For complete warranty service information, please refer to the warranty card for the Terms and Conditions. ...
User Manual
Page 8
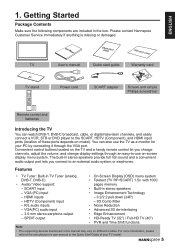
Convenient control buttons located on -screen display menu system. Features • TV Tuner: Built-in the box. HDTV (Component) input - Please contact Hannspree Customer Service immediately if anything is missing or damaged. SPDIF output • On-Screen Display (OSD) menu system • Teletext (TV RF+SCART) 1.5v. R/L audio inputs - User's Manual QGuuicidkeStart Warranty Card...
Convenient control buttons located on -screen display menu system. Features • TV Tuner: Built-in the box. HDTV (Component) input - Please contact Hannspree Customer Service immediately if anything is missing or damaged. SPDIF output • On-Screen Display (OSD) menu system • Teletext (TV RF+SCART) 1.5v. R/L audio inputs - User's Manual QGuuicidkeStart Warranty Card...

User Manual
Page 9
...2 Remove the screws and detach the stand from damage. ENGLISH Foot Stand Installation 1 Carefully place the TV screen side down on a cushioned surface to protect the screen from the TV. n Make sure to distinguish between the front and back of the stand when assembling them. 2 Attach...do the work themselves. n Install only with the four included screws. Installing the LED TV requires special skill that results in the illustration and secure it with another person's assistance. Hannspree bears no responsibility for improper mounting or mounting that should not attempt to the wall. ...
...2 Remove the screws and detach the stand from damage. ENGLISH Foot Stand Installation 1 Carefully place the TV screen side down on a cushioned surface to protect the screen from the TV. n Make sure to distinguish between the front and back of the stand when assembling them. 2 Attach...do the work themselves. n Install only with the four included screws. Installing the LED TV requires special skill that results in the illustration and secure it with another person's assistance. Hannspree bears no responsibility for improper mounting or mounting that should not attempt to the wall. ...
User Manual
Page 10
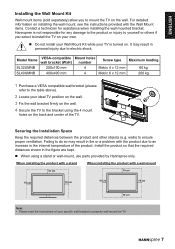
... SL40UMNB VESA-compatible wall bracket (WxH) 200x100 mm 400x400 mm Mount holes number 4 4 Screw type Metric 4 x 12 mm Metric 6 x 12 mm Maximum loading 60 kg 200 kg 1 Purchase a VESA compatible wall bracket (please refer to the table above). 2 Locate your specific wall bracket to properly wall mount the TV....electric shock. Install the product so that the required distances shown in personal injuiry due to an increase in the internal temperature of the TV. Hannspree is turned on the back and center of the product. It may result in fire or a problem with the Wall Mount items. ...
... SL40UMNB VESA-compatible wall bracket (WxH) 200x100 mm 400x400 mm Mount holes number 4 4 Screw type Metric 4 x 12 mm Metric 6 x 12 mm Maximum loading 60 kg 200 kg 1 Purchase a VESA compatible wall bracket (please refer to the table above). 2 Locate your specific wall bracket to properly wall mount the TV....electric shock. Install the product so that the required distances shown in personal injuiry due to an increase in the internal temperature of the TV. Hannspree is turned on the back and center of the product. It may result in fire or a problem with the Wall Mount items. ...

User Manual
Page 11
... previous item on . Description 1 Program select 2 Volume adjust 3 Menu 4 OK Button Function Press to increase the program number or move downward to turn the TV on / off. During standby mode, press to detect the current level of visible light in the surrounding environment. OK Press to confirm the selection on... the OSD menu. 5 Power Press to turn the TV on or off. 6 Light sensor and Remote IR sensor Used to turn the TV on the OSD menu. Press to increase the volume or move to the right on the OSD menu. ...
... previous item on . Description 1 Program select 2 Volume adjust 3 Menu 4 OK Button Function Press to increase the program number or move downward to turn the TV on / off. During standby mode, press to detect the current level of visible light in the surrounding environment. OK Press to confirm the selection on... the OSD menu. 5 Power Press to turn the TV on or off. 6 Light sensor and Remote IR sensor Used to turn the TV on the OSD menu. Press to increase the volume or move to the right on the OSD menu. ...

User Manual
Page 12
... a DVD player using the included SCART adapter cable. Connect to a PC's VGA port. 7 Cable/Antenna VGA Connect to an antenna or cable TV. 8 SCART Adapter 9 VGA Audio Input DTV/TV CABLE/ANTENNA SCART ADAPTER Connect to a USB device such as a USB USB flash drive or USB hard disk drive. No. Connect to...
... a DVD player using the included SCART adapter cable. Connect to a PC's VGA port. 7 Cable/Antenna VGA Connect to an antenna or cable TV. 8 SCART Adapter 9 VGA Audio Input DTV/TV CABLE/ANTENNA SCART ADAPTER Connect to a USB device such as a USB USB flash drive or USB hard disk drive. No. Connect to...

User Manual
Page 13
...or teletext mode. shift, PVR, Schedule list, and USB. to select the input 1 signal type selections. Do not exceed an angle of the TV. With a DTV source, perform specific tasks in USB mode. ENGLISH Remote Control 1 Source Press to set functions and change values. directly. Press ...the 11 main menu, to select menu options, to switch to display program information (if available). to freeze/ unfreeze the picture in digital TV mode. 20 16 Return Press to return to select an audio language available for DTV). Blue (Lang): To select a sound type available ...
...or teletext mode. shift, PVR, Schedule list, and USB. to select the input 1 signal type selections. Do not exceed an angle of the TV. With a DTV source, perform specific tasks in USB mode. ENGLISH Remote Control 1 Source Press to set functions and change values. directly. Press ...the 11 main menu, to select menu options, to switch to display program information (if available). to freeze/ unfreeze the picture in digital TV mode. 20 16 Return Press to return to select an audio language available for DTV). Blue (Lang): To select a sound type available ...
User Manual
Page 14
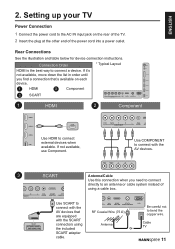
...R PONENT L VGA SCART DTV AUDIO ADAPTER CABLE/A Antenna/Cable Use this connection when you find a connection that are equipped L VGA SCART DTV/TV AUDIO ADAPTER CABLE/ANTENNA VGA RF Coaxial Wire (75 Ω) Be careful not to the AC IN input jack on each HDMI 1 device. Setting... and table below for device connection instructions. HDMI 2 1 HDMI 2 Component HDMI 3 3 SCART Pr/Cr Pb/Cb Y R COMPONENT L VGA SCART DTV/TV AUDIO ADAPTER CABLE/ANTENNA VGA USB 1 HDMI 2 Component HDMI 1 HDMI 2 HDMI HDMI 3 Use HDMI to connect a device. If it's not available, ...
...R PONENT L VGA SCART DTV AUDIO ADAPTER CABLE/A Antenna/Cable Use this connection when you find a connection that are equipped L VGA SCART DTV/TV AUDIO ADAPTER CABLE/ANTENNA VGA RF Coaxial Wire (75 Ω) Be careful not to the AC IN input jack on each HDMI 1 device. Setting... and table below for device connection instructions. HDMI 2 1 HDMI 2 Component HDMI 3 3 SCART Pr/Cr Pb/Cb Y R COMPONENT L VGA SCART DTV/TV AUDIO ADAPTER CABLE/ANTENNA VGA USB 1 HDMI 2 Component HDMI 1 HDMI 2 HDMI HDMI 3 Use HDMI to connect a device. If it's not available, ...
User Manual
Page 15
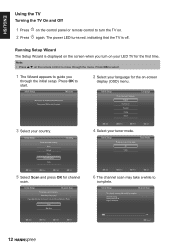
... Back Select Next Exit Exit Back Select Next Exit Exit 4 Select your country. The power LED turns red, indicating that the TV is displayed on the screen when you turn the TV on. Note: • Press p/q on -screen display (OSD) menu. Press OK to select. 1 The Wizard appears to guide you skip... and press OK for Initial Setup !! Start channel scan now? Initial Setup Channel Scan The channel scan may take a while to complete. ENGLISH Using the TV Turning the TV On and Off 1 Press 2 Press on the control panel or remote control to turn on your LED...
... Back Select Next Exit Exit Back Select Next Exit Exit 4 Select your country. The power LED turns red, indicating that the TV is displayed on the screen when you turn the TV on. Note: • Press p/q on -screen display (OSD) menu. Press OK to select. 1 The Wizard appears to guide you skip... and press OK for Initial Setup !! Start channel scan now? Initial Setup Channel Scan The channel scan may take a while to complete. ENGLISH Using the TV Turning the TV On and Off 1 Press 2 Press on the control panel or remote control to turn on your LED...

User Manual
Page 16
... the channel search. Adjusting the Volume 1 Press VOL + on the control panel or + on the remote control to increase the volume. 13 TV To select the source signal: CMP AV • Press Source on the remote control. Initial Setup Complete Congratulations !! Selecting Channels • Press ... Setup. The Input Source menu VGA appears. Back Select Next Exit Exit Back Selecting Your Content Source You can watch cable or broadcast TV, play DVD or connect to increase / decrease the program number. • Press the numeric buttons on the remote control. ENGLISH 7...
... the channel search. Adjusting the Volume 1 Press VOL + on the control panel or + on the remote control to increase the volume. 13 TV To select the source signal: CMP AV • Press Source on the remote control. Initial Setup Complete Congratulations !! Selecting Channels • Press ... Setup. The Input Source menu VGA appears. Back Select Next Exit Exit Back Selecting Your Content Source You can watch cable or broadcast TV, play DVD or connect to increase / decrease the program number. • Press the numeric buttons on the remote control. ENGLISH 7...
User Manual
Page 17
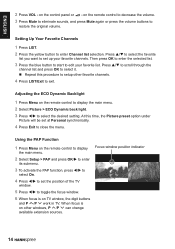
.... At this procedure to setup other windows, P /P can change available extension sources. 14 Using the PAP Function 1 Press Menu on TV window, the digit buttons and P /P work in TV. Press p/q to scroll through the channel list and press OK to toggle the focus window. 6 When focus is on the control panel... up your favorite list. Then press OK to enter the selected list. 3 Press the blue button to start to set the position of the TV window. 5 Press t/u to select it. Press p/q to select the favorite list you want to edit your favorite channels. ENGLISH 2 Press VOL...
.... At this procedure to setup other windows, P /P can change available extension sources. 14 Using the PAP Function 1 Press Menu on TV window, the digit buttons and P /P work in TV. Press p/q to scroll through the channel list and press OK to toggle the focus window. 6 When focus is on the control panel... up your favorite list. Then press OK to enter the selected list. 3 Press the blue button to start to set the position of the TV window. 5 Press t/u to select it. Press p/q to select the favorite list you want to edit your favorite channels. ENGLISH 2 Press VOL...

User Manual
Page 18
... and press OK/u to enter its submenu. 3 Press p/q to select a connector your location (Shop or Home). 4 Press Exit to the TV menu. Resetting to Factory Default Settings 1 Press Menu on the remote control to display the main menu. 2 Select Setup > Location. 3 Press t/u to select your...equipment is connected to. 4 Press t/u to confirm. 5 The Initial setup menu appears. Follow the on the remote control to display the main menu. 2 Select TV > Input settings and press OK/u to enter its submenu. 3 Use the digit buttons to enter the password 4 Press ◄/► to select OK and press...
... and press OK/u to enter its submenu. 3 Press p/q to select a connector your location (Shop or Home). 4 Press Exit to the TV menu. Resetting to Factory Default Settings 1 Press Menu on the remote control to display the main menu. 2 Select Setup > Location. 3 Press t/u to select your...equipment is connected to. 4 Press t/u to confirm. 5 The Initial setup menu appears. Follow the on the remote control to display the main menu. 2 Select TV > Input settings and press OK/u to enter its submenu. 3 Use the digit buttons to enter the password 4 Press ◄/► to select OK and press...
User Manual
Page 19
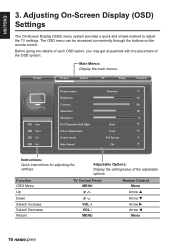
...of each OSD option, you may get acquainted with the placement of the adjustable options. Function OSD Menu Up Down Select/ Increase Select/ Decrease Return TV Control Panel MENU P P VOL + VOL MENU Remote Control Menu Arrow p Arrow q Arrow u Arrow t Menu 16 The OSD menu can ...be accessed conveniently through the buttons on the remote control. Picture Picture Sound TV Setup Parental OK Enter Select Menu Exit Exit Exit Picture preset Personal Brightness 52 Contrast 90 Saturation 55 Sharpness 4 ECO Dynamic back light Auto...
...of each OSD option, you may get acquainted with the placement of the adjustable options. Function OSD Menu Up Down Select/ Increase Select/ Decrease Return TV Control Panel MENU P P VOL + VOL MENU Remote Control Menu Arrow p Arrow q Arrow u Arrow t Menu 16 The OSD menu can ...be accessed conveniently through the buttons on the remote control. Picture Picture Sound TV Setup Parental OK Enter Select Menu Exit Exit Exit Picture preset Personal Brightness 52 Contrast 90 Saturation 55 Sharpness 4 ECO Dynamic back light Auto...
User Manual
Page 21
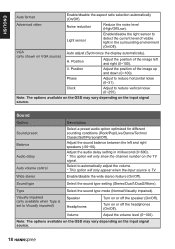
...depending on or off the headphones (On/Off). Enable/disable the wide stereo feature (On/Off). Visually impaired (only available when Type is TV. VGA (only shown on the input signal source. Light sensor Enable/disable the light sensor to automatically adjust the volume. * This option ...off the speaker (On/Off). H. Select to detect the current level of the image left and right speakers (-50~50). Turn on the TV signal. Note: The options available on the OSD may vary depending on VGA source) Auto adjust (Sychronize the display automatically). V. Adjust the...
...depending on or off the headphones (On/Off). Enable/disable the wide stereo feature (On/Off). Visually impaired (only available when Type is TV. VGA (only shown on the input signal source. Light sensor Enable/disable the light sensor to automatically adjust the volume. * This option ...off the speaker (On/Off). H. Select to detect the current level of the image left and right speakers (-50~50). Turn on the TV signal. Note: The options available on the OSD may vary depending on VGA source) Auto adjust (Sychronize the display automatically). V. Adjust the...

User Manual
Page 22
...Description Menu language Preferred audio language Set the on the selected tuner mode. Scan the channel search manually if you are receiving TV channels with an antenna. * only on Air mode Reset all scanned channels. Channel skip Channel sort Channel edit CMP Name AV.../Ukraine/Latvia/Lithuania/Austria/ Belgium/Switzerland/Czech Republic/Germany/Denmark/ Spain/Finland/France). Update the channel search automatically if you are receiving TV channels with an antenna. * only on Air mode Scan the analog channel search manually. Preferred audio language 2nd Set the second audio...
...Description Menu language Preferred audio language Set the on the selected tuner mode. Scan the channel search manually if you are receiving TV channels with an antenna. * only on Air mode Reset all scanned channels. Channel skip Channel sort Channel edit CMP Name AV.../Ukraine/Latvia/Lithuania/Austria/ Belgium/Switzerland/Czech Republic/Germany/Denmark/ Spain/Finland/France). Update the channel search automatically if you are receiving TV channels with an antenna. * only on Air mode Scan the analog channel search manually. Preferred audio language 2nd Set the second audio...


