
User Manual
Page 1
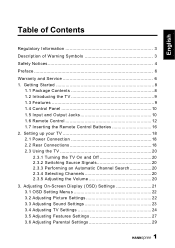
... Input and Output Jacks 10 1.6 Remote Control 12 1.7 Inserting the Remote Control Batteries 16 2. Adjusting On-Screen Display (OSD) Settings 21 3.1 OSD Setting Menus 22 3.2 Adjusting Picture Settings 22 3.3 Adjusting Sound Settings 23 3.4 Adjusting TV Settings 24 3.5 Adjusting Features Settings 27 3.6 Adjusting Parental Settings 29 1 English Table of Contents Regulatory Information 3 Description of Warning Symbols 3 Safety Notices 4 Preface 6 Warranty and Service 6 1. Setting up your TV 18 2.1 Power Connection 18 2.2 Rear Connections 18 2.3 Using the TV 20 2.3.1 Turning...
... Input and Output Jacks 10 1.6 Remote Control 12 1.7 Inserting the Remote Control Batteries 16 2. Adjusting On-Screen Display (OSD) Settings 21 3.1 OSD Setting Menus 22 3.2 Adjusting Picture Settings 22 3.3 Adjusting Sound Settings 23 3.4 Adjusting TV Settings 24 3.5 Adjusting Features Settings 27 3.6 Adjusting Parental Settings 29 1 English Table of Contents Regulatory Information 3 Description of Warning Symbols 3 Safety Notices 4 Preface 6 Warranty and Service 6 1. Setting up your TV 18 2.1 Power Connection 18 2.2 Rear Connections 18 2.3 Using the TV 20 2.3.1 Turning...

User Manual
Page 4
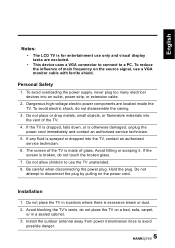
... distance between the TV and the wall to provide enough space for use by qualified service personnel only. English Safety Notices Installation Safety Notes Location Avoid allowing the TV to get prolonged exposure to sunlight or other open flames away from this apparatus to rain or moisture. CAUTION These servicing instructions are qualified to dripping or splashing...
... distance between the TV and the wall to provide enough space for use by qualified service personnel only. English Safety Notices Installation Safety Notes Location Avoid allowing the TV to get prolonged exposure to sunlight or other open flames away from this apparatus to rain or moisture. CAUTION These servicing instructions are qualified to dripping or splashing...
User Manual
Page 5
... flammable materials into an outlet, power strip, or extension cable. 2. Do not attempt to use a VGA monitor cable with ferrite shield. Dangerous high-voltage electric power components are excluded. • This device uses a VGA connector to connect to avoid possible danger. 5 Hold the plug. Installation 1. English Notes: • The LCD TV is for entertainment use only and visual display tasks are located inside the TV.
... flammable materials into an outlet, power strip, or extension cable. 2. Do not attempt to use a VGA monitor cable with ferrite shield. Dangerous high-voltage electric power components are excluded. • This device uses a VGA connector to connect to avoid possible danger. 5 Hold the plug. Installation 1. English Notes: • The LCD TV is for entertainment use only and visual display tasks are located inside the TV.
User Manual
Page 6
... installation and operations of such damages in this manual are followed. The information in this manual has been carefully checked for accuracy; Warranty and Service For complete warranty service information, please refer to the "Warranty Card...manual in setting up , using the TV. The information in this manual is designed to enjoy superior audio and video while enriching your TV. 6 To the extent allowed by applicable law, Hannspree, Inc. ("Hannspree") shall not be liable for purchasing a Hannspree Liquid Crystal Display Television (LCD TV). This instruction manual...
... installation and operations of such damages in this manual are followed. The information in this manual has been carefully checked for accuracy; Warranty and Service For complete warranty service information, please refer to the "Warranty Card...manual in setting up , using the TV. The information in this manual is designed to enjoy superior audio and video while enriching your TV. 6 To the extent allowed by applicable law, Hannspree, Inc. ("Hannspree") shall not be liable for purchasing a Hannspree Liquid Crystal Display Television (LCD TV). This instruction manual...
User Manual
Page 9
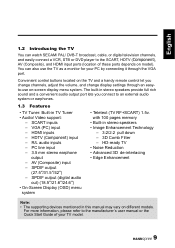
....6") • On-Screen Display (OSD) menu system • Teletext (TV RF+SCART) 1.5v. You can watch SECAM/ PAL/ DVB-T broadcast, cable, or digital television channels, and easily connect a VCR, STB or DVD player to the SCART, HDTV (Component), AV (Composite), and HDMI input ports (location of your PC by connecting it through an easyto-use the TV as a monitor for your TV model. 9 The built-in TV Tuner • Audio/ Video support: - with 100...
....6") • On-Screen Display (OSD) menu system • Teletext (TV RF+SCART) 1.5v. You can watch SECAM/ PAL/ DVB-T broadcast, cable, or digital television channels, and easily connect a VCR, STB or DVD player to the SCART, HDTV (Component), AV (Composite), and HDMI input ports (location of your PC by connecting it through an easyto-use the TV as a monitor for your TV model. 9 The built-in TV Tuner • Audio/ Video support: - with 100...
User Manual
Page 10
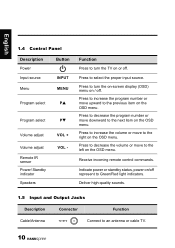
... increase the volume or move downward to turn the on-screen display (OSD) menu on /off . Indicate power or standby status, power on / off. Receive incoming remote control commands. Deliver high-quality sounds. 1.5 Input and Output Jacks Description Connector Function Cable/Antenna TV / DTV Connect to select the proper input source. Function Press to the next item on the OSD menu. Press to Green/Red light indicators. Press to decrease the program number or move...
... increase the volume or move downward to turn the on-screen display (OSD) menu on /off . Indicate power or standby status, power on / off. Receive incoming remote control commands. Deliver high-quality sounds. 1.5 Input and Output Jacks Description Connector Function Cable/Antenna TV / DTV Connect to select the proper input source. Function Press to the next item on the OSD menu. Press to Green/Red light indicators. Press to decrease the program number or move...

User Manual
Page 12
... a DVD player or set -top box. Press to turn the TV on or off. HDMI 1 HDMI 2 HDMI 3 SPDIF Connect a HDMI equipment or an HDMIDVI adapter cable to a digital audio output device such as a DVD player or set-top box. Power Connector AC IN Connect to the included power cord. 1.6 Remote Control Description Icon Power Input Signal Type INPUT Function Press to select the input signal type selections: TV, DTV, SCART, AV, HDMI 1, HDMI 2, HDTV, and PC. 12 Connect to devices such as a DVD player or set -top box. English Description CI HDMI 1 Input HDMI 2 Input HDMI 3 Input...
... a DVD player or set -top box. Press to turn the TV on or off. HDMI 1 HDMI 2 HDMI 3 SPDIF Connect a HDMI equipment or an HDMIDVI adapter cable to a digital audio output device such as a DVD player or set-top box. Power Connector AC IN Connect to the included power cord. 1.6 Remote Control Description Icon Power Input Signal Type INPUT Function Press to select the input signal type selections: TV, DTV, SCART, AV, HDMI 1, HDMI 2, HDTV, and PC. 12 Connect to devices such as a DVD player or set -top box. English Description CI HDMI 1 Input HDMI 2 Input HDMI 3 Input...
User Manual
Page 14
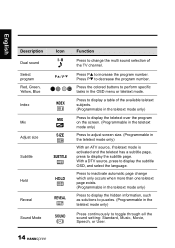
... decrease the program number. Press to display a table of the TV channel. Press the colored buttons to display the subtitle page. With a DTV source, press to increase the program number. Press PS to display the subtitle OSD, and select the language. English Description Dual sound Select program Red, Green, Yellow, Blue Index Mix Adjust size Subtitle Hold Reveal Sound Mode Icon P /P INDEX MIX SIZE SUBTITLE HOLD REVEAL SOUND Function Press to change which...
... decrease the program number. Press to display a table of the TV channel. Press the colored buttons to display the subtitle page. With a DTV source, press to increase the program number. Press PS to display the subtitle OSD, and select the language. English Description Dual sound Select program Red, Green, Yellow, Blue Index Mix Adjust size Subtitle Hold Reveal Sound Mode Icon P /P INDEX MIX SIZE SUBTITLE HOLD REVEAL SOUND Function Press to change which...

User Manual
Page 15
... the selected channel. Favorite channel Freeze Sleep timer Aspect ratio FAV. FREEZE SLEEP ASPECT Press to open favorite list menu and press / to strong light. • Aim the transmitter on -screen. (Programmable in the TV source only) Press repeatedly to toggle through all the picture setting: Vivid, Soft, User, Standard. Cancel the timer by selecting the Sleep Off option. Note: • For best results, use the remote control within...
... the selected channel. Favorite channel Freeze Sleep timer Aspect ratio FAV. FREEZE SLEEP ASPECT Press to open favorite list menu and press / to strong light. • Aim the transmitter on -screen. (Programmable in the TV source only) Press repeatedly to toggle through all the picture setting: Vivid, Soft, User, Standard. Cancel the timer by selecting the Sleep Off option. Note: • For best results, use the remote control within...
User Manual
Page 18
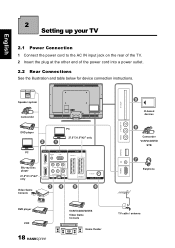
... PR HDMI 2 L AUDIO R COMPONENT SPDIF SSERVIICCEE 34 SCART 2 TV/DTV CABLE ANTENNA 5 6 DVD player VCR 18 VCR/VCD/DVD/STB Video Game Console Home theater HDMI 3 SERVICE VIDEO L AUDIO R CI SLOT 9 CI-based devices 8 Camcorder VCR/VCD/DVD STB 7 Earphone TV cable / antenna English 2 Setting up your TV 2.1 Power Connection 1 Connect the power cord to the AC IN input jack on the rear of the TV. 2 Insert the plug at the other end of the power cord into a power outlet. 2.2 Rear Connections...
... PR HDMI 2 L AUDIO R COMPONENT SPDIF SSERVIICCEE 34 SCART 2 TV/DTV CABLE ANTENNA 5 6 DVD player VCR 18 VCR/VCD/DVD/STB Video Game Console Home theater HDMI 3 SERVICE VIDEO L AUDIO R CI SLOT 9 CI-based devices 8 Camcorder VCR/VCD/DVD STB 7 Earphone TV cable / antenna English 2 Setting up your TV 2.1 Power Connection 1 Connect the power cord to the AC IN input jack on the rear of the TV. 2 Insert the plug at the other end of the power cord into a power outlet. 2.2 Rear Connections...
User Manual
Page 19
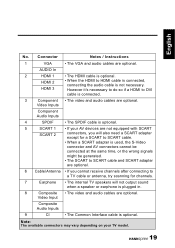
... you cannot receive channels after connecting to a TV cable or antenna, try scanning for channels. 7 Earphone • The internal TV speakers will not output sound when a speaker or earphone is optional. 5 SCART 1 • If your TV model. 19 Video Inputs Component Audio Inputs 4 SPDIF • The SPDIF cable is plugged in. 8 Composite • The video and audio cables are optional. Video Input Composite Audio Inputs 9 CI • The Common Interface cable is optional. AUDIO In 2 HDMI 1 • The HDMI cable is...
... you cannot receive channels after connecting to a TV cable or antenna, try scanning for channels. 7 Earphone • The internal TV speakers will not output sound when a speaker or earphone is optional. 5 SCART 1 • If your TV model. 19 Video Inputs Component Audio Inputs 4 SPDIF • The SPDIF cable is plugged in. 8 Composite • The video and audio cables are optional. Video Input Composite Audio Inputs 9 CI • The Common Interface cable is optional. AUDIO In 2 HDMI 1 • The HDMI cable is...
User Manual
Page 20
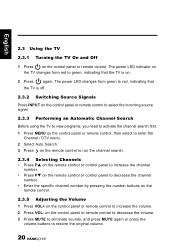
... menu. 2 Select Auto Search. 3 Press on the remote control to run the channel search. 2.3.4 Selecting Channels • Press PS on the remote control or control panel to increase the channel number. • Press PT on the remote control or control panel to decrease the channel number. • Enter the specific channel number by pressing the number buttons on the remote control. 2.3.5 Adjusting the Volume 1 Press VOL+ on the TV changes from green to restore the original volume. 20 The power LED changes from red...
... menu. 2 Select Auto Search. 3 Press on the remote control to run the channel search. 2.3.4 Selecting Channels • Press PS on the remote control or control panel to increase the channel number. • Press PT on the remote control or control panel to decrease the channel number. • Enter the specific channel number by pressing the number buttons on the remote control. 2.3.5 Adjusting the Volume 1 Press VOL+ on the TV changes from green to restore the original volume. 20 The power LED changes from red...

User Manual
Page 22
... be set by different adjustment methods. 3.2 Adjusting Picture Settings 1 Press MENU to enter the OSD Main Menu screen. Press PS/PTon the control panel or / arrow keys to On or Off. 22 Picture Sound TV Features Parental OK Enter Smart Picture Brightness Contrast Colour Tint Sharpness Colour Temperature Advanced Control Standard 50 50 50 0 3 Cool Select Menu Exit 5 Press MENU to return to the Picture menu entry. 6 Press MENU to adjust...
... be set by different adjustment methods. 3.2 Adjusting Picture Settings 1 Press MENU to enter the OSD Main Menu screen. Press PS/PTon the control panel or / arrow keys to On or Off. 22 Picture Sound TV Features Parental OK Enter Smart Picture Brightness Contrast Colour Tint Sharpness Colour Temperature Advanced Control Standard 50 50 50 0 3 Cool Select Menu Exit 5 Press MENU to return to the Picture menu entry. 6 Press MENU to adjust...
User Manual
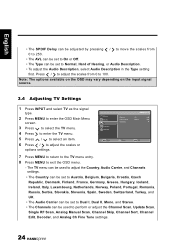
Page 24
... the scales from 0 to perform or adjust the Channel Scan, Update Scan, Single RF Scan, Analog Manual Scan, Channel Skip, Channel Sort, Channel Edit, Decoder, and Analog Ch Fine Tune settings. 24 Picture Sound TV Features Parental Country Audio Carrier Channels UK Stereo OK Enter Select Menu Exit 7 Press MENU to return to the TV menu entry. 8 Press MENU to adjust the scales or options settings. The TV menu can be used to 100. Note: The options...
... the scales from 0 to perform or adjust the Channel Scan, Update Scan, Single RF Scan, Analog Manual Scan, Channel Skip, Channel Sort, Channel Edit, Decoder, and Analog Ch Fine Tune settings. 24 Picture Sound TV Features Parental Country Audio Carrier Channels UK Stereo OK Enter Select Menu Exit 7 Press MENU to return to the TV menu entry. 8 Press MENU to adjust the scales or options settings. The TV menu can be used to 100. Note: The options...

User Manual
Page 26
... use the number keys on the remote control to type letters, digits, or symbols. To change the channel frequency, select Frequency and use the number keys on the remote control to type the desired frequency. - Picture Sound TV Features Parental 55 Analog ---- 56 Analog ---- 57 Analog ---- 58 Analog ---- 59 Analog ---- 60 Analog ---- 61 Analog ---- KEY CHARACTER 0 - @0 1 _-1 2 ABCa b c 2 3 DEF d e f 3 4 GH I , D/K, A2 D/K, A2 D/K1, B/G, A2 B/G, L, or L'. • The Decoder supports the Canal+ (paid TV channel with encrypted programs...
... use the number keys on the remote control to type letters, digits, or symbols. To change the channel frequency, select Frequency and use the number keys on the remote control to type the desired frequency. - Picture Sound TV Features Parental 55 Analog ---- 56 Analog ---- 57 Analog ---- 58 Analog ---- 59 Analog ---- 60 Analog ---- 61 Analog ---- KEY CHARACTER 0 - @0 1 _-1 2 ABCa b c 2 3 DEF d e f 3 4 GH I , D/K, A2 D/K, A2 D/K1, B/G, A2 B/G, L, or L'. • The Decoder supports the Canal+ (paid TV channel with encrypted programs...

User Manual
Page 27
... The Time can be used to adjust theTime Zone, Time, and Sleep Timer settings. • The Subtitle can be used to adjust the Analog Subtitle, 1st Subtitle, 2nd Subtitle, and Subtitle Type settings. • The Teletext Language can be used to adjust the Digital Teletext Lang. and Decode Page Lang. Picture Sound TV Features Parental OK Enter Menu Language Picture Format Time Subitile Teletext Language Common Interface Reset Default UK Stereo Select Menu Exit 6 Press MENU...
... The Time can be used to adjust theTime Zone, Time, and Sleep Timer settings. • The Subtitle can be used to adjust the Analog Subtitle, 1st Subtitle, 2nd Subtitle, and Subtitle Type settings. • The Teletext Language can be used to adjust the Digital Teletext Lang. and Decode Page Lang. Picture Sound TV Features Parental OK Enter Menu Language Picture Format Time Subitile Teletext Language Common Interface Reset Default UK Stereo Select Menu Exit 6 Press MENU...

User Manual
Page 29
... input sources. • Select Set Password to change the password. The default is only accessible in TV mode. 29 Picture Sound TV Features Parental Channel Block Parental Guidance Input Block Set Password Clear All OK Enter Select Menu Back 8 Press MENU to return to the Parental menu entry. 9 Press MENU to set as the signal type. 2 Press MENU to enter the OSD Main Menu screen. 3 Press to select the Parental menu. 4 Press to restore defaults for all parental settings. The Parental menu can be used to adjust...
... input sources. • Select Set Password to change the password. The default is only accessible in TV mode. 29 Picture Sound TV Features Parental Channel Block Parental Guidance Input Block Set Password Clear All OK Enter Select Menu Back 8 Press MENU to return to the Parental menu entry. 9 Press MENU to set as the signal type. 2 Press MENU to enter the OSD Main Menu screen. 3 Press to select the Parental menu. 4 Press to restore defaults for all parental settings. The Parental menu can be used to adjust...

User Manual
Page 30
... antenna or replace the video signal cable. Adjust the sharpness setting. Make sure the battery is connected securely. English 4 Troubleshooting Situation Solution • Connect the power cord properly. • Check if the power LED is on the control panel or remote control. Replace the battery with high quality signals. Try operating the remote control at a closer distance to cycle through connected video sources. Make sure the audio cable is inserted correctly. Adjust the brightness in the Channel or DTV OSD menu. Adjust...
... antenna or replace the video signal cable. Adjust the sharpness setting. Make sure the battery is connected securely. English 4 Troubleshooting Situation Solution • Connect the power cord properly. • Check if the power LED is on the control panel or remote control. Replace the battery with high quality signals. Try operating the remote control at a closer distance to cycle through connected video sources. Make sure the audio cable is inserted correctly. Adjust the brightness in the Channel or DTV OSD menu. Adjust...

User Manual
Page 32
... Sound Output (RMS Watts) 3 W 3 W 5 W 10 W 10 W 10 W Sound Mode Personal, Music, Speech Picture Format Auto, Normal, Zoom1, Zoom2, Full, Subtitle, Wide (70cm/27.5" only), Native (HDMI only) Picture Mode Standard, Vivid, Movie, Eco, Personal CONNECTION Tuner Input (75 Ω) PC IN: D-SUB and PC Audio Component Video and L/R Audio Input Rear Connector SCART 1 SPDIF Output (Digital audio out) HDMI 1 SCART 1 SPDIF Output (Digital audio out) HDMI 1 SCART 1 SPDIF HDMI 1 SCART 1 SCART 2 SPDIF HDMI 1 HDMI 2 SCART 1 SCART 2 SPDIF HDMI 1 HDMI 2 SCART 1 SCART 2 SPDIF HDMI 1 HDMI...
... Sound Output (RMS Watts) 3 W 3 W 5 W 10 W 10 W 10 W Sound Mode Personal, Music, Speech Picture Format Auto, Normal, Zoom1, Zoom2, Full, Subtitle, Wide (70cm/27.5" only), Native (HDMI only) Picture Mode Standard, Vivid, Movie, Eco, Personal CONNECTION Tuner Input (75 Ω) PC IN: D-SUB and PC Audio Component Video and L/R Audio Input Rear Connector SCART 1 SPDIF Output (Digital audio out) HDMI 1 SCART 1 SPDIF Output (Digital audio out) HDMI 1 SCART 1 SPDIF HDMI 1 SCART 1 SCART 2 SPDIF HDMI 1 HDMI 2 SCART 1 SCART 2 SPDIF HDMI 1 HDMI 2 SCART 1 SCART 2 SPDIF HDMI 1 HDMI...

User Manual
Page 33
... Metric 6 x 10 mm 1 Purchase a VESA compatible wall bracket (please refer to the table above). 2 Locate your specific wall bracket to properly wall mount the TV. • The TV stand base can ask a qualified service personnel about using the hole on the back of the TV. Customers should only be screwed on a table or a hard surface using an optional bracket to mount the TV to do the work themselves. Maximum loading 15 kg...
... Metric 6 x 10 mm 1 Purchase a VESA compatible wall bracket (please refer to the table above). 2 Locate your specific wall bracket to properly wall mount the TV. • The TV stand base can ask a qualified service personnel about using the hole on the back of the TV. Customers should only be screwed on a table or a hard surface using an optional bracket to mount the TV to do the work themselves. Maximum loading 15 kg...


