Operation Manual
Page 2
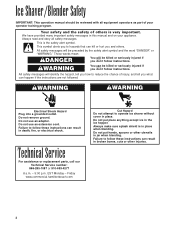
... For assistance or replacement parts, call our Technical Service number: 866-285-1087 or 910-693-4277 8 a.m. - 5:00 p.m. EST Monday - Friday www.commercial.hamiltonbeach.com Cut Hazard Do not attempt to follow these instructions can be killed or seriously injured if you don't follow instructions. This symbol alerts... safety alert symbol. Your safety and the safety of your appliance. We have provided many important safety messages in jar when blending. Ice Shaver/Blender Safety IMPORTANT: This operation manual should be reviewed with all safety messages.
... For assistance or replacement parts, call our Technical Service number: 866-285-1087 or 910-693-4277 8 a.m. - 5:00 p.m. EST Monday - Friday www.commercial.hamiltonbeach.com Cut Hazard Do not attempt to follow these instructions can be killed or seriously injured if you don't follow instructions. This symbol alerts... safety alert symbol. Your safety and the safety of your appliance. We have provided many important safety messages in jar when blending. Ice Shaver/Blender Safety IMPORTANT: This operation manual should be reviewed with all safety messages.
Operation Manual
Page 3
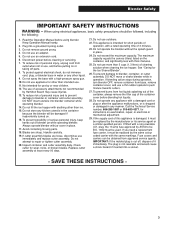
... of it must be replaced by Hamilton Beach may cause injuries. 13. This appliance is damaged, it immediately. To prevent damage to blender, container, or cutter assembly, DO NOT move or shake blender while in place. 17. Plug into blender container while operating blender. 14. Do not use an ... assembly. Inspect container and cutter assembly daily. Call the Technical Service number, 866-285-1087 or 910-693-4277, for the Ice Shaver/Blender". 26. If the supply cord of accessory attachments not recommended by the same colour coded carrier with thick mixtures. 25. To ...
... of it must be replaced by Hamilton Beach may cause injuries. 13. This appliance is damaged, it immediately. To prevent damage to blender, container, or cutter assembly, DO NOT move or shake blender while in place. 17. Plug into blender container while operating blender. 14. Do not use an ... assembly. Inspect container and cutter assembly daily. Call the Technical Service number, 866-285-1087 or 910-693-4277, for the Ice Shaver/Blender". 26. If the supply cord of accessory attachments not recommended by the same colour coded carrier with thick mixtures. 25. To ...
Operation Manual
Page 4
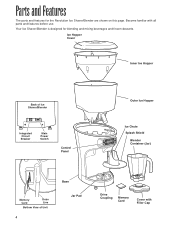
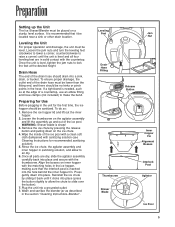
Your Ice Shaver/Blender is designed for the Revolution Ice Shaver/Blender are shown on this page. Ice Hopper Cover Inner Ice Hopper Back of Ice Shaver/Blender Integrated Circuit Breaker Main Power Switch Control Panel Outer Ice Hopper Ice Chute Splash Shield Blender Container (Jar) Memory Card Drain Line Bottom View of Unit 4 Base Jar Pad Drive Coupling Memory Card Cover with all parts and features before use. Parts and Features The parts and features for blending and mixing beverages and frozen desserts. Become familiar with Filler Cap
Your Ice Shaver/Blender is designed for the Revolution Ice Shaver/Blender are shown on this page. Ice Hopper Cover Inner Ice Hopper Back of Ice Shaver/Blender Integrated Circuit Breaker Main Power Switch Control Panel Outer Ice Hopper Ice Chute Splash Shield Blender Container (Jar) Memory Card Drain Line Bottom View of Unit 4 Base Jar Pad Drive Coupling Memory Card Cover with all parts and features before use. Parts and Features The parts and features for blending and mixing beverages and frozen desserts. Become familiar with Filler Cap
Operation Manual
Page 5
...). 5. To do so: 1. WARNING: Shaver blade is level and all parts are in the hose. Remove the ice chute by sliding it back until the unit is sharp! 3. Align the bosses on the agitator assembly and lift the assembly up the Unit The Ice Shaver/Blender must be located near a sink or other... drain location. Wash and sanitize the blender jar as at the desired height. Plug the unit into place. Loosen the jam nuts and turn the...
...). 5. To do so: 1. WARNING: Shaver blade is level and all parts are in the hose. Remove the ice chute by sliding it back until the unit is sharp! 3. Align the bosses on the agitator assembly and lift the assembly up the Unit The Ice Shaver/Blender must be located near a sink or other... drain location. Wash and sanitize the blender jar as at the desired height. Plug the unit into place. Loosen the jam nuts and turn the...
Operation Manual
Page 6
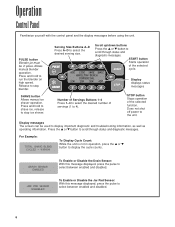
...To Display Cycle Count: While the unit is not in place. Allows manual blender operation. Does not shut off power to select the desired serving size. Press the L or M button to stop ice shaver. Serving Size Buttons A-D Press A-D to the unit. START button Starts operation...messages before using the unit. PULSE button Blender jar must be used to stop blender. Press and hold to shave ice, release to display important diagnostic and troubleshooting information, as well as operating information. SHAVE button Allows manual ice shaver operation. Scroll up/down buttons Press ...
...To Display Cycle Count: While the unit is not in place. Allows manual blender operation. Does not shut off power to select the desired serving size. Press the L or M button to stop ice shaver. Serving Size Buttons A-D Press A-D to the unit. START button Starts operation...messages before using the unit. PULSE button Blender jar must be used to stop blender. Press and hold to shave ice, release to display important diagnostic and troubleshooting information, as well as operating information. SHAVE button Allows manual ice shaver operation. Scroll up/down buttons Press ...
Operation Manual
Page 7
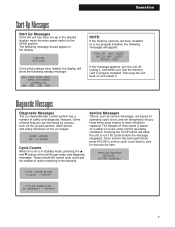
...: TURN OFF MAIN POWER SWITCH AND INSERT MEMORY CARD If this message appears, turn the unit off, unplug it . Diagnostic Messages Diagnostic Messages The ice shaver/blender control system has a number of these features are designed to let you know when parts subject to the ON (I) position. SERVICE MESSAGE REPLACE CUTTER ... diagnostic features. INNER HOPPER NOT IN PLACE Cycle Counts When the unit is not properly installed, the following standby message: 8OZ 12OZ 16OZ 20OZ HAMILTON BEACH COMMERCIAL 1DR 2DR 3DR 4DR NOTE: If the memory card has not been installed, or is in the warranty.
...: TURN OFF MAIN POWER SWITCH AND INSERT MEMORY CARD If this message appears, turn the unit off, unplug it . Diagnostic Messages Diagnostic Messages The ice shaver/blender control system has a number of these features are designed to let you know when parts subject to the ON (I) position. SERVICE MESSAGE REPLACE CUTTER ... diagnostic features. INNER HOPPER NOT IN PLACE Cycle Counts When the unit is not properly installed, the following standby message: 8OZ 12OZ 16OZ 20OZ HAMILTON BEACH COMMERCIAL 1DR 2DR 3DR 4DR NOTE: If the memory card has not been installed, or is in the warranty.
Operation Manual
Page 8
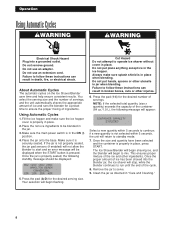
.... Press the pad (A-D) for a preset time to mix. Failure to be displayed: 8OZ 12OZ 16OZ 20OZ HAMILTON BEACH COMMERCIAL 1DR 2DR 3DR 4DR 5. About Automatic Cycles The automatic cycles on the Ice Shaver/Blender save time and help ensure consistent results. Make sure the main power switch is in place when blending. if a new quantity is...
.... Press the pad (A-D) for a preset time to mix. Failure to be displayed: 8OZ 12OZ 16OZ 20OZ HAMILTON BEACH COMMERCIAL 1DR 2DR 3DR 4DR 5. About Automatic Cycles The automatic cycles on the Ice Shaver/Blender save time and help ensure consistent results. Make sure the main power switch is in place when blending. if a new quantity is...
Operation Manual
Page 9
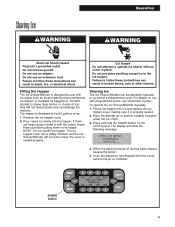
... ice; The ice hopper cover has a safety interlock and the Ice Shaver/Blender will show the following message: HAMILTON BEACH COMMERCIAL SHAVING... 4. Shaving Ice The Ice Shaver/Blender can damage the machine. Do not put place anything except ice in the hopper. Fill the ice hopper with ice cubes such as those made by most commercial ice makers or available as part of ice. 1. Filling the Hopper The Ice Shaver/Blender...
... ice; The ice hopper cover has a safety interlock and the Ice Shaver/Blender will show the following message: HAMILTON BEACH COMMERCIAL SHAVING... 4. Shaving Ice The Ice Shaver/Blender can damage the machine. Do not put place anything except ice in the hopper. Fill the ice hopper with ice cubes such as those made by most commercial ice makers or available as part of ice. 1. Filling the Hopper The Ice Shaver/Blender...
Operation Manual
Page 11
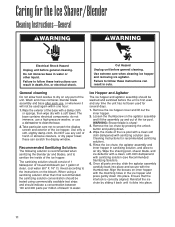
... Cleaning Instructions for the Ice Shaver/Blender Cleaning Instructions-General wWARNING wWARNING Electrical Shock Hazard Unplug unit before general cleaning. Remove the ice hopper cover and lift out the inner hopper. 2. Remove the ice chute by sliding it ...shaver blade, and ice deflector with a clean, soft cloth dampenend with sanitizing solution (see Recommended Sanitizing Solution). 6. Do NOT use , or whenever it clicks into place. Wipe the inside of the ice hopper: The sanitizing solution should be washed and sanitized before the unit is sharp! 3. When using commercially...
... Cleaning Instructions for the Ice Shaver/Blender Cleaning Instructions-General wWARNING wWARNING Electrical Shock Hazard Unplug unit before general cleaning. Remove the ice hopper cover and lift out the inner hopper. 2. Remove the ice chute by sliding it ...shaver blade, and ice deflector with a clean, soft cloth dampenend with sanitizing solution (see Recommended Sanitizing Solution). 6. Do NOT use , or whenever it clicks into place. Wipe the inside of the ice hopper: The sanitizing solution should be washed and sanitized before the unit is sharp! 3. When using commercially...
Operation Manual
Page 12
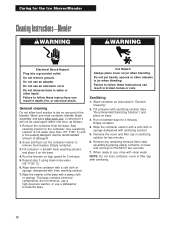
...when blending. Use the recommended amount of hot water (less than 115° F/46° C) and a non-sudsing detergent. Run the blender on high speed for two seconds. 7. Repeat step 3 using clean rinse water (95° F/35° C). 6. The base contains electrical... Solution") and place on PULSE for 2 minutes. 5. When ready to follow these instructions can result in sanitizing solution for the Ice Shaver/Blender Cleaning Instructions-Blender wWARNING wWARNING Electrical Shock Hazard Plug into a grounded outlet. Do not use , rinse with a damp cloth or sponge. Caring for...
...when blending. Use the recommended amount of hot water (less than 115° F/46° C) and a non-sudsing detergent. Run the blender on high speed for two seconds. 7. Repeat step 3 using clean rinse water (95° F/35° C). 6. The base contains electrical... Solution") and place on PULSE for 2 minutes. 5. When ready to follow these instructions can result in sanitizing solution for the Ice Shaver/Blender Cleaning Instructions-Blender wWARNING wWARNING Electrical Shock Hazard Plug into a grounded outlet. Do not use , rinse with a damp cloth or sponge. Caring for...
Operation Manual
Page 13
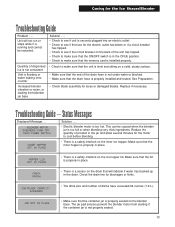
... for the motor to make sure that the unit is properly installed and routed. Quantity of dispensed ice is not consistent Unit is flooding or water leaking onto counter Increased blender vibration or noise, or leaking from starting if the container jar is running and cannot be caused ...or blocked. • Make sure that the container jar is securely plugged into an electric outlet. • Check to see if the fuse for the Ice Shaver/Blender Troubleshooting Guide Problem . . . Caring for the electric outlet has blown or if a circuit breaker has tripped. • Check to make sure that ...
... for the motor to make sure that the unit is properly installed and routed. Quantity of dispensed ice is not consistent Unit is flooding or water leaking onto counter Increased blender vibration or noise, or leaking from starting if the container jar is running and cannot be caused ...or blocked. • Make sure that the container jar is securely plugged into an electric outlet. • Check to see if the fuse for the Ice Shaver/Blender Troubleshooting Guide Problem . . . Caring for the electric outlet has blown or if a circuit breaker has tripped. • Check to make sure that ...
Operation Manual
Page 14
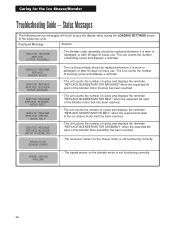
... after 90 days of heavy use . Caring for the Ice Shaver/Blender Troubleshooting Guide - Displayed Message. . . SERVICE MESSAGE REPLACE SHAVER BLADE SERVICE MESSAGE REPLACE BLENDER MOTOR BRUSHES SERVICE MESSAGE REPLACE BLENDER MOTOR BELT SERVICE MESSAGE REPLACE SHAVER MOTOR BELT SERVICE MESSAGE REPLACE BLENDER DRIVE ASSEMBLIES REVOLUTION SENSOR ERROR • The ice shaver blade should be replaced whenever it is not functioning...
... after 90 days of heavy use . Caring for the Ice Shaver/Blender Troubleshooting Guide - Displayed Message. . . SERVICE MESSAGE REPLACE SHAVER BLADE SERVICE MESSAGE REPLACE BLENDER MOTOR BRUSHES SERVICE MESSAGE REPLACE BLENDER MOTOR BELT SERVICE MESSAGE REPLACE SHAVER MOTOR BELT SERVICE MESSAGE REPLACE BLENDER DRIVE ASSEMBLIES REVOLUTION SENSOR ERROR • The ice shaver blade should be replaced whenever it is not functioning...
Operation Manual
Page 15
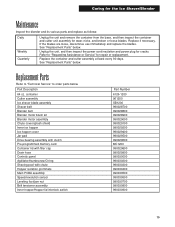
...Shaver belt Blender belt Blender motor brush kit Blender motor assembly Chute cover/splash shield Inner ice hopper Ice hopper cover Jar pad Drive bearing assembly with clutch Pre-programmed memory card Container lid with filler cap Drain hose Controls panel Agititator/thumbscrew/O-ring Shaving pool with chute Hopper isolation grommets Main PCBA assembly Speed/revolution... plug for repair or replacement. See "Replacement Parts" below. Caring for the Ice Shaver/Blender Maintenance Inspect the blender and its various parts and replace as follows: Daily Weekly Quarterly Unplug the unit...
...Shaver belt Blender belt Blender motor brush kit Blender motor assembly Chute cover/splash shield Inner ice hopper Ice hopper cover Jar pad Drive bearing assembly with clutch Pre-programmed memory card Container lid with filler cap Drain hose Controls panel Agititator/thumbscrew/O-ring Shaving pool with chute Hopper isolation grommets Main PCBA assembly Speed/revolution... plug for repair or replacement. See "Replacement Parts" below. Caring for the Ice Shaver/Blender Maintenance Inspect the blender and its various parts and replace as follows: Daily Weekly Quarterly Unplug the unit...


