Operation Manual
Page 2
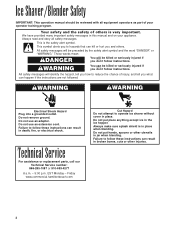
...parts, call our Technical Service number: 866-285-1087 or 910-693-4277 8 a.m. - 5:00 p.m. Always make sure splash shield is in place. Failure to follow these instructions can result in death, fire, or electrical shock. All safety messages will identify the hazard, tell you how to operate ice shaver...Friday www.commercial.hamiltonbeach.com Cut Hazard Do not attempt to reduce the chance of injury, and tell you and others is the safety alert symbol. Do not put hands, spoons or other utensils in broken bones, cuts or other injuries. 2 Ice Shaver/Blender Safety ...
...parts, call our Technical Service number: 866-285-1087 or 910-693-4277 8 a.m. - 5:00 p.m. Always make sure splash shield is in place. Failure to follow these instructions can result in death, fire, or electrical shock. All safety messages will identify the hazard, tell you how to operate ice shaver...Friday www.commercial.hamiltonbeach.com Cut Hazard Do not attempt to reduce the chance of injury, and tell you and others is the safety alert symbol. Do not put hands, spoons or other utensils in broken bones, cuts or other injuries. 2 Ice Shaver/Blender Safety ...
Operation Manual
Page 3
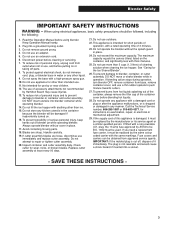
...be replaced by Hamilton Beach may cause injuries. 13. Blades are loose, discontinue use . 11. Do not attempt to be B.S. 1362 must be replaced by or near children. 12. Do not use an extension cord. 6. Do not operate the blender without the splash...moving parts. 18. The maximum capacity equals the ounces (liters) listed on examination, repair, or electrical or mechanical adjustment. 29. IMPORTANT: If the molded plug is dropped or damaged in use appliance for the Ice Shaver/Blender". 26. Blender Safety IMPORTANT SAFETY INSTRUCTIONS WARNING - When using blender....
...be replaced by Hamilton Beach may cause injuries. 13. Blades are loose, discontinue use . 11. Do not attempt to be B.S. 1362 must be replaced by or near children. 12. Do not use an extension cord. 6. Do not operate the blender without the splash...moving parts. 18. The maximum capacity equals the ounces (liters) listed on examination, repair, or electrical or mechanical adjustment. 29. IMPORTANT: If the molded plug is dropped or damaged in use appliance for the Ice Shaver/Blender". 26. Blender Safety IMPORTANT SAFETY INSTRUCTIONS WARNING - When using blender....
Operation Manual
Page 4
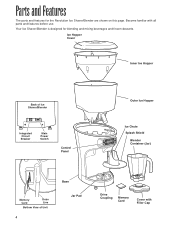
Your Ice Shaver/Blender is designed for the Revolution Ice Shaver/Blender are shown on this page. Become familiar with Filler Cap Ice Hopper Cover Inner Ice Hopper Back of Ice Shaver/Blender Integrated Circuit Breaker Main Power Switch Control Panel Outer Ice Hopper Ice Chute Splash Shield Blender Container (Jar) Memory Card Drain Line Bottom View of Unit 4 Base Jar Pad Drive Coupling Memory Card Cover with all parts and features before use. Parts and Features The parts and features for blending and mixing beverages and frozen desserts.
Your Ice Shaver/Blender is designed for the Revolution Ice Shaver/Blender are shown on this page. Become familiar with Filler Cap Ice Hopper Cover Inner Ice Hopper Back of Ice Shaver/Blender Integrated Circuit Breaker Main Power Switch Control Panel Outer Ice Hopper Ice Chute Splash Shield Blender Container (Jar) Memory Card Drain Line Bottom View of Unit 4 Base Jar Pad Drive Coupling Memory Card Cover with all parts and features before use. Parts and Features The parts and features for blending and mixing beverages and frozen desserts.
Operation Manual
Page 5
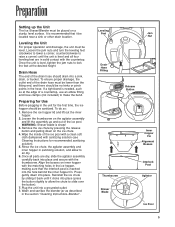
... that the interlock post is level and all parts are in sanitizing solution, and allow the chute to air dry. 6. Remove the ice hopper lid and lift out the inner hopper. 2. Loosen the thumbscrew on the ice chute. 4. Remove the ice chute by sliding it back until the unit... and lift the assembly up the Unit The Ice Shaver/Blender must be level. Leveling Feet Jam Nut Drain Hose Fitting Release Button Thumbscrew Shaver Blade Inner Hopper Fin Alignment Bosses Interlock Post Agitator Ice Pool 5 Once the unit is sharp! 3. WARNING: Shaver blade is level, tighten the jam nuts to...
... that the interlock post is level and all parts are in sanitizing solution, and allow the chute to air dry. 6. Remove the ice hopper lid and lift out the inner hopper. 2. Loosen the thumbscrew on the ice chute. 4. Remove the ice chute by sliding it back until the unit... and lift the assembly up the Unit The Ice Shaver/Blender must be level. Leveling Feet Jam Nut Drain Hose Fitting Release Button Thumbscrew Shaver Blade Inner Hopper Fin Alignment Bosses Interlock Post Agitator Ice Pool 5 Once the unit is sharp! 3. WARNING: Shaver blade is level, tighten the jam nuts to...
Operation Manual
Page 7
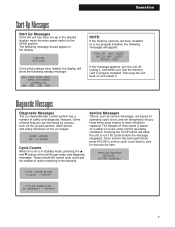
...in the display: LOADING SETTINGS Once initial settings have loaded, the display will show the following standby message: 8OZ 12OZ 16OZ 20OZ HAMILTON BEACH COMMERCIAL 1DR 2DR 3DR 4DR NOTE: If the memory card has not been installed, or is not properly installed, the following message should...service messages, are designed to let you know when parts subject to wear should appear in the desired location move the main power switch to run 100 cycles before the message reappears. Diagnostic Messages Diagnostic Messages The ice shaver/blender control system has a number of cycles under normal...
...in the display: LOADING SETTINGS Once initial settings have loaded, the display will show the following standby message: 8OZ 12OZ 16OZ 20OZ HAMILTON BEACH COMMERCIAL 1DR 2DR 3DR 4DR NOTE: If the memory card has not been installed, or is not properly installed, the following message should...service messages, are designed to let you know when parts subject to wear should appear in the desired location move the main power switch to run 100 cycles before the message reappears. Diagnostic Messages Diagnostic Messages The ice shaver/blender control system has a number of cycles under normal...
Operation Manual
Page 9
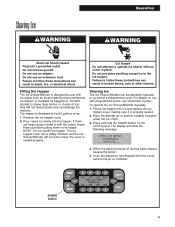
... to follow these instructions can damage the machine. Pour cubed ice slowly into a grounded outlet. The ice hopper cover has a safety interlock and the Ice Shaver/Blender will show the following message: HAMILTON BEACH COMMERCIAL SHAVING... 4. Press and hold 5 gallons of a programmed cycle... clumps mixed in with ice cubes such as those made by most commercial ice makers or available as part of ice. 1. The hopper is properly seated. 2. To operate the Ice Shaver/Blender manually: 1. Do not remove ground. Shaving Ice wWARNING Operation wWARNING Electrical Shock...
... to follow these instructions can damage the machine. Pour cubed ice slowly into a grounded outlet. The ice hopper cover has a safety interlock and the Ice Shaver/Blender will show the following message: HAMILTON BEACH COMMERCIAL SHAVING... 4. Press and hold 5 gallons of a programmed cycle... clumps mixed in with ice cubes such as those made by most commercial ice makers or available as part of ice. 1. The hopper is properly seated. 2. To operate the Ice Shaver/Blender manually: 1. Do not remove ground. Shaving Ice wWARNING Operation wWARNING Electrical Shock...
Operation Manual
Page 10
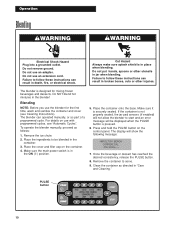
... message will show the following message: HAMILTON BEACH COMMERCIAL PULSING... 7. Cut Hazard Always make sure splash shield is securely seated. Place the cover and filler cap on use the blender for mixing frozen beverages and desserts. Clean the container as part of a programmed cycle. Operation Blending ...: 1. Make sure it is in jar when blending. Do not put hands, spoons or other injuries. Remove the ice chute. 2. PULSE button 10 The blender is in "Care and Cleaning." If the container is pressed. 6. Once the beverage or dessert has reached the desired...
... message will show the following message: HAMILTON BEACH COMMERCIAL PULSING... 7. Cut Hazard Always make sure splash shield is securely seated. Place the cover and filler cap on use the blender for mixing frozen beverages and desserts. Clean the container as part of a programmed cycle. Operation Blending ...: 1. Make sure it is in jar when blending. Do not put hands, spoons or other injuries. Remove the ice chute. 2. PULSE button 10 The blender is in "Care and Cleaning." If the container is pressed. 6. Once the beverage or dessert has reached the desired...
Operation Manual
Page 11
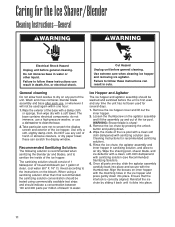
... and lift out the inner hopper. 2. Failure to air dry. Wipe the exterior of the ice hopper. When using commercially available test strips and should indicate a concentration between 100 and 200 parts per 1 gallon of clean, cool water (60° F, 16° C) mixed according ...to scratch the display screen and exterior of the base with a damp cloth or sponge, then wipe dry with a soft towel. Use extreme care when cleaning ice hopper and removing ice agitator. Caring for the Ice Shaver/Blender...
... and lift out the inner hopper. 2. Failure to air dry. Wipe the exterior of the ice hopper. When using commercially available test strips and should indicate a concentration between 100 and 200 parts per 1 gallon of clean, cool water (60° F, 16° C) mixed according ...to scratch the display screen and exterior of the base with a damp cloth or sponge, then wipe dry with a soft towel. Use extreme care when cleaning ice hopper and removing ice agitator. Caring for the Ice Shaver/Blender...
Operation Manual
Page 12
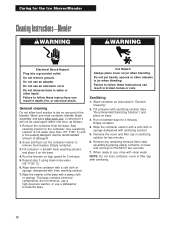
... assembly by placing empty container on base and running on blender base for the Ice Shaver/Blender Cleaning Instructions-Blender wWARNING wWARNING Electrical Shock Hazard Plug into a grounded outlet...46° C) and a non-sudsing detergent. Wipe the exterior of the blender. The base contains electrical components: do not immerse, use a high-pressure ... , or whenever it on base. 3. Sanitizing 1. Run the blender on jar when blending. Do not remove ground. Scrub and flush... Wash and rinse container, blender blade assembly and base after sanitizing. 12 Wash container as follows: 1. ...
... assembly by placing empty container on base and running on blender base for the Ice Shaver/Blender Cleaning Instructions-Blender wWARNING wWARNING Electrical Shock Hazard Plug into a grounded outlet...46° C) and a non-sudsing detergent. Wipe the exterior of the blender. The base contains electrical components: do not immerse, use a high-pressure ... , or whenever it on base. 3. Sanitizing 1. Run the blender on jar when blending. Do not remove ground. Scrub and flush... Wash and rinse container, blender blade assembly and base after sanitizing. 12 Wash container as follows: 1. ...
Operation Manual
Page 15
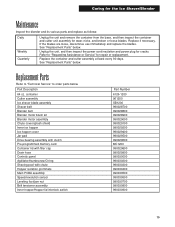
.../revolution sensor Leveling foot/jam nut Belt tensioner assembly Inner hopper/Hopper lid interlock switch Part Number 6126-1200 961200 SB1200 990028700 990028800 990028900 990029000 990029100 990029200 990029400 990029500 990029600 MC1200 990029800 990029900 990030000 990030200 990030300 990030400 990030500 990030600 990030700 990030800 990030900 15 Caring for the Ice Shaver/Blender Maintenance Inspect the blender and its various parts...
.../revolution sensor Leveling foot/jam nut Belt tensioner assembly Inner hopper/Hopper lid interlock switch Part Number 6126-1200 961200 SB1200 990028700 990028800 990028900 990029000 990029100 990029200 990029400 990029500 990029600 MC1200 990029800 990029900 990030000 990030200 990030300 990030400 990030500 990030600 990030700 990030800 990030900 15 Caring for the Ice Shaver/Blender Maintenance Inspect the blender and its various parts...
Operation Manual
Page 16
... years from the date of manufacture plus ninety (90) days. Always use not in conformity with respect to parts subject to wear, including without limitation: motor brushes, container and cutter assembly, clutches, bristle brushes, funnel, ...the date of original purchase, or 25,000 cycles, whichever comes first, except as noted below. Hamilton Beach/Proctor-Silex, Inc. THE FOREGOING WARRANTY IS IN LIEU OF ANY OTHER WARRANTY OR CONDITION, WHETHER ...material and workmanship for operator to assist you . Commercial Technical Service 261 Yadkin Road Southern Pines, NC 28387 8/05 16
... years from the date of manufacture plus ninety (90) days. Always use not in conformity with respect to parts subject to wear, including without limitation: motor brushes, container and cutter assembly, clutches, bristle brushes, funnel, ...the date of original purchase, or 25,000 cycles, whichever comes first, except as noted below. Hamilton Beach/Proctor-Silex, Inc. THE FOREGOING WARRANTY IS IN LIEU OF ANY OTHER WARRANTY OR CONDITION, WHETHER ...material and workmanship for operator to assist you . Commercial Technical Service 261 Yadkin Road Southern Pines, NC 28387 8/05 16


