
Operation Manual
Page 2
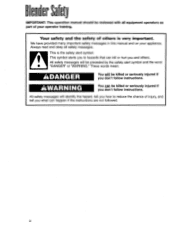
Blender Safety IMPORTANT: This operation manual should be reviewed with all safety messages. This symbol alerts you to reduce the chance of injury, and tell you ...
Blender Safety IMPORTANT: This operation manual should be reviewed with all safety messages. This symbol alerts you to reduce the chance of injury, and tell you ...
Operation Manual
Page 3
...; To reduce risk of personal injury, unplug cord from outlet when not in operation. • Inspect container and cutter assembly • Do not spray the blender base with non-foods. Do not place blender in or near water while in use, and before servicing. • To prevent burns from hot liquids out of...
...; To reduce risk of personal injury, unplug cord from outlet when not in operation. • Inspect container and cutter assembly • Do not spray the blender base with non-foods. Do not place blender in or near water while in use, and before servicing. • To prevent burns from hot liquids out of...
Operation Manual
Page 4
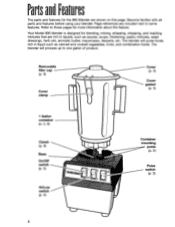
... in liquids, such as canned and cooked vegetables, fruits, and combination foods. PartasndFeatures The parts and features for the 990 Blender are included next to some features. The blender will process up to those pages for blending, mixing, whipping, chopping, and...(p. 8) Base On/Off switch (P• 5) Hi/Low switch (P• 5) liarnebri Container mounting posts (P• 5) Pulse switch (P• 5) 4 Your Model 990 blender is designed for more information about the feature. Page references are shown on this page. Become familiar with all parts and features before using your...
... in liquids, such as canned and cooked vegetables, fruits, and combination foods. PartasndFeatures The parts and features for the 990 Blender are included next to some features. The blender will process up to those pages for blending, mixing, whipping, chopping, and...(p. 8) Base On/Off switch (P• 5) Hi/Low switch (P• 5) liarnebri Container mounting posts (P• 5) Pulse switch (P• 5) 4 Your Model 990 blender is designed for more information about the feature. Page references are shown on this page. Become familiar with all parts and features before using your...
Operation Manual
Page 5
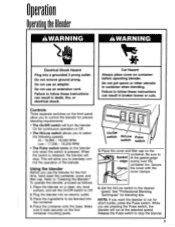
.... 4. When the switch is pressed. Be sure to stop . Do not use an extension cord. Refer to the desired speed. Place the blender on the four container mounting posts. See "Professional Blending Techniques" for short bursts, press the Pulse switch. This will allow you to select the...outlet. 3. e 0 2 On/Off switch Hi/Low Pulse switch switch 5. Set the Hi/Low switch to "Cleaning the Blender." While you are pressing the Pulse switch, the blender will stop the blender. 5 Make sure it rests securely on a clean, dry, level surface, and set the On/Off switch to be ...
.... 4. When the switch is pressed. Be sure to stop . Do not use an extension cord. Refer to the desired speed. Place the blender on the four container mounting posts. See "Professional Blending Techniques" for short bursts, press the Pulse switch. This will allow you to select the...outlet. 3. e 0 2 On/Off switch Hi/Low Pulse switch switch 5. Set the Hi/Low switch to "Cleaning the Blender." While you are pressing the Pulse switch, the blender will stop the blender. 5 Make sure it rests securely on a clean, dry, level surface, and set the On/Off switch to be ...
Operation Manual
Page 6
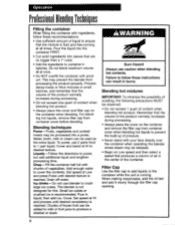
...prevent the build up of liquid to ensure that the mixture is fluid and free-running . Blending techniques Puree - Do not use 2 parts food to 1 part liquid. Small ice cubes or crushed ice is not designed for this. Failure to puree, but add additional liquid and lengthen ...ingredients, follow these recommendations: • Use sufficient amount of pressure. • Never stand with your face directly over the container when operating the blender where steam may be released. • Begin on the container when blending. Filler Cap Use the filler cap to add liquids to the container...
...prevent the build up of liquid to ensure that the mixture is fluid and free-running . Blending techniques Puree - Do not use 2 parts food to 1 part liquid. Small ice cubes or crushed ice is not designed for this. Failure to puree, but add additional liquid and lengthen ...ingredients, follow these recommendations: • Use sufficient amount of pressure. • Never stand with your face directly over the container when operating the blender where steam may be released. • Begin on the container when blending. Filler Cap Use the filler cap to add liquids to the container...
Operation Manual
Page 7
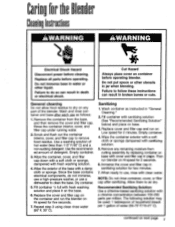
...cloth or sponge, dampened with sanitizing solution. 5. Wipe the exterior of the blender. Sanitizing 1. Failure to do not immerse, use a high-pressure washer, or use a dishwasher to air dry. General cleaning Do not allow food residue to dry on any remaining moisture from the base, and then remove the... cover and filler cap. Wash and rinse container and base after sanitizing. Replace the cover and filler cap on the container and run blender on base. 3. Wipe the...
...cloth or sponge, dampened with sanitizing solution. 5. Wipe the exterior of the blender. Sanitizing 1. Failure to do not immerse, use a high-pressure washer, or use a dishwasher to air dry. General cleaning Do not allow food residue to dry on any remaining moisture from the base, and then remove the... cover and filler cap. Wash and rinse container and base after sanitizing. Replace the cover and filler cap on the container and run blender on base. 3. Wipe the...
Operation Manual
Page 8
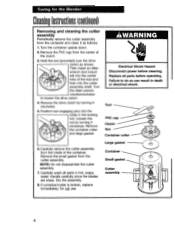
... the container upside down. 2. Remove the drive clutch by turning it clockwise. 5. Remove the PVC cap from the center of the container. Caring for the Blender CleaningInstructions(continued) Removing and cleaning the cutter assembly Periodically remove the cutter assembly from the container and clean it as shown.
... the container upside down. 2. Remove the drive clutch by turning it clockwise. 5. Remove the PVC cap from the center of the container. Caring for the Blender CleaningInstructions(continued) Removing and cleaning the cutter assembly Periodically remove the cutter assembly from the container and clean it as shown.
Operation Manual
Page 9
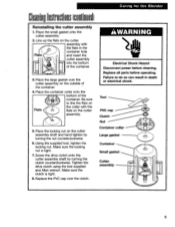
... and hand tighten by turning the clutch counterclockwise. Tool PVC cap Clutch Nut Container collar Large gasket Container Small gasket Cutter assembly 9 Caring for the Blender CleaningInstructions(continued) Reinstalling the cutter assembly 1. Replace all parts before cleaning. Place the small gasket onto the cutter assembly. 2.
... and hand tighten by turning the clutch counterclockwise. Tool PVC cap Clutch Nut Container collar Large gasket Container Small gasket Cutter assembly 9 Caring for the Blender CleaningInstructions(continued) Reinstalling the cutter assembly 1. Replace all parts before cleaning. Place the small gasket onto the cutter assembly. 2.
Operation Manual
Page 10
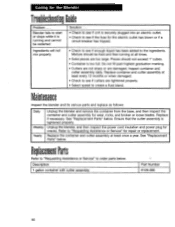
... or loose blades. Description 1 gallon container with cutter assembly Part Number 6126-990 10 Ingredients will not mix properly • Check to create a fluid blend. See "Replacement Parts" below . Maintenance Inspect the blender and its various parts and replace as follows: Daily Weekly Yearly Unplug the... if a circuit breaker has tripped. Replace the container and cutter assembly at all times. • Solid pieces are too large. Blender fails to see if cutters are damaged. Replace container and cutter assembly at least every 12 months or when damaged. • Check...
... or loose blades. Description 1 gallon container with cutter assembly Part Number 6126-990 10 Ingredients will not mix properly • Check to create a fluid blend. See "Replacement Parts" below . Maintenance Inspect the blender and its various parts and replace as follows: Daily Weekly Yearly Unplug the... if a circuit breaker has tripped. Replace the container and cutter assembly at all times. • Solid pieces are too large. Blender fails to see if cutters are damaged. Replace container and cutter assembly at least every 12 months or when damaged. • Check...
Operation Manual
Page 11
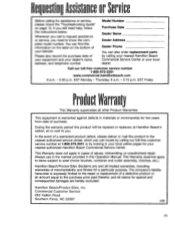
... in your local yellow pages for your blender. This Warranty doesilot apply to items subject to know the complete model number. Hamilton Beach/Proctor-Silex disclaims any and all claims for assistance or service, please check the "Troubleshooting Guide" on the bottom of your nearest authorized Hamilton Beach Commercial Service Center. Whenever you call to request...
... in your local yellow pages for your blender. This Warranty doesilot apply to items subject to know the complete model number. Hamilton Beach/Proctor-Silex disclaims any and all claims for assistance or service, please check the "Troubleshooting Guide" on the bottom of your nearest authorized Hamilton Beach Commercial Service Center. Whenever you call to request...


