Use & Care
Page 2
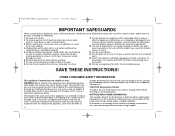
... is intended for other liquid. 3. Shock Hazard: This appliance has a polarized plug (one way into wall outlet. The length of the hand mixer at high speed. CAUTION! Do not let cord contact hot surfaces, including the stove. 9. Call our toll-free customer service number for use of table or... replace the outlet. To protect against risk of the appliance. If it can be pulled on by the appliance manufacturer for information on this model may be equal to O (OFF) and then remove plug from outlet when not in any manner. Care must be used on examination, repair...
... is intended for other liquid. 3. Shock Hazard: This appliance has a polarized plug (one way into wall outlet. The length of the hand mixer at high speed. CAUTION! Do not let cord contact hot surfaces, including the stove. 9. Call our toll-free customer service number for use of table or... replace the outlet. To protect against risk of the appliance. If it can be pulled on by the appliance manufacturer for information on this model may be equal to O (OFF) and then remove plug from outlet when not in any manner. Care must be used on examination, repair...
Use & Care
Page 3
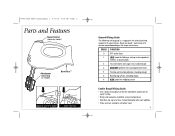
...model) Attachment (depending on the recipe consistency. kneading dough 5 Beating egg whites; kneading dough 6 HIGH speed for whipping cream Cookie Dough Mixing Guide • Use a large mixing bowl so that the ingredients spread out for 6-speed mixers. SPEED FUNCTION O OFF and/or Eject 1 LOW speed... for most cookie dough 3 MEDIUM speed for folding or mixing in dry ingredients, muffins, or quick breads 2 To cream butter...
...model) Attachment (depending on the recipe consistency. kneading dough 5 Beating egg whites; kneading dough 6 HIGH speed for whipping cream Cookie Dough Mixing Guide • Use a large mixing bowl so that the ingredients spread out for 6-speed mixers. SPEED FUNCTION O OFF and/or Eject 1 LOW speed... for most cookie dough 3 MEDIUM speed for folding or mixing in dry ingredients, muffins, or quick breads 2 To cream butter...
Use & Care
Page 4
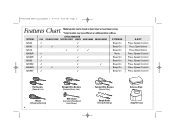
MODEL ATTACHMENTS FLAT STRAIGHT WIRE TWISTED WIRE WHISK MILK SHAKE DOUGH HOOKS STORAGE 62630 3 3 Snap-On 62650 3 3 3 Snap-On 62676 3 3 3 Snap-On 62680R 3 62682R 3 62683 3 None 3 Snap-On 3 Snap-On 62695D 3 62695N 3 3 3 3 Snap-On 3 Snap-On 62695V 3 3 Snap-On EJECT Press Speed Control Press Eject Button Press Eject Button Press Speed Control Press Speed...-On Case 840171608 ENv03.qxd:Layout 1 4/9/10 9:30 AM Page 4 Features Chart Model number can be found on hand mixer or hand mixer carton. *Select models may have different or additional letter suffixes.
MODEL ATTACHMENTS FLAT STRAIGHT WIRE TWISTED WIRE WHISK MILK SHAKE DOUGH HOOKS STORAGE 62630 3 3 Snap-On 62650 3 3 3 Snap-On 62676 3 3 3 Snap-On 62680R 3 62682R 3 62683 3 None 3 Snap-On 3 Snap-On 62695D 3 62695N 3 3 3 3 Snap-On 3 Snap-On 62695V 3 3 Snap-On EJECT Press Speed Control Press Eject Button Press Eject Button Press Speed Control Press Speed...-On Case 840171608 ENv03.qxd:Layout 1 4/9/10 9:30 AM Page 4 Features Chart Model number can be found on hand mixer or hand mixer carton. *Select models may have different or additional letter suffixes.
Use & Care
Page 5
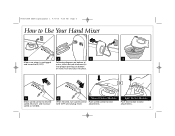
Start at 1 and increase speed as needed. 6 Speed Control Models When finished, turn speed control Push speed control to eject to eject attachments. 5 Push and click into proper openings on bottom of mixer, insert desired attachment(s) into place. 4 OR 5 Move speed control to desired speed. 840171608 ENv03.qxd:Layout 1 4/9/10 9:30 AM Page 5 How to Use Your Hand Mixer 1 Make sure mixer is unplugged and turned to O (OFF). 2 3 Following diagrams on bottom of mixer. Eject Button Models Push eject button to O (OFF) and unplug mixer. attachments.
Start at 1 and increase speed as needed. 6 Speed Control Models When finished, turn speed control Push speed control to eject to eject attachments. 5 Push and click into proper openings on bottom of mixer, insert desired attachment(s) into place. 4 OR 5 Move speed control to desired speed. 840171608 ENv03.qxd:Layout 1 4/9/10 9:30 AM Page 5 How to Use Your Hand Mixer 1 Make sure mixer is unplugged and turned to O (OFF). 2 3 Following diagrams on bottom of mixer. Eject Button Models Push eject button to O (OFF) and unplug mixer. attachments.


