Use & Care
Page 2
...control to persons, including the following: 1. Care must be pulled on this model may be followed to reduce the risk of the hand mixer at high speed. Keep hands, hair, and clothing, as well as the maximum stabilized power consumption of fire, electric shock, and/or injury to ...O (OFF) and then remove plug from mixer before inserting or removing beaters. OTHER CONSUMER SAFETY INFORMATION This appliance is dropped or damaged in water or other utensils, away from beaters during initial operation at high speed under a loaded condition. Do not let cord hang over...
...control to persons, including the following: 1. Care must be pulled on this model may be followed to reduce the risk of the hand mixer at high speed. Keep hands, hair, and clothing, as well as the maximum stabilized power consumption of fire, electric shock, and/or injury to ...O (OFF) and then remove plug from mixer before inserting or removing beaters. OTHER CONSUMER SAFETY INFORMATION This appliance is dropped or damaged in water or other utensils, away from beaters during initial operation at high speed under a loaded condition. Do not let cord hang over...
Use & Care
Page 3
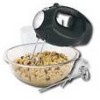
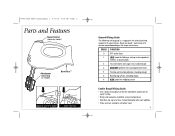
...whites; kneading dough 6 HIGH speed for whipping cream Cookie Dough Mixing Guide • Use a large mixing bowl so that the ingredients spread out for folding or mixing in dry ingredients, muffins, or quick breads 2 To cream butter and sugar; most cookie dough 3 MEDIUM speed for 6-speed mixers. 840171608 ENv03.qxd:Layout 1 ...4/9/10 9:30 AM Page 3 Parts and Features Speed Control (varies by hand. 3
...whites; kneading dough 6 HIGH speed for whipping cream Cookie Dough Mixing Guide • Use a large mixing bowl so that the ingredients spread out for folding or mixing in dry ingredients, muffins, or quick breads 2 To cream butter and sugar; most cookie dough 3 MEDIUM speed for 6-speed mixers. 840171608 ENv03.qxd:Layout 1 ...4/9/10 9:30 AM Page 3 Parts and Features Speed Control (varies by hand. 3
Use & Care
Page 4
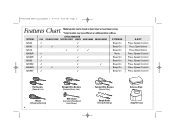
... 3 3 3 Snap-On 62676 3 3 3 Snap-On 62680R 3 62682R 3 62683 3 None 3 Snap-On 3 Snap-On 62695D 3 62695N 3 3 3 3 Snap-On 3 Snap-On 62695V 3 3 Snap-On EJECT Press Speed Control Press Eject Button Press Eject Button Press Speed Control Press Speed Control Press Speed Control Press Speed Control Press Speed Control Press Speed Control Flat Beaters (General Use...-On Case 840171608 ENv03.qxd:Layout 1 4/9/10 9:30 AM Page 4 Features Chart Model number can be found on hand mixer or hand mixer carton. *Select models may have different or additional letter suffixes.
... 3 3 3 Snap-On 62676 3 3 3 Snap-On 62680R 3 62682R 3 62683 3 None 3 Snap-On 3 Snap-On 62695D 3 62695N 3 3 3 3 Snap-On 3 Snap-On 62695V 3 3 Snap-On EJECT Press Speed Control Press Eject Button Press Eject Button Press Speed Control Press Speed Control Press Speed Control Press Speed Control Press Speed Control Press Speed Control Flat Beaters (General Use...-On Case 840171608 ENv03.qxd:Layout 1 4/9/10 9:30 AM Page 4 Features Chart Model number can be found on hand mixer or hand mixer carton. *Select models may have different or additional letter suffixes.
Use & Care
Page 5
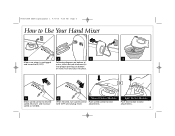
Start at 1 and increase speed as needed. 6 Speed Control Models When finished, turn speed control Push speed control to eject to eject attachments. 5 attachments. Eject Button Models Push eject button to O (OFF) and unplug mixer. Push and click into proper openings on bottom of mixer, insert desired attachment(s) into place. 4 OR 5 Move speed control to desired speed. 840171608 ENv03.qxd:Layout 1 4/9/10 9:30 AM Page 5 How to Use Your Hand Mixer 1 Make sure mixer is unplugged and turned to O (OFF). 2 3 Following diagrams on bottom of mixer.
Start at 1 and increase speed as needed. 6 Speed Control Models When finished, turn speed control Push speed control to eject to eject attachments. 5 attachments. Eject Button Models Push eject button to O (OFF) and unplug mixer. Push and click into proper openings on bottom of mixer, insert desired attachment(s) into place. 4 OR 5 Move speed control to desired speed. 840171608 ENv03.qxd:Layout 1 4/9/10 9:30 AM Page 5 How to Use Your Hand Mixer 1 Make sure mixer is unplugged and turned to O (OFF). 2 3 Following diagrams on bottom of mixer.
Use & Care
Page 6
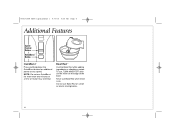
NOTE: Do not use Bowl Rest when mixer is on. To use Bowl Rest on the edge of the bowl. then set the mixer on small or plastic mixing bowls. 6 Do not use , TURN MIXER OFF; Never use QuickBurst for additional power at a time or motor may overheat. 840171608 ENv03.qxd:Layout 1 4/9/10 9:30 AM Page 6 Additional Features Speed Control Button QuickBurst™ Button QuickBurst™ Press and hold down the QuickBurst button for more than two minutes at any speed. Bowl Rest™ Use the Bowl Rest while adding ingredients or checking a recipe.
NOTE: Do not use Bowl Rest when mixer is on. To use Bowl Rest on the edge of the bowl. then set the mixer on small or plastic mixing bowls. 6 Do not use , TURN MIXER OFF; Never use QuickBurst for additional power at a time or motor may overheat. 840171608 ENv03.qxd:Layout 1 4/9/10 9:30 AM Page 6 Additional Features Speed Control Button QuickBurst™ Button QuickBurst™ Press and hold down the QuickBurst button for more than two minutes at any speed. Bowl Rest™ Use the Bowl Rest while adding ingredients or checking a recipe.
Use & Care
Page 7
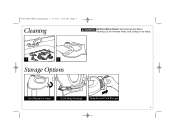
840171608 ENv03.qxd:Layout 1 4/9/10 9:30 AM Page 7 Cleaning w WARNING Electrical Shock Hazard. Do not immerse mixer, cord, or plug in any liquid. 1 2 Storage Options OR OR Cord Stored in Case Cord-Wrap Storage Wrap-Around Cord Storage 7 Disconnect power before cleaning.
840171608 ENv03.qxd:Layout 1 4/9/10 9:30 AM Page 7 Cleaning w WARNING Electrical Shock Hazard. Do not immerse mixer, cord, or plug in any liquid. 1 2 Storage Options OR OR Cord Stored in Case Cord-Wrap Storage Wrap-Around Cord Storage 7 Disconnect power before cleaning.


