Use & Care
Page 2
... or counter or touch hot surfaces, including stove. 12. Care must be followed to prevent accidental tipping. 8. Unplug from outlet when either the BrewStation® or clock is lifted during the brewing cycle. The coffee tank is necessary when any manner. Close supervision is designed for information on or taking off parts and before cleaning the appliance. 6. The use outdoors. 11. It...
... or counter or touch hot surfaces, including stove. 12. Care must be followed to prevent accidental tipping. 8. Unplug from outlet when either the BrewStation® or clock is lifted during the brewing cycle. The coffee tank is necessary when any manner. Close supervision is designed for information on or taking off parts and before cleaning the appliance. 6. The use outdoors. 11. It...
Use & Care
Page 3
WARNING! No user serviceable parts are inside. WARNING! To avoid an electrical circuit overload, do not remove the bottom cover. To disconnect BrewStation®, turn controls to arrange the extension cord so that reduces the risk of electric shock. Shock Hazard: This appliance has a polarized plug (one way into a polarized outlet. Care must be pulled on this appliance was selected...
WARNING! No user serviceable parts are inside. WARNING! To avoid an electrical circuit overload, do not remove the bottom cover. To disconnect BrewStation®, turn controls to arrange the extension cord so that reduces the risk of electric shock. Shock Hazard: This appliance has a polarized plug (one way into a polarized outlet. Care must be pulled on this appliance was selected...

Use & Care
Page 4
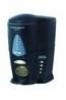
840160001 ENv08.qxd:840144300 ENv01.qxd 10/9/08 10:24 AM Page 4 Parts and Features Filter Basket Water Level Guide Coffee Tank Coffee Level Guide Coffee Dispenser Bar Drip Tray Water Reservoir Keep Hot Plate Optional Accessories Water Filter Lid Permanent Gold Tone Filter Water Level Guide Water Filter Water Filter Base Coffee Scoop Coffee Tank Screen To Order Call: 1.800.851.8900 (U.S.) 1.800.267.2826 (Canada) 01.800.71.16.100 (Mexico) or visit hamiltonbeach.com 4
840160001 ENv08.qxd:840144300 ENv01.qxd 10/9/08 10:24 AM Page 4 Parts and Features Filter Basket Water Level Guide Coffee Tank Coffee Level Guide Coffee Dispenser Bar Drip Tray Water Reservoir Keep Hot Plate Optional Accessories Water Filter Lid Permanent Gold Tone Filter Water Level Guide Water Filter Water Filter Base Coffee Scoop Coffee Tank Screen To Order Call: 1.800.851.8900 (U.S.) 1.800.267.2826 (Canada) 01.800.71.16.100 (Mexico) or visit hamiltonbeach.com 4

Use & Care
Page 5
... water. Fill coffee tank with desired amount of automatic drip ground coffee in "Optional Features." Holding coffee tank level, use Water Level Guide on keep hot plate. 2. For each cup of coffee being made, neatly place 3/4 tablespoon of cold water. 840160001 ENv08.qxd:840144300 ENv01.qxd 10/9/08 10:24 AM Page 5 How to 12 cup size). B.) If your model has a water filter, follow steps listed in "Optional Features." 3. A permanent filter may also be used. make coffee in the BrewStation...
... water. Fill coffee tank with desired amount of automatic drip ground coffee in "Optional Features." Holding coffee tank level, use Water Level Guide on keep hot plate. 2. For each cup of coffee being made, neatly place 3/4 tablespoon of cold water. 840160001 ENv08.qxd:840144300 ENv01.qxd 10/9/08 10:24 AM Page 5 How to 12 cup size). B.) If your model has a water filter, follow steps listed in "Optional Features." 3. A permanent filter may also be used. make coffee in the BrewStation...
Use & Care
Page 6
... a cup. The BrewStation® features a twohour automatic shutoff. NOTE: Care should be dispensed during and just after brewing. Do not remove coffee tank while brewing light is on or coffee is cool. Remove cup when desired amount has been dispensed. Do not open lid during and after brewing to preserve the coffee's heat and flavor, and to avoid scalding from hot coffee and steam. Never use coffee tank to cool before cleaning the unit, coffee...
... a cup. The BrewStation® features a twohour automatic shutoff. NOTE: Care should be dispensed during and just after brewing. Do not remove coffee tank while brewing light is on or coffee is cool. Remove cup when desired amount has been dispensed. Do not open lid during and after brewing to preserve the coffee's heat and flavor, and to avoid scalding from hot coffee and steam. Never use coffee tank to cool before cleaning the unit, coffee...
Use & Care
Page 7
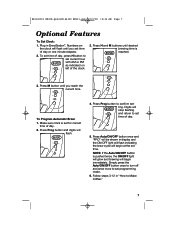
... M buttons until you set time of day. 2. Press Auto/ON/OFF button once and "PRO" will begin immediately. Numbers on left of day or one minute elapses. 2. Make sure clock is reached. 3. Follow steps 3-12 in "How to confirm setting. Press Prog button to Make Coffee." 7 Simply press the Auto/ON/OFF button once to turn off and once more to set time of the clock. 3. To Program Automatic Brew: 1. Press M button until desired brewing time is set...
... M buttons until you set time of day. 2. Press Auto/ON/OFF button once and "PRO" will begin immediately. Numbers on left of day or one minute elapses. 2. Make sure clock is reached. 3. Follow steps 3-12 in "How to confirm setting. Press Prog button to Make Coffee." 7 Simply press the Auto/ON/OFF button once to turn off and once more to set time of the clock. 3. To Program Automatic Brew: 1. Press M button until desired brewing time is set...
Use & Care
Page 8
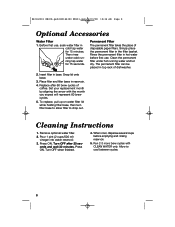
.... 2. Pour 1 pint (2 cups/500 ml) vinegar into water reservoir. 3. Rinse the permanent filter in cold tap water for 15 seconds. Replace after 20 seconds and wait 30 minutes. When cool, dispense several cups before first use , soak water filter in hot water before emptying and rinsing reservoir. 5. The permanent filter can be placed in base. Set your replacement month by aligning the arrow with CLEAN WATER only. Remove optional water filter. 2. Before first use . Snap lid...
.... 2. Pour 1 pint (2 cups/500 ml) vinegar into water reservoir. 3. Rinse the permanent filter in cold tap water for 15 seconds. Replace after 20 seconds and wait 30 minutes. When cool, dispense several cups before first use , soak water filter in hot water before emptying and rinsing reservoir. 5. The permanent filter can be placed in base. Set your replacement month by aligning the arrow with CLEAN WATER only. Remove optional water filter. 2. Before first use . Snap lid...
Use & Care
Page 9
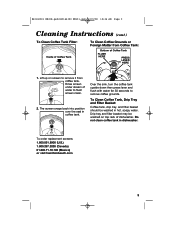
..., turn the coffee tank upside down then press lever and flush with water for 30 seconds to flush screen clean. 2. The screen snaps back into position over the seal in dishwasher. To Clean Coffee Tank, Drip Tray and Filter Basket: Coffee tank, drip tray, and filter basket should be washed on screen to remove it from Coffee Tank: Bottom of Coffee Tank FLUSH HERE PRESS LEVER HERE 1. Rinse screen under stream of water to remove coffee grounds. To order replacment screens...
..., turn the coffee tank upside down then press lever and flush with water for 30 seconds to flush screen clean. 2. The screen snaps back into position over the seal in dishwasher. To Clean Coffee Tank, Drip Tray and Filter Basket: Coffee tank, drip tray, and filter basket should be washed on screen to remove it from Coffee Tank: Bottom of Coffee Tank FLUSH HERE PRESS LEVER HERE 1. Rinse screen under stream of water to remove coffee grounds. To order replacment screens...
Use & Care
Page 10
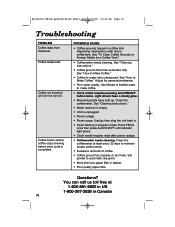
... "Cleaning Instructions." • Coffee ground other than one paper filter in Canada 10 Use filtered or bottled water to Make Coffee." Unplug; See "How to make coffee. • Clock model requires pressing Auto/ON/OFF button twice. then plug the unit back in. • Clock blinking in coffee tank. PROBABLE CAUSE • Coffee grounds trapped in coffee tank dispensing mechanism under ring in program mode. Coffee not brewing/ unit will not turn on. You can call us toll free...
... "Cleaning Instructions." • Coffee ground other than one paper filter in Canada 10 Use filtered or bottled water to Make Coffee." Unplug; See "How to make coffee. • Clock model requires pressing Auto/ON/OFF button twice. then plug the unit back in. • Clock blinking in coffee tank. PROBABLE CAUSE • Coffee grounds trapped in coffee tank dispensing mechanism under ring in program mode. Coffee not brewing/ unit will not turn on. You can call us toll free...
Use & Care
Page 11
... exclude all costs associated with the printed directions, or damage to be free from normal use, use . To make a warranty claim. or 1.800.267.2826 in Canada or visit hamiltonbeach.com in the US or hamiltonbeach.ca in the U.S. and Canada. This product is limited to the amount of equal ... this appliance to be defective, at our option; All liability is used for a period of one of the purchase price. This warranty is void if the product is limited to the duration of express or implied warranty. For faster service, locate the model, type, and series numbers on where you .
... exclude all costs associated with the printed directions, or damage to be free from normal use, use . To make a warranty claim. or 1.800.267.2826 in Canada or visit hamiltonbeach.com in the US or hamiltonbeach.ca in the U.S. and Canada. This product is limited to the amount of equal ... this appliance to be defective, at our option; All liability is used for a period of one of the purchase price. This warranty is void if the product is limited to the duration of express or implied warranty. For faster service, locate the model, type, and series numbers on where you .


