
Use and Care Manual
Page 2
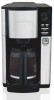
... be operated on a flat surface away from outlet when either the coffee maker or clock is designed for their safety. 11. maker in water or other abrasive 6. Unplug from the edge 18. pouring coffee. a heated oven. 8. To disconnect coffee maker, turn controls to avoid a hazard. To reduce the risk of ... may be used on or taking off parts 17. and before putting on a range top or in a microwave oven. Do not place coffee maker on carafe. 7. No user-serviceable parts are closely supervised and instructed 10. Care must be equal to ensure that it will not drape over...
... be operated on a flat surface away from outlet when either the coffee maker or clock is designed for their safety. 11. maker in water or other abrasive 6. Unplug from the edge 18. pouring coffee. a heated oven. 8. To disconnect coffee maker, turn controls to avoid a hazard. To reduce the risk of ... may be used on or taking off parts 17. and before putting on a range top or in a microwave oven. Do not place coffee maker on carafe. 7. No user-serviceable parts are closely supervised and instructed 10. Care must be equal to ensure that it will not drape over...

Use and Care Manual
Page 4
... button to count up after the brewing is cool. 9. Set time will display constant in 2 hours and the light will turn on the coffee maker and button will illuminate. Default is completely closed. Fill carafe with water; lift lid to open until brewing cycle is complete and unit is ... shutoff at 2 hours. Press I / (ON/OFF) button once and unplug. For each cup of coffee being made, place one level tablespoon (15 ml) of ground coffee into outlet. 2. NOTE: If the coffee maker is not turned off manually, it will continue to set current minutes. Press and release HOUR button. To...
... button to count up after the brewing is cool. 9. Set time will display constant in 2 hours and the light will turn on the coffee maker and button will illuminate. Default is completely closed. Fill carafe with water; lift lid to open until brewing cycle is complete and unit is ... shutoff at 2 hours. Press I / (ON/OFF) button once and unplug. For each cup of coffee being made, place one level tablespoon (15 ml) of ground coffee into outlet. 2. NOTE: If the coffee maker is not turned off manually, it will continue to set current minutes. Press and release HOUR button. To...

Use and Care Manual
Page 5
... flashing. If buying preground coffee, chose a package with the latest expiration date or a smaller quantity. • If grinding whole beans, set the desired brew time. 4. To Program Automatic Brew NOTE: White LED comes on to set your coffee maker is activated. Press and ...hold the PROGRAM button until the PROGRAM light flashes. 3. This will yield bettertasting coffee than whole beans. To avoid overflow, use freshly ground coffee within about 1/3 less grounds when brewing decaf or flavored coffees. • Make sure your coffee grinder ...
... flashing. If buying preground coffee, chose a package with the latest expiration date or a smaller quantity. • If grinding whole beans, set the desired brew time. 4. To Program Automatic Brew NOTE: White LED comes on to set your coffee maker is activated. Press and ...hold the PROGRAM button until the PROGRAM light flashes. 3. This will yield bettertasting coffee than whole beans. To avoid overflow, use freshly ground coffee within about 1/3 less grounds when brewing decaf or flavored coffees. • Make sure your coffee grinder ...

Use and Care Manual
Page 6
...the TOP RACK only. Run 2-3 more brew cycles with hard water). 1. How to cool between cycles. 7. Do not immerse cord, plug, or coffee maker in warm, soapy water. Dry. 3. Allow to Replace the Water Filter 1. Clean Notification If unit is always plugged in water. 2. NOTES: •...; Performing the cleaning procedure will scroll across the display. Add pod to cool. 6. Wipe coffee maker with a damp cloth or sponge. Press the I / (ON/OFF) button two times to Replace the Water Filter"). 4. Then turn OFF. When brew...
...the TOP RACK only. Run 2-3 more brew cycles with hard water). 1. How to cool between cycles. 7. Do not immerse cord, plug, or coffee maker in warm, soapy water. Dry. 3. Allow to Replace the Water Filter 1. Clean Notification If unit is always plugged in water. 2. NOTES: •...; Performing the cleaning procedure will scroll across the display. Add pod to cool. 6. Wipe coffee maker with a damp cloth or sponge. Press the I / (ON/OFF) button two times to Replace the Water Filter"). 4. Then turn OFF. When brew...
Use and Care Manual
Page 7
Glass will break as a result of your coffee maker. This symbol reminds you that may result if breakage occurs while carafe holds heated liquids. 840275202 ENv06.indd 7 7 1/27/2017 11:22:42 AM Do ...
Glass will break as a result of your coffee maker. This symbol reminds you that may result if breakage occurs while carafe holds heated liquids. 840275202 ENv06.indd 7 7 1/27/2017 11:22:42 AM Do ...

Use and Care Manual
Page 8
...and not placed securely back on . • Water reservoir is empty. • Unit is recommended for brewing decaffeinated coffee. • Excessive amounts of coffee. • Coffee ground too finely (not automatic drip grind). • Carafe not securely placed on keep-warm plate or swivel filter.... • Carafe removed during brewing for more than 20 seconds and not placed securely back on keep-warm plate. • Coffee maker needs cleaning. • Coffee grounds between paper filter and filter basket. • Paper filter not open and in . • Clock requires reset after power...
...and not placed securely back on . • Water reservoir is empty. • Unit is recommended for brewing decaffeinated coffee. • Excessive amounts of coffee. • Coffee ground too finely (not automatic drip grind). • Carafe not securely placed on keep-warm plate or swivel filter.... • Carafe removed during brewing for more than 20 seconds and not placed securely back on keep-warm plate. • Coffee maker needs cleaning. • Coffee grounds between paper filter and filter basket. • Paper filter not open and in . • Clock requires reset after power...


