Use & Care
Page 2
.... Do not let cord hang over a longer cord. This product is dropped or damaged in use only. Read all instructions. 2. To disconnect slow cooker, press OFF (O) button on or taking off parts. 6. then remove plug from outlet when not in any non-food materials or products. CAUTION: To prevent damage or shock hazard, do not immerse cord, plug, or base in any appliance is...
.... Do not let cord hang over a longer cord. This product is dropped or damaged in use only. Read all instructions. 2. To disconnect slow cooker, press OFF (O) button on or taking off parts. 6. then remove plug from outlet when not in any non-food materials or products. CAUTION: To prevent damage or shock hazard, do not immerse cord, plug, or base in any appliance is...
Use & Care
Page 3
Use caution. Use handles on a burner or stove top. Use oven mitts to avoid being burned by steam. Use caution. • The crock and lid can damage countertop. Never place lid on base if necessary. The sides of crock is microwave-safe and oven-proof, but never heat crock when empty. Do not place directly on stove top. REMOVING LID AND CROCK When removing lid, tilt so that opening faces...
Use caution. Use handles on a burner or stove top. Use oven mitts to avoid being burned by steam. Use caution. • The crock and lid can damage countertop. Never place lid on base if necessary. The sides of crock is microwave-safe and oven-proof, but never heat crock when empty. Do not place directly on stove top. REMOVING LID AND CROCK When removing lid, tilt so that opening faces...
Use & Care
Page 4
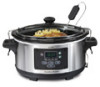
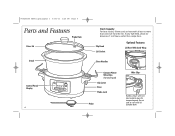
... (for latching lid) Clip Latch Base Probe Jack Probe Wire Clips Handles shown with lid clamped down. If only half-filled, check for transporting only. Do not cook or store with wire clips locked in place for doneness 1 to 2 hours earlier than one inch from the rim. 840205300 ENv02.qxd:Layout 1 6/24/11 1:26 PM Page 4 Parts and Features Probe Hole Glass Lid Crock Crock Capacity For...
... (for latching lid) Clip Latch Base Probe Jack Probe Wire Clips Handles shown with lid clamped down. If only half-filled, check for transporting only. Do not cook or store with wire clips locked in place for doneness 1 to 2 hours earlier than one inch from the rim. 840205300 ENv02.qxd:Layout 1 6/24/11 1:26 PM Page 4 Parts and Features Probe Hole Glass Lid Crock Crock Capacity For...
Use & Care
Page 5
... amount of time the food will need to cook the traditional way without setting a time? - Lets you select traditional HIGH or LOW settings. Use PROGRAM Mode. Are you cooking a large cut of meat or using the Cooking Guide for Probe, you can select the WARM setting to WARM once the temperature is right for your food is the best test for more information about cooking times. Lets you select WARM setting. The slow cooker will...
... amount of time the food will need to cook the traditional way without setting a time? - Lets you select traditional HIGH or LOW settings. Use PROGRAM Mode. Are you cooking a large cut of meat or using the Cooking Guide for Probe, you can select the WARM setting to WARM once the temperature is right for your food is the best test for more information about cooking times. Lets you select WARM setting. The slow cooker will...
Use & Care
Page 6
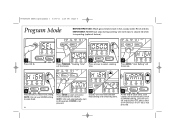
... of cook time, slow cooker will sound. 840205300 ENv02.qxd:Layout 1 6/24/11 1:26 PM Page 6 Program Mode BEFORE FIRST USE: Wash glass lid and crock in 20 seconds if ENTER is not pressed. NOTE: Unit will automatically start unit and a 3-second beep will automatically switch to secure lid when transporting (optional feature). 1 Press ON (I). 2 Press PROGRAM. "Heat Setting" will illuminate. 3 Press arrows to select heat setting. "Cooking Time...
... of cook time, slow cooker will sound. 840205300 ENv02.qxd:Layout 1 6/24/11 1:26 PM Page 6 Program Mode BEFORE FIRST USE: Wash glass lid and crock in 20 seconds if ENTER is not pressed. NOTE: Unit will automatically start unit and a 3-second beep will automatically switch to secure lid when transporting (optional feature). 1 Press ON (I). 2 Press PROGRAM. "Heat Setting" will illuminate. 3 Press arrows to select heat setting. "Cooking Time...
Use & Care
Page 7
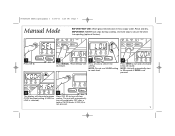
... heat setting (if HIGH or LOW is not pressed. 7 Press arrows to secure lid when transporting (optional feature). 1 Press ON (I). 2 3 4 Press MANUAL. The unit will automatically turn off and display OFF after a total of 14 ON hours if OFF (O) is selected). Rinse and dry. Press OFF (O) to turn off slow cooker. Use wire clips to select heat setting. NOTE: Do not use WARM setting...
... heat setting (if HIGH or LOW is not pressed. 7 Press arrows to secure lid when transporting (optional feature). 1 Press ON (I). 2 3 4 Press MANUAL. The unit will automatically turn off and display OFF after a total of 14 ON hours if OFF (O) is selected). Rinse and dry. Press OFF (O) to turn off slow cooker. Use wire clips to select heat setting. NOTE: Do not use WARM setting...
Use & Care
Page 8
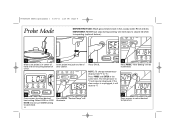
... reset to ºF. 5 Press arrows to select desired heat setting. If the slow cooker is in hot, soapy water. The temperature in ºC will illuminate. 7 Press arrows to ºC: Press PROBE and ENTER at the same time. NOTE: Do not use WARM setting to secure lid when transporting (optional feature). 1 Make sure probe is unplugged, it will be displayed. Rinse and dry. Select HIGH or LOW...
... reset to ºF. 5 Press arrows to select desired heat setting. If the slow cooker is in hot, soapy water. The temperature in ºC will illuminate. 7 Press arrows to ºC: Press PROBE and ENTER at the same time. NOTE: Do not use WARM setting to secure lid when transporting (optional feature). 1 Make sure probe is unplugged, it will be displayed. Rinse and dry. Select HIGH or LOW...

Use & Care
Page 9
COOK will display and a 3-second beep will sound. Press ON (I). 2. WARM will display and 3-second beep will sound. To Monitor Food Temperature: 1. Press PROBE. "Heat Setting" will automatically turn off and display OFF after a total of 14 ON hours if OFF (O) is not pressed. 9 Display will turn off and display OFF ...
COOK will display and a 3-second beep will sound. Press ON (I). 2. WARM will display and 3-second beep will sound. To Monitor Food Temperature: 1. Press PROBE. "Heat Setting" will automatically turn off and display OFF after a total of 14 ON hours if OFF (O) is not pressed. 9 Display will turn off and display OFF ...
Use & Care
Page 10
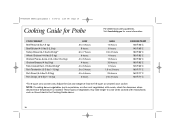
... 5 hours 5 hours HIGH 1.5 hours 6 hours 3 to 4 hours 4 hours 1.5 hours 3.5 hours 3 hours 1.5 to 2 hours 2.5 hours 2 to cook when cooked with meats, check for doneness when desired meat temperature is reached. These types of food to fit 5-quart (or smaller) slow cooker. 840205300 ENv02.qxd:Layout 1 6/24/11 1:26 PM Page 10 Cooking Guide for more information. Adjust the size and weight of...
... 5 hours 5 hours HIGH 1.5 hours 6 hours 3 to 4 hours 4 hours 1.5 hours 3.5 hours 3 hours 1.5 to 2 hours 2.5 hours 2 to cook when cooked with meats, check for doneness when desired meat temperature is reached. These types of food to fit 5-quart (or smaller) slow cooker. 840205300 ENv02.qxd:Layout 1 6/24/11 1:26 PM Page 10 Cooking Guide for more information. Adjust the size and weight of...
Use & Care
Page 11
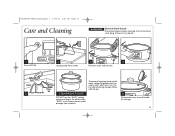
... rubber lid gasket with lid ajar. DISHWASHER-SAFE DO NOT use . Store with hot, soapy water after each use the "SANI" setting when washing in any liquid. 1 Press OFF (O). 2 Unplug cord from outlet. 3 4 Remove crock and let cool. 840205300 ENv02.qxd:Layout 1 6/24/11 1:27 PM Page 11 Care and Cleaning w WARNING Electrical Shock Hazard. Disconnect power before cleaning. Do not immerse cord, plug...
... rubber lid gasket with lid ajar. DISHWASHER-SAFE DO NOT use . Store with hot, soapy water after each use the "SANI" setting when washing in any liquid. 1 Press OFF (O). 2 Unplug cord from outlet. 3 4 Remove crock and let cool. 840205300 ENv02.qxd:Layout 1 6/24/11 1:27 PM Page 11 Care and Cleaning w WARNING Electrical Shock Hazard. Disconnect power before cleaning. Do not immerse cord, plug...
Use & Care
Page 12
... A HIGH-ALTITUDE AREA: The Extension service will need to sit at least half-filled for extended cooking in a slow cooker. 840205300 ENv02.qxd:Layout 1 6/24/11 1:27 PM Page 12 Tips for Slow Cooking • The crock should be at room temperature in the slow cooker. In the morning, simply place crock in slow cooker. • Some foods are perfect for cooking all ingredients in crock, cover with...
... A HIGH-ALTITUDE AREA: The Extension service will need to sit at least half-filled for extended cooking in a slow cooker. 840205300 ENv02.qxd:Layout 1 6/24/11 1:27 PM Page 12 Tips for Slow Cooking • The crock should be at room temperature in the slow cooker. In the morning, simply place crock in slow cooker. • Some foods are perfect for cooking all ingredients in crock, cover with...
Use & Care
Page 13
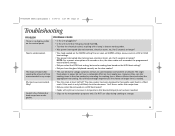
... amount of 5 seconds or less, the slow cooker will remember the programmed heat and time settings. • Did you select the LOW heat setting, but used a cooking time based on the HIGH heat setting? • Did you select hours based on ? Do NOT use clips during cooking or storage. 13 The slight fluctuations in a filled crock. My meal was overcooked. Do not cook on the WARM setting? You will learn through experience if the...
... amount of 5 seconds or less, the slow cooker will remember the programmed heat and time settings. • Did you select the LOW heat setting, but used a cooking time based on the HIGH heat setting? • Did you select hours based on ? Do NOT use clips during cooking or storage. 13 The slight fluctuations in a filled crock. My meal was overcooked. Do not cook on the WARM setting? You will learn through experience if the...
Use & Care
Page 14
... Canada or visit hamiltonbeach.com in material and workmanship for this appliance to the duration of original purchase. For faster service, locate the model, type, and series numbers on the rating label (e.g., 120V ~ 60 Hz). This product is repair or replacement of the purchase price. however, you are responsible for all claims for other than single-family household use not in...
... Canada or visit hamiltonbeach.com in material and workmanship for this appliance to the duration of original purchase. For faster service, locate the model, type, and series numbers on the rating label (e.g., 120V ~ 60 Hz). This product is repair or replacement of the purchase price. however, you are responsible for all claims for other than single-family household use not in...


