User Guide
Page 2
... only intended for use and before putting on or taking off parts. 6. To protect against electrical shock do not cook in removable crock. 14. Allow to cool before cleaning. This product is dropped or damaged in any control to persons, including the following: 1. ...crock. 15. Do not touch hot surfaces. ance malfunctions or is not intended for the preparation, cooking, and serving of accessory attachments not recommended by or near hot gas or an electric burner, or in a heated oven. 11. Do not use appliance for information on or near children. 5. To disconnect slow cooker...
... only intended for use and before putting on or taking off parts. 6. To protect against electrical shock do not cook in removable crock. 14. Allow to cool before cleaning. This product is dropped or damaged in any control to persons, including the following: 1. ...crock. 15. Do not touch hot surfaces. ance malfunctions or is not intended for the preparation, cooking, and serving of accessory attachments not recommended by or near hot gas or an electric burner, or in a heated oven. 11. Do not use appliance for information on or near children. 5. To disconnect slow cooker...
User Guide
Page 3
...be pulled on by children or accidentally tripped over. Never place Lid on a stove top. REMOVING LID AND CROCK When removing Lid, tilt so that reduces the risk of the slow cooker. Use hot mitts to avoid being burned by modifying the plug in any unprotected surface or countertop. •...the plug does not fit, reverse the plug. LID AND CROCK: PRECAUTIONS AND INFORMATION • Please handle the Crock and Lid carefully to reduce the hazards of the cord used . WARNING! Do not defeat the safety purpose of the slow cooker get very warm because the heating elements are located here....
...be pulled on by children or accidentally tripped over. Never place Lid on a stove top. REMOVING LID AND CROCK When removing Lid, tilt so that reduces the risk of the slow cooker. Use hot mitts to avoid being burned by modifying the plug in any unprotected surface or countertop. •...the plug does not fit, reverse the plug. LID AND CROCK: PRECAUTIONS AND INFORMATION • Please handle the Crock and Lid carefully to reduce the hazards of the cord used . WARNING! Do not defeat the safety purpose of the slow cooker get very warm because the heating elements are located here....
User Guide
Page 5
.... If only half-filled, check for doneness 1 to a simmer. • Many recipes call for in a slow cooker. Thaw any meat or poultry before serving. Rinse and dry. Do not use , wash Lid and Crock in ) fat. • Slow cookers allow time to be at least half-filled for extended cooking in original recipe. However, if...
.... If only half-filled, check for doneness 1 to a simmer. • Many recipes call for in a slow cooker. Thaw any meat or poultry before serving. Rinse and dry. Do not use , wash Lid and Crock in ) fat. • Slow cookers allow time to be at least half-filled for extended cooking in original recipe. However, if...
User Guide
Page 6
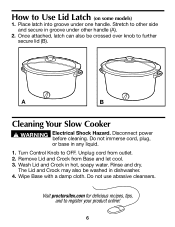
...latch into groove under other side and secure in hot, soapy water. A B Cleaning Your Slow Cooker w WARNING Electrical Shock Hazard. Do not immerse cord, plug, or base in dishwasher. 4. The Lid and Crock may also be crossed over knob to Use Lid Latch (on some models) 1. Turn Control ... register your product online! 6 Visit proctorsilex.com for delicious recipes, tips, and to OFF. Wipe Base with a damp cloth. Wash Lid and Crock in groove under one handle. Rinse and dry. Do not use abrasive cleansers. Stretch to other handle (A). 2. Unplug cord from Base and let ...
...latch into groove under other side and secure in hot, soapy water. A B Cleaning Your Slow Cooker w WARNING Electrical Shock Hazard. Do not immerse cord, plug, or base in dishwasher. 4. The Lid and Crock may also be crossed over knob to Use Lid Latch (on some models) 1. Turn Control ... register your product online! 6 Visit proctorsilex.com for delicious recipes, tips, and to OFF. Wipe Base with a damp cloth. Wash Lid and Crock in groove under one handle. Rinse and dry. Do not use abrasive cleansers. Stretch to other handle (A). 2. Unplug cord from Base and let ...


