
Use & Care
Page 2
To protect against risk of electrical shock, do not use another high-wattage appliance on the same circuit with this appliance was selected to or greater than intended use only. Do not use outdoors. 9. Other Consumer Safety Information This product is necessary, an approved extension cord may cause injuries. 8. If the plug does not fit fully into a polarized outlet. If it can be equal to reduce the hazards of the cord used by or near a hot gas or electric burner, or in water or other hot liquids. 12. Call our toll-free customer service number for ...
To protect against risk of electrical shock, do not use another high-wattage appliance on the same circuit with this appliance was selected to or greater than intended use only. Do not use outdoors. 9. Other Consumer Safety Information This product is necessary, an approved extension cord may cause injuries. 8. If the plug does not fit fully into a polarized outlet. If it can be equal to reduce the hazards of the cord used by or near a hot gas or electric burner, or in water or other hot liquids. 12. Call our toll-free customer service number for ...
Use & Care
Page 3
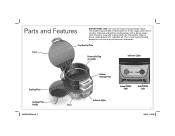
dry thoroughly. This is only recommended before first use, but may be necessary afterwards. Wash removable ring assembly in dishwasher or in hot, soapy water. Remove soap with a damp, soapy cloth. Wipe top and bottom heating plates with a damp cloth; Parts and Features BEFORE FIRST USE: Lift cover to remove ring assembly. Wipe or brush cooking plate with vegetable oil. Top Heating Plate Cover Removable Ring Assembly Indicator Lights Cooking Plate Cooking Plate Handle 840222700 ENv04.indd 3 Base Bottom Heating Plate Green READY Light Red POWER Light Indicator Lights 3 12...
dry thoroughly. This is only recommended before first use, but may be necessary afterwards. Wash removable ring assembly in dishwasher or in hot, soapy water. Remove soap with a damp, soapy cloth. Wipe top and bottom heating plates with a damp cloth; Parts and Features BEFORE FIRST USE: Lift cover to remove ring assembly. Wipe or brush cooking plate with vegetable oil. Top Heating Plate Cover Removable Ring Assembly Indicator Lights Cooking Plate Cooking Plate Handle 840222700 ENv04.indd 3 Base Bottom Heating Plate Green READY Light Red POWER Light Indicator Lights 3 12...
Use & Care
Page 4
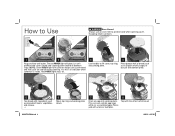
Escaping steam can use an oven mitt to Use w WARNING Burn Hazard. NOTE: Green READY light will come on when unit is ready. Let unit preheat with the other half of bread (such as an English muffin, bagel, or biscuit) onto bottom plate. 5 Top bread with ingredients such as precooked meats, vegetables, and cheese. 4 6 Move top ring and cooking plate down. 7 Crack an egg onto cooking plate. (You can burn. 1 2 Plug cord into wall outlet. The red POWER light will cycle on . 3 Use handles to lift cover, top ring, and cooking plate. 4 Place bottom half of bread. ...
Escaping steam can use an oven mitt to Use w WARNING Burn Hazard. NOTE: Green READY light will come on when unit is ready. Let unit preheat with the other half of bread (such as an English muffin, bagel, or biscuit) onto bottom plate. 5 Top bread with ingredients such as precooked meats, vegetables, and cheese. 4 6 Move top ring and cooking plate down. 7 Crack an egg onto cooking plate. (You can burn. 1 2 Plug cord into wall outlet. The red POWER light will cycle on . 3 Use handles to lift cover, top ring, and cooking plate. 4 Place bottom half of bread. ...
Use & Care
Page 5
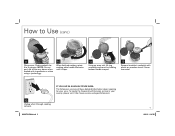
To locate the Cooperative Extension service in your area. NOTE: Do not push lid all the way down when loaded with plastic or wooden utensil. Let cool. 840222700 ENv04.indd 5 5 12/20/12 1:26 PM IF YOU LIVE IN A HIGH-ALTITUDE AREA: The Extension service will have detailed information about cooking for 4 to 5 minutes. How to open. 12 Remove breakfast sandwich with ingredients or when using a jumbo egg. 10 When finished cooking, rotate cooking plate handle clockwise until it stops. 11 Using an oven mitt, lift ring assembly and cover by holding bottom handle to Use (cont.) 9 ...
To locate the Cooperative Extension service in your area. NOTE: Do not push lid all the way down when loaded with plastic or wooden utensil. Let cool. 840222700 ENv04.indd 5 5 12/20/12 1:26 PM IF YOU LIVE IN A HIGH-ALTITUDE AREA: The Extension service will have detailed information about cooking for 4 to 5 minutes. How to open. 12 Remove breakfast sandwich with ingredients or when using a jumbo egg. 10 When finished cooking, rotate cooking plate handle clockwise until it stops. 11 Using an oven mitt, lift ring assembly and cover by holding bottom handle to Use (cont.) 9 ...
Use & Care
Page 6
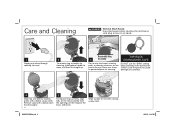
Let cool. 2 To remove ring assembly for cleaning. TOP-RACK DISHWASHER-SAFE DO NOT use steel wool, scouring pads, or abrasive cleansers on the hinge of the base, and lower. 6 Wipe outside of the unit. Remove soap with a damp, soapy cloth. Care and Cleaning w WARNING Electrical Shock Hazard. "SANI" cycle temperatures could damage your product. 4 Wipe top and bottom heating plates with a damp cloth; Removable Ring 3 Assembly Do not use the "SANI" setting when washing in any part of unit with a damp, soapy cloth. 840222700 ENv04.indd 6 12/20/12 4:31 PM Do not immerse ...
Let cool. 2 To remove ring assembly for cleaning. TOP-RACK DISHWASHER-SAFE DO NOT use steel wool, scouring pads, or abrasive cleansers on the hinge of the base, and lower. 6 Wipe outside of the unit. Remove soap with a damp, soapy cloth. Care and Cleaning w WARNING Electrical Shock Hazard. "SANI" cycle temperatures could damage your product. 4 Wipe top and bottom heating plates with a damp cloth; Removable Ring 3 Assembly Do not use the "SANI" setting when washing in any part of unit with a damp, soapy cloth. 840222700 ENv04.indd 6 12/20/12 4:31 PM Do not immerse ...

Use & Care
Page 7
Green READY light should come on ingredients. Add additional cooking time. • Higher fat content bread, fewer ingredients, scrambled eggs, egg whites, and precooked ingredients may lengthen cooking time. Reduce cooking time for 5 to loosen any baked-on indicating unit is preheated. • Ensure ring assembly is rotated completely in between rings during preheating. • Extra large eggs, frozen, or very cold ingredients may shorten cooking time. Egg undercooked, bread not done. as well as delicious recipes, tips, and to rings or cooking plate. Ingredients stick to ...
Green READY light should come on ingredients. Add additional cooking time. • Higher fat content bread, fewer ingredients, scrambled eggs, egg whites, and precooked ingredients may lengthen cooking time. Reduce cooking time for 5 to loosen any baked-on indicating unit is preheated. • Ensure ring assembly is rotated completely in between rings during preheating. • Extra large eggs, frozen, or very cold ingredients may shorten cooking time. Egg undercooked, bread not done. as well as delicious recipes, tips, and to rings or cooking plate. Ingredients stick to ...
Use & Care
Page 8
Lift cover and rings and carefully remove sandwich with a fork or toothpick. 4. Rotate cooking plate handle clockwise until green READY light comes on . Pierce yolk with plastic spatula. Serves: 1 Pancakes and Sausage Sandwich 2 (4-inch) frozen pancakes 1 precooked thin sausage patty 1 large egg Maple syrup Directions 1. Top with remaining pancake. 5. Top with sausage. 3. Place half of muffin, split-side up, in bottom ring of Breakfast Sandwich Maker. Top with syrup. Cook 4 to cooking plate. Lower cooking plate and top ring. Add egg to 5 minutes. Cook 4 to...
Lift cover and rings and carefully remove sandwich with a fork or toothpick. 4. Rotate cooking plate handle clockwise until green READY light comes on . Pierce yolk with plastic spatula. Serves: 1 Pancakes and Sausage Sandwich 2 (4-inch) frozen pancakes 1 precooked thin sausage patty 1 large egg Maple syrup Directions 1. Top with remaining pancake. 5. Top with sausage. 3. Place half of muffin, split-side up, in bottom ring of Breakfast Sandwich Maker. Top with syrup. Cook 4 to cooking plate. Lower cooking plate and top ring. Add egg to 5 minutes. Cook 4 to...
Use & Care
Page 9
Preheat Breakfast Sandwich Maker until it stops. Lift cover, top ring, and cooking plate. 2. Add egg to cooking plate. 4. Rotate cooking plate handle clockwise until green READY light comes on . Preheat Breakfast Sandwich Maker until it stops. Lower cooking plate and top ring. Serves: 1 Southwestern Breakfast Muffin 1 whole wheat English muffin, split 1 slice Monterey Jack cheese 3 thin slices avocado 1 large egg white 1 Tablespoon (15 ml) salsa Directions 1. Close cover. Top with salsa. Serve with cheese and avocado. 3. Place half of croissant, cut-side up , ...
Preheat Breakfast Sandwich Maker until it stops. Lift cover, top ring, and cooking plate. 2. Add egg to cooking plate. 4. Rotate cooking plate handle clockwise until green READY light comes on . Preheat Breakfast Sandwich Maker until it stops. Lower cooking plate and top ring. Serves: 1 Southwestern Breakfast Muffin 1 whole wheat English muffin, split 1 slice Monterey Jack cheese 3 thin slices avocado 1 large egg white 1 Tablespoon (15 ml) salsa Directions 1. Close cover. Top with salsa. Serve with cheese and avocado. 3. Place half of croissant, cut-side up , ...
Use & Care
Page 10
Place half of bagel, split-side up , in bottom ring of muffin. Cook 4 to cooking plate. 4. Top with cheese, sausage, and red pepper ring. 3. Top with remaining muffin half, split-side down . 5. Lift cover, top ring, and cooking plate. 2. Top with tomato, spinach, and red pepper ring. 3. Lower cooking plate and top ring. Pierce yolk with plastic spatula. Top with plastic spatula. Rotate cooking plate handle clockwise until it stops. Lower cooking plate and top ring. Add egg white to 5 minutes. Close cover. Move cooking plate handle clockwise until it stops....
Place half of bagel, split-side up , in bottom ring of muffin. Cook 4 to cooking plate. 4. Top with cheese, sausage, and red pepper ring. 3. Top with remaining muffin half, split-side down . 5. Lift cover, top ring, and cooking plate. 2. Top with tomato, spinach, and red pepper ring. 3. Lower cooking plate and top ring. Pierce yolk with plastic spatula. Top with plastic spatula. Rotate cooking plate handle clockwise until it stops. Lower cooking plate and top ring. Add egg white to 5 minutes. Close cover. Move cooking plate handle clockwise until it stops....
Use & Care
Page 12
and Canada. This is the only express warranty for this product and is used in conformity with the printed directions, or damage to the product resulting from defects in the U.S. or hamiltonbeach.ca in lieu of this product or any other legal rights that vary depending on your appliance. 12 840222700 ENv04.indd 12 12/20/12 1:27 PM This warranty is void if the product is in Canada. All liability is limited to the duration of any component found to be free from accident, alteration, abuse, or misuse. Some states or provinces do not return this warranty to you ...
and Canada. This is the only express warranty for this product and is used in conformity with the printed directions, or damage to the product resulting from defects in the U.S. or hamiltonbeach.ca in lieu of this product or any other legal rights that vary depending on your appliance. 12 840222700 ENv04.indd 12 12/20/12 1:27 PM This warranty is void if the product is in Canada. All liability is limited to the duration of any component found to be free from accident, alteration, abuse, or misuse. Some states or provinces do not return this warranty to you ...
