Use & Care
Page 2
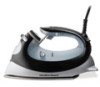
...to touch hot surfaces. Never yank cord to arrange the cord so that of electric shock, do not disassemble the iron. Loop cord loosely around iron when storing. 6. Always disconnect iron from outlet; Burns can cause a risk of people or pets. 2 • Steam vents should always be ... wide blade) that the voltage in your flatiron, basic safety precautions should be hot water in use only. Use the iron on an ironing board. 9. Prepare iron for steam ironing, then iron over . This will stop and does not indicate a defect or hazard. Use caution when you turn a steam...
...to touch hot surfaces. Never yank cord to arrange the cord so that of electric shock, do not disassemble the iron. Loop cord loosely around iron when storing. 6. Always disconnect iron from outlet; Burns can cause a risk of people or pets. 2 • Steam vents should always be ... wide blade) that the voltage in your flatiron, basic safety precautions should be hot water in use only. Use the iron on an ironing board. 9. Prepare iron for steam ironing, then iron over . This will stop and does not indicate a defect or hazard. Use caution when you turn a steam...

Use & Care
Page 4
... cool. NOTICE: To avoid property damage to supporting surfaces, always use (see chart below). When iron is moved, it will begin to NO STEAM position. Iron Position Auto Standby Face Down (soleplate touching any surface) 30 seconds Upright (resting on select models): Select models ...are equipped with an automatic standby feature, which turns iron heat off iron completely, turn temperature control dial to OFF. 4 6 Unplug iron and allow to reach desired temperature before using. See Fabric Setting Chart. To shut off when not...
... cool. NOTICE: To avoid property damage to supporting surfaces, always use (see chart below). When iron is moved, it will begin to NO STEAM position. Iron Position Auto Standby Face Down (soleplate touching any surface) 30 seconds Upright (resting on select models): Select models ...are equipped with an automatic standby feature, which turns iron heat off iron completely, turn temperature control dial to OFF. 4 6 Unplug iron and allow to reach desired temperature before using. See Fabric Setting Chart. To shut off when not...
Use & Care
Page 5
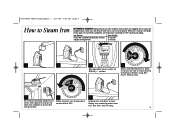
... with an automatic standby feature, which turns iron heat off iron completely, turn temperature Unplug iron and allow hot soleplate to touch delicate garments. When iron is moved, it will begin to reach desired temperature before using. iron. Iron Position Auto Standby Face Down (soleplate touching ... inches from allow to cool. See Care and Cleaning. 5 840178000 ENnv04.qxd:Layout 1 12/2/08 9:42 AM Page 5 How to Steam Iron AUTOMATIC STANDBY (optional feature on heel) 15 minutes 1 2 3 4 Set adjustable steam switch to STEAM position. To shut off when not ...
... with an automatic standby feature, which turns iron heat off iron completely, turn temperature Unplug iron and allow hot soleplate to touch delicate garments. When iron is moved, it will begin to reach desired temperature before using. iron. Iron Position Auto Standby Face Down (soleplate touching ... inches from allow to cool. See Care and Cleaning. 5 840178000 ENnv04.qxd:Layout 1 12/2/08 9:42 AM Page 5 How to Steam Iron AUTOMATIC STANDBY (optional feature on heel) 15 minutes 1 2 3 4 Set adjustable steam switch to STEAM position. To shut off when not ...
Use & Care
Page 6
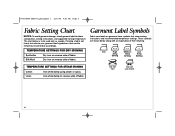
... Temp Setting Setting Setting TEMPERATURE SETTINGS FOR STEAM IRONING Cotton Linen Iron while damp using steam or spray. Silk/Wool Dry iron on reverse side of fabric. Iron while damp on reverse side of fabric. TEMPERATURE SETTINGS FOR DRY IRONING Synthetics Dry iron on garments have symbols that show ironing instructions and recommended temperature settings. Do not...
... Temp Setting Setting Setting TEMPERATURE SETTINGS FOR STEAM IRONING Cotton Linen Iron while damp using steam or spray. Silk/Wool Dry iron on reverse side of fabric. Iron while damp on reverse side of fabric. TEMPERATURE SETTINGS FOR DRY IRONING Synthetics Dry iron on garments have symbols that show ironing instructions and recommended temperature settings. Do not...
Use & Care
Page 7
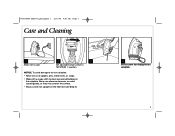
NOTICE: To avoid damage to the iron soleplate: • Never iron over zippers, pins, metal rivets, or snaps. • Wipe with a soapy cloth to NO STEAM position. 840178000 ENnv04.qxd:Layout 1 12/2/08 9:42 AM Page 7 Care and Cleaning 1 Allow iron to cool. 2 3 Set adjustable steam switch to clean occasional buildup on soleplate. 7 Never use abrasive cleansers or metal scouring pads, as they may scratch the surface. • Always store iron upright on the heel rest (see Step 4). 4 Do not store iron laying flat on the soleplate.
NOTICE: To avoid damage to the iron soleplate: • Never iron over zippers, pins, metal rivets, or snaps. • Wipe with a soapy cloth to NO STEAM position. 840178000 ENnv04.qxd:Layout 1 12/2/08 9:42 AM Page 7 Care and Cleaning 1 Allow iron to cool. 2 3 Set adjustable steam switch to clean occasional buildup on soleplate. 7 Never use abrasive cleansers or metal scouring pads, as they may scratch the surface. • Always store iron upright on the heel rest (see Step 4). 4 Do not store iron laying flat on the soleplate.
Use & Care
Page 8
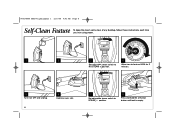
840178000 ENnv04.qxd:Layout 1 12/2/08 9:42 AM Page 8 Self-Clean Feature To keep the steam vents clear of any buildup, follow these instructions each time you iron using steam. 1 2 3 4 Set adjustable steam switch to STEAM position. 8 Press and hold the self-clean button until tank is empty. Allow iron to heat on HIGH for 2 minutes. 5 Turn iron OFF and unplug. 8 6 Hold iron over sink. 7 Set adjustable steam switch to NO STEAM position.
840178000 ENnv04.qxd:Layout 1 12/2/08 9:42 AM Page 8 Self-Clean Feature To keep the steam vents clear of any buildup, follow these instructions each time you iron using steam. 1 2 3 4 Set adjustable steam switch to STEAM position. 8 Press and hold the self-clean button until tank is empty. Allow iron to heat on HIGH for 2 minutes. 5 Turn iron OFF and unplug. 8 6 Hold iron over sink. 7 Set adjustable steam switch to NO STEAM position.
Use & Care
Page 9
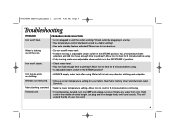
...heat for 2 minutes before using. • Is adjustable steam switch in the STEAM position, has a temperature been selected, and did iron have enough time to preheat? Wrinkles not removed. • Choose correct temperature setting for 5 minutes before using . Twisted cord. &#... Chart and Garment Label Symbols. Fabric/clothing scorched. • Select a lower temperature setting. Iron leaves spots on . Let plug and iron dangle freely until cord uncoils. Empty any water from iron. Allow iron to a fabric setting? • Has auto standby feature activated? This will extend the life...
...heat for 2 minutes before using. • Is adjustable steam switch in the STEAM position, has a temperature been selected, and did iron have enough time to preheat? Wrinkles not removed. • Choose correct temperature setting for 5 minutes before using . Twisted cord. &#... Chart and Garment Label Symbols. Fabric/clothing scorched. • Select a lower temperature setting. Iron leaves spots on . Let plug and iron dangle freely until cord uncoils. Empty any water from iron. Allow iron to a fabric setting? • Has auto standby feature activated? This will extend the life...


