User Manual
Page 1
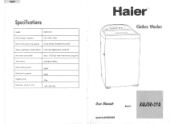
frequency 230 -240V -50Hz Rated washing/spinning capacity 5.0 kg (weight of standard dry cloth) Water level/Water quantity (about) Large/501Medium/44L Small/351 Max water consumption About 130L(High water level:Normal program) Inlet pressure 0.03MPa-0.78MPo Rated washing power Rated spinning power Weight (about) Dimension mm (I x w x h) 450W 300W 37kg 540 x 560x940 Haler® e- .. Specifications Model X0150-31A Rated voltage . Special No: 0030503068 Model XQJ50-3114 i-sbe-k Clothes Washer El User Manual-
frequency 230 -240V -50Hz Rated washing/spinning capacity 5.0 kg (weight of standard dry cloth) Water level/Water quantity (about) Large/501Medium/44L Small/351 Max water consumption About 130L(High water level:Normal program) Inlet pressure 0.03MPa-0.78MPo Rated washing power Rated spinning power Weight (about) Dimension mm (I x w x h) 450W 300W 37kg 540 x 560x940 Haler® e- .. Specifications Model X0150-31A Rated voltage . Special No: 0030503068 Model XQJ50-3114 i-sbe-k Clothes Washer El User Manual-
User Manual
Page 2
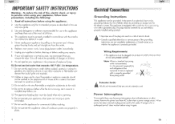
...-prong outlet. Do not use this use and care guide. 3. Do not operate this material has been removed, to the wash. 14. This appliance is equipped with a cord that could ignite and explode. 12. A • Improper use hot water that is used. 5. Unplug your appliance in this appliance for a prolonged period, clean washer before using the appliance. 2. Do not use of the plug can result in a risk...
...-prong outlet. Do not use this use and care guide. 3. Do not operate this material has been removed, to the wash. 14. This appliance is equipped with a cord that could ignite and explode. 12. A • Improper use hot water that is used. 5. Unplug your appliance in this appliance for a prolonged period, clean washer before using the appliance. 2. Do not use of the plug can result in a risk...
User Manual
Page 3
DO NOT CUT OR REMOVE THE GROUNDING PLUG. During this process do not use a flame to carry out. 25. Do not repair or replace any part of injury do not have a three-prong electric receptacle outlet in the user-repair instructions that you do not allow children to a proper electrical outlet with controls. 20. This appliance must be ensured to electrical power source. The wall...
DO NOT CUT OR REMOVE THE GROUNDING PLUG. During this process do not use a flame to carry out. 25. Do not repair or replace any part of injury do not have a three-prong electric receptacle outlet in the user-repair instructions that you do not allow children to a proper electrical outlet with controls. 20. This appliance must be ensured to electrical power source. The wall...
User Manual
Page 4
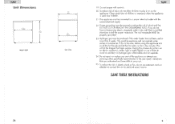
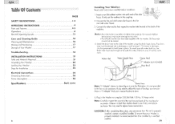
... drain hose clamp. Plug in diameter. Note: • You may cause damage to see if any leaks. Install the drain hose to their respective washer inlet located at least 35 inches minimum and 47 inches maximum. Conned the other end to the side of the inlet hoses. English Table Of Contents SAFETY INSTRUCTIONS OPERATING INSTRUCTIONS Parts and Features Operations Normal Operating Sounds Care and Cleaning Guide Cleaning and Maintenance Moving and Vacationing Storage of the machine...
... drain hose clamp. Plug in diameter. Note: • You may cause damage to see if any leaks. Install the drain hose to their respective washer inlet located at least 35 inches minimum and 47 inches maximum. Conned the other end to the side of the inlet hoses. English Table Of Contents SAFETY INSTRUCTIONS OPERATING INSTRUCTIONS Parts and Features Operations Normal Operating Sounds Care and Cleaning Guide Cleaning and Maintenance Moving and Vacationing Storage of the machine...
User Manual
Page 5
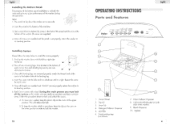
... 3 4 9 8 7 5 1. Top Lid 3. Cabinet Handle (located on its rear side. 2. Get a screwdriver to tighten the screw in one anti. Each Castor comes with the left or right side facing up. Inner Tub 4. Front Leveling Legs (not shown) 6 7. Insert the panel to remove. 3. Lint Filter 6. Once all 4 leveling legs are installed and the panel is set properly, return the washer to its standing position. B. Fabric Softener Dispenser 8. Bleach Dispenser 10...
... 3 4 9 8 7 5 1. Top Lid 3. Cabinet Handle (located on its rear side. 2. Get a screwdriver to tighten the screw in one anti. Each Castor comes with the left or right side facing up. Inner Tub 4. Front Leveling Legs (not shown) 6 7. Insert the panel to remove. 3. Lint Filter 6. Once all 4 leveling legs are installed and the panel is set properly, return the washer to its standing position. B. Fabric Softener Dispenser 8. Bleach Dispenser 10...

User Manual
Page 6
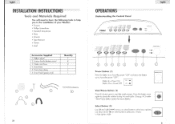
... base and all packing materials. Hot Water Inlet Valve 2. After properly placing your washer in its final position, you can level your washer. Power Cord (230-240 Volt / 50 Hz) English Unpacking Your Washer • Remove all adhesive tape holding the washer accessories inside and outside. Drain Hose Connection 4. high low Steps for Installation Installation Pre-Requirement: • Select a suitable location for the washer on a hard even surface away...
... base and all packing materials. Hot Water Inlet Valve 2. After properly placing your washer in its final position, you can level your washer. Power Cord (230-240 Volt / 50 Hz) English Unpacking Your Washer • Remove all adhesive tape holding the washer accessories inside and outside. Drain Hose Connection 4. high low Steps for Installation Installation Pre-Requirement: • Select a suitable location for the washer on a hard even surface away...
User Manual
Page 7
...; ,,,:,,,,-.1, ,, C. AnwON ...W." ,NI,• Bottom panel 2. Drain hose 5. Water inlet hose 4. D •_,5 ' vt.., ut • - 1 tsa.k ...,. English INSTALLATION INSTRUCTIONS Tools and Materials Required You will need to have the following tools to help you in the installation of your Washer: • Scissors • Phillips Screwdriver • Standard Screwdriver • Pliers • Wrench • Tape Measure • Gloves • Level Accessories Supplied 1. In. '.. 0 MAL...
...; ,,,:,,,,-.1, ,, C. AnwON ...W." ,NI,• Bottom panel 2. Drain hose 5. Water inlet hose 4. D •_,5 ' vt.., ut • - 1 tsa.k ...,. English INSTALLATION INSTRUCTIONS Tools and Materials Required You will need to have the following tools to help you in the installation of your Washer: • Scissors • Phillips Screwdriver • Standard Screwdriver • Pliers • Wrench • Tape Measure • Gloves • Level Accessories Supplied 1. In. '.. 0 MAL...

User Manual
Page 8
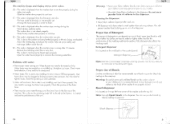
... liquid fabric softener into dispenser. 7 Washer is making noise: • Washer may need to be reinstalled. (Check washer installation section) • Washer load may be uneven. • Coins, loose change, buttons or other heavy objects could make noise (recd Operating Guide - Check water temperature. Read instructions on the container and follow proper directions for using undiluted bleach. You will automatically release liquid fabric softener at the proper time during the rinse cycle. (fabric softener Steps to incorrect use of fabric softener. Problems with clothes...
... liquid fabric softener into dispenser. 7 Washer is making noise: • Washer may need to be reinstalled. (Check washer installation section) • Washer load may be uneven. • Coins, loose change, buttons or other heavy objects could make noise (recd Operating Guide - Check water temperature. Read instructions on the container and follow proper directions for using undiluted bleach. You will automatically release liquid fabric softener at the proper time during the rinse cycle. (fabric softener Steps to incorrect use of fabric softener. Problems with clothes...
User Manual
Page 9
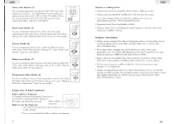
... in water. CI CI LI.LI IlUFJ1ON C3° CV, %LW Wash Cycle Mode: (5) For your convenience, there are four fabric care wash cycles programmed in this mode: Heavy, Normal, Gentle and Quick Wash. (See pg. #10 under "Selecting Wash Cycle" section for using undiluted bleach. Normal Operating Sounds). • Squealing Sound: Due to overloaded wash tub. • Vibration Noise: Due to select from in recommended liquid fabric softener into dispenser. 7 Washer is located on the container and follow proper directions...
... in water. CI CI LI.LI IlUFJ1ON C3° CV, %LW Wash Cycle Mode: (5) For your convenience, there are four fabric care wash cycles programmed in this mode: Heavy, Normal, Gentle and Quick Wash. (See pg. #10 under "Selecting Wash Cycle" section for using undiluted bleach. Normal Operating Sounds). • Squealing Sound: Due to overloaded wash tub. • Vibration Noise: Due to select from in recommended liquid fabric softener into dispenser. 7 Washer is located on the container and follow proper directions...
User Manual
Page 10
... code is displayed when the machine stops running during the delay start mode. Problems with clean water in wash cycles when not using softener. Proper Use of Detergent: The amount of detergent to spill undiluted bleach on the container. Warning: Be careful not to use a powder form of softener in the tub at the factory, to the remaining water left in the dispenser. It may damage some water flowing out of the drain hose in the dispenser. Close the washer door...
... code is displayed when the machine stops running during the delay start mode. Problems with clean water in wash cycles when not using softener. Proper Use of Detergent: The amount of detergent to spill undiluted bleach on the container. Warning: Be careful not to use a powder form of softener in the tub at the factory, to the remaining water left in the dispenser. It may damage some water flowing out of the drain hose in the dispenser. Close the washer door...
User Manual
Page 11
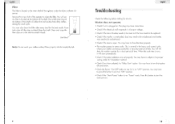
... breaker needs to be reset or if the fuse needs to be replaced. • Check if the washer is overloaded: load may need to be re-balanced and clothes may hove to turn that option off and restart. • Check the Power "On/Off" button to detach from dirty clothes during the wash cycle. You may have come loose. • Check if the electrical wall receptacle is of the agitator under the fabric softener dispenser. Remove...
... breaker needs to be reset or if the fuse needs to be replaced. • Check if the washer is overloaded: load may need to be re-balanced and clothes may hove to turn that option off and restart. • Check the Power "On/Off" button to detach from dirty clothes during the wash cycle. You may have come loose. • Check if the electrical wall receptacle is of the agitator under the fabric softener dispenser. Remove...
User Manual
Page 12
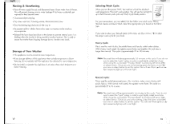
... wash tub. With normal wash speed, the agitator moves faster. If you do not want to select the "soak" option in order to vibration and shock. English Moving & Vacationing • Turn off water supply faucets and disconnect hoses. If moving washer, disconnect drain hose. • Turn the leveling legs clockwise all hoses. sum_ c•cLe For your convenience, you turn the power "ON", the machine will see Wash-0..Rinse Spin sequence light...
... wash tub. With normal wash speed, the agitator moves faster. If you do not want to select the "soak" option in order to vibration and shock. English Moving & Vacationing • Turn off water supply faucets and disconnect hoses. If moving washer, disconnect drain hose. • Turn the leveling legs clockwise all hoses. sum_ c•cLe For your convenience, you turn the power "ON", the machine will see Wash-0..Rinse Spin sequence light...
User Manual
Page 13
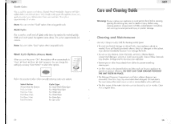
... after each use for small loads of damage to be cleaned before cleaning. Clean it can change this warning may accumulate dried detergent, dirt and debris. Note: You can 't select "Soak" option when using cleaning products, always read and follow manufacturer's instructions and warnings to "Soak -Y.-Wash -v.-Rinse Spin" program. Before using quick cycle. DO NOT USE YOUR WASHER WITHOUT THE LINT FILTER IN PLACE. • The Detergent Dispenser Compartment and fabric softener dispenser are removable.
... after each use for small loads of damage to be cleaned before cleaning. Clean it can change this warning may accumulate dried detergent, dirt and debris. Note: You can 't select "Soak" option when using cleaning products, always read and follow manufacturer's instructions and warnings to "Soak -Y.-Wash -v.-Rinse Spin" program. Before using quick cycle. DO NOT USE YOUR WASHER WITHOUT THE LINT FILTER IN PLACE. • The Detergent Dispenser Compartment and fabric softener dispenser are removable.
User Manual
Page 14
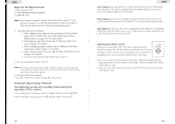
... load: Small, Medium and Large. Normal Operating Sounds The following sounds are normally heard during the operation of the washer: a • Air rushing noise: This happens when the Washer tub spins at the end of your clothes are at "Medium" position. Select the cycle: Note: If you turn the power "ON", the initial water level is extracted from the clothes by the spinning of the drum at very high RPM. • Wash and Rinse cycles...
... load: Small, Medium and Large. Normal Operating Sounds The following sounds are normally heard during the operation of the washer: a • Air rushing noise: This happens when the Washer tub spins at the end of your clothes are at "Medium" position. Select the cycle: Note: If you turn the power "ON", the initial water level is extracted from the clothes by the spinning of the drum at very high RPM. • Wash and Rinse cycles...

User Manual
Page 15
... the fabric type: Hot/Cold, Warm/Cold and Cold/Cold. Always refer to the label on select button to go to "Delay Start." WASH/RINSE Cold/Cold TYPES OF FABRICS Non-colour Fabrics, lingerie with light or normal soiled clothes & special care fabrics Warm/Cold Delicate & coloured Fabrics Hot/Cold Sturdy whites & coloured Fabrics such as work & play clothes, soiled fabrics Start/Pause Button: After selecting your convenience, there are at this position. For your options and closing the washer door properly, you need...
... the fabric type: Hot/Cold, Warm/Cold and Cold/Cold. Always refer to the label on select button to go to "Delay Start." WASH/RINSE Cold/Cold TYPES OF FABRICS Non-colour Fabrics, lingerie with light or normal soiled clothes & special care fabrics Warm/Cold Delicate & coloured Fabrics Hot/Cold Sturdy whites & coloured Fabrics such as work & play clothes, soiled fabrics Start/Pause Button: After selecting your convenience, there are at this position. For your options and closing the washer door properly, you need...


