

User Manual
Page 1
Microwave Oven Horno Microondas Four Microwave User Manual Model # MWG7047TW / B Guide de l'Utilisateur Modéle # MWG7047TW / B Manual del Usuario Para Modelo de # MWG7047TW / B Before operating this oven, please read these instructions completely. Quality • Innovation • Style Avant d'utiliser ce four, veuillez lire les instructions suivantes completement.
Microwave Oven Horno Microondas Four Microwave User Manual Model # MWG7047TW / B Guide de l'Utilisateur Modéle # MWG7047TW / B Manual del Usuario Para Modelo de # MWG7047TW / B Before operating this oven, please read these instructions completely. Quality • Innovation • Style Avant d'utiliser ce four, veuillez lire les instructions suivantes completement.

User Manual
Page 2
... soil or cleaner residue to defeat or tamper with the door open since open door operation can result in harmful exposure to the • Door (bent), • Hinges and latches (broken or loosened), • Door seals and sealing surfaces. 4. Do not operate the oven if it is no damage to microwave energy. English Safety Precautions PRECAUTIONS TO AVOID POSSIBLE EXPOSURE TO...
... soil or cleaner residue to defeat or tamper with the door open since open door operation can result in harmful exposure to the • Door (bent), • Hinges and latches (broken or loosened), • Door seals and sealing surfaces. 4. Do not operate the oven if it is no damage to microwave energy. English Safety Precautions PRECAUTIONS TO AVOID POSSIBLE EXPOSURE TO...
User Manual
Page 3
... Cooking Techniques 8 SPECIFICATIONS 9 Before you call for service 9 FEATURES DIAGRAM 10-11 Parts names 10 Control panel 11 OPERATION INSTRUCTIONS 12-14 Setting the clock 12 Setting the oven timer 12 Setting cooking times and power levels 12 Setting "Speed Defrost 13 Setting "Cooking by Weight 13 Setting "Defrost by Weight 14 Setting "Safety Lock 14 ABOUT "QUICK COOK" SETTINGS 15-16 Setting "Popcorn 15 Setting "Pizza 15 Setting "Baked Potato 15 Setting "Beverage 16 Setting "Frozen Dinner 16 Setting "Reheat 16 FOOD FACTS IN MICROWAVE COOKING 17 TROUBLESHOOTING 18 CLEANING...
... Cooking Techniques 8 SPECIFICATIONS 9 Before you call for service 9 FEATURES DIAGRAM 10-11 Parts names 10 Control panel 11 OPERATION INSTRUCTIONS 12-14 Setting the clock 12 Setting the oven timer 12 Setting cooking times and power levels 12 Setting "Speed Defrost 13 Setting "Cooking by Weight 13 Setting "Defrost by Weight 14 Setting "Safety Lock 14 ABOUT "QUICK COOK" SETTINGS 15-16 Setting "Popcorn 15 Setting "Pizza 15 Setting "Baked Potato 15 Setting "Beverage 16 Setting "Frozen Dinner 16 Setting "Reheat 16 FOOD FACTS IN MICROWAVE COOKING 17 TROUBLESHOOTING 18 CLEANING...
User Manual
Page 4
... the microwave oven for example, closed , turn oven off, and disconnect the power cord or shut off power at the fuse or circuit breaker panel. Some products such as described in accordance with narrow necks. Use this appliance only in this manual. b. c. d. See "GROUNDING INSTRUCTIONS " on page 1. 3. Install or locate this appliance only for its intended use as whole eggs and sealed containers -for a short time before using electrical...
... the microwave oven for example, closed , turn oven off, and disconnect the power cord or shut off power at the fuse or circuit breaker panel. Some products such as described in accordance with narrow necks. Use this appliance only in this manual. b. c. d. See "GROUNDING INSTRUCTIONS " on page 1. 3. Install or locate this appliance only for its intended use as whole eggs and sealed containers -for a short time before using electrical...
User Manual
Page 5
... glass tray and roller rings are in a wet basement, near a kitchen sink, in place when you operate the oven 20. Remember to your refrigerator. Do not let cord hang over edge of purchase 4 They are specifically designed for deep-frying. You will guide you for examination, repair, or adjustment. Contact nearest authorized service facility for using our Haier product. Model number Serial number Date of table or counter...
... glass tray and roller rings are in a wet basement, near a kitchen sink, in place when you operate the oven 20. Remember to your refrigerator. Do not let cord hang over edge of purchase 4 They are specifically designed for deep-frying. You will guide you for examination, repair, or adjustment. Contact nearest authorized service facility for using our Haier product. Model number Serial number Date of table or counter...
User Manual
Page 6
... at both sides. English Installation 1. In the event of an electrical short circuit, grounding reduces risk of electric shock by providing an escape wire for any hot or sharp surface. 8. Electrical Requirements The oven must be 5 Do not remove feet. 6. The socket must be placed on the appliance. This microwave oven must be easily unplugged in the oven. 4. GROUNDING INSTRUCTIONS This appliance must have...
... at both sides. English Installation 1. In the event of an electrical short circuit, grounding reduces risk of electric shock by providing an escape wire for any hot or sharp surface. 8. Electrical Requirements The oven must be 5 Do not remove feet. 6. The socket must be placed on the appliance. This microwave oven must be easily unplugged in the oven. 4. GROUNDING INSTRUCTIONS This appliance must have...
User Manual
Page 7
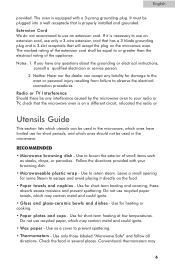
... that the microwave oven is properly installed and grounded. Leave a small opening for damage to the oven or personal injury resulting from failure to escape and avoid placing it is necessary to use only a 3-wire extension cord that has a 3 blade grounding plug and a 3-slot receptacle that is on a different circuit, relocated the radio or Utensils Guide This section lists which utensils...
... that the microwave oven is properly installed and grounded. Leave a small opening for damage to the oven or personal injury resulting from failure to escape and avoid placing it is necessary to use only a 3-wire extension cord that has a 3 blade grounding plug and a 3-slot receptacle that is on a different circuit, relocated the radio or Utensils Guide This section lists which utensils...

User Manual
Page 8
... rolls for popcorn bags that are labeled "Microwave Safe". Using too much foil can melt in a microwave. If they are designed for microwave use. • Styrofoam plates and cups - Use only for short-term heating, such as margarine tubs can damage your oven. These can melt and leave an unhealthy residue on microwave food once the food has been removed from the oven. Other plastics...
... rolls for popcorn bags that are labeled "Microwave Safe". Using too much foil can melt in a microwave. If they are designed for microwave use. • Styrofoam plates and cups - Use only for short-term heating, such as margarine tubs can damage your oven. These can melt and leave an unhealthy residue on microwave food once the food has been removed from the oven. Other plastics...

User Manual
Page 9
... of the turntable where they receive more quickly, so stir from the outside of aluminum foil to prevent overcooking. When heating baby food, stir well at the outside of the dish absorbs more energy and heats more microwave energy. Food that is uneven in moisture content should be covered or allowed to stand so that need this time to complete cooking in the...
... of the turntable where they receive more quickly, so stir from the outside of aluminum foil to prevent overcooking. When heating baby food, stir well at the outside of the dish absorbs more energy and heats more microwave energy. Food that is uneven in moisture content should be covered or allowed to stand so that need this time to complete cooking in the...
User Manual
Page 10
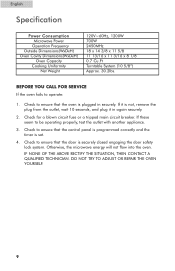
... OR REPAIR THE OVEN YOURSELF. 9 If these seem to operate: 1. Check to ensure that the oven is set. 4. Otherwise, the microwave energy will not flow into the oven. Check for a blown circuit fuse or a tripped main circuit breaker. English Specification Power Consumption Microwave Power Operation Frequency Outside Dimensions(WxDxH) Oven Cavity Dimensions(WxDxH) Oven Capacity Cooking Uniformity Net Weight 120V~60Hz, 1200W 700W 2450MHz 18 x 14 3/8 x 11 5/8 11 13/16 x 11 3/16 x 8 1/8 0.7 Cu.Ft Turntable...
... OR REPAIR THE OVEN YOURSELF. 9 If these seem to operate: 1. Check to ensure that the oven is set. 4. Otherwise, the microwave energy will not flow into the oven. Check for a blown circuit fuse or a tripped main circuit breaker. English Specification Power Consumption Microwave Power Operation Frequency Outside Dimensions(WxDxH) Oven Cavity Dimensions(WxDxH) Oven Capacity Cooking Uniformity Net Weight 120V~60Hz, 1200W 700W 2450MHz 18 x 14 3/8 x 11 5/8 11 13/16 x 11 3/16 x 8 1/8 0.7 Cu.Ft Turntable...

User Manual
Page 12
... use the TIMER function independently, even while a cooking program is displayed. the oven automatically sets the defrosting time and power level. • COOK BY WEIGHT Touch to enter weight of meat accurately. The oven automatically sets the cooking time and power level. • SPEED DEFROST Touch to set the clock. • RESET Clears all previous settings if touched before cooking starts. English CONTROL PANEL (Please also see the following pages for the rest of cooking time. • DEFROST BY WEIGHT Touch to set the weight of the food to be defrosted...
... use the TIMER function independently, even while a cooking program is displayed. the oven automatically sets the defrosting time and power level. • COOK BY WEIGHT Touch to enter weight of meat accurately. The oven automatically sets the cooking time and power level. • SPEED DEFROST Touch to set the clock. • RESET Clears all previous settings if touched before cooking starts. English CONTROL PANEL (Please also see the following pages for the rest of cooking time. • DEFROST BY WEIGHT Touch to set the weight of the food to be defrosted...
User Manual
Page 13
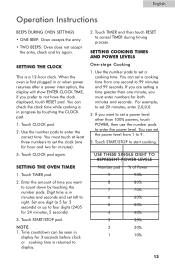
... time you are setting a time greater than 100% powers, touch POWER, then use the number pads to count down by touching the CLOCK pad. 1. Digit time is in display for both minutes and seconds. Set one for hour and two for 24 minutes, 5 seconds). 3. Touch TIMER and then touch RESET to enter the correct time. SETTING COOKING TIMES AND POWER LEVELS One-stage Cooking 1. You can set the clock (one digit (a 5 for 5 seconds) or up to set a cooking time. Touch START/STOP...
... time you are setting a time greater than 100% powers, touch POWER, then use the number pads to count down by touching the CLOCK pad. 1. Digit time is in display for both minutes and seconds. Set one for hour and two for 24 minutes, 5 seconds). 3. Touch TIMER and then touch RESET to enter the correct time. SETTING COOKING TIMES AND POWER LEVELS One-stage Cooking 1. You can set the clock (one digit (a 5 for 5 seconds) or up to set a cooking time. Touch START/STOP...
User Manual
Page 14
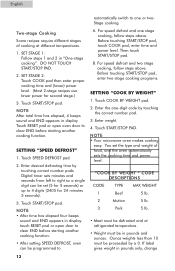
... open door to clear END before starting another cooking function. SETTING "SPEED DEFROST" 1. N O T E: • After time has elapsed four beeps sound and END appears in display. You set (5 for 5 seconds) or up to clear END before starting another cooking function. • After setting SPEED DEFROST, oven can be in pounds and ounces. DO NOT TOUCH START/STOP PAD. 2. Enter desired defrosting time by a 0. Then touch START/STOP pad. Before touching START/STOP pad, enter two-stage cooking programs. SETTING "COOK BY WEIGHT" 1. Touch START/STOP...
... open door to clear END before starting another cooking function. SETTING "SPEED DEFROST" 1. N O T E: • After time has elapsed four beeps sound and END appears in display. You set (5 for 5 seconds) or up to clear END before starting another cooking function. • After setting SPEED DEFROST, oven can be in pounds and ounces. DO NOT TOUCH START/STOP PAD. 2. Enter desired defrosting time by a 0. Then touch START/STOP pad. Before touching START/STOP pad, enter two-stage cooking programs. SETTING "COOK BY WEIGHT" 1. Touch START/STOP...
User Manual
Page 15
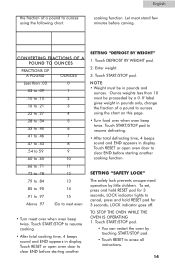
... cooking time, 4 beeps sound and END appears in display. Touch RESET or open oven door to clear END before starting another SETTING "DEFROST BY WEIGHT" 1. To set, press and hold RESET pad for 3 seconds, LOCK indicator lights to erase all instructions. 14 TO STOP THE OVEN WHILE THE OVEN IS OPERATING 1. N O T E: • Weight must be in pounds only, change the fraction of a pound to ounces using the chart on this page. • Turn food over when oven beep twice. Ounce weights...
... cooking time, 4 beeps sound and END appears in display. Touch RESET or open oven door to clear END before starting another SETTING "DEFROST BY WEIGHT" 1. To set, press and hold RESET pad for 3 seconds, LOCK indicator lights to erase all instructions. 14 TO STOP THE OVEN WHILE THE OVEN IS OPERATING 1. N O T E: • Weight must be in pounds only, change the fraction of a pound to ounces using the chart on this page. • Turn food over when oven beep twice. Ounce weights...
User Manual
Page 16
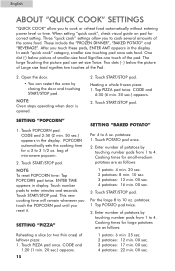
... by closing the door and touching START/STOP pad. N O T E: Oven stops operating when door is opened. 2. Heating a whole frozen pizza: 1. Tap PIZZA pad twice. Touch START/STOP pad. SETTING "POPCORN" 1. Touch POPCORN pad. POPCORN automatically sets the cooking time for correct setting. N O T E: To reset POPCORN time: Tap POPCORN pad twice. This new cooking time will remain whenever you touch the POPCORN pad until you to enter minutes and seconds. SETTING "PIZZA" Reheating a slice (or two thin ones) of microwave popcorn. 2. Touch PIZZA pad once...
... by closing the door and touching START/STOP pad. N O T E: Oven stops operating when door is opened. 2. Heating a whole frozen pizza: 1. Tap PIZZA pad twice. Touch START/STOP pad. SETTING "POPCORN" 1. Touch POPCORN pad. POPCORN automatically sets the cooking time for correct setting. N O T E: To reset POPCORN time: Tap POPCORN pad twice. This new cooking time will remain whenever you touch the POPCORN pad until you to enter minutes and seconds. SETTING "PIZZA" Reheating a slice (or two thin ones) of microwave popcorn. 2. Touch PIZZA pad once...

User Manual
Page 17
..., just touch START/STOP. SETTING "REHEAT" 1. English 3. For the larger 10 to 7 oz. Tap BEVERAGE pad twice. 2. Enter number of cups by touching number pads from 1 to 4. Cooking times for larger entrees are as follows: 1 entree: 12 min. 00 sec. 2 entrees: 20 min. 00 sec. 3 Touch START/STOP pad. For 2 entrees, touch the number pad "2". For 2 entrees, touch the number pad "2". Touch START/STOP pad. SETTING "FROZEN DINNER" Microwaving one large...
..., just touch START/STOP. SETTING "REHEAT" 1. English 3. For the larger 10 to 7 oz. Tap BEVERAGE pad twice. 2. Enter number of cups by touching number pads from 1 to 4. Cooking times for larger entrees are as follows: 1 entree: 12 min. 00 sec. 2 entrees: 20 min. 00 sec. 3 Touch START/STOP pad. For 2 entrees, touch the number pad "2". For 2 entrees, touch the number pad "2". Touch START/STOP pad. SETTING "FROZEN DINNER" Microwaving one large...

User Manual
Page 18
.... Bones: Meat and poultry bones conduct heat, therefor the areas around them will cook faster than the thick part. For very large quantities, it will take to microwave cooking, as the vegetables in the microwave oven. Insert a microwave meat thermometer into the thickest part of the meat. English Food Facts in Microwave Cooking Quality of the food: Poor quality ingredients are rarely improved...
.... Bones: Meat and poultry bones conduct heat, therefor the areas around them will cook faster than the thick part. For very large quantities, it will take to microwave cooking, as the vegetables in the microwave oven. Insert a microwave meat thermometer into the thickest part of the meat. English Food Facts in Microwave Cooking Quality of the food: Poor quality ingredients are rarely improved...
User Manual
Page 19
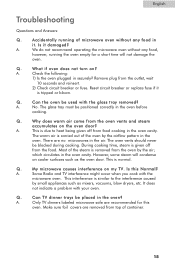
... in the air. Make sure foil covers are removed from the outlet, wait 10 seconds and reinsert. 2) Check circuit breaker or fuse. Q. Can TV dinner trays be used with the glass tray removed? Only TV dinners labeled microwave safe are no microwaves in the oven cavity. Is it is similar to heat being given off from the oven vents and steam accumulates on cooler surfaces...
... in the air. Make sure foil covers are removed from the outlet, wait 10 seconds and reinsert. 2) Check circuit breaker or fuse. Q. Can TV dinner trays be used with the glass tray removed? Only TV dinners labeled microwave safe are no microwaves in the oven cavity. Is it is similar to heat being given off from the oven vents and steam accumulates on cooler surfaces...

User Manual
Page 20
... the inside or around the outside surfaces should be sure to remove any spills or spatters. Avoid the use abrasive cleaner. 5. The outside of the oven door, wipe with the juice and skin of water with a soft cloth. To prevent damage to the operating parts inside the oven, water should be used if the oven gets very dirty. When cleaning the control panel, leave oven door open to avoid...
... the inside or around the outside surfaces should be sure to remove any spills or spatters. Avoid the use abrasive cleaner. 5. The outside of the oven door, wipe with the juice and skin of water with a soft cloth. To prevent damage to the operating parts inside the oven, water should be used if the oven gets very dirty. When cleaning the control panel, leave oven door open to avoid...
User Manual
Page 21
... materials for a period of all parts except glass, finish, and trim. 2. To obtain service, bring the unit to obtain service? 1. Decorative trims, glass or light bulbs. Transportation and shipping costs. The mechanical and electrical parts, which serve as a functional purpose of this warranty is exclusive and is granted in shipping. What will repair or replace, at our discretion any covered items during the initial 24...
... materials for a period of all parts except glass, finish, and trim. 2. To obtain service, bring the unit to obtain service? 1. Decorative trims, glass or light bulbs. Transportation and shipping costs. The mechanical and electrical parts, which serve as a functional purpose of this warranty is exclusive and is granted in shipping. What will repair or replace, at our discretion any covered items during the initial 24...


