
User Manual
Page 3
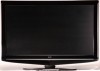
CONTENTS Know Your Machine 3 Remote Control 6 Wall Mounting...8 Antenna Connection 10 Tuning Menu Options 11 Other Connections 13 Basic Operation 18 Menu Operation 22 Teletext ...32 Common Interface Module 34 Troubleshooting ... S PR T DISPLAY U MENU V EXIT X OK Y Navigation Buttons a Green Button b Yellow Button d Blue Button e Red Button f MIX g TELETEXT h SIZE k SUBPAGE m INDEX n SUBTITLE p REVEL/Tick q HOLD/VIEW A B C F G J K N O Q T U X a e f g m n 1 x Remote Control D E H L M P R S V Y b d h k p q 3
CONTENTS Know Your Machine 3 Remote Control 6 Wall Mounting...8 Antenna Connection 10 Tuning Menu Options 11 Other Connections 13 Basic Operation 18 Menu Operation 22 Teletext ...32 Common Interface Module 34 Troubleshooting ... S PR T DISPLAY U MENU V EXIT X OK Y Navigation Buttons a Green Button b Yellow Button d Blue Button e Red Button f MIX g TELETEXT h SIZE k SUBPAGE m INDEX n SUBTITLE p REVEL/Tick q HOLD/VIEW A B C F G J K N O Q T U X a e f g m n 1 x Remote Control D E H L M P R S V Y b d h k p q 3
User Manual
Page 5
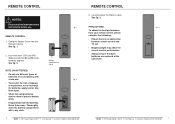
... with the and marks correctly aligned. BUSH HD Ready Digital LCDTV User Manual Customer Helpline 0845 604 0105 7 Carefully close the Battery Cover. REMOTE CONTROL NOTES: - See fig. 2. Battery Compartment Cover NOTE ON BATTERIES: • Do not mix different types of leakage or explosions, never ... away. Please read the important safety instructions before use. PRECAUTIONS: fig. 3 To obtain the best performance from the Remote Control. Insert two new 1.5V size AAA Batteries with a dry cloth. 6 BUSH HD Ready Digital LCDTV User Manual Customer Helpline 0845 604 0105...
... with the and marks correctly aligned. BUSH HD Ready Digital LCDTV User Manual Customer Helpline 0845 604 0105 7 Carefully close the Battery Cover. REMOTE CONTROL NOTES: - See fig. 2. Battery Compartment Cover NOTE ON BATTERIES: • Do not mix different types of leakage or explosions, never ... away. Please read the important safety instructions before use. PRECAUTIONS: fig. 3 To obtain the best performance from the Remote Control. Insert two new 1.5V size AAA Batteries with a dry cloth. 6 BUSH HD Ready Digital LCDTV User Manual Customer Helpline 0845 604 0105...
User Manual
Page 11
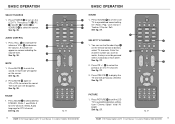
C See fig. 26. AUDIO CONTROL 1. See fig. 26. 2. See fig. 27. F SELECT TV CHANNEL H L 1. See fig. 27. A number will appear on the screen. R See fig. 26. See fig. 26. Press ... LCD-TV. See fig. 27. PICTURE 1. BASIC OPERATION BASIC OPERATION SELECT SOURCE 1. Press PRE PR H to mute the sound. Press POWER A to turn on the remote control to restore the sound. Press MUTE R to display the TV channel previously selected. S to select the source. Then press TV D , PC E , SCART C , VIDEO B or B SOURCE...
C See fig. 26. AUDIO CONTROL 1. See fig. 26. 2. See fig. 27. F SELECT TV CHANNEL H L 1. See fig. 27. A number will appear on the screen. R See fig. 26. See fig. 26. Press ... LCD-TV. See fig. 27. PICTURE 1. BASIC OPERATION BASIC OPERATION SELECT SOURCE 1. Press PRE PR H to mute the sound. Press POWER A to turn on the remote control to restore the sound. Press MUTE R to display the TV channel previously selected. S to select the source. Then press TV D , PC E , SCART C , VIDEO B or B SOURCE...

User Manual
Page 12
... expand 16:9: Scales the classic 4:3 format to 14:9. - Press SLEEP M to confirm. See fig. 28. 2. See fig. 28. Panorama: Removes the black bars on the remote control to be set the time (5-180 minutes.) See fig. 28. 3. J X Automatic Panorama 4:3 fig. 29 Y Movie expand 16:9 16:9 subtitle Wide screen fig. 30 Movie expand...
... expand 16:9: Scales the classic 4:3 format to 14:9. - Press SLEEP M to confirm. See fig. 28. 2. See fig. 28. Panorama: Removes the black bars on the remote control to be set the time (5-180 minutes.) See fig. 28. 3. J X Automatic Panorama 4:3 fig. 29 Y Movie expand 16:9 16:9 subtitle Wide screen fig. 30 Movie expand...

User Manual
Page 20
... picture Picture too dark Audio only, no images Picture only, no images 1. Check if channel is in memory. Press any button on power. 3. Please use remote control Cannot receive sufficient channels through antenna No colours Blinking picture accompanied by ghost image Broken lines or segments Certain TV channels are blocked (Hope to...
... picture Picture too dark Audio only, no images Picture only, no images 1. Check if channel is in memory. Press any button on power. 3. Please use remote control Cannot receive sufficient channels through antenna No colours Blinking picture accompanied by ghost image Broken lines or segments Certain TV channels are blocked (Hope to...
User Manual
Page 22
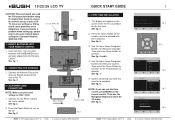
... Ready Digital LCDTV QSG Customer Helpline 0845 604 0105 BUSH HD Ready Digital LCDTV Thank you for the first time. INSERT BATTERIES INTO YOUR REMOTE CONTROL 1. Insert two new 1.5V size AAA batteries with the installation. See fig. 2. 3 - This display will appear on the screen when... set up your TV. Use the Up or Down Navigation Buttons to proceed with the and marks correctly aligned into the Remote Control. Press the Power Button to turn on the remote control to select your language. See fig. 5 and 6. 4. See fig. 2. 2. If you can not find this TV. See...
... Ready Digital LCDTV QSG Customer Helpline 0845 604 0105 BUSH HD Ready Digital LCDTV Thank you for the first time. INSERT BATTERIES INTO YOUR REMOTE CONTROL 1. Insert two new 1.5V size AAA batteries with the installation. See fig. 2. 3 - This display will appear on the screen when... set up your TV. Use the Up or Down Navigation Buttons to proceed with the and marks correctly aligned into the Remote Control. Press the Power Button to turn on the remote control to select your language. See fig. 5 and 6. 4. See fig. 2. 2. If you can not find this TV. See...


