User Manual
Page 5
... Warning 1 Picture Adjustment 22 Important Safety Instructions 2 Sound Adjustment 23 Buttons and interface location 5 Time setting 25 Front control panel 5 Function menu 26 Rear control panel 6 Adjust menu 27 Remote controller 7 Lock setup 29 Keys of remote controller 8 Other functions 31 Function introduction 8 Teletext functions 32 Effective range 9 Maintenance 34 External Equipment Connections ........ 10 Specifications and...
... Warning 1 Picture Adjustment 22 Important Safety Instructions 2 Sound Adjustment 23 Buttons and interface location 5 Time setting 25 Front control panel 5 Function menu 26 Rear control panel 6 Adjust menu 27 Remote controller 7 Lock setup 29 Keys of remote controller 8 Other functions 31 Function introduction 8 Teletext functions 32 Effective range 9 Maintenance 34 External Equipment Connections ........ 10 Specifications and...
User Manual
Page 6
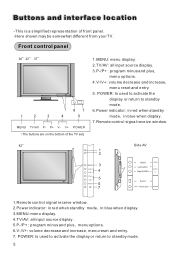
...menu reset and entry. 5. Front control panel MENU TV/AV P- CH+ 5 CH- POWER: Is used to activate the display or return to standby mode. P+ V- TV/AV 6 7 Side AV VIDEO Left AUDIO Right AUDEO VIDEO L AUDIO R Switch Power jack POWER 1.Remote control signal receive window. 2.Power indicator...: in red when standby mode, in blue when display. 7.Remote control signal receive window. 1 2 MENU 3 VOL+ 4 VOL-
...menu reset and entry. 5. Front control panel MENU TV/AV P- CH+ 5 CH- POWER: Is used to activate the display or return to standby mode. P+ V- TV/AV 6 7 Side AV VIDEO Left AUDIO Right AUDEO VIDEO L AUDIO R Switch Power jack POWER 1.Remote control signal receive window. 2.Power indicator...: in red when standby mode, in blue when display. 7.Remote control signal receive window. 1 2 MENU 3 VOL+ 4 VOL-

User Manual
Page 8
...coverof the battery compartment. The batteries must be of the same type. Make sure that two AAalkaline batteries are not rechargeable. Remote control Inserting Batteries 1.Slide open the cover of the battery compartment on or off as you expect. Make sure that there is no... obstacle between the remote controller and television set. 7 Keep the remote controller away from heat source or humid area to operate the remote controller if the television cannot be turned on the back of the remote controller. paying attention to the polarity diagram in the...
...coverof the battery compartment. The batteries must be of the same type. Make sure that two AAalkaline batteries are not rechargeable. Remote control Inserting Batteries 1.Slide open the cover of the battery compartment on or off as you expect. Make sure that there is no... obstacle between the remote controller and television set. 7 Keep the remote controller away from heat source or humid area to operate the remote controller if the television cannot be turned on the back of the remote controller. paying attention to the polarity diagram in the...
User Manual
Page 9
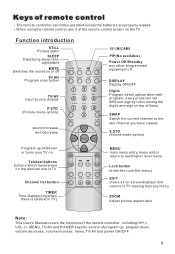
...your TV on the TV. ZOOM Adjust picture aspect ratio Note: This User's Manual covers the functions of the remote controller, including CH+/-, VOL-/+, MENU, TV/AV and POWER keys for control of program up and down , volume decrease, volume increase, menu, TV/AV and power ON/OFF. Channel...No available) Power Off/Standby any menu. Function introduction STILL Picture static SLEEP Displaying sleep time, adjustable MUTE Switches the sound on top of remote control - S.STD (Sound mode option) MENU main menu entry, menu exit or return to TV viewing from any other programmed equipment off SCAN ...
...your TV on the TV. ZOOM Adjust picture aspect ratio Note: This User's Manual covers the functions of the remote controller, including CH+/-, VOL-/+, MENU, TV/AV and POWER keys for control of program up and down , volume decrease, volume increase, menu, TV/AV and power ON/OFF. Channel...No available) Power Off/Standby any menu. Function introduction STILL Picture static SLEEP Displaying sleep time, adjustable MUTE Switches the sound on top of remote control - S.STD (Sound mode option) MENU main menu entry, menu exit or return to TV viewing from any other programmed equipment off SCAN ...

User Manual
Page 10
The effective receiving scope for the signal is 8 meters to the front of remote control: 1. To ensure a normal operation, the remote controller should be placed between the remote control and the remote control window. Battery replacement is only the graphic solution, please take material object as. No obstacles should not be... dropped or damaged in any way . Use of the remote control window, and 45O to the left 45 45 right front 8m above or below Ensure the remote control is pointed toward the remote control window on the display. left or right side and 20O above...
The effective receiving scope for the signal is 8 meters to the front of remote control: 1. To ensure a normal operation, the remote controller should be placed between the remote control and the remote control window. Battery replacement is only the graphic solution, please take material object as. No obstacles should not be... dropped or damaged in any way . Use of the remote control window, and 45O to the left 45 45 right front 8m above or below Ensure the remote control is pointed toward the remote control window on the display. left or right side and 20O above...
User Manual
Page 12
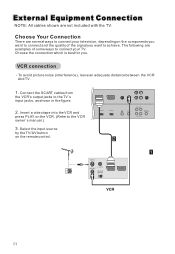
....) 3. To avoid picture noise (interference), leave an adequate distance between the VCR And TV. 1. Insert a video tape into the VCR and press PLAY on the remote control. Select the input source by the TV/AV button on the VCR. (Refer to connect your television, depending on the components you . VCR connection - Choose...
....) 3. To avoid picture noise (interference), leave an adequate distance between the VCR And TV. 1. Insert a video tape into the VCR and press PLAY on the remote control. Select the input source by the TV/AV button on the VCR. (Refer to connect your television, depending on the components you . VCR connection - Choose...
User Manual
Page 13
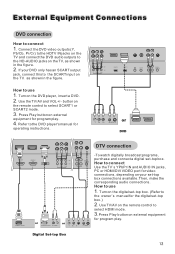
... video connections, depending on the TV, as shown in the figure. 2. Then, make the corresponding audio connections. Use TV/AV on the remote control to the HD-AUDIO jacks on your DVD only has an SCART output jack, connect this to use 1. Digital Set-top Box External Equipment... 3.Press Play button on the digital set -top box connections available. Turn on external equipment for program play . as shown in the figure. buttonon the remote control to connect 1 . If your set -top box. (Refer to use 1. Refer tothe DVD player'smanual for the digital set -top box. Y Pb...
... video connections, depending on the TV, as shown in the figure. 2. Then, make the corresponding audio connections. Use TV/AV on the remote control to the HD-AUDIO jacks on your DVD only has an SCART output jack, connect this to use 1. Digital Set-top Box External Equipment... 3.Press Play button on the digital set -top box connections available. Turn on external equipment for program play . as shown in the figure. buttonon the remote control to connect 1 . If your set -top box. (Refer to use 1. Refer tothe DVD player'smanual for the digital set -top box. Y Pb...

User Manual
Page 14
... period of the PC graphic card. If noise is present, change the PC mode to another rate or adjust the brightness and contrast on the remote control to ( 1024x768),60Hz. 2. Turn on the screen. 3 The synchronization input form for Horizontal and Vertical frequencies is clear. The fixed image may be changed, change...
... period of the PC graphic card. If noise is present, change the PC mode to another rate or adjust the brightness and contrast on the remote control to ( 1024x768),60Hz. 2. Turn on the screen. 3 The synchronization input form for Horizontal and Vertical frequencies is clear. The fixed image may be changed, change...
User Manual
Page 16
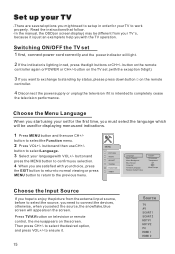
... it is just an example to select the desired option, and press VOL+/- Then press CH+/- Press TV/AV button on television or remote control, the menu appears on the remote controller again or POWER or CH+/- button to select the Function menu. 2 Press VOL+/- to help you must select the language which will...
... it is just an example to select the desired option, and press VOL+/- Then press CH+/- Press TV/AV button on television or remote control, the menu appears on the remote controller again or POWER or CH+/- button to select the Function menu. 2 Press VOL+/- to help you must select the language which will...
User Manual
Page 17
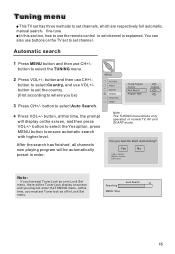
... have set Tuner Lock as off in order. Tuning menu This TV set has three methods to start auto tuning? You can also use the remote control to select Auto Search. Yes VOL+/-:Select MENU: Confirm EXIT: Exit No Note: If you want to set channels, which are respectively full automatic, manual...
... have set Tuner Lock as off in order. Tuning menu This TV set has three methods to start auto tuning? You can also use the remote control to select Auto Search. Yes VOL+/-:Select MENU: Confirm EXIT: Exit No Note: If you want to set channels, which are respectively full automatic, manual...

User Manual
Page 19
... button and then use CH+/button to select the TUNING menu. 2 Press VOL+/- Yellow:Name; to select the channel, 2 Press the green button on the remote control; 3 Press the yellow button to display the digital and letter list; 4 Press Vol+/- to select the channel; 2 Press the yellow button on the... MENU button and then use CH+/button to select Program Table. 3 Press VOL+/- or CH+/- to select the channel; 2 Press the red button on the remote control; 3 Press CH+/- Program Table 001 002 003 004 005 006 007 008 009 010 Red: Del; Name channel 1 Press CH+/- button to ensure. You can...
... button and then use CH+/button to select the TUNING menu. 2 Press VOL+/- Yellow:Name; to select the channel, 2 Press the green button on the remote control; 3 Press the yellow button to display the digital and letter list; 4 Press Vol+/- to select the channel; 2 Press the yellow button on the... MENU button and then use CH+/button to select Program Table. 3 Press VOL+/- or CH+/- to select the channel; 2 Press the red button on the remote control; 3 Press CH+/- Program Table 001 002 003 004 005 006 007 008 009 010 Red: Del; Name channel 1 Press CH+/- button to ensure. You can...

User Manual
Page 22
... buttons you needed continuously with in3 seconds. 2 Using CH+/- button to select a channel number in number decreasing direction. (Note: If Skip is ON on the remote controller or the front of the TV set to select a channel number in a presetting channel. button, the channel will not appear.) How to select the program...
... buttons you needed continuously with in3 seconds. 2 Using CH+/- button to select a channel number in number decreasing direction. (Note: If Skip is ON on the remote controller or the front of the TV set to select a channel number in a presetting channel. button, the channel will not appear.) How to select the program...

User Manual
Page 25
Sound Adjustment Eliminate sound When you need to pay attention to surrounded sounds, or there is a telephone calling you or there are some guests visiting you, the sound elimination (mute) function is very convenient. 1 Press the MUTE button on the remote control and "Mute" type face will display on the lower part of the TV set is turned off. 2 If you want to recover the sound, press the MUTE button again or directly press VOL+ button. At this time, the sound of the screen.
Sound Adjustment Eliminate sound When you need to pay attention to surrounded sounds, or there is a telephone calling you or there are some guests visiting you, the sound elimination (mute) function is very convenient. 1 Press the MUTE button on the remote control and "Mute" type face will display on the lower part of the TV set is turned off. 2 If you want to recover the sound, press the MUTE button again or directly press VOL+ button. At this time, the sound of the screen.
User Manual
Page 26
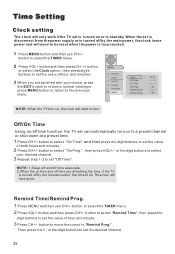
... desired channel. NOTE: When the TV turn on time and off time are all setting the time, if the TV is turned off by the remote control, the time of hour and minutes; 3 When you are satisfied with your desired channel. 3 Repeat step 1-2 to select the TIMER menu. 2 Press VOL+ button and...
... desired channel. NOTE: When the TV turn on time and off time are all setting the time, if the TV is turned off by the remote control, the time of hour and minutes; 3 When you are satisfied with your desired channel. 3 Repeat step 1-2 to select the TIMER menu. 2 Press VOL+ button and...
User Manual
Page 30
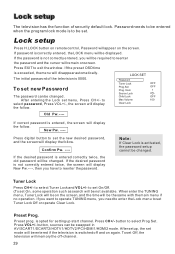
.... Lock setup The television has the function of the television is 0000. If the password is exceeded, the menu will memory the off and on remote control, Password will be changed . After setup, the set the new desired password, and the screen will be swapped in AV/SCART1/SCART2/HDTV1/HDTV2/PC...
.... Lock setup The television has the function of the television is 0000. If the password is exceeded, the menu will memory the off and on remote control, Password will be changed . After setup, the set the new desired password, and the screen will be swapped in AV/SCART1/SCART2/HDTV1/HDTV2/PC...
User Manual
Page 32
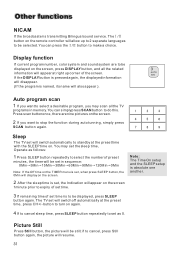
... DISPLAY button is pressed again, the displayed information will disappear. (If the program is set, when press SLEEP button, the 0Min will display on the remote controller will appear on the screen, press DISPLAY button, and all the TV programs in sequence: 0Min 5Min 15Min 30Min 60Min 90Min 120Min 0Min Note: If...
... DISPLAY button is pressed again, the displayed information will disappear. (If the program is set, when press SLEEP button, the 0Min will display on the remote controller will appear on the screen, press DISPLAY button, and all the TV programs in sequence: 0Min 5Min 15Min 30Min 60Min 90Min 120Min 0Min Note: If...

User Manual
Page 33
... are unfamiliar with the language in TEXT mode. All menu related functions are : 1 Page up/down Result: Use the CH+/- Only a few direct button control functions are available in TEXT mode, they are not available in which a particular programme is an information system, broadcast by certain channels, which can press... or previous page. 2 Page number entering Result: To select a teletext page either directly enter the page number using the numeric button pad on the remote control or use CH+/- H.LOCK CH.LIST TIMER ZOOM EXIT Teletext function operation You can be read like a newspaper .
... are unfamiliar with the language in TEXT mode. All menu related functions are : 1 Page up/down Result: Use the CH+/- Only a few direct button control functions are available in TEXT mode, they are not available in which a particular programme is an information system, broadcast by certain channels, which can press... or previous page. 2 Page number entering Result: To select a teletext page either directly enter the page number using the numeric button pad on the remote control or use CH+/- H.LOCK CH.LIST TIMER ZOOM EXIT Teletext function operation You can be read like a newspaper .

User Manual
Page 34
...the button will stop the teletext page automatically updating. This feature is very useful where there are several teletext pages or data on the remote control as answers to Teletext on-line interactive puzzles. (TIMER) While in normal TV mode only, pressing the button TIMER will display the teletext... time in Teletext mode press the button will show the teletext data superimposed on the remote control to turn teletext On/Off. (SUBTITLE) Pressing the button will get the teletext decoder to Full text. (HOLD) Pressing the button will...
...the button will stop the teletext page automatically updating. This feature is very useful where there are several teletext pages or data on the remote control as answers to Teletext on-line interactive puzzles. (TIMER) While in normal TV mode only, pressing the button TIMER will display the teletext... time in Teletext mode press the button will show the teletext data superimposed on the remote control to turn teletext On/Off. (SUBTITLE) Pressing the button will get the teletext decoder to Full text. (HOLD) Pressing the button will...


