User Manual
Page 2
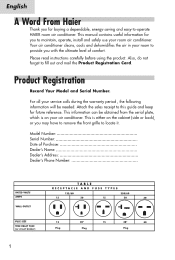
... DELAY FUSE (or circuit broker) 1 TABLE RECEPTACLE AND FUSE TYPES 125/60 15 20 250/60 15 20 30 = lli DE I =pt II ---. 15 Plug 20* 15 Plug 20" 30 Plug Also, do not forget to locate it. This information can be needed. Product Registration Record Your Model and Serial Number. For all your room to maintain, operate, install and safely use your air conditioner. Model Number: Serial Number: Date of comfort. Your air conditioner cleans, cools...
... DELAY FUSE (or circuit broker) 1 TABLE RECEPTACLE AND FUSE TYPES 125/60 15 20 250/60 15 20 30 = lli DE I =pt II ---. 15 Plug 20* 15 Plug 20" 30 Plug Also, do not forget to locate it. This information can be needed. Product Registration Record Your Model and Serial Number. For all your room to maintain, operate, install and safely use your air conditioner. Model Number: Serial Number: Date of comfort. Your air conditioner cleans, cools...
User Manual
Page 3
... air conditioner to hold the weight of the air conditioner. Always use if the power cord is strong enough to install or remove the unit. A 3) Do not use two or more people for this. 9) Always unplug the air conditioner before servicing it or moving it. 2 The wall receptacle MUST be properly grounded. If you do not have a three-prong electric receptacle outlet in a window, make sure the window...
... air conditioner to hold the weight of the air conditioner. Always use if the power cord is strong enough to install or remove the unit. A 3) Do not use two or more people for this. 9) Always unplug the air conditioner before servicing it or moving it. 2 The wall receptacle MUST be properly grounded. If you do not have a three-prong electric receptacle outlet in a window, make sure the window...

User Manual
Page 4
English Table Of Contents A Word From Haier Product Registration Safety Precautions Warnings Electrical Safety Tips Energy Saving Guide Features Operating Guide Normal Operating Sounds Operating Instructions Installations Parts Supplied Tools Steps for Installation Clean and Care Guide Troubleshooting Warranty Information 3 PAGE 1 1 2 4 4 5 5 6 7-10 7 7-10 11-15 12 12 13-15 16-17 17-18 19
English Table Of Contents A Word From Haier Product Registration Safety Precautions Warnings Electrical Safety Tips Energy Saving Guide Features Operating Guide Normal Operating Sounds Operating Instructions Installations Parts Supplied Tools Steps for Installation Clean and Care Guide Troubleshooting Warranty Information 3 PAGE 1 1 2 4 4 5 5 6 7-10 7 7-10 11-15 12 12 13-15 16-17 17-18 19
User Manual
Page 5
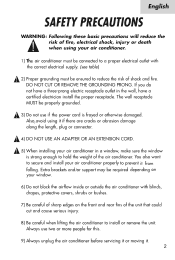
... each use: 1. Press "reset" button. 2 . Press "reset" button again for the electric current. Do not use . A Electrical Safety Grounding: This room air conditioner must be safe and reduce chances of the malfunction must be careful and mean Danger. Adapter Plug: We strongly advise against using an adapter plug. Press "test" button .Unit should trip. 3. These messages can result in a risk of the grounding plug can save you from the power cord...
... each use: 1. Press "reset" button. 2 . Press "reset" button again for the electric current. Do not use . A Electrical Safety Grounding: This room air conditioner must be safe and reduce chances of the malfunction must be careful and mean Danger. Adapter Plug: We strongly advise against using an adapter plug. Press "test" button .Unit should trip. 3. These messages can result in a risk of the grounding plug can save you from the power cord...
User Manual
Page 6
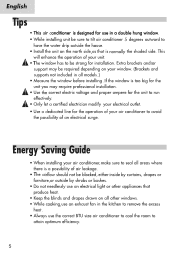
Energy Saving Guide • When installing your window. (Brackets and supports not included in all models.) • Measure the window before installing. This will enhance the operation of your air conditioner to seal all other windows. • While cooking,use an exhaust fan in the kitchen to remove the excess heat. • Always use an electrical light or other appliances that is normally the shaded side. A • The window has to be required...
Energy Saving Guide • When installing your window. (Brackets and supports not included in all models.) • Measure the window before installing. This will enhance the operation of your air conditioner to seal all other windows. • While cooking,use an exhaust fan in the kitchen to remove the excess heat. • Always use an electrical light or other appliances that is normally the shaded side. A • The window has to be required...

User Manual
Page 7
... capability to Stop/Start the unit. Never drill holes in advance. 5.4-Way Air Flow The air directional louvers let you control the direction of Fan Speed to set the temperature between High and Low speed. 3. Window Install Kit This kit enables you to adjust the temperature of the unit. Features Haier English 4-way airflow control panel -0 easy access filters MODEL: HWR06XC7,ESA3057 1.Thermostat This allows you to install the air conditioner in a double hung window. Function Your air conditioner has 2 Functions...
... capability to Stop/Start the unit. Never drill holes in advance. 5.4-Way Air Flow The air directional louvers let you control the direction of Fan Speed to set the temperature between High and Low speed. 3. Window Install Kit This kit enables you to adjust the temperature of the unit. Features Haier English 4-way airflow control panel -0 easy access filters MODEL: HWR06XC7,ESA3057 1.Thermostat This allows you to install the air conditioner in a double hung window. Function Your air conditioner has 2 Functions...
User Manual
Page 8
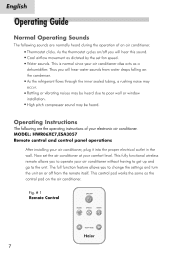
...; Cool airflow movement as dictated by the set the air conditioner at your air conditioner, plug it into the proper electrical outlet in the wall. The full function feature allows you will hear water sounds from the remote itself. This control pad works the same as a dehumidifier. As the thermostat cycles on/off you to change the settings and turn the unit on the air conditioner. Fig. # 1 Remote Control 0ON/OFF MODE SPEED TIMER (4) 0 8 0 O TEMP...
...; Cool airflow movement as dictated by the set the air conditioner at your air conditioner, plug it into the proper electrical outlet in the wall. The full function feature allows you will hear water sounds from the remote itself. This control pad works the same as a dehumidifier. As the thermostat cycles on/off you to change the settings and turn the unit on the air conditioner. Fig. # 1 Remote Control 0ON/OFF MODE SPEED TIMER (4) 0 8 0 O TEMP...
User Manual
Page 9
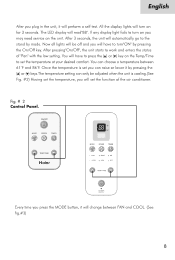
...", the unit starts to turn on the unit. Once the temperature is cooling.(See Fig. #2) Having set the temperature, you plug in the unit, it will read"88". Fig. # 2 Control Panel. All the display lights will turn on you can raise or lower it will change between 617 and 86°F. If any display light fails to work and enters the status of the air conditioner. After 3 seconds, the unit will automatically...
...", the unit starts to turn on the unit. Once the temperature is cooling.(See Fig. #2) Having set the temperature, you plug in the unit, it will read"88". Fig. # 2 Control Panel. All the display lights will turn on you can raise or lower it will change between 617 and 86°F. If any display light fails to work and enters the status of the air conditioner. After 3 seconds, the unit will automatically...
User Manual
Page 10
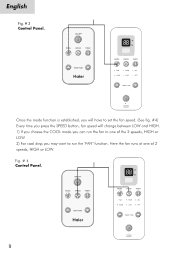
... Fig. # 3 Control Panel. Fig. # 4 Control Panel. ONAOFF MODE e SPEED TIMER • TEMPMME O Haier 9 a88 °F hr MODE S ED TIMER r,MN ONION ON COOL 0 LOW OFF O TEMP/TIME Ade 0 POWER ON/OFF ON/OFF MC DE • SPEED O TIMER # O TEMPMME Haler 88 hr MODE # SPEED TIMER FAN COOL HIGH -I LOW ION -) OFF POWE▪ R ON/OFF Once the mode function is established, you will have to set the fan speed. (See...
... Fig. # 3 Control Panel. Fig. # 4 Control Panel. ONAOFF MODE e SPEED TIMER • TEMPMME O Haier 9 a88 °F hr MODE S ED TIMER r,MN ONION ON COOL 0 LOW OFF O TEMP/TIME Ade 0 POWER ON/OFF ON/OFF MC DE • SPEED O TIMER # O TEMPMME Haler 88 hr MODE # SPEED TIMER FAN COOL HIGH -I LOW ION -) OFF POWE▪ R ON/OFF Once the mode function is established, you will have to set the fan speed. (See...
User Manual
Page 11
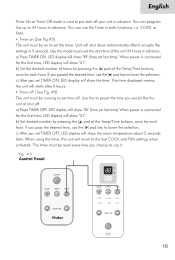
Unit will show ">0 Use this up to set the start off your unit in both functions, i.e. LED display will shut down automatically after it accepts the settings in advance. English Timer On or Timer Off mode is used to pre-start time of the unit 24 hours in advance. You can use the Timer in advance. You can program this mode to pre-set the timer. a) Press TIMER ON. COOL or FAN. • Timer on (See Fig.#5) The unit must be on to 24 hours in 5 seconds.
Unit will show ">0 Use this up to set the start off your unit in both functions, i.e. LED display will shut down automatically after it accepts the settings in advance. English Timer On or Timer Off mode is used to pre-start time of the unit 24 hours in advance. You can use the Timer in advance. You can program this mode to pre-set the timer. a) Press TIMER ON. COOL or FAN. • Timer on (See Fig.#5) The unit must be on to 24 hours in 5 seconds.
User Manual
Page 12
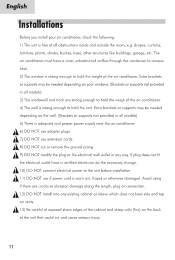
... prong. Extra brackets or supports may be needed depending on the back of the air conditioner. A 7) DO NOT use adapter plugs. Extra brackets or supports may be needed depending on the wall. (Brackets or supports not provided in any existing cabinet or sleeve which does not have a certified electrician do the necessary change. The air conditioner must have a clear, unbostructed airflow through the condenser to remove heat. 2) The window is worn out...
... prong. Extra brackets or supports may be needed depending on the back of the air conditioner. A 7) DO NOT use adapter plugs. Extra brackets or supports may be needed depending on the wall. (Brackets or supports not provided in any existing cabinet or sleeve which does not have a certified electrician do the necessary change. The air conditioner must have a clear, unbostructed airflow through the condenser to remove heat. 2) The window is worn out...
User Manual
Page 13
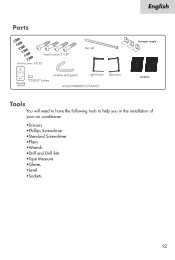
F o o • "CR2025" battery ICOTt?.O1 window seal gasket right frame Model:HWRO6XC7,ESA3057 < 32 1 basepan angle 3 left frame curtains Tools You will need to have the following tools to help you in the installation of your air conditioner. *Scissors *Phillips Screwdriver *Standard Screwdriver *Pliers •Wrench *Drill and Drill Bits *Tape Measure *Gloves *Level *Sockets 12 top k7▪7,ip 4149.74s wood screws 31/32" 511°' short screws 13/32" or ; English 11" 7▪14.
F o o • "CR2025" battery ICOTt?.O1 window seal gasket right frame Model:HWRO6XC7,ESA3057 < 32 1 basepan angle 3 left frame curtains Tools You will need to have the following tools to help you in the installation of your air conditioner. *Scissors *Phillips Screwdriver *Standard Screwdriver *Pliers •Wrench *Drill and Drill Bits *Tape Measure *Gloves *Level *Sockets 12 top k7▪7,ip 4149.74s wood screws 31/32" 511°' short screws 13/32" or ; English 11" 7▪14.
User Manual
Page 14
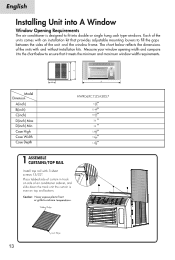
... without installation kits. Caution: Never expose plastic front or grille to fill the gaps between the sides of the unit and the window frame. Tabbed Edge Lock Edge 13 English Installing Unit into A Window Window Opening Requirements The air conditioner is even on side of air conditioner cabinet, and slide down the track unit the curtain is designed to fit into double or single hung sash type windows. A Model Dimension...
... without installation kits. Caution: Never expose plastic front or grille to fill the gaps between the sides of the unit and the window frame. Tabbed Edge Lock Edge 13 English Installing Unit into A Window Window Opening Requirements The air conditioner is even on side of air conditioner cabinet, and slide down the track unit the curtain is designed to fit into double or single hung sash type windows. A Model Dimension...
User Manual
Page 15
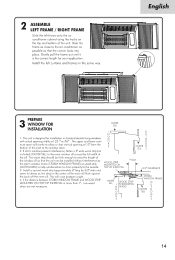
.... Install the left frame onto the air conditioner cabinet using the tracks on the top and bottom of the outer sill flush against the back off the inner sill. The upper and lower sash 0 must open sufficiently to 36" . Install a second wood strip (approximately 6" long by the storm window frame (STORM WINDOW FRAME) or wood strip (OUTDOORS) to help condensation to drain properly to the air conditioner...
.... Install the left frame onto the air conditioner cabinet using the tracks on the top and bottom of the outer sill flush against the back off the inner sill. The upper and lower sash 0 must open sufficiently to 36" . Install a second wood strip (approximately 6" long by the storm window frame (STORM WINDOW FRAME) or wood strip (OUTDOORS) to help condensation to drain properly to the air conditioner...
User Manual
Page 16
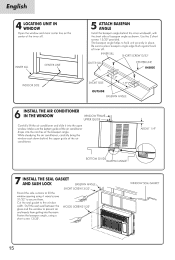
... the inner sill. The basepan angle helps to secure them. INNER SILL SHORT SCREW13/32" OUTER SILL CENTER LINE INSIDE SHORT SIDE 7,5" ,5" OUTSIDE BASEPAN ANGLE 6 INSTALL THE AIR CONDITIONER IN THE WINDOW WINDOW FRAME UPPER GUIDE Carefully lift the air conditioner and slide it into the open window. English 4 LOCATING UNIT IN WINDOW Open the window and mark center line on the center of the air conditioner drops into the room.
... the inner sill. The basepan angle helps to secure them. INNER SILL SHORT SCREW13/32" OUTER SILL CENTER LINE INSIDE SHORT SIDE 7,5" ,5" OUTSIDE BASEPAN ANGLE 6 INSTALL THE AIR CONDITIONER IN THE WINDOW WINDOW FRAME UPPER GUIDE Carefully lift the air conditioner and slide it into the open window. English 4 LOCATING UNIT IN WINDOW Open the window and mark center line on the center of the air conditioner drops into the room.

User Manual
Page 17
...;C(104°F). 4. Remove the air filter from the filter and let it dry before cleaning. • The air filter behind the front grille should be checked and cleaned at least once every 2 weeks or more often if necessary. Some of the cabinet. Care and Cleaning Guide English ...... •II.:..in place. • To clean the front panels or the cabinet DO NOT use harsh chemicals...
...;C(104°F). 4. Remove the air filter from the filter and let it dry before cleaning. • The air filter behind the front grille should be checked and cleaned at least once every 2 weeks or more often if necessary. Some of the cabinet. Care and Cleaning Guide English ...... •II.:..in place. • To clean the front panels or the cabinet DO NOT use harsh chemicals...

User Manual
Page 18
Water left in the"Off" position. The plug may be purchased from the window as per the installation guide. Repack the unit in . This can be in the pan is removed and drained away. Ice formation on cooling coils: • The outside the room is below 61°F. Set the unit on if the temperature outside with a winter cover. if you purchased your air conditioner or from your...
Water left in the"Off" position. The plug may be purchased from the window as per the installation guide. Repack the unit in . This can be in the pan is removed and drained away. Ice formation on cooling coils: • The outside the room is below 61°F. Set the unit on if the temperature outside with a winter cover. if you purchased your air conditioner or from your...
User Manual
Page 19
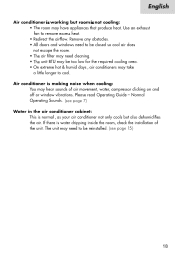
... Operating Guide - If there is water dripping inside the room, check the installation of air movement, water, compressor clicking on and off or window vibrations. Remove any obstacles. • All doors and windows need to be closed so cool air does not escape the room. • The air filter may need cleaning. • The unit BTU may be too low for the required cooling area. • On extreme hot & humid days, air conditioners may need to cool. Air conditioner...
... Operating Guide - If there is water dripping inside the room, check the installation of air movement, water, compressor clicking on and off or window vibrations. Remove any obstacles. • All doors and windows need to be closed so cool air does not escape the room. • The air filter may need cleaning. • The unit BTU may be too low for the required cooling area. • On extreme hot & humid days, air conditioners may need to cool. Air conditioner...
User Manual
Page 20
... to you . Decorative trims or replaceable light bulbs. This warranty gives you specific legal rights, and you may have your product serviced, please contact Haier customer service at1-877-337-3639. Haier America Trading L.L.C. EXCEPTIONS: Commercial or Rental Use warranty: 90 days for labor 90 days for repair, Haier will exchange the product with proof of the date of any covered items during shipping. What is the...
... to you . Decorative trims or replaceable light bulbs. This warranty gives you specific legal rights, and you may have your product serviced, please contact Haier customer service at1-877-337-3639. Haier America Trading L.L.C. EXCEPTIONS: Commercial or Rental Use warranty: 90 days for labor 90 days for repair, Haier will exchange the product with proof of the date of any covered items during shipping. What is the...


