User Manual
Page 1
... using Names of the parts the 2nd cover Safety precautions 1 Installation and adjustment 3 Introduction of the major functions .......5 Using process Preparation before washing 6 The musts in washing 7 Usage of the detergent 8 Washing sequence 9 Disposal after washing 13 Trouble-shooting* Answers to guarantee your safety. User's manual HWM80-113S Twin-tub Washing Machine Please read this manual. The manufacturer will not bear the responsibility for future reference Please check if the power...
... using Names of the parts the 2nd cover Safety precautions 1 Installation and adjustment 3 Introduction of the major functions .......5 Using process Preparation before washing 6 The musts in washing 7 Usage of the detergent 8 Washing sequence 9 Disposal after washing 13 Trouble-shooting* Answers to guarantee your safety. User's manual HWM80-113S Twin-tub Washing Machine Please read this manual. The manufacturer will not bear the responsibility for future reference Please check if the power...
User Manual
Page 2
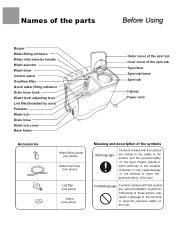
... of the users. Names of the parts Before Using Buzzer Water-filling entrance Water inlet selector handle Wash selector Wash timer Control panel Overflow filter Quick water-filling entrance Drain hose hook Water level adjusting lever Lint filter(Installed by user) Pulsator Wash tub Drain hose Wash tub cover Base frame Outer cover of the spin tub Inner cover of the spin tub Spin timer Spin tub frame Spin tub Cabinet Power cord Accessories Water-filling jointer (one piece) Water inlet hose (one piece) Lint filter (one piece) Gland (one piece) Meaning and...
... of the users. Names of the parts Before Using Buzzer Water-filling entrance Water inlet selector handle Wash selector Wash timer Control panel Overflow filter Quick water-filling entrance Drain hose hook Water level adjusting lever Lint filter(Installed by user) Pulsator Wash tub Drain hose Wash tub cover Base frame Outer cover of the spin tub Inner cover of the spin tub Spin timer Spin tub frame Spin tub Cabinet Power cord Accessories Water-filling jointer (one piece) Water inlet hose (one piece) Lint filter (one piece) Gland (one piece) Meaning and...
User Manual
Page 3
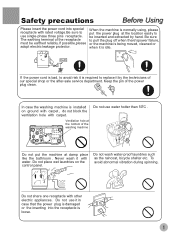
... power plug clean. Be sure to use water hotter than 50 C . Do not wash water-proof laundries such as the raincoat, bicycle shelter etc. Safety precautions Before Using Please insert the power cord into the receptacle is loose. Never wash it is installed on the control panel. Do not place wet laundries on ground with carpet , do not block the ventilation hole with water. In case the washing machine...
... power plug clean. Be sure to use water hotter than 50 C . Do not wash water-proof laundries such as the raincoat, bicycle shelter etc. Safety precautions Before Using Please insert the power cord into the receptacle is loose. Never wash it is installed on the control panel. Do not place wet laundries on ground with carpet , do not block the ventilation hole with water. In case the washing machine...

User Manual
Page 4
... suggested to use the machine. Safety precautions Before Using Do not stretch hands into the working machine. Petrol Thinner Handicapped or children without care shall not use foamless washing powder. Do not decompose, repair or alter the machine by yourself. Please check if the water faucet is open, and if the connection of the water inlet pipe is slow. Take special care of the coins, buttons, sand, hairpin...
... suggested to use the machine. Safety precautions Before Using Do not stretch hands into the working machine. Petrol Thinner Handicapped or children without care shall not use foamless washing powder. Do not decompose, repair or alter the machine by yourself. Please check if the water faucet is open, and if the connection of the water inlet pipe is slow. Take special care of the coins, buttons, sand, hairpin...
User Manual
Page 5
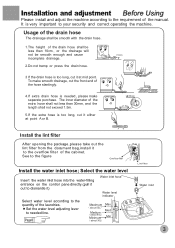
Installation and adjustment Before Using Please install and adjust the machine according to your security and correct operating the machine. It is very important to the requirement of the drain hose shall be less than 10cm , or the drainage will not be smooth enough and cause 30mm Usage of the drain hose The drainage shall be smooth with the drain hose. 1.The height of the manual.
Installation and adjustment Before Using Please install and adjust the machine according to your security and correct operating the machine. It is very important to the requirement of the drain hose shall be less than 10cm , or the drainage will not be smooth enough and cause 30mm Usage of the drain hose The drainage shall be smooth with the drain hose. 1.The height of the manual.
User Manual
Page 6
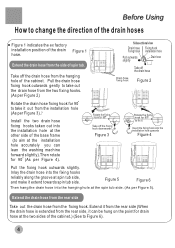
... rear side Take out the drain hose from the hanging hole of spin tub. Extend the drain hose from the installation hole (As per Figure 5). Rotate the fixing hook for 90 Take off the drain hose Drain hose fixing hook Figure 2 Rotate the drain hose fixing hook for 90 to take it extend towards spin tub side. Before Using How to change the direction of the drain hoses Figure 1 indicates the ex factory...
... rear side Take out the drain hose from the hanging hole of spin tub. Extend the drain hose from the installation hole (As per Figure 5). Rotate the fixing hook for 90 Take off the drain hose Drain hose fixing hook Figure 2 Rotate the drain hose fixing hook for 90 to take it extend towards spin tub side. Before Using How to change the direction of the drain hoses Figure 1 indicates the ex factory...
User Manual
Page 7
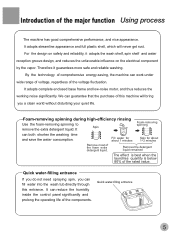
...-removing spinning during high-efficiency rinsing Use the foam-removing spinning to Spin remove the extra detergent liquid. For the design on safety and reliability, it guarantees more safe and reliable washing. Quick water-filling entrance If you do not need spraying spin, you a clean world without disturbing your quiet life. It adopts complete enclosed base frame and low-noise motor, and thus reduces the working noise significantly. Fill water for about 1 minutes Spin...
...-removing spinning during high-efficiency rinsing Use the foam-removing spinning to Spin remove the extra detergent liquid. For the design on safety and reliability, it guarantees more safe and reliable washing. Quick water-filling entrance If you do not need spraying spin, you a clean world without disturbing your quiet life. It adopts complete enclosed base frame and low-noise motor, and thus reduces the working noise significantly. Fill water for about 1 minutes Spin...
User Manual
Page 8
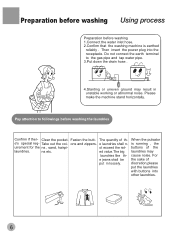
... of discretion,please put in unstable working or abnormal noise. e's special req- Take out the coi- laundries. Then insert the power plug into other laundries. Do not connect the earth terminal to followings before washing 1.Connect the water inlet hose. 2.Confirm that the washing machine is running , the buttons of the laundries shall not exceed the rated value.The big laundries like the jeans shall be put...
... of discretion,please put in unstable working or abnormal noise. e's special req- Take out the coi- laundries. Then insert the power plug into other laundries. Do not connect the earth terminal to followings before washing 1.Connect the water inlet hose. 2.Confirm that the washing machine is running , the buttons of the laundries shall not exceed the rated value.The big laundries like the jeans shall be put...
User Manual
Page 9
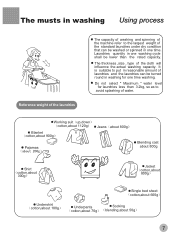
... lower than 3.2kg, so as to avoid splashing of the cloth will influence the actual washing capacity. The thickness ,size , type of water. The musts in washing Using process Reference weight of the laundries The capacity of washing and spinning of the machine refer to the largest weight of the standard laundries under dry condition that can be turned round in washing for laundries less than the rated capacity.
... lower than 3.2kg, so as to avoid splashing of the cloth will influence the actual washing capacity. The thickness ,size , type of water. The musts in washing Using process Reference weight of the laundries The capacity of washing and spinning of the machine refer to the largest weight of the standard laundries under dry condition that can be turned round in washing for laundries less than the rated capacity.
User Manual
Page 10
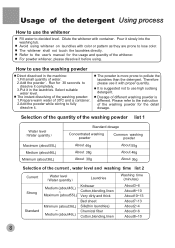
... decided level. Run for 30 seconds to dissolve it completely. 3.Put it slowly into the washing tub. Avoid using . Select suitable water level. Usage of the detergent Using process How to use high sudsing detergent. Dilute the whitener with container. Pour it in the machine: 1.Fill small quantity of water. 2.Add the powder . Please refer to the instruction of the washing powder for the usage and quantity of the current , water level and washing time list...
... decided level. Run for 30 seconds to dissolve it completely. 3.Put it slowly into the washing tub. Avoid using . Select suitable water level. Usage of the detergent Using process How to use high sudsing detergent. Dilute the whitener with container. Pour it in the machine: 1.Fill small quantity of water. 2.Add the powder . Please refer to the instruction of the washing powder for the usage and quantity of the current , water level and washing time list...
User Manual
Page 11
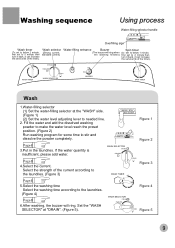
... 4 DRAIN Figure 5 If the water quantity is insufficient, please add water. 4.Select the current. Fill the water and add the dissolved washing powder to make the water level reach the preset position. (Figure 2) Run washing program for some time to 2 minute then turn it back. Set the "WASH SELECTOR" at the "WASH" side. (Figure 1) (2) Set the water level adjusting lever to needed line. 2. WASH SPIN Figure 1 Figure 2 3.Put in the laundries. Washing sequence Using process Water-filling...
... 4 DRAIN Figure 5 If the water quantity is insufficient, please add water. 4.Select the current. Fill the water and add the dissolved washing powder to make the water level reach the preset position. (Figure 2) Run washing program for some time to 2 minute then turn it back. Set the "WASH SELECTOR" at the "WASH" side. (Figure 1) (2) Set the water level adjusting lever to needed line. 2. WASH SPIN Figure 1 Figure 2 3.Put in the laundries. Washing sequence Using process Water-filling...
User Manual
Page 12
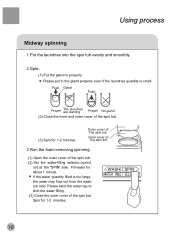
... spin tub. (2) Set the water-filling selector control rod at the "SPIN" side. Outer cover of The spin tub Inner cover of The spin tub 3.Run the foam-removing spinning. (1) Open the outer cover of the spin tub. WASH SPIN Fill water for 1-2 minutes. Push Gland Push Proper The laundries are slanting Proper No gland (2) Close the inner and outer cover of the spin tub. (3) Spin for about 1 minute. Spin for 1-2 minutes. Using process Midway spinning...
... spin tub. (2) Set the water-filling selector control rod at the "SPIN" side. Outer cover of The spin tub Inner cover of The spin tub 3.Run the foam-removing spinning. (1) Open the outer cover of the spin tub. WASH SPIN Fill water for 1-2 minutes. Push Gland Push Proper The laundries are slanting Proper No gland (2) Close the inner and outer cover of the spin tub. (3) Spin for about 1 minute. Spin for 1-2 minutes. Using process Midway spinning...
User Manual
Page 13
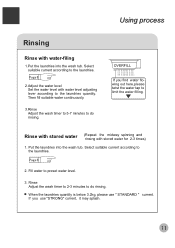
... spinning and rinsing with water-filing 1.Put the laundries into the wash tub. If you find water flowing out here,please twist the water tap to do rinsing. Using process Rinsing Rinse with stored water for 2-3 times) 1. OVERFILL If you use " STANDARD " current. Put the laundries into the wash tub. Select suitable current according to preset water level. 3. Fill water to the laundries. 2. Select suitable current according to the laundries. 2.Adjust the water level Set the water level...
... spinning and rinsing with water-filing 1.Put the laundries into the wash tub. If you find water flowing out here,please twist the water tap to do rinsing. Using process Rinsing Rinse with stored water for 2-3 times) 1. OVERFILL If you use " STANDARD " current. Put the laundries into the wash tub. Select suitable current according to preset water level. 3. Fill water to the laundries. 2. Select suitable current according to the laundries. 2.Adjust the water level Set the water level...
User Manual
Page 14
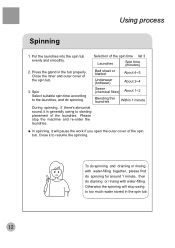
... the laundries. Using process Spinning 1. Bed sheet or blanket Underwear (knitwear) About 4~5 About 2~4 3. Please stop owing to the laundries, and do draining or rinsing with water-filling. Close the inner and outer cover of the spin time list 3 Laundries Spin time (minutes) 2. Spin Select suitable spin time according to too much water stored in the tub properly. In spinning, it will stop the machine and re-order the laundries. To do spinning and draining or rinsing with water...
... the laundries. Using process Spinning 1. Bed sheet or blanket Underwear (knitwear) About 4~5 About 2~4 3. Please stop owing to the laundries, and do draining or rinsing with water-filling. Close the inner and outer cover of the spin time list 3 Laundries Spin time (minutes) 2. Spin Select suitable spin time according to too much water stored in the tub properly. In spinning, it will stop the machine and re-order the laundries. To do spinning and draining or rinsing with water...
User Manual
Page 15
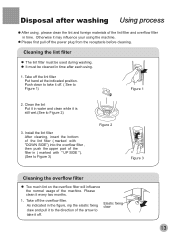
... lint on the overflow filter will influence the normal usage of the machine. Install the lint filter After cleaning, insert the bottom of the lint filter ( marked with "DOWN SIDE") into the overflow filter , then push the upper part of the arrow to Figure 2) 3. Take off the power plug from the receptacle before cleaning. As indicated in time. Disposal after each using. 1. Push down to...
... lint on the overflow filter will influence the normal usage of the machine. Install the lint filter After cleaning, insert the bottom of the lint filter ( marked with "DOWN SIDE") into the overflow filter , then push the upper part of the arrow to Figure 2) 3. Take off the power plug from the receptacle before cleaning. As indicated in time. Disposal after each using. 1. Push down to...
User Manual
Page 16
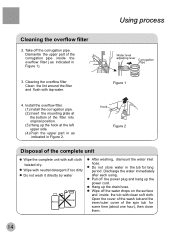
... each using. Dismantle the upper part of the spin tub for long period. Wipe with tap water. Pull off the corrugation pipe. Take off the power plug and hang up the drain hose. Hang up the power cord. Cleaning the overflow filter Clean the lint around the filter and flush with neutral detergent if too dirty Do not wash it directly by water Petrol Thinner Alcohol After washing, dismount the water inlet hose. Wipe...
... each using. Dismantle the upper part of the spin tub for long period. Wipe with tap water. Pull off the corrugation pipe. Take off the power plug and hang up the drain hose. Hang up the power cord. Cleaning the overflow filter Clean the lint around the filter and flush with neutral detergent if too dirty Do not wash it directly by water Petrol Thinner Alcohol After washing, dismount the water inlet hose. Wipe...
User Manual
Page 17
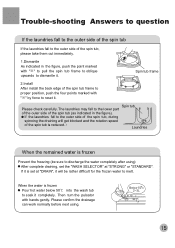
... work normally before next using ) After complete draining, set at "STRONG" or "STANDARD". Below 50 c 2~3L Trouble-shooting Answers to question If the laundries fall to the outer side of the spin tub If the laundries fall to the outer side of the spin tub, please take them out immediately. 1.Dismantle As indicated in the figure). If it completely. Spin tub frame Spin tub Please check carefully. When the water...
... work normally before next using ) After complete draining, set at "STRONG" or "STANDARD". Below 50 c 2~3L Trouble-shooting Answers to question If the laundries fall to the outer side of the spin tub If the laundries fall to the outer side of the spin tub, please take them out immediately. 1.Dismantle As indicated in the figure). If it completely. Spin tub frame Spin tub Please check carefully. When the water...
User Manual
Page 18
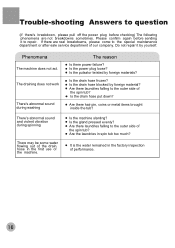
... there power failure? Is the machine slanting? Do not repair it to repair. The draining does not work There's abnormal sound during washing There's abnormal sound and violent vibration during spinning There may be some water flowing out of the drain hose in the factory inspection of the spin tub? Is the drain hose blocked by foreign material? Are the laundries in spin tub too much? Please confirm again before checking) The...
... there power failure? Is the machine slanting? Do not repair it to repair. The draining does not work There's abnormal sound during washing There's abnormal sound and violent vibration during spinning There may be some water flowing out of the drain hose in the factory inspection of the spin tub? Is the drain hose blocked by foreign material? Are the laundries in spin tub too much? Please confirm again before checking) The...

User Manual
Page 19
Packing list User's manual Water inlet hose Water-filling jointer Gland Lint filter Twin-tub washing machine One piece One piece One piece One piece One piece One set
Packing list User's manual Water inlet hose Water-filling jointer Gland Lint filter Twin-tub washing machine One piece One piece One piece One piece One piece One set
User Manual
Page 20
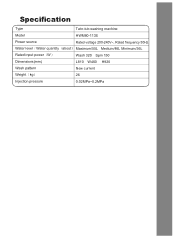
Specification Type Model Power source Water level Water quantity about Rated input power W Dimensions(mm) Wash pattern Weight kg Injection pressure Twin-tub washing machine HWM80-113S Rated voltage 200-240V~, Rated frequency 50Hz Maximum/55L Medium/46L Minimum/36L Wash 320 Spin 150 L810 W460 H926 New current 26 0.02MPa~0.2MPa
Specification Type Model Power source Water level Water quantity about Rated input power W Dimensions(mm) Wash pattern Weight kg Injection pressure Twin-tub washing machine HWM80-113S Rated voltage 200-240V~, Rated frequency 50Hz Maximum/55L Medium/46L Minimum/36L Wash 320 Spin 150 L810 W460 H926 New current 26 0.02MPa~0.2MPa


