User Manual
Page 1
Twin-tub Washing Machine User's manual This manual is for future reference. Retain it for HWM75-27S Please read this manual carefully before using.
Twin-tub Washing Machine User's manual This manual is for future reference. Retain it for HWM75-27S Please read this manual carefully before using.
User Manual
Page 2
Contents Names of the parts Safety precautions Installation and adjustment Preparation before washing The musts in washing Usage of the detergent Washing sequence Disposal after washing Trouble-Shooting *Answers to question Packing list *Specification
Contents Names of the parts Safety precautions Installation and adjustment Preparation before washing The musts in washing Usage of the detergent Washing sequence Disposal after washing Trouble-Shooting *Answers to question Packing list *Specification

User Manual
Page 3
... may cause damage of the machine or injure the personal safety of the user. Names of the parts Buzzer Water-filling entrance Water inlet selector handle Wash selector Wash timer Control panel Overflow filter Water level adjusting lever Drain hose hanging hole Lint filter Installed by user) Valve cover Pulsator Wash tub Drain hose Wash tub cober Base frame Outer cover of the spin tub Inner cover of the spin tub Spin timer Spin tub frame Spin tub Cabinet Meaning and description of the symbols...
... may cause damage of the machine or injure the personal safety of the user. Names of the parts Buzzer Water-filling entrance Water inlet selector handle Wash selector Wash timer Control panel Overflow filter Water level adjusting lever Drain hose hanging hole Lint filter Installed by user) Valve cover Pulsator Wash tub Drain hose Wash tub cober Base frame Outer cover of the spin tub Inner cover of the spin tub Spin timer Spin tub frame Spin tub Cabinet Meaning and description of the symbols...
User Manual
Page 4
Do not wash water-proof laundries like the bathroom . When the machine is installed on the control panel. Do not put the power plug at the bottom of the washing machine Do not let the machine share one receptacle with other electric appliances. In case the washing machine is normally using, please put the machine at damp place like the raincoat, bike covers etc. Do not place wet laundries on...
Do not wash water-proof laundries like the bathroom . When the machine is installed on the control panel. Do not put the power plug at the bottom of the washing machine Do not let the machine share one receptacle with other electric appliances. In case the washing machine is normally using, please put the machine at damp place like the raincoat, bike covers etc. Do not place wet laundries on...
User Manual
Page 5
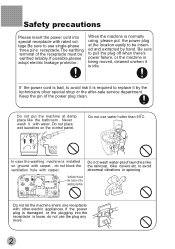
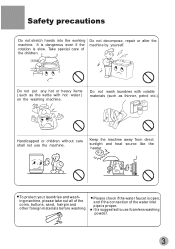
Please check if the water faucet is open, and if the connection of the water inlet pipe is suggested to use the machine. Do not decompose, repair or alter the machine by yourself. Petrol Thinner Handicapped or children without care shall not use foamless washing powder. 3 It is proper. Keep the machine away from direct sunlight and heat source like the heater. Safety precautions Do not...
Please check if the water faucet is open, and if the connection of the water inlet pipe is suggested to use the machine. Do not decompose, repair or alter the machine by yourself. Petrol Thinner Handicapped or children without care shall not use foamless washing powder. 3 It is proper. Keep the machine away from direct sunlight and heat source like the heater. Safety precautions Do not...
User Manual
Page 6
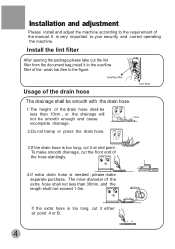
Usage of the drain hose Overflow filter Lint filter The drainage shall be smooth with the drain hose. 1.The height of the manual. Install the lint filter After opening the package,please take out the lint filter from the document bag,install it to the overflow filter of the wash tub.See to your security and correct operating the machine. It is very important to the figure. Installation and adjustment Please install and adjust the machine according to the requirement of the drain hose shall be less than 10cm , or the drainage will not be smooth enough and cause 30mm
Usage of the drain hose Overflow filter Lint filter The drainage shall be smooth with the drain hose. 1.The height of the manual. Install the lint filter After opening the package,please take out the lint filter from the document bag,install it to the overflow filter of the wash tub.See to your security and correct operating the machine. It is very important to the figure. Installation and adjustment Please install and adjust the machine according to the requirement of the drain hose shall be less than 10cm , or the drainage will not be smooth enough and cause 30mm
User Manual
Page 7
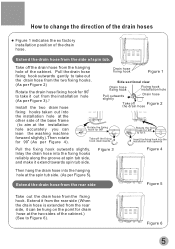
... the drain hose Drain hose fixing hook Figure 1 fixing hook outwards gently to take it extend towards spin tub side. Take off the drain hose from the two fixing hooks. (As per Figure 5). Extend the drain hose from the rear side Figure 5 Take out the drain hose from the installation hole (As per Figure 4). Figure 6 5 How to change the direction of the drain hoses Figure 1 indicates the ex factory installation position...
... the drain hose Drain hose fixing hook Figure 1 fixing hook outwards gently to take it extend towards spin tub side. Take off the drain hose from the two fixing hooks. (As per Figure 5). Extend the drain hose from the rear side Figure 5 Take out the drain hose from the installation hole (As per Figure 4). Figure 6 5 How to change the direction of the drain hoses Figure 1 indicates the ex factory installation position...
User Manual
Page 8
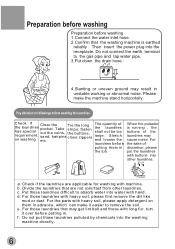
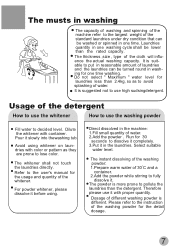
... remove the dirt like mud or dust. For those laundries that are applicable for washing with buttons into the washing machine directly. 6 a. Divide the laundries that may cause noise. For those laundries difficult to followings before washing 1.Connect the water inlet hose. 2.Confirm that the washing machine is running , the buttons of the laundries shall not be too large. fasten the buttons; Stretch and loosen the laundries before putting in the tub. Check...
... remove the dirt like mud or dust. For those laundries that are applicable for washing with buttons into the washing machine directly. 6 a. Divide the laundries that may cause noise. For those laundries difficult to followings before washing 1.Connect the water inlet hose. 2.Confirm that the washing machine is running , the buttons of the laundries shall not be too large. fasten the buttons; Stretch and loosen the laundries before putting in the tub. Check...
User Manual
Page 9
... the user's manual for the usage and quantity of different washing powder is more prone to pollute the laundries than the rated capacity. Select suitable water level. The powder is different. Laundries quantity in one washing cycle shall be lower than the detergent. It is suggested not to use the washing powder Fill water to decided level. Direct dissolved in washing for 30 seconds to dissolve it completely. 3.Put it in one time washing...
... the user's manual for the usage and quantity of different washing powder is more prone to pollute the laundries than the rated capacity. Select suitable water level. The powder is different. Laundries quantity in one washing cycle shall be lower than the detergent. It is suggested not to use the washing powder Fill water to decided level. Direct dissolved in washing for 30 seconds to dissolve it completely. 3.Put it in one time washing...
User Manual
Page 10
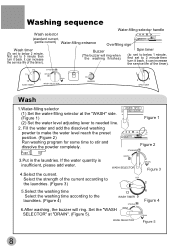
..., first set to 5 minute then turn it back. Fill the water and add the dissolved washing powder to make the water level reach the preset position. (Figure 2) Run washing program for some time to needed line. 2. Set the "WASH GENTLE SELECTOR" at the "WASH" side. (Figure 1) (2) Set the water level adjusting lever to stir and dissolve the powder completely. GENTLE WASH SELECTOR 4.Select the current. WASH SELECTOR Figure 4 DRAIN Figure 5 8 WASH SPIN Figure 1 Figure...
..., first set to 5 minute then turn it back. Fill the water and add the dissolved washing powder to make the water level reach the preset position. (Figure 2) Run washing program for some time to needed line. 2. Set the "WASH GENTLE SELECTOR" at the "WASH" side. (Figure 1) (2) Set the water level adjusting lever to stir and dissolve the powder completely. GENTLE WASH SELECTOR 4.Select the current. WASH SELECTOR Figure 4 DRAIN Figure 5 8 WASH SPIN Figure 1 Figure...
User Manual
Page 11
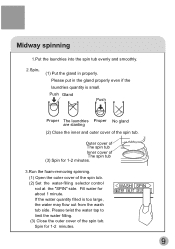
... Push Proper The laundries Proper No gland are slanting (2) Close the inner and outer cover of the spin tub. WASH SPIN 9 Spin for 1-2 minutes. 3.Run the foam-removing spinning. (1) Open the outer cover of the spin tub. (2) Set the water-filling selector control rod at the "SPIN" side. Please twist the water tap to limit the water filling. (3) Close the outer cover of the spin tub. If the water quantity filled...
... Push Proper The laundries Proper No gland are slanting (2) Close the inner and outer cover of the spin tub. WASH SPIN 9 Spin for 1-2 minutes. 3.Run the foam-removing spinning. (1) Open the outer cover of the spin tub. (2) Set the water-filling selector control rod at the "SPIN" side. Please twist the water tap to limit the water filling. (3) Close the outer cover of the spin tub. If the water quantity filled...
User Manual
Page 12
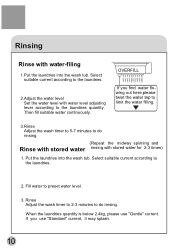
... the laundries. 2.Adjust the water level Set the water level with water level adjusting lever according to do rinsing. (Repeat the midway spinning and Rinse with stored water rinsing with water-filing 1.Put the laundries into the wash tub. If you find water flowing out here,please twist the water tap to limit the water filling. 3.Rinse Adjust the wash timer to 5-7 minutes to do rinsing. OVERFILL If you use "Gentle" current. Rinse Adjust the wash...
... the laundries. 2.Adjust the water level Set the water level with water level adjusting lever according to do rinsing. (Repeat the midway spinning and Rinse with stored water rinsing with water-filing 1.Put the laundries into the wash tub. If you find water flowing out here,please twist the water tap to limit the water filling. 3.Rinse Adjust the wash timer to 5-7 minutes to do rinsing. OVERFILL If you use "Gentle" current. Rinse Adjust the wash...

User Manual
Page 13
... draining or rinsing with water-filling. Spin Select suitable spin time according to slanting placement of the laundries. In spinning, it is generally owing to the laundries, and do draining or rinsing with water-filling together, please first do spinning for around 1 minute, then do spinning. Please stop owing to resume the spinning. Press the gland in the spin tub. 11 During spinning, if there's abnormal sound, it will stop the machine...
... draining or rinsing with water-filling. Spin Select suitable spin time according to slanting placement of the laundries. In spinning, it is generally owing to the laundries, and do draining or rinsing with water-filling together, please first do spinning for around 1 minute, then do spinning. Please stop owing to resume the spinning. Press the gland in the spin tub. 11 During spinning, if there's abnormal sound, it will stop the machine...
User Manual
Page 14
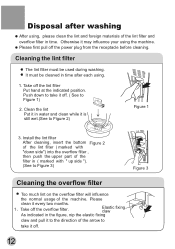
... every two months. 1 Take off the power plug from the receptacle before cleaning. Disposal after each using , please clean the lint and foreign materials of the lint filter and overflow filter in time. Push down side") into the overflow filter , then push the upper part of the filter in time after washing After using . 1. Install the lint filter After cleaning, insert the bottom Figure 2 of the lint...
... every two months. 1 Take off the power plug from the receptacle before cleaning. Disposal after each using , please clean the lint and foreign materials of the lint filter and overflow filter in time. Push down side") into the overflow filter , then push the upper part of the filter in time after washing After using . 1. Install the lint filter After cleaning, insert the bottom Figure 2 of the lint...

User Manual
Page 15
... power plug and hang up the drain hose. Dismantle the upper part of the complete unit Wipe the complete unit with tap water. Discharge the water immediately after each using. Cleaning the overflow filter 2. Figure 1 4. Do not store water in Figure 1). Hang up the power cord. Hook Figure 2 Disposal of the corrugation pipe inside the tub with neutral detergent if too dirty Do not wash it directly...
... power plug and hang up the drain hose. Dismantle the upper part of the complete unit Wipe the complete unit with tap water. Discharge the water immediately after each using. Cleaning the overflow filter 2. Figure 1 4. Do not store water in Figure 1). Hang up the power cord. Hook Figure 2 Disposal of the corrugation pipe inside the tub with neutral detergent if too dirty Do not wash it directly...
User Manual
Page 16
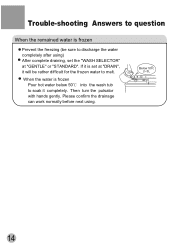
Please confirm the drainage can work normally before next using ) After complete draining, set at "GENTLE" or "STANDARD". Trouble-shooting Answers to question When the remained water is set the "WASH SELECTOR" at "DRAIN", it completely. Then turn the pulsator with hands gently. Below 50 c 2~3L 14 If it is frozen Prevent the freezing (be rather difficult for the frozen water to discharge the water completely after using . When the water is frozen Pour hot water below 50 into the wash tub to soak it will be sure to melt.
Please confirm the drainage can work normally before next using ) After complete draining, set at "GENTLE" or "STANDARD". Trouble-shooting Answers to question When the remained water is set the "WASH SELECTOR" at "DRAIN", it completely. Then turn the pulsator with hands gently. Below 50 c 2~3L 14 If it is frozen Prevent the freezing (be rather difficult for the frozen water to discharge the water completely after using . When the water is frozen Pour hot water below 50 into the wash tub to soak it will be sure to melt.

User Manual
Page 17
... in the factory inspection of the spin tub? Please confirm again before checking) The following phenomena are real breakdowns, please come to repair. Is there power failure? Are the laundries in the first use of the machine. Is the pulsator twisted by foreign material? There's abnormal sound and violent vibration during spinning Is the machine slanting? Trouble-shooting Answers to question (If there's breakdown, please...
... in the factory inspection of the spin tub? Please confirm again before checking) The following phenomena are real breakdowns, please come to repair. Is there power failure? Are the laundries in the first use of the machine. Is the pulsator twisted by foreign material? There's abnormal sound and violent vibration during spinning Is the machine slanting? Trouble-shooting Answers to question (If there's breakdown, please...

User Manual
Page 18
Packing list Name User's manual Water inlet hose Lint filter Gland Twin-tub washing machine Quantity One piece One piece One piece One piece One set Specification Water level/Water quantity (about) Maximum/55L Medium/46L Minimum/36L Injection pressure(MPa Rated washing / spinning capacity(kg) 7.5/7.0 (weight of standard dry cloth) 16
Packing list Name User's manual Water inlet hose Lint filter Gland Twin-tub washing machine Quantity One piece One piece One piece One piece One set Specification Water level/Water quantity (about) Maximum/55L Medium/46L Minimum/36L Injection pressure(MPa Rated washing / spinning capacity(kg) 7.5/7.0 (weight of standard dry cloth) 16


