User Manual
Page 1
Retain it for HWM50-0566 Please read this manual carefully before using. Fully Automatic Washing Machine User's manual This manual is for future reference.
Retain it for HWM50-0566 Please read this manual carefully before using. Fully Automatic Washing Machine User's manual This manual is for future reference.
User Manual
Page 2
CONTENTS Specification the 2nd cover Names of the parts 1 Safety precautions 2 Installation and adjustment 4 Install the water inlet hose 6 Preparation before washing 8 Put in the laundries 9 Usage of the detergent 9 Close the top lid 9 Use the operation buttons 10 Finish washing 13 Disposal after washing 14 Trouble-shooting answer to question 15 Packing list 16 Specification table Water level/Water quantity (about) Water Injection pressure Rated washing / spinning capacity 0.03MPa ~ 1MPa 5.0kg/5.0kg
CONTENTS Specification the 2nd cover Names of the parts 1 Safety precautions 2 Installation and adjustment 4 Install the water inlet hose 6 Preparation before washing 8 Put in the laundries 9 Usage of the detergent 9 Close the top lid 9 Use the operation buttons 10 Finish washing 13 Disposal after washing 14 Trouble-shooting answer to question 15 Packing list 16 Specification table Water level/Water quantity (about) Water Injection pressure Rated washing / spinning capacity 0.03MPa ~ 1MPa 5.0kg/5.0kg

User Manual
Page 3
... in inner tub of washing machine Inner cover component Automatic washing machine One Inside in inner tub of washing machine One Names of the parts Top lid component Control pannel Liquid detergent inlet Filter frame Balance ring Lint filter Inner tub Pulsater Front control board Cabinet Base frame Inner cove component Water inlet valve Water absorption cushion Detergent box Attachment block (2 pieces) Handle Drain hose frame Drain hose Power cord Back cover Adjustable leg film Adjustable leg Fixed leg (3 pieces) Meaning and...
... in inner tub of washing machine Inner cover component Automatic washing machine One Inside in inner tub of washing machine One Names of the parts Top lid component Control pannel Liquid detergent inlet Filter frame Balance ring Lint filter Inner tub Pulsater Front control board Cabinet Base frame Inner cove component Water inlet valve Water absorption cushion Detergent box Attachment block (2 pieces) Handle Drain hose frame Drain hose Power cord Back cover Adjustable leg film Adjustable leg Fixed leg (3 pieces) Meaning and...

User Manual
Page 4
... power plug clean,if the power plug is required to the preset position. Phenomena The reason How to use the plug any foreign materials? Is the water tap opened during water inlet. Not wash The machine does not act Not spin The top lid is setting the drain time. The cloth sensor is installed on special receptacle. The digitron displays E1. The digitron displays E2. The program is not closed reliably? Do not repair...
... power plug clean,if the power plug is required to the preset position. Phenomena The reason How to use the plug any foreign materials? Is the water tap opened during water inlet. Not wash The machine does not act Not spin The top lid is setting the drain time. The cloth sensor is installed on special receptacle. The digitron displays E1. The digitron displays E2. The program is not closed reliably? Do not repair...
User Manual
Page 5
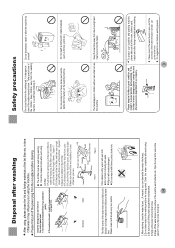
... the lint filter, and then you can get it down it off the power plug before washing. Safety precautions Do not put up the power cord and drain hose. 5.Wipe off the power plug from direct sunlight and the machine. in the washing machine for some time (about 1 hour), then close the water faucet. ( If needed, you can dismantle the water inlet hose). 2.Do not store water in time. Do not wash laundries with...
... the lint filter, and then you can get it down it off the power plug before washing. Safety precautions Do not put up the power cord and drain hose. 5.Wipe off the power plug from direct sunlight and the machine. in the washing machine for some time (about 1 hour), then close the water faucet. ( If needed, you can dismantle the water inlet hose). 2.Do not store water in time. Do not wash laundries with...

User Manual
Page 6
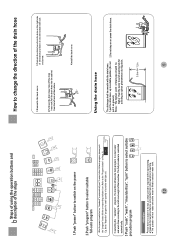
... Front Soft items Adjust the Installation position The distance that washing machine away from " saving water "to "storing water "automatically. After the machine starts operation, you need to switch off the power and make setting in other water level, first push the "start/pause" button, then push the "water level" button to set the water level automatically. The purpose is drythe outer tub andthe inner tub , which can set the water level. To change from wall should be...
... Front Soft items Adjust the Installation position The distance that washing machine away from " saving water "to "storing water "automatically. After the machine starts operation, you need to switch off the power and make setting in other water level, first push the "start/pause" button, then push the "water level" button to set the water level automatically. The purpose is drythe outer tub andthe inner tub , which can set the water level. To change from wall should be...
User Manual
Page 7
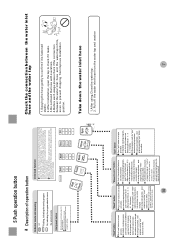
... drain hose up to the cloth and weight of the laundries. b Steps of using the operation buttons and description of the steps Start Pause Soak 7 Sterilize Soak Wash Rinse Spin 20 Thrice 15 Twice Once Wash Rinse Sterilize 3 Spin Reserve Lock 6 42L 45L 36L 39L 29L 32L 22L 26L 14L 18L Wleavteelr carpeting Standard Fibre Save Wool Superfast TUB CLEAN Program TUB CLEAN Power 5 4 2 Power 1.Push "power" button to switch on the power 2.Push "program" button...
... drain hose up to the cloth and weight of the laundries. b Steps of using the operation buttons and description of the steps Start Pause Soak 7 Sterilize Soak Wash Rinse Spin 20 Thrice 15 Twice Once Wash Rinse Sterilize 3 Spin Reserve Lock 6 42L 45L 36L 39L 29L 32L 22L 26L 14L 18L Wleavteelr carpeting Standard Fibre Save Wool Superfast TUB CLEAN Program TUB CLEAN Power 5 4 2 Power 1.Push "power" button to switch on the power 2.Push "program" button...
User Manual
Page 8
... the water inlet valve Water absorption cushion Figure 2 Reserve, remain time digitron It displays "--" during detecting. If wet laundries are put in water filling, it will perform washing while filling water.When water level 22L is operating. Under power-on the outer tuband the inner tub. When water level 18L is not pushed, the machine will switch off the power. It displays remained reserve time (hour). If the "start /pause button to display the reserve mode.
... the water inlet valve Water absorption cushion Figure 2 Reserve, remain time digitron It displays "--" during detecting. If wet laundries are put in water filling, it will perform washing while filling water.When water level 22L is operating. Under power-on the outer tuband the inner tub. When water level 18L is not pushed, the machine will switch off the power. It displays remained reserve time (hour). If the "start /pause button to display the reserve mode.
User Manual
Page 9
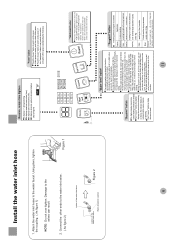
...,press it to start the machine During working Child lock function Push and hold thereserve button and spinbutton, then push downthe power on working ,push it leaks. 3.Do not bend the hose with overstrain. 4.Before each usage please check if the connection between the water inlet hose and the water tap 1.Swaying the hose gently to confirm if it is fastened stable. 2.After installation, open the tap to...
...,press it to start the machine During working Child lock function Push and hold thereserve button and spinbutton, then push downthe power on working ,push it leaks. 3.Do not bend the hose with overstrain. 4.Before each usage please check if the connection between the water inlet hose and the water tap 1.Swaying the hose gently to confirm if it is fastened stable. 2.After installation, open the tap to...
User Manual
Page 10
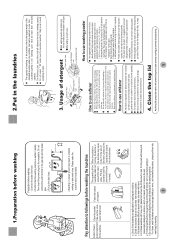
Then insert the power plug into the receptacle. Do not connect the earth terminal to the gas pipe and tap water pipe. 3.Put up the drain hose 0.8m 1.Preparation before washing Preparation before washing 1.Connect the water inlet hose 2.Confirm that the washing machine is earthed reliably.
Then insert the power plug into the receptacle. Do not connect the earth terminal to the gas pipe and tap water pipe. 3.Put up the drain hose 0.8m 1.Preparation before washing Preparation before washing 1.Connect the water inlet hose 2.Confirm that the washing machine is earthed reliably.


