User Manual
Page 2
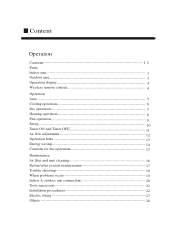
Content Operation Cautions 1-2 Parts Indoor unit 3 Outdoor unit 3 Operation display 4 Wireless remote control 4 Operation Auto 5 Cooling operation 6 Dry operation 7 Heating operation 8 Fan operation 9 Sleep 10 Timer ON and Timer OFF 11 Air flow adjustment 12 Operation hints 13 Energy saving 14 Cautions for the operation 15 Maintenance Air filter and unit cleaning 16 Before/after season maintenance 17 Trouble shooting 18 When problems occur 19 Indoor & outdoor unit connection 20 Tools necessary 21 Installation procedures 22 Electric wiring 27...
Content Operation Cautions 1-2 Parts Indoor unit 3 Outdoor unit 3 Operation display 4 Wireless remote control 4 Operation Auto 5 Cooling operation 6 Dry operation 7 Heating operation 8 Fan operation 9 Sleep 10 Timer ON and Timer OFF 11 Air flow adjustment 12 Operation hints 13 Energy saving 14 Cautions for the operation 15 Maintenance Air filter and unit cleaning 16 Before/after season maintenance 17 Trouble shooting 18 When problems occur 19 Indoor & outdoor unit connection 20 Tools necessary 21 Installation procedures 22 Electric wiring 27...
User Manual
Page 3
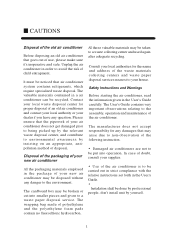
... center, and contribute to non-observation of the following instruction. It must be carried out in strict compliance with the relative instructions set forth in the User's Guide. Disposal of the packaging of your new air conditioner All the packaging materials employed in order to a waste collecting center and used again after adequate recycling. Consult your local authorities for...
... center, and contribute to non-observation of the following instruction. It must be carried out in strict compliance with the relative instructions set forth in the User's Guide. Disposal of the packaging of your new air conditioner All the packaging materials employed in order to a waste collecting center and used again after adequate recycling. Consult your local authorities for...

User Manual
Page 4
CAUTIONS For the purpose of the air conditoiner. All electrical repairs must be carried out by pulling on the power cord. Inadequate repairs may result in a major source of danger for the user of safety, the air conditioner must be properly grounded in accordance with specifications. Do not damage any parts of the air conditioner. Always remember to play with sharp or pointed items...
CAUTIONS For the purpose of the air conditoiner. All electrical repairs must be carried out by pulling on the power cord. Inadequate repairs may result in a major source of danger for the user of safety, the air conditioner must be properly grounded in accordance with specifications. Do not damage any parts of the air conditioner. Always remember to play with sharp or pointed items...
User Manual
Page 6
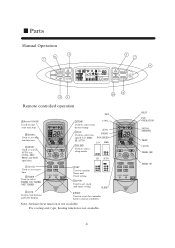
... OFF FAN MODE CLOCK TIMER SLEEP SET LOCK RESET 3 TEMP COOL Used to select your desired temp. 8 FAN Used to select fan AUTO SWING speed: LO, MED, FAN SPEED HI, AUTO. Parts Manual Operation 5 6 7 3 2 9 TIMER CLOCK TIME TIME SET SLEEP : AM PM TIMER ON : AM PM TIMER OFF : AM PM SET TEMP LOW MID HIGH A U T O ROOM TEMP Ion TEMP MODE C TEMP ON OFF SWING FAN SPEED 41 10 8 Remote controlled operation DRY 9 Power ON/OFF Used for unit start and stop. 10 SWING Used to set auto fan direction 2 MODE Used to select AUTO run, COOL, DRY, HEAT and FAN operation. 7 CLOCK Used...
... OFF FAN MODE CLOCK TIMER SLEEP SET LOCK RESET 3 TEMP COOL Used to select your desired temp. 8 FAN Used to select fan AUTO SWING speed: LO, MED, FAN SPEED HI, AUTO. Parts Manual Operation 5 6 7 3 2 9 TIMER CLOCK TIME TIME SET SLEEP : AM PM TIMER ON : AM PM TIMER OFF : AM PM SET TEMP LOW MID HIGH A U T O ROOM TEMP Ion TEMP MODE C TEMP ON OFF SWING FAN SPEED 41 10 8 Remote controlled operation DRY 9 Power ON/OFF Used for unit start and stop. 10 SWING Used to set auto fan direction 2 MODE Used to select AUTO run, COOL, DRY, HEAT and FAN operation. 7 CLOCK Used...

User Manual
Page 7
... first time and after 5 mins. Remote contronller's operation TEMP TEMP SWING MODE FAN SPEED ON OFF AM TEMP ON SWING OFF FAN When in use, put the signal transmission head directly to the receiver hole on the cover again Confirmation indicator: In disorderation, reload the batteries or load the new batteries after replacing batteries in remote TIMER TIME 2 CLOCK TIME 1 SET SLEEP 3 : AM controller, clock should be in line...
... first time and after 5 mins. Remote contronller's operation TEMP TEMP SWING MODE FAN SPEED ON OFF AM TEMP ON SWING OFF FAN When in use, put the signal transmission head directly to the receiver hole on the cover again Confirmation indicator: In disorderation, reload the batteries or load the new batteries after replacing batteries in remote TIMER TIME 2 CLOCK TIME 1 SET SLEEP 3 : AM controller, clock should be in line...
User Manual
Page 8
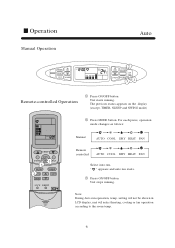
... TEMP ON SWING OFF1 FAN 3 MODE SLEEP 2CLOCK SET TIMER LOCK RESET Remote controlled AUTO COOL DRY HEAT FAN Select Auto run, " " appears and auto run operation, temp. Operation Manual Operation Auto TIMER CLOCK TIME TIME SET SLEEP 2 : AM SET TEMP C TEMP MODE TEMP ON LOW MID HIGH A U T O OFF SWING FAN SPEED 31 Remote-controlled Operation 1 Press ON/OFF button Unit starts running . TIMER, SLEEP and SWING mode) AUTO AM 2 Press MODE button. setting will not be shown in LCD display, unit will select heating, cooling or fan operation according to the room temp...
... TEMP ON SWING OFF1 FAN 3 MODE SLEEP 2CLOCK SET TIMER LOCK RESET Remote controlled AUTO COOL DRY HEAT FAN Select Auto run, " " appears and auto run operation, temp. Operation Manual Operation Auto TIMER CLOCK TIME TIME SET SLEEP 2 : AM SET TEMP C TEMP MODE TEMP ON LOW MID HIGH A U T O OFF SWING FAN SPEED 31 Remote-controlled Operation 1 Press ON/OFF button Unit starts running . TIMER, SLEEP and SWING mode) AUTO AM 2 Press MODE button. setting will not be shown in LCD display, unit will select heating, cooling or fan operation according to the room temp...
User Manual
Page 10
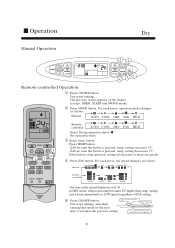
... pressed, setting will increase or decrease quickly. 4 Press FAN button. TIMER, SLEEP and SWING mode) AUTO AM 2 Press MODE button. Operation Dry Manual Operation TIMER CLOCK TIME TIME SET SLEEP : AM LOW 32 SET TEMP C TEMP MODE TEMP ON OFF SWING FAN SPEED 5 1 4 Remote-controlled Operation 1 Press ON/OFF button Unit starts running , and when entering this mode for the next COOL operation starts when room Temp.setting+2 C Temp.setting Ultra-low air flow time, it will run intermittently at the speed displayed on the display (except. In DRY mode, when room temp.becomes...
... pressed, setting will increase or decrease quickly. 4 Press FAN button. TIMER, SLEEP and SWING mode) AUTO AM 2 Press MODE button. Operation Dry Manual Operation TIMER CLOCK TIME TIME SET SLEEP : AM LOW 32 SET TEMP C TEMP MODE TEMP ON OFF SWING FAN SPEED 5 1 4 Remote-controlled Operation 1 Press ON/OFF button Unit starts running , and when entering this mode for the next COOL operation starts when room Temp.setting+2 C Temp.setting Ultra-low air flow time, it will run intermittently at the speed displayed on the display (except. In DRY mode, when room temp.becomes...
User Manual
Page 11
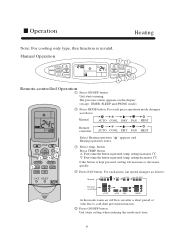
... each press, fan speed changes as follows: Manual AUTO COOL DRY FAN HEAT AM TEMP ON 3 SWING OFF FAN4 15 MODE SLEEP 2 CLOCK SET TIMER LOCK RESET Remote controller AUTO COOL DRY FAN HEAT Select Heating operation " " appears and Heating operation starts. 3 Select temp. TIMER, SLEEP and SWING mode) 2 Press MODE button. setting increases 1 C Every time the button is kept pressed, setting will blow out after a short period of time due to cold-draft prevention function. 5 Press ON/OFF button Unit stops setting when entering this function is pressed, temp. setting decreases...
... each press, fan speed changes as follows: Manual AUTO COOL DRY FAN HEAT AM TEMP ON 3 SWING OFF FAN4 15 MODE SLEEP 2 CLOCK SET TIMER LOCK RESET Remote controller AUTO COOL DRY FAN HEAT Select Heating operation " " appears and Heating operation starts. 3 Select temp. TIMER, SLEEP and SWING mode) 2 Press MODE button. setting increases 1 C Every time the button is kept pressed, setting will blow out after a short period of time due to cold-draft prevention function. 5 Press ON/OFF button Unit stops setting when entering this function is pressed, temp. setting decreases...

User Manual
Page 12
... the display (except. TIMER, SLEEP and SWING mode) 2 Press MODE button. Operation Fan Manual Operation TIMER TIME : AM CLOCK TIME LO SET SLEEP 2 SET TEMP C TEMP MODE TEMP ON OFF SWING FAN SPEED 4 1 3 Remote-controlled Operation 1 Press ON/OFF button Unit starts running , and when entering this mode, temp. For each press,operation mode changes as follows: LOW MID HIGH 10 Operation cycles are as follows: Manual AUTO COOL DRY FAN HEAT AM Remote controller AUTO COOL DRY FAN HEAT TEMP ON SWING OFF FAN3 41 MODE SLEEP 2 CLOCK SET TIMER LOCK RESET Select Fan...
... the display (except. TIMER, SLEEP and SWING mode) 2 Press MODE button. Operation Fan Manual Operation TIMER TIME : AM CLOCK TIME LO SET SLEEP 2 SET TEMP C TEMP MODE TEMP ON OFF SWING FAN SPEED 4 1 3 Remote-controlled Operation 1 Press ON/OFF button Unit starts running , and when entering this mode, temp. For each press,operation mode changes as follows: LOW MID HIGH 10 Operation cycles are as follows: Manual AUTO COOL DRY FAN HEAT AM Remote controller AUTO COOL DRY FAN HEAT TEMP ON SWING OFF FAN3 41 MODE SLEEP 2 CLOCK SET TIMER LOCK RESET Select Fan...

User Manual
Page 13
... set temperature 1 hour later, and be switched 1 hour Set the temperature Rises 1 C In cooling and dry Closc down after another hour. The temperature is invalid. 11 Operation SLEEP TIMER CLOCK TIME TIME SET SLEEP : AM SET TEMP TEMP MODE C TEMP ON LOW MID HIGH OFF SWING FAN SPEED Remote-controlled operation Before sleeping you a comfort sleep. The temperature will raise for 1 C after 3 hours running The conditioner will drop for 3 hours. TEMP ON SWING OFF FAN MODE CLOCK TIMER SLEEP SET LOCK RESET Set the temperature...
... set temperature 1 hour later, and be switched 1 hour Set the temperature Rises 1 C In cooling and dry Closc down after another hour. The temperature is invalid. 11 Operation SLEEP TIMER CLOCK TIME TIME SET SLEEP : AM SET TEMP TEMP MODE C TEMP ON LOW MID HIGH OFF SWING FAN SPEED Remote-controlled operation Before sleeping you a comfort sleep. The temperature will raise for 1 C after 3 hours running The conditioner will drop for 3 hours. TEMP ON SWING OFF FAN MODE CLOCK TIMER SLEEP SET LOCK RESET Set the temperature...
User Manual
Page 14
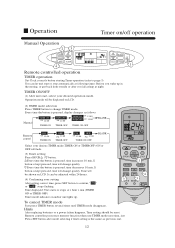
... or " OFF " stops flashing. TEMP ON SWING OFF FAN 1 MODE SLEEP CLOCK SET TIMER 4 2LOCK 3 RESET To cancel TIMER mode Just press TIMER button several times until TIMER mode disappears. TIMER ON/OFF (1) After unit start or stop automatically at following times: Before you wake up . Time displayed: Unit starts or stops at night. Operation Timer on/off operation Manual Operation 23 TIMER CLOCK TIME TIME SET SLEEP 4 : AM TIMER ON AM : LOW MID HIGH ROOM TEMP TEMP MODE C TEMP ON OFF SWING FAN SPEED 1 Remote controlled operation TIMER operation Set Clock correctly before...
... or " OFF " stops flashing. TEMP ON SWING OFF FAN 1 MODE SLEEP CLOCK SET TIMER 4 2LOCK 3 RESET To cancel TIMER mode Just press TIMER button several times until TIMER mode disappears. TIMER ON/OFF (1) After unit start or stop automatically at following times: Before you wake up . Time displayed: Unit starts or stops at night. Operation Timer on/off operation Manual Operation 23 TIMER CLOCK TIME TIME SET SLEEP 4 : AM TIMER ON AM : LOW MID HIGH ROOM TEMP TEMP MODE C TEMP ON OFF SWING FAN SPEED 1 Remote controlled operation TIMER operation Set Clock correctly before...

User Manual
Page 16
AUTO AM TEMP ON SWING OFF FAN MODE CLOCK TIMER SLEEP SET LOCK RESET TIMER CLOCK TIME TIME SET SLEEP : AM ROOM TEMP LOW MID HIGH A U T O TEMP MODE C TEMP ON OFF SWING FAN SPEED Side from side Swing Press SWING " " or " " appears on the display, the vertical louvers move from side to keep an even room temp. Notice:In cooling or dry operation, don't put horizontal louvers at downward position for a long time. Fixed...
AUTO AM TEMP ON SWING OFF FAN MODE CLOCK TIMER SLEEP SET LOCK RESET TIMER CLOCK TIME TIME SET SLEEP : AM ROOM TEMP LOW MID HIGH A U T O TEMP MODE C TEMP ON OFF SWING FAN SPEED Side from side Swing Press SWING " " or " " appears on the display, the vertical louvers move from side to keep an even room temp. Notice:In cooling or dry operation, don't put horizontal louvers at downward position for a long time. Fixed...

User Manual
Page 17
... room temp. In dry mode, fan speed will affect unit's heating efficiency. 15 due to warm room air, so outdoor temp. Defrosting When frost accumulates on heat exchanger in cooling mode, it will stop and fan speed LOW or stop . Use objectively Heat pump works by means of the unit. degree will change automatically. Fan speed changes When Fan speed is running . setting. In heating mode. reaches temp. Cold draft prevention In heating mode, indoor fan will activate to stop unit operation, when ambient temp. During defrosting, both indoor and outdoor fan stop...
... room temp. In dry mode, fan speed will affect unit's heating efficiency. 15 due to warm room air, so outdoor temp. Defrosting When frost accumulates on heat exchanger in cooling mode, it will stop and fan speed LOW or stop . Use objectively Heat pump works by means of the unit. degree will change automatically. Fan speed changes When Fan speed is running . setting. In heating mode. reaches temp. Cold draft prevention In heating mode, indoor fan will activate to stop unit operation, when ambient temp. During defrosting, both indoor and outdoor fan stop...

User Manual
Page 20
... or other chemical detergents. 18 Indoor and outdoor cleaning Clean it with warm and wet cloth or with neutral detergent, then wipe it dry with clean water. Don't use water higher than 40 C , which will cause discoloring and deformation . If it is very dirty, clean it with cloth soaked in Fig. Use water or vacuum cleaner to air filter. Maintenance Disconnect power supply Don't touch it...
... or other chemical detergents. 18 Indoor and outdoor cleaning Clean it with warm and wet cloth or with neutral detergent, then wipe it dry with clean water. Don't use water higher than 40 C , which will cause discoloring and deformation . If it is very dirty, clean it with cloth soaked in Fig. Use water or vacuum cleaner to air filter. Maintenance Disconnect power supply Don't touch it...

User Manual
Page 21
... indoor unit, cover outdoor unit after making sure it is running without air filter. Don't fail to attach air filter after cleaning. Maintenance After season maintenance Let the unit run in Fan mode for half a day in a fine weather to starting. Turn off the unit and pull out power plug. Before season maintenance Check if there are obstacles at start, please connect external power supply to the unit 12 hrs prior to dry completely the unit inside...
... indoor unit, cover outdoor unit after making sure it is running without air filter. Don't fail to attach air filter after cleaning. Maintenance After season maintenance Let the unit run in Fan mode for half a day in a fine weather to starting. Turn off the unit and pull out power plug. Before season maintenance Check if there are obstacles at start, please connect external power supply to the unit 12 hrs prior to dry completely the unit inside...

User Manual
Page 22
... button is set to ON, unit won 't stop , a swishing or gurgling noise may be changed in dry operation. Unit will not restart after it is stopped, this will happen. No outlet air or fan speed can't be heard. After unit stops, indoor fan will switch to fan operation. Please wait 3 minutes Unit will reduce fan speed repeatedly and automatically if room temp. Trouble shooting Followings are not problems Sound of water flowings are not problems. During unit start ? In cooling operation, unit switches to fan operation...
... button is set to ON, unit won 't stop , a swishing or gurgling noise may be changed in dry operation. Unit will not restart after it is stopped, this will happen. No outlet air or fan speed can't be heard. After unit stops, indoor fan will switch to fan operation. Please wait 3 minutes Unit will reduce fan speed repeatedly and automatically if room temp. Trouble shooting Followings are not problems Sound of water flowings are not problems. During unit start ? In cooling operation, unit switches to fan operation...
User Manual
Page 23
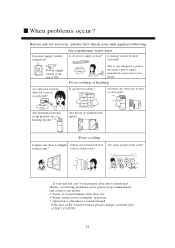
...'t work properly after above mentioned checks, or following . When problems occur? Are operation controlls adjusted correctly as specified? Poor cooling or heating Is air filter too dirty? in cooling/dry operation. If the fuse on ? This is not set at up position (in the room? Any doors or windows left open? sources in heating mode)? Poor cooling Is there any obstacles at inlet or outlet grill? Before ask for services, please...
...'t work properly after above mentioned checks, or following . When problems occur? Are operation controlls adjusted correctly as specified? Poor cooling or heating Is air filter too dirty? in cooling/dry operation. If the fuse on ? This is not set at up position (in the room? Any doors or windows left open? sources in heating mode)? Poor cooling Is there any obstacles at inlet or outlet grill? Before ask for services, please...

User Manual
Page 31
... 28 Connect the connecting pipe and inlet and outlet liquid pipe according to the piping method. 4.Purging method Discharge the air out of the indoor unit and the refrigerant pipe by vacuumizing (1) Fasten all the nuts of the indoor and outdoor pipes to make these parts out of leakage. (2) Under the condition of the complete close of the indoor and outdoor valve center (both liquid...
... 28 Connect the connecting pipe and inlet and outlet liquid pipe according to the piping method. 4.Purging method Discharge the air out of the indoor unit and the refrigerant pipe by vacuumizing (1) Fasten all the nuts of the indoor and outdoor pipes to make these parts out of leakage. (2) Under the condition of the complete close of the indoor and outdoor valve center (both liquid...

User Manual
Page 32
.... Replace cover after wiring. Pull it out from inside the wall hole where piping already exists. Terminals of outdoor unit Insert the cable from front. Use copper wire only, the parameter of indoor unit Insert the cable from front. Wiring of connecting cable is tight. OK NO terminal block table clanip Wiring of same number and same color shall be connected by qualified person. Terminal block (indoor) power...
.... Replace cover after wiring. Pull it out from inside the wall hole where piping already exists. Terminals of outdoor unit Insert the cable from front. Use copper wire only, the parameter of indoor unit Insert the cable from front. Wiring of connecting cable is tight. OK NO terminal block table clanip Wiring of same number and same color shall be connected by qualified person. Terminal block (indoor) power...

User Manual
Page 33
... breaker of the air conditioner should be incorporation in other places, use a circuit breaker against Current leakage. Pipe cutting and flaring Be sure to make a flare. Is draminage securely carried out? Is room temp. Are electric wires of indoor and outdoor securely fixed? Is earth line ( grounding ) securely connected? Insert flaring tool to carry out deburring after pipe cutting with a pipe cutter. Is electric wiring of indoor and outdoor unit...
... breaker of the air conditioner should be incorporation in other places, use a circuit breaker against Current leakage. Pipe cutting and flaring Be sure to make a flare. Is draminage securely carried out? Is room temp. Are electric wires of indoor and outdoor securely fixed? Is earth line ( grounding ) securely connected? Insert flaring tool to carry out deburring after pipe cutting with a pipe cutter. Is electric wiring of indoor and outdoor unit...


