
User Manual
Page 3
... in strict compliance with the relative instructions set forth in a air conditioner can be noticed that may be done by professional people, don't install unit by insisting on an appropriate, antipollution method of disposal. Use of the air conditioner is to the assembly, operation and maintenance of the air conditioner. The valuable materials contained in the User's Guide. The User's Guide contains very important observations relating to...
... in strict compliance with the relative instructions set forth in a air conditioner can be noticed that may be done by professional people, don't install unit by insisting on an appropriate, antipollution method of disposal. Use of the air conditioner is to the assembly, operation and maintenance of the air conditioner. The valuable materials contained in the User's Guide. The User's Guide contains very important observations relating to...

User Manual
Page 4
... case should children be allowed to sit on the power cord. Do not obstruct or cover the ventilation grille of the air conditioner that carry refrigerant by qualified electricians. Always remember to play with the air conditioner. Always grip plug firmly and pull straight out from the outlet. Specifications The refrigerating circuit is leak-proof. All electrical repairs must be properly grounded in serious eye injuries...
... case should children be allowed to sit on the power cord. Do not obstruct or cover the ventilation grille of the air conditioner that carry refrigerant by qualified electricians. Always remember to play with the air conditioner. Always grip plug firmly and pull straight out from the outlet. Specifications The refrigerating circuit is leak-proof. All electrical repairs must be properly grounded in serious eye injuries...

User Manual
Page 5
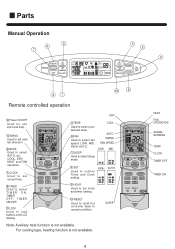
Parts TIMER CLOCK TIME TIME SET SLEEP : AM SET TEMP LOW MID HIGH TEMP MODE C TEMP ON OFF SWING FAN SPEED 1 2 3 4 Indoor unit 1 Outlet grill 2 Operation panel 3 Inlet grill 4 Air filter [inside the unit] 5 Remote-controller AM TEMP ON SWING OFF FAN MODE CLOCK TIMER SLEEP SET LOCK RESET 5 Outdoor unit 6 6 Air inlet [At side and rear] 7 7 Air outlet 3
Parts TIMER CLOCK TIME TIME SET SLEEP : AM SET TEMP LOW MID HIGH TEMP MODE C TEMP ON OFF SWING FAN SPEED 1 2 3 4 Indoor unit 1 Outlet grill 2 Operation panel 3 Inlet grill 4 Air filter [inside the unit] 5 Remote-controller AM TEMP ON SWING OFF FAN MODE CLOCK TIMER SLEEP SET LOCK RESET 5 Outdoor unit 6 6 Air inlet [At side and rear] 7 7 Air outlet 3
User Manual
Page 6
.... 11 LOCK Used to lock buttons and LCD display. Parts Manual Operation 5 6 7 3 2 9 TIMER CLOCK TIME TIME SET SLEEP : AM PM TIMER ON : AM PM TIMER OFF : AM PM SET TEMP LOW MID HIGH A U T O ROOM TEMP Ion TEMP MODE C TEMP ON OFF SWING FAN SPEED 41 10 8 Remote controlled operation 9 Power ON/OFF Used for unit start and stop. 10 SWING Used to set auto fan direction 2 MODE Used to select AUTO run, COOL, DRY, HEAT and FAN operation. 7 CLOCK Used to set clock and timer setting. 12 RESET Used to reset the controller back to normal condition. AUTO ON AM...
.... 11 LOCK Used to lock buttons and LCD display. Parts Manual Operation 5 6 7 3 2 9 TIMER CLOCK TIME TIME SET SLEEP : AM PM TIMER ON : AM PM TIMER OFF : AM PM SET TEMP LOW MID HIGH A U T O ROOM TEMP Ion TEMP MODE C TEMP ON OFF SWING FAN SPEED 41 10 8 Remote controlled operation 9 Power ON/OFF Used for unit start and stop. 10 SWING Used to set auto fan direction 2 MODE Used to select AUTO run, COOL, DRY, HEAT and FAN operation. 7 CLOCK Used to set clock and timer setting. 12 RESET Used to reset the controller back to normal condition. AUTO ON AM...

User Manual
Page 7
... should be disposed properly,use two new same-type batteries when loading. Press or to pres the reset key. Remote controller's operation TEMP TEMP MODE SWING FANSPEED ON OFF AM TEMP ON SWING OFF FAN When in remote TIMER TIME 2 CLOCK TIME 1 SET SLEEP 3 : AM controller, clock should be adjusted as well. Operation Clock set correct time. If there are any obsacles as follows: Press CLOCK button, "AM"or "PM" flashes.
... should be disposed properly,use two new same-type batteries when loading. Press or to pres the reset key. Remote controller's operation TEMP TEMP MODE SWING FANSPEED ON OFF AM TEMP ON SWING OFF FAN When in remote TIMER TIME 2 CLOCK TIME 1 SET SLEEP 3 : AM controller, clock should be adjusted as well. Operation Clock set correct time. If there are any obsacles as follows: Press CLOCK button, "AM"or "PM" flashes.

User Manual
Page 8
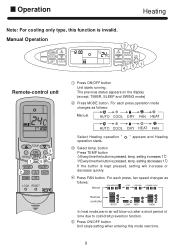
... not be shown in LCD display, unit will select heating, cooling or fan operation according to the room temp. For each press, operation mode changes as follows: Manual AUTO COOL DRY FAN HEAT TEMP ON SWING OFF1 FAN 3 MODE SLEEP 2CLOCK SET TIMER LOCK RESET Remote controller AUTO COOL DRY HEAT FAN Select Auto run, " " appears and auto run operation, temp. TIMER, SLEEP and SWING mode) AUTO AM 2 Press MODE button. Note: During Auto run starts. 3 Press ON/OFF button Unit stops running . Operation Manual Operation Auto TIMER CLOCK TIME TIME SET SLEEP : AM LOW MID HIGH...
... not be shown in LCD display, unit will select heating, cooling or fan operation according to the room temp. For each press, operation mode changes as follows: Manual AUTO COOL DRY FAN HEAT TEMP ON SWING OFF1 FAN 3 MODE SLEEP 2CLOCK SET TIMER LOCK RESET Remote controller AUTO COOL DRY HEAT FAN Select Auto run, " " appears and auto run operation, temp. TIMER, SLEEP and SWING mode) AUTO AM 2 Press MODE button. Note: During Auto run starts. 3 Press ON/OFF button Unit stops running . Operation Manual Operation Auto TIMER CLOCK TIME TIME SET SLEEP : AM LOW MID HIGH...

User Manual
Page 10
...TIME SET SLEEP : AM LOW 32 SET TEMP C TEMP MODE TEMP ON OFF SWING FANSPEED 51 4 Remote-control unit AUTO AM TEMP ON 3 SWING OFF FAN4 15 MODE SLEEP 2 CLOCK SET TIMER LOCK RESET 1 Press ON/OFF button Unit starts running , and when entering this mode for the next COOL operation starts when room temp. For each press, fan speed changes as follows: Manual AUTO COOL DRY FAN HEAT Remote controller AUTO COOL DRY HEAT FAN Select Drying operation shows" " Dry operation starts 3 Select temp. setting. setting,unit will run intermittently at the speed displayed on...
...TIME SET SLEEP : AM LOW 32 SET TEMP C TEMP MODE TEMP ON OFF SWING FANSPEED 51 4 Remote-control unit AUTO AM TEMP ON 3 SWING OFF FAN4 15 MODE SLEEP 2 CLOCK SET TIMER LOCK RESET 1 Press ON/OFF button Unit starts running , and when entering this mode for the next COOL operation starts when room temp. For each press, fan speed changes as follows: Manual AUTO COOL DRY FAN HEAT Remote controller AUTO COOL DRY HEAT FAN Select Drying operation shows" " Dry operation starts 3 Select temp. setting. setting,unit will run intermittently at the speed displayed on...
User Manual
Page 11
...time due to cold-draft prevention function. 5 Press ON/OFF button Unit stops setting when entering this function is invalid. For each press, fan speed changes as follows: Manual AUTO COOL DRY FAN HEAT AUTO COOL DRY HEAT FAN Select Heating operation " operation starts. Manual Operation TIMER CLOCK TIME TIME SET SLEEP : AM LOW 32 SET TEMP C TEMP MODE TEMP ON OFF SWING FAN SPEED 5 1 4 Remote-control unit AM TEMP ON 3 SWING OFF FAN4 15 MODE SLEEP 2 CLOCK SET TIMER LOCK RESET 1 Press ON/OFF button Unit starts running. TIMER, SLEEP and SWING mode) 2 Press MODE button...
...time due to cold-draft prevention function. 5 Press ON/OFF button Unit stops setting when entering this function is invalid. For each press, fan speed changes as follows: Manual AUTO COOL DRY FAN HEAT AUTO COOL DRY HEAT FAN Select Heating operation " operation starts. Manual Operation TIMER CLOCK TIME TIME SET SLEEP : AM LOW 32 SET TEMP C TEMP MODE TEMP ON OFF SWING FAN SPEED 5 1 4 Remote-control unit AM TEMP ON 3 SWING OFF FAN4 15 MODE SLEEP 2 CLOCK SET TIMER LOCK RESET 1 Press ON/OFF button Unit starts running. TIMER, SLEEP and SWING mode) 2 Press MODE button...
User Manual
Page 12
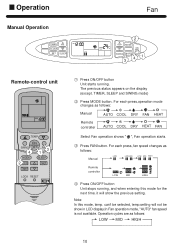
...in LCD display.In Fan operation mode, "AUTO" fan speed is not available. Operation cycles are as follows: Manual AUTO COOL DRY FAN HEAT Remote controller AUTO COOL DRY HEAT FAN Select Fan operation shows " ", Fan operation starts. 3 Press FAN button. Note: In this mode for the next time, it will not be show the previous setting. Operation Fan Manual Operation TIMER TIME : AM CLOCK TIME LO SET SLEEP 2 TEMP MODE ROOM C TEMP TEMP ON OFF SWING FAN SPEED 4 1 3 Remote-control unit AM TEMP ON SWING OFF FAN3 41 MODE SLEEP 2 CLOCK SET TIMER LOCK RESET 1 Press...
...in LCD display.In Fan operation mode, "AUTO" fan speed is not available. Operation cycles are as follows: Manual AUTO COOL DRY FAN HEAT Remote controller AUTO COOL DRY HEAT FAN Select Fan operation shows " ", Fan operation starts. 3 Press FAN button. Note: In this mode for the next time, it will not be show the previous setting. Operation Fan Manual Operation TIMER TIME : AM CLOCK TIME LO SET SLEEP 2 TEMP MODE ROOM C TEMP TEMP ON OFF SWING FAN SPEED 4 1 3 Remote-control unit AM TEMP ON SWING OFF FAN3 41 MODE SLEEP 2 CLOCK SET TIMER LOCK RESET 1 Press...

User Manual
Page 13
... catching cold in sleeping. The temperature will raise for 1 C after running stops 3. TEMP ON SWING OFF FAN MODE CLOCK TIMER SLEEP SET LOCK RESET Set the temperature Close down the machine 2. Operation SLEEP TIMER CLOCK TIME TIME SET SLEEP : AM SET TEMP C TEMP MODE TEMP ON LOW MID HIGH OFF SWING FAN SPEED Remote control unit Before sleeping you a comfort sleep. It continues under comfort sleep mode, and give you can press the Sleep button. Usage of sleeping. 4. The Sleep running starts The Sleep running The Sleep function...
... catching cold in sleeping. The temperature will raise for 1 C after running stops 3. TEMP ON SWING OFF FAN MODE CLOCK TIMER SLEEP SET LOCK RESET Set the temperature Close down the machine 2. Operation SLEEP TIMER CLOCK TIME TIME SET SLEEP : AM SET TEMP C TEMP MODE TEMP ON LOW MID HIGH OFF SWING FAN SPEED Remote control unit Before sleeping you a comfort sleep. It continues under comfort sleep mode, and give you can press the Sleep button. Usage of sleeping. 4. The Sleep running starts The Sleep running The Sleep function...
User Manual
Page 14
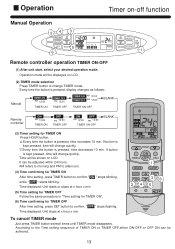
... operation Manual Operation 23 TIMER CLOCK TIME TIME SET SLEEP 4 : AM TIMER ON AM : LOW MID HIGH ROOM TEMP TEMP MODE C TEMP ON SWING FAN SPEED OFF 1 Remote control unit TIMER operation Set Clock correctly before starting Timer operation (refer to page 5) You can be displayed on LCD. (2) TIMER mode selection Press TIMER button to confirm, " ON " or " OFF " stops flashing. Operation mode will be reset. It can let unit start , select your setting After setting correct time, press SET button to change quickly. Remote controller possesses memory function when use TIMER...
... operation Manual Operation 23 TIMER CLOCK TIME TIME SET SLEEP 4 : AM TIMER ON AM : LOW MID HIGH ROOM TEMP TEMP MODE C TEMP ON SWING FAN SPEED OFF 1 Remote control unit TIMER operation Set Clock correctly before starting Timer operation (refer to page 5) You can be displayed on LCD. (2) TIMER mode selection Press TIMER button to confirm, " ON " or " OFF " stops flashing. Operation mode will be reset. It can let unit start , select your setting After setting correct time, press SET button to change quickly. Remote controller possesses memory function when use TIMER...
User Manual
Page 15
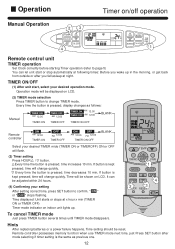
... the button is kept pressed, time will be achieved. 13 AM refers to morning and PM to confirm, " OFF " stops flashing. It can be shown on -off function Manual Operation 24 3 TIMER TIME : AM TEMP MODE CLOCK SET TIME TIMER ON AM : 5 SLEEP TIMER OFF AM LO MED HI ROOM TEMP C TEMP SWING FAN SPEED ON OFF 6 1 Remote controller operation TIMER ON-OFF (1) After unit start, select your desired operation mode. Operation Timer on LCD. Time displayed: Unit stops...
... the button is kept pressed, time will be achieved. 13 AM refers to morning and PM to confirm, " OFF " stops flashing. It can be shown on -off function Manual Operation 24 3 TIMER TIME : AM TEMP MODE CLOCK SET TIME TIMER ON AM : 5 SLEEP TIMER OFF AM LO MED HI ROOM TEMP C TEMP SWING FAN SPEED ON OFF 6 1 Remote controller operation TIMER ON-OFF (1) After unit start, select your desired operation mode. Operation Timer on LCD. Time displayed: Unit stops...

User Manual
Page 16
This will be helpful to side. AUTO AM TEMP ON SWING OFF FAN MODE CLOCK TIMER SLEEP SET LOCK RESET TIMER CLOCK TIME TIME SET SLEEP : AM ROOM TEMP LOW MID HIGH A U T O TEMP MODE C TEMP ON OFF SWING FAN SPEED Side from side Swing Press SWING " " or " " appears on the display, the vertical louvers move from side to keep an even room temp. Notice:In cooling or dry operation, don't put horizontal louvers at up...
This will be helpful to side. AUTO AM TEMP ON SWING OFF FAN MODE CLOCK TIMER SLEEP SET LOCK RESET TIMER CLOCK TIME TIME SET SLEEP : AM ROOM TEMP LOW MID HIGH A U T O TEMP MODE C TEMP ON OFF SWING FAN SPEED Side from side Swing Press SWING " " or " " appears on the display, the vertical louvers move from side to keep an even room temp. Notice:In cooling or dry operation, don't put horizontal louvers at up...

User Manual
Page 17
... cooling or dehumidifying mode, condensate might appear at Auto in heating mode, unit will not restart until 3 min have elapsed for the first 2-5 min. Use objectively Heat pump works by means of the unit. Cold draft prevention In heating mode, indoor fan will activate to stop unit operation, when ambient temp. Fan speed changes When Fan speed is running . When unit is set at outlet grill. 3-min delay protection Unit will start defrosting automatically. due to warm room air, so outdoor temp. Operation hints Unit operation...
... cooling or dehumidifying mode, condensate might appear at Auto in heating mode, unit will not restart until 3 min have elapsed for the first 2-5 min. Use objectively Heat pump works by means of the unit. Cold draft prevention In heating mode, indoor fan will activate to stop unit operation, when ambient temp. Fan speed changes When Fan speed is running . When unit is set at outlet grill. 3-min delay protection Unit will start defrosting automatically. due to warm room air, so outdoor temp. Operation hints Unit operation...

User Manual
Page 20
... with neutral detergent or soap water. Wash it with hot water hand or solvent to clean the unit Air filter cleaning Pull it out from top as this may cause damage to clean it dry with clean and soft cloth. Maintenance Disconnect power supply Don't touch it with wet Don't wash with clean water and install it after complete dry. Indoor and outdoor cleaning Clean it with warm and wet...
... with neutral detergent or soap water. Wash it with hot water hand or solvent to clean the unit Air filter cleaning Pull it out from top as this may cause damage to clean it dry with clean and soft cloth. Maintenance Disconnect power supply Don't touch it with wet Don't wash with clean water and install it after complete dry. Indoor and outdoor cleaning Clean it with warm and wet...

User Manual
Page 21
... to starting. There might be certain power consumption even if unit is running without air filter. Maintenance After season maintenance Let the unit run in Fan mode for half a day in a fine weather to attach air filter after cleaning. Clean air filter and indoor unit, cover outdoor unit after making sure it is stopped. Don't fail to dry completely the unit inside. Also please keep the power supply switch ON during the whole season. 19 To protect compressor...
... to starting. There might be certain power consumption even if unit is running without air filter. Maintenance After season maintenance Let the unit run in Fan mode for half a day in a fine weather to attach air filter after cleaning. Clean air filter and indoor unit, cover outdoor unit after making sure it is stopped. Don't fail to dry completely the unit inside. Also please keep the power supply switch ON during the whole season. 19 To protect compressor...
User Manual
Page 22
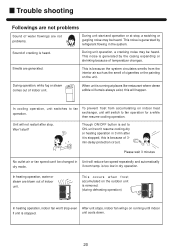
... 3min-delay protection circuit. This noise is set to fan operation for a while then resume cooling operation. exchanger, unit will go on indoor heat operation. Though ON/OFF button is generated by refrigerant flowing in dry operation. In heating operation, water or steam are generated. Unit will not restart after it is stopped, this will reduce fan speed repeatedly and automatically dry mode. Trouble shooting Followings are not problems Sound of water flowings are not problems. During unit start ? if room temp.
... 3min-delay protection circuit. This noise is set to fan operation for a while then resume cooling operation. exchanger, unit will go on indoor heat operation. Though ON/OFF button is generated by refrigerant flowing in dry operation. In heating operation, water or steam are generated. Unit will not restart after it is stopped, this will reduce fan speed repeatedly and automatically dry mode. Trouble shooting Followings are not problems Sound of water flowings are not problems. During unit start ? if room temp.
User Manual
Page 23
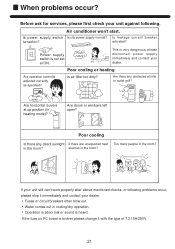
Air conditioner won't start. This is not set at ON. Fuses or circuit breakers often blow out. If the fuse on ? Power supply switch is very dangerous, please disconnect power supply immediately and contact your unit still can't work properly after above mentioned checks, or following . Poor cooling or heating Are operation controlls adjusted correctly as specified? If your dealer. Water comes out in the room? Is power supply switch Is city power supply normal...
Air conditioner won't start. This is not set at ON. Fuses or circuit breakers often blow out. If the fuse on ? Power supply switch is very dangerous, please disconnect power supply immediately and contact your unit still can't work properly after above mentioned checks, or following . Poor cooling or heating Are operation controlls adjusted correctly as specified? If your dealer. Water comes out in the room? Is power supply switch Is city power supply normal...

User Manual
Page 30
... 1250 28 Installation procedures 3. Connect the connecting pipe and inlet and outlet liquid pipe according to the piping method. 4.Purging method Discharge the air out of the indoor unit and the refrigerant pipe by vacuumizing (1) Fasten all the nuts of the indoor and outdoor pipes to make these parts out of leakage. (2) Under the condition of the complete close of the indoor and outdoor valve center...
... 1250 28 Installation procedures 3. Connect the connecting pipe and inlet and outlet liquid pipe according to the piping method. 4.Purging method Discharge the air out of the indoor unit and the refrigerant pipe by vacuumizing (1) Fasten all the nuts of the indoor and outdoor pipes to make these parts out of leakage. (2) Under the condition of the complete close of the indoor and outdoor valve center...
User Manual
Page 31
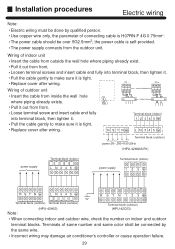
Use copper wire only, the parameter of indoor unit Insert the cable from outside the wall hole where piping already exist. Pull the cable gently to make sure it . The power supply connects from front. Incorrect wiring may damage air conditioner's controller or cause operation failure. 29 Replace cover after wiring. Pull it out from inside the wall hole where piping already exists. OK NO Wiring of same number and same color shall...
Use copper wire only, the parameter of indoor unit Insert the cable from outside the wall hole where piping already exist. Pull the cable gently to make sure it . The power supply connects from front. Incorrect wiring may damage air conditioner's controller or cause operation failure. 29 Replace cover after wiring. Pull it out from inside the wall hole where piping already exists. OK NO Wiring of same number and same color shall...


